Slides: Available to view (Firefox/Chrome recommended – press “S” to see the required speaker notes)
Video: There was a stream recorded on the day, however, due to the technical issues detailed below, I uploaded a better, pre-recorded version, after the event.
Slot: Room 1, 14:30-15:00
Notes: Wow, this probably had the worst technical issues of any of my talks so far.
In the morning before the talk, I checked my talk, and realised the speaker notes were still the long-form version I’d written for the recording… so I jumped into the editor and started putting the bullet-points in. I checked the output, and the formatting had all changed! Oh no, what had I done? Well, actually, a recent update to the presenter plugin I use for WordPress had moved the location of all the theme CSS files… fortunately, I’d had this happen to me before, so I knew what to look for – but for 10 minutes, I thought editing the speaker notes had properly caused me issues! Thank goodness for SSH!!
In the actual venue, in the morning, I was told that they’d moved the room allocations for everything in Slot 1, because they needed to run to pre-recorded videos for speakers who couldn’t attend in there. No worries! I said! We get to the afternoon, and they let me know that I’m in Room 1, as they’d finished screening the videos… The adjustments to the schedule is probably the one (small) issue I have had with BSides Liverpool – but having been involved with OggCamp, I know how hard this piece is!
I head to Room 1 and set up, but it’s the first time I tried to deliver a talk using my new laptop, which doesn’t have any external video ports, so a few weeks ago, I bought an USB HDMI interface… tested it at home, and thought all was “good”. The screen they were using for Room 1 didn’t recognise the interface I was using! Oh no!! So I borrowed a laptop from one of the crew, but it didn’t have bluetooth, so I couldn’t use the “clicker” for moving my slides on, and then we’re just about to go live, and the crew tell me that the camera to use to record my talking head, is not rendering any video, and “can I use the webcam on the laptop”.. Hmmm Of course, I say yes, but it means that I need to have the Windows Camera app on screen the whole time.
Anyway, talk starts up, and part way through the presentation, I don’t notice, but the WiFi drops out, so when I get to the pre-recorded demo of running Ansible…. NOPE. Bah, OK, so I continue on, and the final images (a QR code for the project I’m plugging, and my social media avatar) are missing. Oh well. Also, part way through, I realised that the screen resolution where the slides are being rendered are basically showing up dreadfully, because the text size is so very small on the screen, and the people at the back of the room really can’t see the content!
Had some fab questions from the audience, talking about things I’ve not really thought about (and really made me interested in how to do things with Windows and Ansible).
And then, just as I wrap up, I noticed that when I’d clicked on to show the demo, it had hidden the webcam. Ah, oh well. Fortunately, as I mentioned, I’d pre-recorded my talk, the only thing I’ve “lost” is the questions, but as I wasn’t really sure on many of the answers I provided, I’m not desperately sad about it.
Fundamentally, all of the technical issues really stemmed from the fact my laptop wasn’t capable of rendering on the screen. If I’d solved that in advance, the rest of the issues could have been resolved when I wasn’t stressing about getting my presentation to work on an unfamiliar machine.
I’m very grateful to BSides Liverpool for giving me the opportunity to deliver my presentation, and the rest of the event (I’ll post about that later) was fab!
A few posts ago I wrote about building Windows virtual machines with Terraform, and a couple of days ago, “YoureInHell” on Twitter reached out and asked what advice I’d give about having several different terraform modules use the same basic build of custom data.
They’re trying to avoid putting the same template file into several repos (I suspect so that one team can manage the “custom-data”, “user-data” or “cloud-init” files, and another can manage the deployment terraform files), and asked if I had any suggestions.
I had three ideas.
Using a New Module
This was my initial thought; create a new module called something like “Standard Build File”, and this build file contains just the following terraform file, and a template file called “build.tmpl”.
module "buildTemplate" {
  source   = "git::https://git.example.net/buildTemplate.git?ref=latestLive"
  # See https://www.terraform.io/docs/language/modules/sources.html
  #   for more details on how to specify the source of this module
  unsetVar = "Set To This String"
}

output "RenderedTemplate" {
  value = module.buildTemplate.template
}
And that means that you can use the module.buildTemplate.template anywhere you’d normally specify your templateFile, and get a consistent, yet customizable template (and note, because I specified a particular tag, you can use that to move to the “current latest” or “the version we released into live on YYYY-MM-DD” by using a tag, or a commit ref.)
Now, the downside to this is that you’ve now got a whole separate module for creating your instances that needs to be maintained. What are our other options?
Git Submodules for your template
I use Git Submodules a LOT for my code. It’s a bit easy to get into a state with them, particularly if you’re not great at keeping on top of them, but… if you are OK with them, you’d create a repo, again, let’s use “https://git.example.net/buildTemplate.git” as our git repo, and put your template in there. In your terraform git repo, you’d run this command: git submodule add https://git.example.net/buildTemplate.git and this would add a directory to your repo called “buildTemplate” that you can use your templatefile function in Terraform against (like this: templatefile("buildTemplate/build.tmpl", {someVar="var"})).
Now, this means that you’ve effectively got two git repos in one tree, and if any changes occur in your submodule repo, you’d need to do git checkout main ; git pull to get the latest updates from your main branch, and when you check it out initially on another machine, you’ll need to do git clone https://git.example.net/terraform --recurse-submodules to get the submodules populated at the same time.
A benefit to this is that because it’s “inline” with the rest of your tree, if you need to make any changes to this template, it’s clearly where it’s supposed to be in your tree, you just need to remember about the submodule when it comes to making PRs and suchforth.
How about that third idea?
Keep it simple, stupid 😁
Why bother with submodules, or modules from a git repo? Terraform can be quite easy to over complicate… so why not create all your terraform files in something like this structure:
And then in each of your terraform files (web_servers, logic_servers and database_servers) just reference the file in your project root, like this: templatefile("../build.tmpl", {someVar="var"})
The downside to this is that you can’t as easily farm off the control of that build script to another team, and they’d be making (change|pull|merge) requests against the same repo as you… but then again, isn’t that the idea for functional teams? 😃
Over the last week, I discovered a new tool for my arsenal called Architectural Decision Records (ADR). They were first written about in 2011, in a post called “Documenting Architecture Decisions“, where the author, Michael Nygard, advocates for short documents explaining each decision that influences the architecture of an environment.
I found this via a Github repository, created by the team at gov.uk, which includes their ADR library, and references the tool they use to manage these documents – adr-tools.
Late edit 2021-12-14: I released (v0.0.1) my own rust-based application for making Decision Records. Yes, Decision Records – not Architecture Decision Records… because I think you should be able to apply the same logic to all decisions, not just architectural ones.
Installing adr-tools on Linux
Currently adr-tools are easier to install under OSX rather than Linux or Windows Subsystem for Linux (WSL) (I’m working on this – bear with me! 😃 ).
The current installation notes suggest for Linux (which would also work on WSL) is to download the latest release tar.gz or zip file and unpack it into your path somewhere. This isn’t exactly the best way to deploy anything on Linux, but… I guess it works right now?
For me, I downloaded the file, and unpacked the whole tar.gz file (as root) into /usr/local/bin/, giving me a directory of /usr/local/bin/adr-tools-3.0.0/. There’s a subdirectory in here, called src which contains a large number of files – mostly starting _adr or adr- and two additional files, init.md and template.md.
Rather than putting all of these files into /usr/local/bin directly, instead I leave them in the adr-tools-3.0.0 directory, and create a symbolic link (symlink) to the /usr/local/bin directory with this command:
cd /usr/local/bin
ln -s adr-tools-3.0.0/src/* .
This gives me all those files in one place, so I can refer to them later.
An aside – why link everything in that src directory? (Feel free to skip this block!)
Now, why, you might ask, do all of these unrelated files need to be in the same place? Well…. the author of the script has put this in at the top of almost all the files:
#!/bin/bash
set -e
eval "$($(dirname $0)/adr-config)"
There are, technically, good reasons for this! This is designed to be run in, what in the Windows world, you might call as a “Portable Script”. So, you bung adr-tools into some directory somewhere, and then just call adr somecommand and it knows that all the files are where they need to be. The (somewhat) down side to this is that if you just want to call adr somecommand rather than path/to/my/adr somecommand then all those files need to be there
I’m currently looking to see if I can improve this somewhat, so that it’s not quite so complex to install, but for now, that’s what you need.
Anyway…
Using adr-tools to document your decisions
I’ll start documenting a fictional hosted web service project, and note down some of the decisions which have been made.
Initializing your ADR directory
Start by running adr init. You may want to specify a directory where you want to put these records, so instead use: adr init path/to/adr, like this:
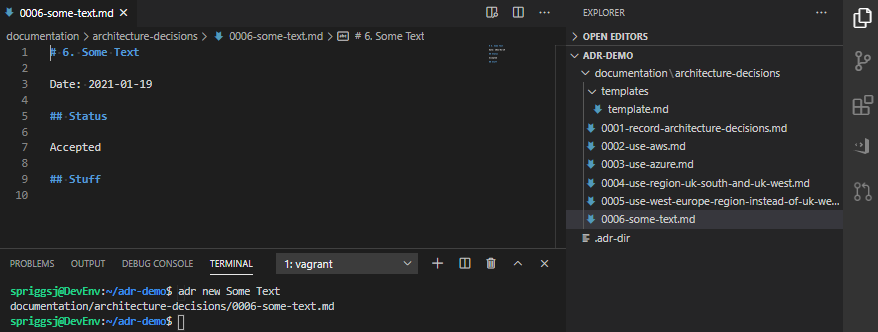
Initializing the ADR in “documentation/architecture-decisions” with adr init documentation/architecture-decisions
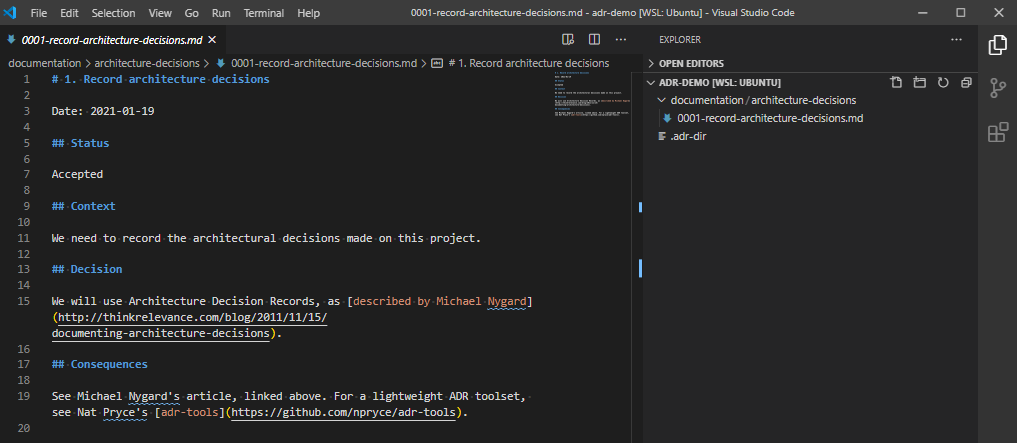
You’ll notice that when I run this command, it creates a new entry, called 0001-record-architecture-decisions.md. Let’s open this up, and see what’s in here.
The VSCode record for the choice to use ADR. It is a markdown file, with the standard types of data recorded.
In here we have the record ID (1.), the title of the record Record architecture decisions, the date the choice was made Date: 2021-01-19, a status of Accepted, the context on why we made this choice, the decision, and the consequences of making this decision. Make changes, if needed, and save it. Let’s move on.
Creating our first own record
This all is quite straightforward thus far. Let’s create our next record.
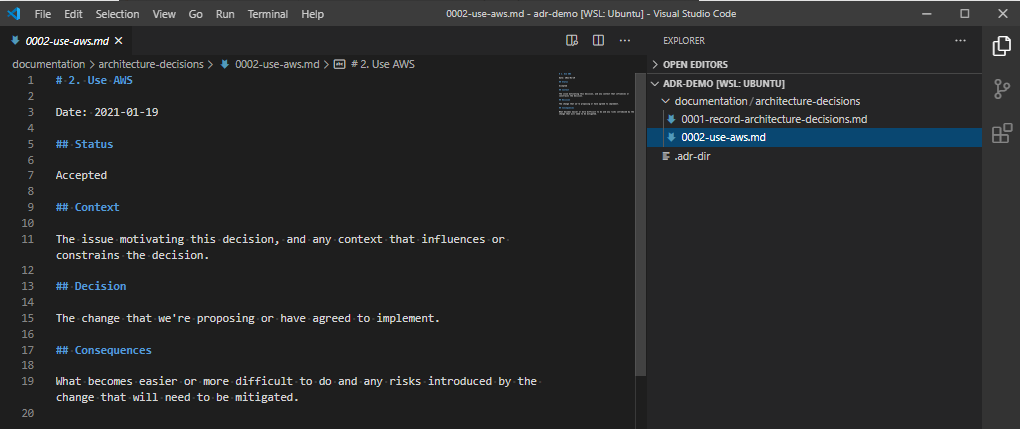
Issuing the command adr new <sometitle> you create the next ADR record.
Let’s open up that record.
The template for the ADR record for “Use AWS”.
Like the first record, we have a title, a status, a context, decision and consequences. Let’s define these.
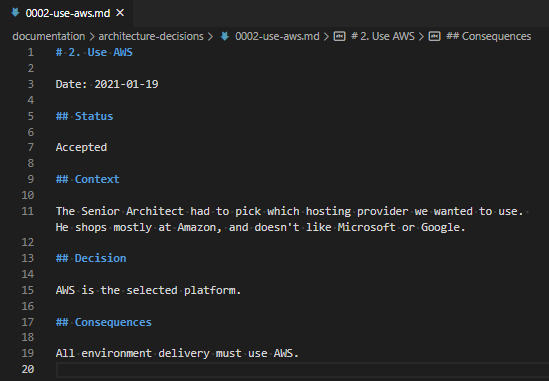
A “finished” brief ADR record.
This document shouldn’t be very long! It just describes why a choice was made and what that entails.
Changing decisions – completely replacing (superseding) a decision
Of course, over time, decisions will be replaced due to various decisions elsewhere.
You can ask adr to supersede a previous record, using the “-s” flag, and the record number.
Let’s look at how that works on the second ADR record.
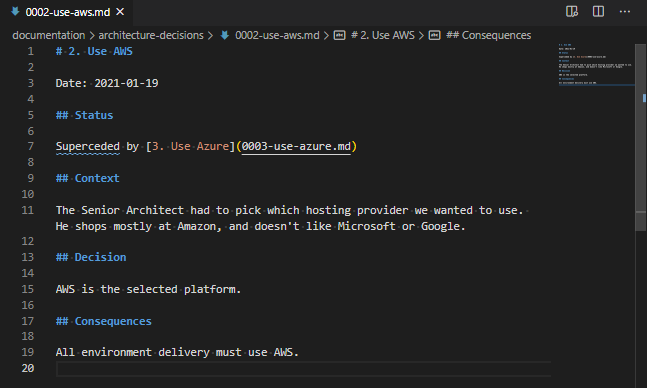
After the command adr new -s 2 Use Azure, the ADR record number 2 has a new status, “Superceded by” and the superseded linked document. Yes, “Superceded” is a typo. There is an open PR for it
So, under the “Status”, where is previously said “Approved”, it now says “Superceded by [3. Use Azure](0003-use-azure.md)“. This is a markdown statement which indicates where the superseded document is located. As I mentioned in the comment below the above image, there is an open Pull Request to fix this on the adr-tools, so hopefully that typo won’t last long!
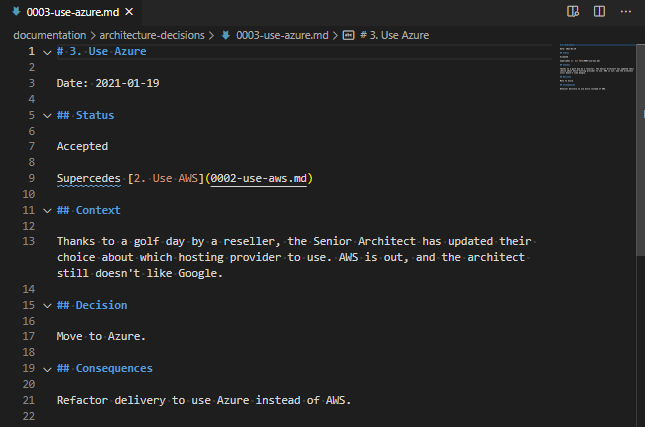
We’ve got our new ADR too – let’s take a look at that one?
Our new ADR shows that it “supercedes” the previous record. Which is good! Typo aside :)
Other references
Of course, you don’t always completely overrule a decision. Sometimes your decision is influenced by, or has a dependency on something else, like this one.
We know which provider we’re using at long last, now let’s pick a region. Use the -l flag to “link” between the referenced and new ADR. The context for the -l flag is “<number>:<text for link to number>:<text for link in targetted document>”.
The command here is:
adr new -l '3:Dependency:Influences' Use Region UK South and UK West
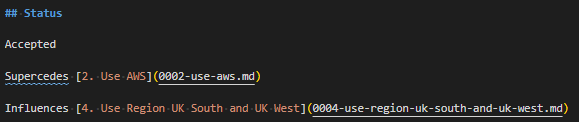
I’m just going to crop from the “Status” block on both the referenced ADR (3) and the ADR which references it (4):
Status block in ADR 0003 which is referenced by ADR 0004Status block in the new ADR 0004 which references ADR 0003
And of course, you can also use the same switch to mark documents as partially obsoleted, like this:
adr new -l '4:Partially obsoletes:Partially obsoleted by' Use West Europe region instead of UK West region
Status block in ADR 0004 indicating it’s partially obsoleted. Probably worth updating the status properly to show it’s not just “Accepted”.
If you forget to add the referencing in, you can also use the adr link command, like this:
adr link 3 Influences 5 Dependency
To be clear, that command adds a (complete) line to ADR 0003 saying “Influences [5. ADR Title](link)” and a separate (complete) line to ADR 0005 saying “Dependency [3. ADR Title](link)“.
What else can we do?
There are four other “things” that it’s worth doing at this point.
Note that you can change the template per-ADR directory.
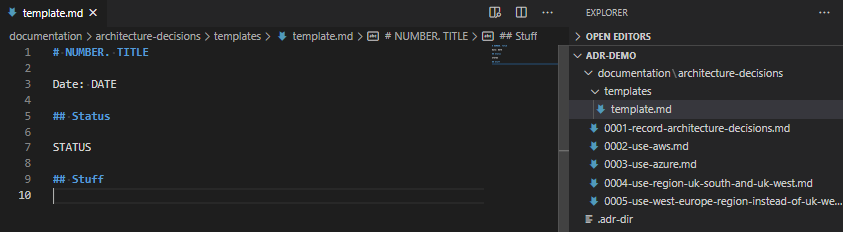
Create a directory called “templates” in the ADR directory, and put a file in there called “template.md“. Tweak this as you need. Ensure you have AT LEAST the line ## Status and # NUMBER. TITLE as these are required by the script.
A much abbreviated template file, containing just “Number”, “Title”, “Date”, “Status”, and a new dummy heading called “Stuff”.And the result of running adr new Some Text once you’ve created that template.
As you can see, it’s possible to add all sorts of content in this template as a result. Bear in mind, before your template turns into something like this, that it’s supposed to be a short document explaining why each decision was made, not a funding proposal, or a complex epic of your user stories!
Be careful not to let your template run away with you!
Note that you can automatically open an editor, by setting the EDITOR (where the process is expected to finish before returning control, like using nano, emacs or vim, for example) or VISUAL (where the process is expected to “fork”, like for example, gedit or vscode) environment variable, and then running adr new A Title, like this:
We can create “Table of Contents” files, using the adr generate toc command, like this:
Generating the table of contents, for injecting into other files.
This can be included into your various other markdown files. There are switches, so you can set the link path, but your best bet is to find that using adr help generate toc.
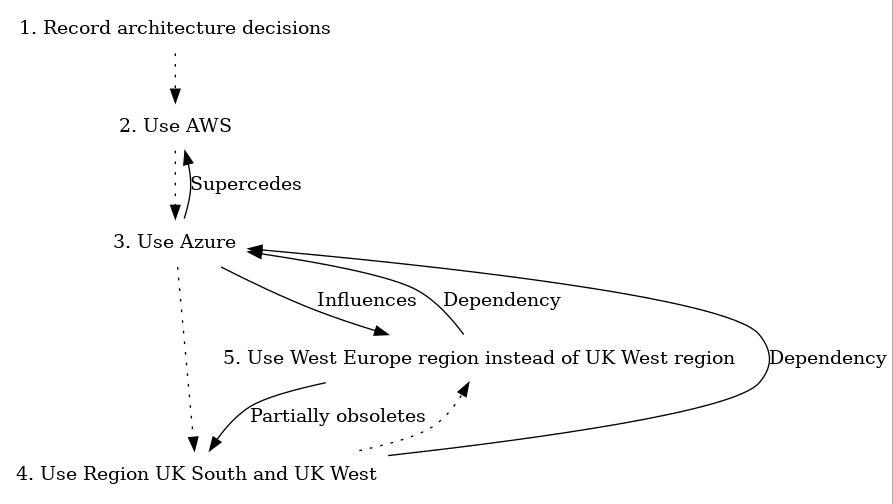
We can also generate graphviz files of the link maps between elements of the various ADRs, like this: adr generate graph | dot -Tjpg > graph.jpg
If you omit the “| dot -Tjpg > graph.jpg” part, then you’ll see the graphviz output, which looks like this: (I’ve removed the documents 6 and 7).
digraph {
  node [shape=plaintext];
  subgraph {
    _1 [label="1. Record architecture decisions"; URL="0001-record-architecture-decisions.html"];
    _2 [label="2. Use AWS"; URL="0002-use-aws.html"];
    _1 -> _2 [style="dotted", weight=1];
    _3 [label="3. Use Azure"; URL="0003-use-azure.html"];
    _2 -> _3 [style="dotted", weight=1];
    _4 [label="4. Use Region UK South and UK West"; URL="0004-use-region-uk-south-and-uk-west.html"];
    _3 -> _4 [style="dotted", weight=1];
    _5 [label="5. Use West Europe region instead of UK West region"; URL="0005-use-west-europe-region-instead-of-uk-west-region.html"];
    _4 -> _5 [style="dotted", weight=1];
  }
  _3 -> _2 [label="Supercedes", weight=0]
  _3 -> _5 [label="Influences", weight=0]
  _4 -> _3 [label="Dependency", weight=0]
  _5 -> _4 [label="Partially obsoletes", weight=0]
  _5 -> _3 [label="Dependency", weight=0]
}
To make the graphviz part work, you’ll need to install graphviz, which is just an apt get away.
Any caveats?
adr-tools is not actively maintained. I’ve contacted the author, about seeing if I can help out with the maintenance, but… we’ll see, and given some fairly high profile malware takeovers of projects like this sort of thing on Github, Docker, NPM, and more… I can see why there might be some reluctance to consider it! Also, I’m an unknown entity, I’ve just dropped in on the project and offered to help, with no previous exposure to the lead dev or the project… so, we’ll see. Worst case, I’ll fork it!
Working with this also requires an understanding of markdown files, and why these might be a useful document format for records like this. There was a PR submitted to support multiple file formats (like asciidoc and rst) but these were not approved by the author.
There is no current intention to support languages other than English. The tool is hard-coded to look for strings like “status” and “superceded” which is hard. Part of the reason I raised the PRs I did was to let me fix some of these sorts of issues. Again, we’ll see what happens.
Lastly, it can be overwhelming to see a lot of documents in one place, particularly if they’re as granular as the documents I produced in this demo. If the project supported categories, or could be broken down into components (like doc/adr/networking and doc/adr/server_builds and doc/adr/applications) then this might help, but it’s not on the roadmap right now!
Late edit 2021-01-25: If you don’t think these templates have enough context or content, there are lots of others listed on Joel Parker Henderson’s repo of examples and templates. If you want a python based viewer of ADR records, take a look at adr-viewer.
I love Ansible… I mean, I really love Ansible. You can ask anyone, and they’ll tell you my first love is my wife, then my children… and then it’s Ansible.
OK, maybe it’s Open Source and then Ansible, but either way, Ansible is REALLY high up there.
But, while I love Ansible, I love what Ansible Tower brings to an environment. See, while you get to easily and quickly manage a fleet of machines with Ansible, Ansible Tower gives you the fine grained control over what you need to expose to your developers, your ops team, or even, in a fit of “what-did-you-just-do”-ness, your manager. (I should probably mention that Ansible Tower is actually part of a much larger portfolio of products, called Ansible Automation Platform, and there’s some hosted SaaS stuff that goes with it… but the bit I really want to talk about is Tower, so I’ll be talking about Tower and not Ansible Automation Platform. Sorry!)
Ansible Tower has a scheduling engine, so you can have a “Go” button, for deploying the latest software to your fleet, or just for the 11PM patching cycle. It has a credential store, so your teams can’t just quickly go and perform an undocumented quick fix on that “flaky” box – they need to do their changes via Ansible. And lastly, it has an inventory, so you can see that the last 5 jobs failed to deploy on that host, so maybe you’ve got a problem with it.
One thing that people don’t so much love to do, is to get a license to deploy Tower, particularly if they just want to quickly spin up a demonstration for some colleagues to show how much THEY love Ansible. And for those people, I present AWX.
The first hit is free
One of the glorious and beautiful things that RedHat did, when they bought Ansible, was to make the same assertion about the Ansible products that they make to the rest of their product line, which is… while they may sell a commercial product, underneath it will be an Open Source version of that product, and you can be part of developing and improving that version, to help improve the commercial product. Thus was released AWX.
Now, I hear the nay-sayers commenting, “but what if you have an issue with AWX at 2AM, how do you get support on that”… and to those people, I reply: “If you need support at 2AM for your box, AWX is not the tool for you – what you need is Tower.”… Um, I mean Ansible Automation Platform. However, Tower takes a bit more setting up than what I’d want to do for a quick demo, and it has a few more pre-requisites. ANYWAY, enough about dealing with the nay-sayers.
AWX is an application inside Docker containers. It’s split into three parts, the AWX Web container, which has the REST API. There’s also a PostgreSQL database inside there too, and one “Engine”, which is the separate container which gets playbooks from your version control system, asks for any dynamic inventories, and then runs those playbooks on your inventories.
I like running demos of Tower, using AWX, because it’s reasonably easy to get stood up, and it’s reasonably close to what Tower looks and behaves like (except for the logos)… and, well, it’s a good gateway to getting people interested in what Tower can do for them, without them having to pay (or spend time signing up for evaluation licenses) for the environment in the first place.
And what’s more, it can all be automated
Yes, folks, because AWX is just a set of docker containers (and an install script), and Ansible knows how to start Docker containers (and run an install script), I can add an Ansible playbook to my cloud-init script, Vagrantfile or, let’s face it, when things go really wrong, put it in a bash script for some poor keyboard jockey to install for you.
If you’re running a demo, and you don’t want to get a POC (proof of concept) or evaluation license for Ansible Tower, then the chances are you’re probably not running this on RedHat Enterprise Linux (RHEL) either. That’s OK, once you’ve sold the room on using Tower (by using AWX), you can sell them on using RHEL too. So, I’ll be focusing on using CentOS 8 instead. Partially because there’s a Vagrant box for CentOS 8, but also because I can also use CentOS 8 on AWS, where I can prove that the Ansible Script I’m putting into my Vagrantfile will also deploy nicely via Cloud-Init too. With a very small number of changes, this is likely to work on anything that runs Docker, so everything from Arch to Ubuntu… probably 😁
“OK then. How can you work this magic, eh?” I hear from the back of the room. OK, pipe down, nay-sayers.
First, install Ansible on your host. You just need to run dnf install -y ansible.
Next, you need to install Docker. This is a marked difference between AWX and Ansible Tower, as AWX is based on Docker, but Ansible Tower uses other magic to make it work. When you’re selling the benefits of Tower, note that it’s not a 1-for-1 match at this point, but it’s not a big issue. Fortunately, CentOS can install Docker Community edition quite easily. At this point, I’m swapping to using Ansible playbooks. At the end, I’ll drop a link to where you can get all this in one big blob… In fact, we’re likely to use it with our Cloud-Init deployment.
The next one? That ensures I can run yum config-manager to add a repo. I could use the copy module in Ansible to create the repo files so yum and/or dnf could use that instead, but… meh, this is a single line shell command.
And then we install the repo, and the docker-ce packages we require. We use the “notify” statement to trigger a handler call to start Docker, like this:
handlers:
- name: Start Docker
  systemd:
    name: docker
    state: started
Fab. We’ve got Docker. Now, let’s clone the AWX repo to our machine. Again, we’re doing this with Ansible, naturally :)
tasks:
- name: Clone AWX repo to local path
  git:
    repo: https://github.com/ansible/awx.git
    dest: /opt/awx

- name: Get latest AWX tag
  shell: |
    if [ $(git status -s | wc -l) -gt 0 ]
    then
      git stash >/dev/null 2>&1
    fi
    git fetch --tags && git describe --tags $(git rev-list --tags --max-count=1)
    if [ $(git stash list | wc -l) -gt 0 ]
    then
      git stash pop >/dev/null 2>&1
    fi
  args:
    chdir: /opt/awx
  register: latest_tag
  changed_when: false

- name: Use latest released version of AWX
  git:
    repo: https://github.com/ansible/awx.git
    dest: /opt/awx
    version: "{{ latest_tag.stdout }}"
OK, there’s a fair bit to get from this, but essentially, we clone the repo from Github, then ask (using a collection of git commands) for the latest released version (yes, I’ve been bitten by just using the head of “devel” before), and then we check out that released version.
If we don’t already have a password defined, then create one. We register the fact we’ve had to create one, as we’ll need to tell ourselves it once the build is finished.
After that, we set a collection of values into the installer – the hostname, passwords, secret keys and so on. It loops over a key/value pair, and passes these to a regular expression rewrite command, so at the end, we have the settings we want, without having to change this script between releases.
When this is all done, we execute the installer. I’ve seen this done two ways. In an ideal world, you’d throw this into an Ansible shell module, and get it to execute the install, but the problem with that is that the AWX install takes quite a while, so I’d much rather actually be able to see what’s going on… and so, instead, we exit our prepare script at this point, and drop back to the shell to run the installer. Let’s look at both options, and you can decide which one you want to do. In my script, I’m doing the first, but just because it’s a bit neater to have everything in one place.
- name: Run the AWX install.
  shell: ansible-playbook -i inventory install.yml
  args:
    chdir: /opt/awx/installer
cd /opt/awx/installer
ansible-playbook -i inventory install.yml
When this is done, you get a prepared environment, ready to access using the username admin and the password of … well, whatever you set admin_password to.
AWX takes a little while to stand up, so you might want to run this next Ansible stanza to see when it’s ready to go.
- name: Test access to AWX
  tower_user:
    tower_host: "http://{{ ansible_fqdn }}"
    tower_username: admin
    tower_password: "{{ admin_password }}"
    email: "admin@{{ ansible_fqdn }}"
    first_name: "admin"
    last_name: ""
    password: "{{ admin_password }}"
    username: admin
    superuser: yes
    auditor: no
  register: _result
  until: _result.failed == false
  retries: 240 # retry 240 times
  delay: 5 # pause for 5 sec between each try
The upshot to using that command there is that it sets the email address of the admin account to “admin@your.awx.example.org“, if the fully qualified domain name (FQDN) of your machine is your.awx.example.org.
Moving from the Theoretical to the Practical
Now we’ve got our playbook, let’s wrap this up in both a Vagrant Vagrantfile and a Terraform script, this means you can deploy it locally, to test something internally, and in “the cloud”.
To simplify things, and because the version of Ansible deployed on the Vagrant box isn’t the one I want to use, I am using a single “user-data.sh” script for both Vagrant and Terraform. Here that is:
#!/bin/bash
if [ -e "$(which yum)" ]
then
  yum install git python3-pip -y
  pip3 install ansible docker docker-compose
else
  echo "This script only supports CentOS right now."
  exit 1
fi

git clone https://gist.github.com/JonTheNiceGuy/024d72f970d6a1c6160a6e9c3e642e07 /tmp/Install_AWX
cd /tmp/Install_AWX
/usr/local/bin/ansible-playbook Install_AWX.yml
While they both have their differences, they both can execute a script once the machine has finished booting. Let’s start with Vagrant.
Vagrant.configure("2") do |config|
  config.vm.box = "centos/8"

  config.vm.provider :virtualbox do |v|
    v.memory = 4096
  end

  config.vm.provision "shell", path: "user-data.sh"

  config.vm.network "forwarded_port", guest: 80, host: 8080, auto_correct: true
end
To boot this up, once you’ve got Vagrant and Virtualbox installed, run vagrant up and it’ll tell you that it’s set up a port forward from the HTTP port (TCP/80) to a “high” port – TCP/8080. If there’s a collision (because you’re running something else on TCP/8080), it’ll tell you what port it’s forwarded the HTTP port to instead. Once you’ve finished, run vagrant destroy to shut it down. There are lots more tricks you can play with Vagrant, but this is a relatively quick and easy one. Be aware that you’re not using HTTPS, so traffic to the AWX instance can be inspected, but if you’re running this on your local machine, it’s probably not a big issue.
How about running this on a cloud provider, like AWS? We can use the exact same scripts – both the Ansible script, and the user-data.sh script, using Terraform, however, this is a little more complex, as we need to create a VPC, Internet Gateway, Subnet, Security Group and Elastic IP before we can create the virtual machine. What’s more, the Free Tier (that “first hit is free” thing that Amazon Web Services provide to you) does not have enough horsepower to run AWX, so, if you want to look at how to run up AWX in EC2 (or to tweak it to run on Azure, GCP, Digital Ocean or one of the fine offerings from IBM or RedHat), then click through to the gist I’ve put all my code from this post into. The critical lines in there are to select a “CentOS 8” image, open HTTP and SSH into the machine, and to specify the user-data.sh file to provision the machine. Everything else is cruft to make the virtual machine talk to, and be seen by, hosts on the Internet.
To run this one, you need to run terraform init to load the AWS plugin, then terraform apply. Note that this relies on having an AWS access token defined, so if you don’t have them set up, you’ll need to get that sorted out first. Once you’ve finished with your demo, you should run terraform destroy to remove all the assets created by this terraform script. Again, when you’re running that demo, note that you ONLY have HTTP access set up, not HTTPS, so don’t use important credentials on there!
Once you’ve got your AWX environment running, you’ve got just enough AWX there to demo what Ansible Tower looks like, what it can bring to your organisation… and maybe even convince them that it’s worth investing in a license, rather than running AWX in production. Just in case you have that 2AM call-out that we all dread.
In Ansible 2.10, Ansible started bundling modules and plugins as “Collections”, basically meaning that Ansible didn’t need to make a release every time a vendor wanted to update the libraries it required, or API changes required new fields to be supplied to modules. As part of this split between “Collections” and “Core”, the AWS modules and plugins got moved into a collection.
Now, if you’re using Ansible 2.9 or earlier, this probably doesn’t impact you, but there are some nice features in Ansible 2.10 that I wanted to use, so… buckle up :)
Getting started with Ansible 2.10, using a virtual environment
If you currently are using Ansible 2.9, it’s probably worth creating a “python virtual environment”, or “virtualenv” to try out Ansible 2.10. I did this on my Ubuntu 20.04 machine by typing:
The above ensures that you have virtualenv installed, creates a directory called “bin” in your home directory, if it doesn’t already exist, and then places the virtual environment, using Python3, into a directory there called “ansible_2.10“.
Whenever we want to use this new environment you must activate it, using this command:
source ~/bin/ansible_2.10/bin/activate
Once you’ve executed this, any binary packages created in that virtual environment will be executed from there, in preference to the file system packages.
You can tell that you’ve “activated” this virtual environment, because your prompt changes from user@HOST:~$ to (ansible_2.10) user@HOST:~$ which helps 😀
Next, let’s create a requirements.txt file. This will let us install the environment in a repeatable manner (which is useful with Ansible). Here’s the content of this file.
ansible>=2.10
boto3
botocore
So, this isn’t just Ansible, it’s also the supporting libraries we’ll need to talk to AWS from Ansible.
We execute the following command:
pip install -r requirements.txt
Note, on Windows Subsystem for Linux version 1 (which I’m using) this will take a reasonable while, particularly if it’s crossing from the WSL environment into the Windows environment, depending on where you have specified the virtual environment to be placed.
If you get an error message about something to do with being unable to install ffi, then you’ll need to install the package libffi-dev with sudo apt install -y libffi-dev and then re-run the pip install command above.
Once the installation has completed, you can run ansible --version to see something like the following:
Ansible relies on certain paths in the filesystem to store things like collections, roles and modules, but I like to circumvent these things – particularly if I’m developing something, or moving from one release to the next. Fortunately, Ansible makes this very easy, using a single file, ansible.cfg to tell the code that’s running in this path where to find things.
A quick note on File permissions with ansible.cfg
Note that the POSIX file permissions for the directory you’re in really matter! It must be set to 775 (-rwxrwxr-x) as a maximum – if it’s “world writable” (the last number) it won’t use this file! Other options include 770, 755. If you accidentally set this as world writable, or are using a directory from the “Windows” side of WSL, then you’ll get an error message like this:
[WARNING]: Ansible is being run in a world writable directory (/home/user/ansible_2.10_aws), ignoring it as an ansible.cfg source. For more information see
https://docs.ansible.com/ansible/devel/reference_appendices/config.html#cfg-in-world-writable-dir
This file didn’t previously exist in this directory, so I created that file.
This block asks Ansible to check the following paths in order:
collections in this path (e.g. /home/user/ansible_2.10_aws/collections)
collections in the .ansible directory under the user’s home directory (e.g. /home/user/.ansible/collections)
and finally /usr/share/ansible/collections for system-wide collections.
If you don’t configure Ansible with the ansible.cfg file, the default is to store the collections in ~/.ansible/collections, but you can “only have one version of the collection”, so this means that if you’re relying on things not to change when testing, or if you’re running multiple versions of Ansible on your system, then it’s safest to store the collections in the same file tree as you’re working in!
Installing Collections
Now we have Ansible 2.10 installed, and our Ansible configuration file set up, let’s get our collection ready to install. We do this with a requirements.yml file, like this:
What does this tell us? Firstly, that we want to install the Amazon AWS collection from Ansible Galaxy. Secondly that we want at least the most current version (which is currently version 1.2.1). If you leave the version line out, it’ll get “the latest” version. If you replace ">=1.2.1" with 1.2.1 it’ll install exactly that version from Galaxy.
If you want any other collections, you add them as subsequent lines (more details here), like this:
Once we’ve got this file, we run this command to install the content of the requirements.yml: ansible-galaxy collection install -r requirements.yml
In our case, this installs just the amazon.aws collection, which is what we want. Fab!
Getting our dynamic inventory
Right, so we’ve got all the pieces now that we need! Let’s tell Ansible that we want it to ask AWS for an inventory. There are three sections to this.
Configuring Ansible, again!
We need to open up our ansible.cfg file. Because we’re using the collection to get our Dynamic Inventory plugin, we need to tell Ansible to use that plugin. Edit ./ansible.cfg in your favourite editor, and add this block to the end:
[inventory]
enable_plugins = aws_ec2
If you previously created the ansible.cfg file when you were setting up to get the collection installed alongside, then your ansible.cfg file will look (something) like this:
Your machine needs to have access tokens to interact with the AWS API. These are stored in ~/.aws/credentials (e.g. /home/user/.aws/credentials) and look a bit like this:
In a bit of a change to how Ansible usually does the inventory, to have a plugin based dynamic inventory, you can’t specify a file any more, you have to specify a directory. So, create the file ./inventory/aws_ec2.yaml (having created the directory inventory first). The file contains the following:
---
plugin: amazon.aws.aws_ec2
Late edit 2020-12-01: Further to the comment by Giovanni, I’ve amended this file snippet from plugin: aws_ec2 to plugin: amazon.aws.aws_ec2.
By default, this just retrieves the hostnames of any running EC2 instance, as you can see by running ansible-inventory -i inventory --graph
I need a bit more detail than this – I like to use the tags I assign to AWS assets to decide what I’m going to target the machines with. I also know exactly which regions I’ve got my assets in, and what I want to use to get the names of the devices, so this is what I’ve put in my aws_ec2.yaml file:
Now you have your dynamic inventory, you can target your playbook at any of the groups listed above (like role_Firewall, aws_ec2, aws_region_eu_west_1 or some other tag) like you would any other inventory assignment, like this:
---
- hosts: role_Firewall
  gather_facts: false
  tasks:
  - name: Show the name of this device
    debug:
      msg: "{{ inventory_hostname }}"
And there you have it. Hope this is useful!
Late edit: 2020-11-23: Following a conversation with Andy from Work, we’ve noticed that if you’re trying to do SSM connections, rather than username/password based ones, you might want to put this in your aws_ec2.yml file:
One of my colleagues asked today about using recursive git submodules. First, let’s quickly drill into what a Submodule is.
Git Submodules
A submodule is a separate git repository, attached to the git repository you’re working on via two “touch points” – a file in the root directory called .gitmodules, and, when checked out, the HEAD file in the .git directory.
When you clone a repository with a submodule attached, it creates the directory the submodule will be cloned into, but leave it empty, unless you either do git submodule update --init --recursive or, when you clone the repository initially, you can ask it to pull any recursive submodules, like this git clone https://your.vcs.example.org/someorg/somerepo.git --recursive.
Git stores the commit reference of the submodule (via a file in .git/modules/$SUBMODULE_NAME/HEAD which contains the commit reference). If you change a file in that submodule, it marks the path of the submodule as “dirty” (because you have an uncommitted change), and if you either commit that change, or pull an updated commit from the source repository, then it will mark the path of the submodule as having changed.
In other words, you can track two separate but linked parts of your code in the same tree, working on each in turn, and without impacting each other code base.
I’ve used this, mostly with Ansible playbooks, where I’ve consumed someone else’s role, like this:
Once you’ve checked out this submodule, you can do any normal operations in this submodule, like pulls, pushes, commits, tags, etc.
So, what happens when you want to nest this stuff?
Nesting Submodule Recursion
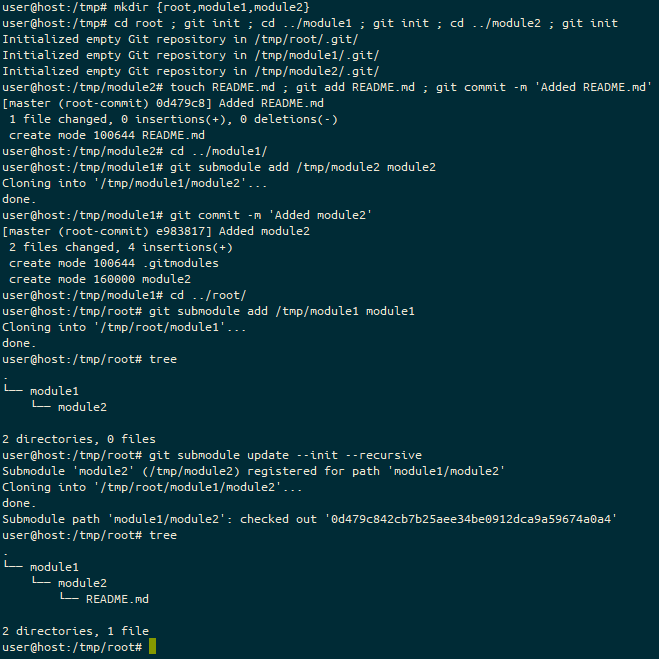
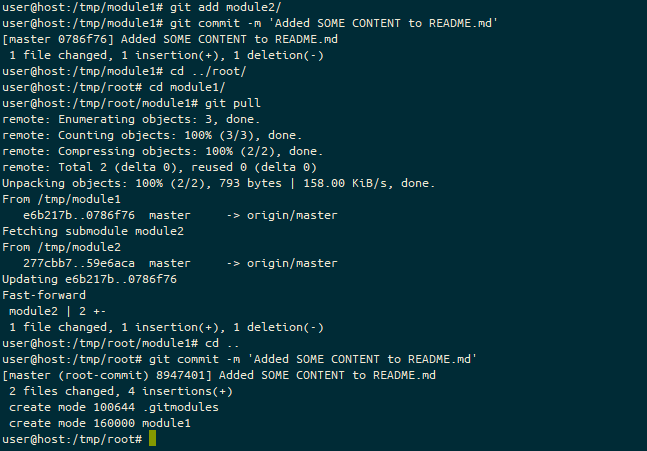
So, my colleague wanted to have files in three layers of directories. In this instance, I’ve simulated this by creating three directories, root, module1 and module2. Typically these would be pulled from their respective Git Service paths, like GitHub or GitLab, but here I’m just using everything on my local file system. Where, in the following screen shot, you see /tmp/ you could easily replace that with https://your.vcs.example.org/someorg/.
The output of running mkdir {root,module1,module2} ; cd root ; git init ; cd ../module1 ; git init ; cd ../module2 ; git init ; touch README.md ; git add README.md ; git commit -m ‘Added README.md’ ; cd ../module1 ; git submodule add /tmp/module2 module2 ; git commit -m ‘Added module2’ ; cd ../root ; git submodule add /tmp/module1 module1 ; git submodule update –init –recursive ; tree showing the resulting tree of submodules under the root directory.
So, here, we’ve created these three paths (basically to initiate the repositories), added a basic commit to the furthest submodule (module2), then done a submodule add into the next furthest submodule (module1) and finally added that into the root tree.
Note, however, when you perform the submodule add it doesn’t automatically clone any submodules, and if you were to, from another machine, perform git clone https://your.vcs.example.org/someorg/root.git you wouldn’t get any of the submodules (neither module1 nor module2) without adding either --recursive to the clone command (like this: git clone --recursive https://your.vcs.example.org/someorg/root.git), or by running the follow-up command git submodule update --init --recursive.
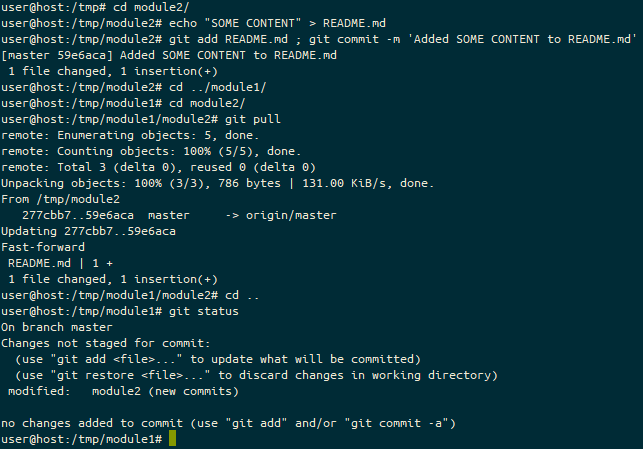
Oh, and if any of these submodules are updated? You need to go in and pull those updates, and then commit that change, like this!
The workflow of pulling updates for each of the submodules, with git add, git commit, and git pull, also noting that when a module has been changed, it shows as having “new commits”.And here we have the finish of the workflow, updating the other submodules. Note that some of these steps (probably the ones in the earlier image) are likely to have been performed by some other developer on another system, so having all the updates on one machine is pretty rare!
The only thing which isn’t in these submodules is if you’ve done a git clone of the root repo (using the terms from the above screen images), the submodules won’t be using the “master” branch (or a particular “tag” or “branch hame”, for that matter), but will instead be using the commit reference. If you wanted to switch to a specific branch or tag, then you’d need to issue the command git checkout some_remote/some_branch or git checkout master instead of (in the above screen captures) git pull.
If you have any questions or issues with this post, please either add a comment, or contact me via one of the methods at the top or side of this page!
Featured image is “Submarine” by “NH53” on Flickr and is released under a CC-BY license.
I’m starting to write some documentation, and I realised that I’ve not documented how I write with Markdown. So, let’s make some notes here :) This is largely drawn from the CommonMark Markdown Cheat Sheet, as well as my own experiences.
I’ll use the terms “Markdown” and “Commonmark” interchangeably, but really I’m talking about the “Commonmark” implementation of Markdown, as Markdown is just a “way of doing things”, whereas Commonmark is a specification to standardise how Markdown is done.
Late edit, 2020-06-24: My colleague, Simon Partridge, who writes the “Tech Snippets” round up of interesting content, pointed me to a Markdown Tutorial that he recommends. I’ve added two “Late Edit” comments below, in the Lists section and a new section called “Soft Breaks”, featuring stuff I’d not come across before that was on the Markdown Tutorial. It’s well worth a look! Dave Lee, the producer on the podcast I co-host, podcaster in his own right, and all-round-lovely-guy, also noted that the Walt Disney quote I included below wasn’t quite formatted right. I’ve fixed this, and added another example for clarity.
Normal text
This is normal text, you might know it in HTML as “paragraph” mode, or <p>some text</p>.
In your word processor, this is the default styled text that you start with.
In Markdown and Commonmark, line lengths don’t matter, you can just keep writing and writing and writing, or you can type 40 characters, and put a single new line in, and it’ll keep the text on the same line, like this:
In your word processor, this is the default styled
text that you start with.

In Markdown and Commonmark, line lengths don't matter, you can just keep writing and writing and writing or you can type 40 characters and put a single new line in, and it'll keep the text on the same line, like this:
Links
While a single page of text is often useful, some people find it easier to connect to other documents. In HTML, you would do this by writing something like this: <a hrеf="http://example.com">Link</a>. In Markdown, you use this format:
You might want to put your [link](http://example.com) in here for later.

This link is in-line for ease of understanding.
This makes it very easy to read in-line where a link is pointing to. It’s also possible to make those links listed elsewhere in the document, by writing something like this:
You might want to put your [link][1] in here for later.

Some documents include links elsewhere in their structure, which is easier
for moving links around your document, while keeping the formatting
structure.

[1]: (http://example.com)
Links can be to absolute URLs (http://example.com/some/page.html), or relative URLs (some/page.html) and can include anchor points (http://example.com/some/page.html#heading-1). They can also link to other protocols, like email (mailto:person@example.org) or ftp (ftp://user:password@192.0.2.1/some/directory/).
Images
Much like the link layout, in HTML an image is inserted with a special tag, in that case, <img src="http://example.com/some/image.png" alt="Some Image">. An image can have an “Alt Tag”, which is text that a screen reader (for people with partial or complete vision loss) can read out. To put an image into a Markdown document, you use the link-style formatting, but add an exclamation mark before it, like this:

![Some other image][1]
[1]: (relative/paths/work/too.png)
If you want to mix Images and Links, you do that like this:
[](my_link.html)
Note that here it looks a little complicated, as you’ve got the image identifier (![]()) inside the link identifier ([]()). Again, you could also use some non-inline URLs to clarify that a little, like this:
[![Click here to send an email][email]](mailto:someone@example.net?subject=Enquiry)

[email]: http://example.org/assets/email.png
Headings
You can prefix text with the # symbol and a space to make it a “top level heading”, like my heading for this blog post “Writing with Commonmark/Markdown formatting”, like this:
# Writing with Commonmark/Markdown formatting
Subsequent level headings, from 2 (e.g. “Headings” above) to 6 are written like this:
## Headings

### Now also at level 3

#### And level 4

##### And so on

###### Until level 6

### You can also jump back up levels, if you need to
Typically, you include a line space before and after the heading, just to make it clearer that this is a heading. It’s also possible to use the equals underlining and hyphen underlining to turn a single top level and second level heading, like this:
# Heading 1

is the same as

Heading 1
=========
## Heading 2

is the same as

Heading 2
---------
I’ve not really seen that structure before, but it seems less clear than the symbol-prefix method… I guess it’s just codifying some early practices.
Another benefit to the headings is that they automatically get turned into “anchor tags”, so you can refer to those points elsewhere in your document, like this:
Refer to [our sales literature for more details](#sales-literature).
## Sales Literature

Note that the anchor tag in this case is any heading tag (level 1 to 6), turned into lower case, and replacing any spaces with hyphens and removing any other characters.
Emphasis
Aside from the above, you can also use some punctuation to indicate emphasis, like this:
This is *bold* text. As is _this_.

This text is **italicised** instead. This is __too__.

This text is ***both*** bold and italicised. ___Also___ here.
So is __*this*__ and **_this_** and _**this**_ and *__this__*.
Lists (ordered and unordered)
An ordered list looks like this:
1. Go to the shops
  1. Open the door
  2. Walk in
  3. Select products
  4. Pay for products
    1. Use debit or credit card
    2. Enter PIN
  5. Open the door
  6. Exit
2. Go home
Both of these can be rendered in Markdown using this format:
1. Go to the shops
    1. Open the door
    2. Walk in
    3. Select products
        * Eggs
        * Dairy
            * Milk
2. Go home
Notice that you can nest ordered and unordered lists. You need to provide four spaces when indenting from one level to the next.
If you’re not sure what the numbering will be, you can replace each of the numbers (1., 2., 3. and so on) with a single number, 1. Also, * for the unordered list can be replaced with -. So, the above example could look like this:
1. Go to the shops
    1. Open the door
    1. Walk in
    1. Select products
        - Eggs
        - Dairy
            * Milk
1. Go home
This all depends on what writing style you prefer.
Late Edit: 2020-06-24 If you want to include a more content under the same list item, you can add a new line and indent it by at least one space (and usually to the same indenting level as the bullet point), like this:
1. Go to the shops

   I've found going to Smiths, on the high street best.

   1. Open the door

      Use the handle on the edge of the door.

   1. Walk in
   1. Select products

      Look for items with the best dates. The items you need are as follows:

      - Eggs
      - Dairy
          * Milk
Soft Breaks (Late edit, 2020-06-24)
A soft break, written in HTML as <br>, is signalled in Markdown with two spaces, like this (spaces replaced with . characters):
People sometimes like to quote other people. In Markdown, we do this by following a long email convention, proceeding the quote with a “chevron” symbol – >, like this:
> The way to get started is to quit talking and begin doing.
>
> [*Walt Disney*](https://blog.hubspot.com/sales/famous-quotes)
Note that this could also have been written like this:
The way to get started is to quit talking and begin doing.
As [Walt Disney](https://blog.hubspot.com/sales/famous-quotes) once said:

> The way to get started is to quit talking and begin doing.
Embedding code
This one I use all the time. Backticks (`) help you embed code, while three backticks (```) start a block of code, like this:
Also, `*` for the unordered list can be replaced with `-`.

```
> The way to get started is to quit talking and begin doing.

[Walt Disney](https://blog.hubspot.com/sales/famous-quotes)
```
Some interpretations of Markdown (notably “Github Flavoured Markdown”) let you signal what type of code you’ve written by adding the language after the first set of three backticks, like this:
```bash
#!/bin/bash
echo "$1"
exit
```
If three backticks don’t work for you, you can instead add four spaces before each line of your code, like this:
    #!/bin/bash
    echo "$1"
    exit
Raw HTML
Sometimes you just can’t do with Markdown what you want to achieve. I’ve notably found this with trying to incorporate several images and figure references in an ordered list, but in those cases, you can always use “raw HTML”. Here’s a list (from the Commonmark Spec as of version 0.29, dated 2019-04-06) of what tags are available to you:
1. Here's something to do with the following image<br>
<br>
*Figure 1 - Some image that is relevant*<br>
Since looking into this further, this is now what I intend to do:
1. Here's something to do with the following image
<figure>
<figcaption>*Figure 1 - Some image that is relevant*</figcaption>
</figure>
Tables
Not all Markdown flavours incorporate these, but some do. Trial-and-error is your friend here!
Github Flavoured Markdown supports tables, as do several other Markdown interpreters, but it’s explicitly not in Commonmark.
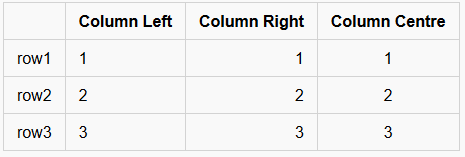
These are very basic tables, but will work for several cases. In this case, you MUST have a heading row (in my case, the first column has no name, but the second, third and fourth have the text “column” and then the alignment the subsequent rows follow), then a line which indicates the alignment of the row, either left (|---|), right (|--:|) or centre (|:-:|). All subsequent lines must contain all the columns specified. You can’t merge columns or rows, without resorting to HTML table definitions.
Note that different flavours disagree on whether the alignment of the text inside the rows matters, so while the above text works out OK, the following would also produce exactly the same result:
Personally, I’d probably use the longer format divider line to match up to the column heads, but use the shorter format for the rows.
Using Markdown
In projects on Github and Gitlab, any file suffixed .md will usually be rendered as a Markdown file. Editing a Markdown file in Github at least will allow you to use the “preview” tab to see the changes. You can also include some Markdown in issues and pull/merge requests. It is not recommended for git logs, and IIRC won’t render it there either.
Visual Studio Code will preview Markdown, and has a “linting” extension, called “markdownlint“, that will help identify common issues with Markdown.
WordPress’ “Gutenberg” block editor supports using markdown, both for importing content, and for using it to shortcut things like bold, italics, headings and links (in fact, I wrote rather a lot of this using it!).
Popular blogging platform Ghost and static site creation tool Jekyll both use Markdown extensively.
Alternatives
Naturally, Plain Text is an option :)
You might also consider “Restructured Text” (RST) which are popular with open source projects for their documentation.
Featured image is “html tattoo” by “webmove” on Flickr and is released under a CC-BY license.
I’m currently building a Proof Of Value (POV) environment for a product, and one of the things I needed in my environment was an Active Directory domain.
To do this in AWS, I had to do the following steps:
Build my Domain Controller
Install Windows
Set the hostname (Reboot)
Promote the machine to being a Domain Controller (Reboot)
Create a domain user
Build my Member Server
Install Windows
Set the hostname (Reboot)
Set the DNS client to point to the Domain Controller
Join the server to the domain (Reboot)
To make this work, I had to find a way to trigger build steps after each reboot. I was working with Windows 2012R2, Windows 2016 and Windows 2019, so the solution had to be cross-version. Fortunately I found this script online! That version was great for Windows 2012R2, but didn’t cover Windows 2016 or later… So let’s break down what I’ve done!
In your userdata field, you need to have two sets of XML strings, as follows:
The first block says to Windows 2016+ “keep trying to run this script on each boot” (note that you need to stop it from doing non-relevant stuff on each boot – we’ll get to that in a second!), and the second bit is the PowerShell commands you want it to run. The rest of this now will focus just on the PowerShell block.
Whew, what a block! Well, again, we can split this up into a couple of bits.
In the first few lines, we build a pointer, a note which says “We got up to here on our previous boots”. We then read that into a variable and find that number and execute any steps in the block with that number. That’s this block:
The next part (and you’ll repeat it for each “number” of reboot steps you need to perform) says “increment the number” then “If this is Windows 2012, remind the userdata handler that the script needs to be run again next boot”. That’s this block:
Then, after each reboot, you need a new block. I have a block to change the computer name, a block to join the machine to the domain, and a block to install an software that I need.
I’m back again with another Mentoring Style video, in which I talk about how to create and use SSH keys (although, in hindsight, not using PuTTY which I probably should have covered!) and how to use SSH Config Files to make your life easier.
One of the guest hosts and stalwart member of the Admin Admin Telegram group has been documenting how he has built his Ansible Networking lab.
Stuart has done three posts so far, but this is the first one actually dealing with the technology. It’s a mammoth read, so I’d recommend doing it on a computer, and not on a tablet or phone!
Posts one and two were about what the series would cover and how the lab has been constructed.