I used to process all my audio for CCHits.net on my home machine, but due to some instabilities, I moved to building the audio on an EC2 server. I’ve seen some comments about doing similar things recently, so I decided to document how I build the CCHits shows.
Read More
Category: Computers
Want multiple vhosts without creating new apache config files each time? Use vhost_alias
This is a pretty quick technical post explaining how to get vhost_alias working with apache2 on Ubuntu 12.10. Read More
Creative Commons made it easy to start CCHits.net
“It’s always hard to talk about a project you’ve started. The inspiration for projects can come from a hundred different places and none of those are the key to why the project happened. CCHits.net is no different, but this post is here to talk about why CCHits.net (henceforth referred to as “CCHits”) came about and why Creative Commons plays so much of a part in how it all got started.”
To read more – see my guest blog entry on the Creative Commons UK Blog.
Building a WPA2 Protected Wireless Access Extender for Jogglers using Ubuntu 12.04
Shesh! What a lot of keywords in the title!
For those who don’t know what some of those key words were, I’ll break down the title
- Ubuntu is a Linux distribution, and 12.04 is the version number of the latest Long Term Stable version.
- Joggler is the name of a device sold by O2 a couple of years ago. It is a re-branded OpenPeak tablet.
- A Wireless Access Extender is a device like a WiFi enabled router, but it uses the same DHCP pool and should use the same SSID name and WPA2 passphrase.
- WPA2 is the latest incarnation of the WiFi security protocol. It is currently (at this time, as far as I know) uncracked, unlike WPA1 or WEP.
So, now that we know what I’m talking about, let’s look at what components we will be using today.
- An O2 Joggler. EBay lists them from between £30 and £100. They originally sold for around £100, but got popular when O2 dropped the price to £50. They are no longer available for sale from O2, hence EBay.
- A wired network connection. I’m using a pair of Ethernet over Power (or “HomePlug”) devices to let me position this device in a useful place in my house. I’ve had a lot of success with the 200M devices sold by 7DayShop.com, but if I were buying new today, I’d probably stretch up to the 500M devices, as they will be Half Duplex (like a narrow street permitting traffic only one way at a time), and will loose some data due to interference and “collisions” – where two devices on the Ethernet over Power “network” are talking at the same time. Ultimately, you won’t get the equivalent to 100M Full Duplex with the 200M devices, but should do with the 500M devices.
- A USB stick. This needs to be 4Gb or greater, but not all devices are suitable. I bought some 4Gb sticks from 7DayShop.com and found they only actually held around 3.5Gb… making them unsuitable. I bought three 8Gb sticks from 7DayShop.com, but only used one for this task!
- A Ubuntu 12.04 install. Actually, I used the Xubuntu 12.04 image, because I didn’t need everything that Ubuntu 12.04 gave me. This is a special non-official build of Xubuntu, customised for Joggler hardware and it’s touchscreen, and is what I’ll be moving all my Jogglers in the house to, eventually, however, the principals in making all of this stuff work will apply just as much to Ubuntu as it would Xubuntu – special build or not!
- Once installed, you’ll use a combination of VNC and SSH to manage your device, these will be through the X11VNC project and OpenSSH-Server. You should have an SSH client (for Linux/Mac, ssh should be fine, for Windows, use PuTTY) and a VNC client (for Ubuntu, I use Remmina, for Windows, I use TightVNC).
So, you’ve got all your goodies, and you’re ready to go. Let’s do this!
- Transfer the Xubuntu image to the USB stick. This is a simple task, and is clearly documented on the site where I got the Xubuntu image from, and involves you copying the image directly to the USB stick, not to one of it’s partitions. It sounds complicated, it really isn’t.
- Stick the Xubuntu stick into the side of the Joggler. Get used to that shape, as it’s going to be in the side of that from now on. This is because the Linux distribution needs more than the 1Gb that the Joggler holds internally.
- Plug in the HomePlug device – make it as close to the wall as you can make it! I’ve had experience of it being three 4way plug strips away from the wall and it worked fine, but I’ve also had the same HomePlug only one 4way away, and it’s completely failed to work, and had to juggle all my sockets to get it plugged directly into the wall. I think it may be down to the number of “noisy” plugs in the same 4way, but I can’t be sure. Just experiment!
- Plug your Ethernet cable between the HomePlug and the Joggler.
- Power on the Joggler. It will start up with an O2 logo (or possibly an “OpenPeak” logo – depends on when the device was manufactured) – sometimes either of these may corrupt or show with a big white block as it’s booting. Don’t worry too much about this, we’ll stay away from the boot screen as much as possible! :)
- Once you get to a blue screen with icons on it – this is Xubuntu (well, actually XFCE4, but the semantics are moot really). Click on the blue spot in the top left corner of the screen – it may be a little fiddly – and select Ubuntu Software Centre.
- Open the “Florence” keyboard – found by pressing the small grid icon near the clock in the top right corner of the screen. If you struggle with this keyboard (I did), you may find it easier to use the “OnBoard” keyboard, found through the applications menu (again, via the blue button in the top corner).
- Select the Search box in the Software Centre and search for OpenSSH-Server. Click on the only entry which comes back (you need to search for the exact term) and then click install. While that’s installing, click on the two arrows icon in the top right corner, and select Connection Information. Make a note of the IP address you have received. Once it’s finished installing you can move away to something a little more comfortable to work on your Joggler!
- SSH to your Joggler’s IP address – the username for the device is “joggler” and the password is also “joggler”. All of the following you’ll need to be root for. I always use the following line to become root:
sudo su -
- The wireless driver that is installed by default on the Jogglers don’t support “Master” mode – the mode you need to be a wifi access point or extender, so you’ll need to change the wireless driver. Thanks to this post, we know that you edit the file /etc/modprobe.d/joggler.conf and move the comment symbol (#) from before the line blacklist rt2870sta to the line blacklist rt2800usb. It should look like this after you’re done:
# blacklist rt2800usb
blacklist rt2870sta
- We need to bridge the wlan0 and eth0 interfaces.
- Install bridge-utils using apt-get install.
- Now we’ll start to configure the bridge. Edit /etc/network/interfaces to create your bridge interfaces.
auto lo
iface lo inet loopback

auto eth0
iface eth0 inet manual

auto wlan0
iface wlan0 inet manual
    pre-up service hostapd start
    post-up brctl addif br0 wlan0

auto br0
iface br0 inet dhcp
    bridge_ports eth0 wlan0
    pre-up iptables-restore -c < /etc/iptables.rules
    post-down iptables-save -c > /etc/iptables.rules
If you want to use a static IP address instead of a DHCP one, then change the last block (auto br0; iface br0 inet dhcp) to the following (this assumes your network is a 192.168.0/24 with .1 as your router to the outside world):
auto br0
iface br0 inet static
    bridge_ports eth0 wlan0
    address 192.168.0.2
    broadcast 192.168.0.255
    netmask 255.255.255.0
    gateway 192.168.0.1
- Setup /etc/sysctl.conf to permit forwarding of packets. Find, and remove the comment symbol (#) from the line which looks like this:
# net.ipv4.ip_forward = 1
- Create your initial /etc/iptables.rules (this is based on details from this page) and then “restore” them using iptables.
*filter
:INPUT ACCEPT [0:0]
:FORWARD ACCEPT [0:0]
:OUTPUT ACCEPT [1:81]
-A FORWARD -m state --state RELATED,ESTABLISHED -j ACCEPT
-A FORWARD -m state --state INVALID -j DROP
-A FORWARD -i wlan0 -o eth0 -j ACCEPT
-A FORWARD -i eth0 -o wlan0 -j ACCEPT
COMMIT
- Check the iptables have restored properly by running iptables -L -v which should return the following data:
# iptables -L -v Chain INPUT (policy ACCEPT 0 packets, 0 bytes) pkts bytes target prot opt in out source destination Chain FORWARD (policy ACCEPT 0 packets, 0 bytes) pkts bytes target prot opt in out source destination 0 0 ACCEPT all -- any any anywhere anywhere state RELATED,ESTABLISHED 0 0 DROP all -- any any anywhere anywhere state INVALID 0 0 ACCEPT all -- wlan0 eth0 anywhere anywhere 0 0 ACCEPT all -- eth0 wlan0 anywhere anywhere Chain OUTPUT (policy ACCEPT 0 packets, 0 bytes) pkts bytes target prot opt in out source destination - Now you’ve got a bridged interface, and your wifi adaptor is ready to go, let’s get the DHCP relay in and working right.
- apt-get install dhcp3-relay
- It’ll ask you where to forward the DHCP requests to – that is your current gateway – if you have your network as 192.168.0.0/24 with the gateway as .1, then it should be 192.168.0.1.
- Next, it’ll ask which interfaces to listen on – this is br0.
- The last screen asks for some options to configure – this is “-m forward” (without the quote marks).
- Last thing to do, we need to configure something to listen on the wifi interface to provide the Access Point facility to your device. This is “hostapd”.
- apt-get install hostapd
- zcat /usr/share/doc/hostapd/examples/hostapd.conf.gz > /etc/hostapd/hostapd.conf
- Edit /etc/hostapd/hostapd.conf replacing the following config items:
FROM: # driver = hostapd
TO:   driver = nl80211
FROM: #country_code = US
TO:   country_code = GB
FROM: hw_mode = a
TO:   hw_mode = g
FROM: channel = 60
TO:   channel = 12
FROM: #ieee80211n = 1
TO:   ieee80211n = 1
FROM: #wpa = 1
TO:   wpa = 2
FROM: #wpa_passphrase=secret passphrase
TO:   wpa_passphrase=MySecretPassword
FROM: #wpa_pairwise = TKIP CCMP
TO:   wpa_pairwise = TKIP CCMP
- Edit /etc/default/hostapd amending the DAEMON_CONF line to show /etc/hostapd/hostapd.conf
Reboot, and your access point should come to life! Huzzah!! Initially it’ll have the SSID of “test” (it’s in /etc/hostapd/hostapd.conf as the config line “ssid = test”) but you should probably change it to the same SSID as your main router. If you do that, ensure your WPA passphrase is the same as your main router too, otherwise your network will get very confused!
So, now you’ve got an Access extender, running Ubuntu… what else could you do with it? Well, I run one of two things on all of mine – sqeezeplay or vlc monitoring a webcam. All very useful stuff, and stuff I was doing with it before it was an access extender!
Submitting tracks and shows to CCHits.net
I’ve been on a few podcasts to talk about CCHits.net, and people always ask how to submit tracks to CCHits.net. It used to be pretty complicated. Well, ok, not *that* complicated, but enough that it put some people off.
One of the major things I wanted to do with the re-write was to make it so anyone can submit a track to CCHits.net. Of course, it still has this reputation for being a bit difficult to get tracks in there, so I thought I’d document just how simple it actually is!
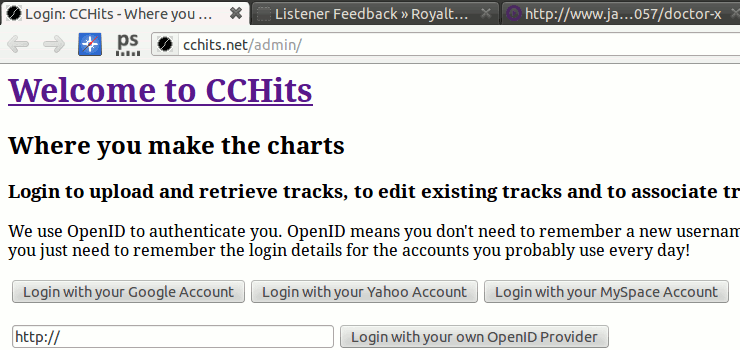
So, first things first. Go to http://cchits.net/admin and register yourself. CCHits.net uses OpenID for authentication, and I’ve picked three of the major OpenID providers as simple one-click buttons to register and later login with. Basically, OpenID asks the referring site to confirm you are a user on their system, and to return a unique value for you as a user on their service. CCHits.net requests only two details from that provider – your e-mail address (if you have it stored with that provider, and you permit the site to have it – although not all providers will provide that restriction), and a “secret key” which only CCHits.net and that provider know, so the next time you login with OpenID to CCHits.net – it’ll know it’s you coming back.
So, click on a button to login, assuming you have an account on one of the three main services, but if not, you may find this page from OpenID.net to be useful! To ensure the quality of tracks submitted is relatively good, CCHits.net verifies each submitter. This is done by sending an e-mail to show@cchits.net, quoting your UserID (as shown below)

I’ll then probably ask you a few questions, and mark your account to get access to the admin areas. Let’s assume that I’ve let you in!
For the purposes of this post, I’m submitting tracks to the site based on plays from a fantastic new show “Listener Feedback”. These tracks were played on a recent show where they reviewed the album “Doctor X” by “Fresh Body Shop”. They played 3 tracks, and here I’ll walk you through submitting the first of these tracks, and what that gives you.
After you log back in, you’ll get to the “Admin” page. From here you’ll initially want to use the “Retrieve or Upload a track” button, and complete the Track URL, but if you’ve been supplied an MP3, OGG (OGG Vorbis aka OGG Audio or OGA) or MP4 Audio track, you can browse to that file and submit it too. Bear in mind that CCHits.net makes every track it has available to it, available to anyone to download, so if you’ve been given a pre-release track, or the file should only be downloaded from the artist’s website – it shouldn’t be submitted to CCHits.net. We do encourage visitors to download from the originating site, but in cases where the site is not available, or the user just can’t be bothered, they can get the file from the site.

In the above box, you’d put the URL to get to the track and hit “Retrieve”. Just under the “Retrieve” button is a list of sites that CCHits.net currently understands how to retrieve data from – if the url isn’t on that list, you’ll have to upload the file yourself. The tracks at ListenerFeedback.net, while they refer to the MySpace URL for the artist, are actually available from Jamendo.com – so let’s find the first track from the show. The below screen shot shows the artist, album and tracks – the first track is called “Can’t get enough”

Let’s look for it on Jamendo.

Found it! We need the URL from the top there. Copy & paste it into CCHits.net, then hit Retrieve.

In this case, Fresh Body Shop have been played before, so CCHits.net compares a few different things, and asks whether this is the same artist that has been played before. Click “Select this artist” to put the artist into the site.

It’s a bit hard to make out all the details in the below screenshot, but notice there are a few interesting things.
- Track and Artist names and URLs have three columns to use – “Set Default”, “Add new value” and “Delete value”. To enable track and artist matching, you can specify several alternative names and URLs for artists and tracks – for example, if the artist’s name is “An Artist” and the track is listed as “An Artist’s Debut Track – A Track!”, you should probably add the track name “A Track!”, and make that the default. Don’t remove it, otherwise the next time the track is added (if it is!), it might not be picked up by the de-duplicator. Likewise, if you’ve found a few different places to download a track from, add them all to the Track URLs, but pick one URL as the default – preferably one which the band tends to favour, or which would encourage the fans to donate money to them.
- There’s a “Track Name Sounds” and “Artist Name Sounds” – these are because the system uses a text-to-speech engine to render the daily, weekly and monthly shows. It can’t just assume that the pronunciation is as-per the title or name, especially if there are abbreviations like “feat” or if this is a remix or version – for example “A Track (2012 Remix)” should be listed as “The 2012 remix of A Track”, or “A Track (feat. Joe Bloggs)” should be listed as “A Track, featuring Joe Bloggs”.
- Lastly, there’s a “Not Safe For Work” flag. I am a father of a young child, and I want to be sure that any track I play for him is either work/family safe, or I at least know it’s a little raw before he hears it. This means that I’d like you to flag anything which contains swearing, makes reference to drugs or firearms, or strongly suggests sexual activity (including moans and grunts!). This doesn’t mean the tracks won’t be played – far from it, but it does mean that before these tracks are played, a little notice is played to say that it may not be considered work or family safe – it just gives people a chance to skip on for now!

Next to each of these fields is a “Go” button – click on that for each edit you make. If you’re just submitting tracks to CCHits.net – your work here is done! Excellent work, thanks for your help. You can see towards the end of this post what these tracks look like when they’re done. If you’re a podcaster or radio presenter, and want to show you played this track on one of your shows, you should click the button next to “Associate this track with a show”.
We’ll get some details to populate the show details on the site. Here is the Listener Feedback page we want to link to. As a minimum we need the URL for the show, but usually there is also a show title, so let’s capture that as well.

Let’s transfer those details into the “Add a track to a show” page. As this is the first track we’re putting in the show, we need to create the show. Put the details in, and click Go. Later tracks will list the show name and URL as non-editable fields, plus the “Go” button at the end of the line.

And that’s it, you’re done with that track. As I mentioned, this episode featured three tracks, so after submitting all of those three, after each track, you get the next screen shot, listing the tracks in the order you’ve played them (you’ll see why in a bit) including buttons to move them up, down and remove them from the show, an edit button for the track, and a vote URL. The Vote URL can be included in your show notes, if you want to point people back to CCHits.net – obviously, you may not be able to, or you may choose to keep your traffic on your own site – it’s entirely up to you – there are no requirements on you to tell people about CCHits, but you’ll get more from the site if you do (after all, we track vote clicks, so you can see whether your tracks are popular with your listeners from the show page).

Should you list the vote URL, and someone clicks on that link? Here’s what they’ll see.

And if they click “I like it”? Where to find out more about the artist (their default URL) and the track (the default URL), and the show notes for your show. They see the number of votes it’s received and the license it was released under, other shows it has been on, and most importantly for tracks from a show, the tracks which come before and after this one.

If you send someone to just the show page, you can see the show name, the details about the track and an “I like this track” button to vote on it. There’s also a QR code to take the listener to more details about the track but without making them vote on it. It also allows them to send their friends to the track if they like it. I realise this is one aspect of the site which needs some work, so if you’re a web developer and can help out, please get in touch!

If you visit the track, you’ll see the sharing QR code, the links to the track and artist, a vote button, details about the votes this track has received, plus details about the adjustments which are made (you’ll have to click through to the FAQ to find out more!). There’s information about the chart position, about where to download the file from, the license, and where else the track has been played on, and the split of votes for that track on those shows. Early votes on the site were not properly tracked, which is why this track in particular has lots of votes for “Non-show votes”, when they were probably daily show votes!

As an submitter on the same page, you’ll see a couple of other links. Notice the track URL is exactly the same! You get to edit the track with the track editor you saw above, and you get to add that track to your own show. If you inadvertently add a track that has already been played before, the site tries several different ways to catch this, and let you use the previously uploaded track in it’s place, via this very link here!

If you want to see all your shows, from the admin page, click on the “Show a list of the shows I created” button

To see your shows!

I hope you’ve found this useful, and consider submitting tracks to CCHits.net
Proxying and using alternate host names with Apache
After spotting this comment on StatusNet saying about using another port on the same IP address for a web service, I thought I’d jot down what I do instead, to ensure I use the standard HTTP and HTTPS ports for my web applications.
In /etc/apache2/sites-available, I create a file called subdomain.your.host.name
<VirtualHost *:80>
    ServerAdmin webmaster@localhost
    ServerName subdomain.your.host.name

    ErrorLog ${APACHE_LOG_DIR}/subdomain.your.host.name.error.log

    # Possible values include: debug, info, notice, warn, error, crit,
    # alert, emerg.
    LogLevel warn

    CustomLog ${APACHE_LOG_DIR}/subdomain.your.host.name.access.log combined

    ProxyPass / http://127.0.0.1:12345/
    ProxyPassReverse / http://127.0.0.1:12345/
</VirtualHost>
Configure your non-apache app to bind to a port on 127.0.0.1, here I’ve set it to 12345
This proxies an HTTP only application… but if you want to proxy an HTTPS application, you either need to have a wildcard SSL certificate, use multiple IP addresses, or, as the original post suggested, use an alternate port.
If you’re proxying an application for HTTPS, try this:
<IfModule mod_ssl.c>
<VirtualHost *:443>
    ServerAdmin webmaster@localhost
    ServerName subdomain.your.host.name

    ErrorLog ${APACHE_LOG_DIR}/ssl_subdomain.your.host.name.error.log
    LogLevel warn
    CustomLog ${APACHE_LOG_DIR}/ssl_subdomain.your.host.name.access.log combined

    SSLEngine on
    SSLCertificateChainFile /etc/openssl/root.crt
    SSLCertificateFile /etc/openssl/server.crt
    SSLCertificateKeyFile /etc/openssl/server.key

    BrowserMatch "MSIE [2-6]" \
        nokeepalive ssl-unclean-shutdown \
        downgrade-1.0 force-response-1.0
    # MSIE 7 and newer should be able to use keepalive
    BrowserMatch "MSIE [17-9]" ssl-unclean-shutdown

    ProxyPass / http://127.0.0.1:4670/
    ProxyPassReverse / http://127.0.0.1:4670/
</VirtualHost>
</IfModule>
Of course, if you’re looking to create several virtual hosts for apache, rather than proxy them, you can instead do this:
<VirtualHost *:80>
    ServerName subdomain.your.host.name
    ServerAdmin webmaster@localhost

    DocumentRoot /var/www_subdomain.your.host.name/
    <Directory />
        Options FollowSymLinks
        AllowOverride None
    </Directory>

    <Directory /var/www_subdomain.your.host.name/>
        Options Indexes FollowSymLinks MultiViews
        AllowOverride All
        Order allow,deny
        allow from all
    </Directory>

    ErrorLog ${APACHE_LOG_DIR}/subdomain.your.host.name.error.log

    # Possible values include: debug, info, notice, warn, error, crit,
    # alert, emerg.
    LogLevel warn

    CustomLog ${APACHE_LOG_DIR}/subdomain.your.host.name.access.log combined

</VirtualHost>
Once you’ve got your config files up, you’ll need to enable them with the following command:
a2ensite subdomain.your.host.name
That assumes you named the file /etc/apache2/sites-available/subdomain.your.host.name
You may need to enable the proxy module with the command:
a2enmod proxy
A quick note on autoloaders for PHP
Over the past few days, as you may have noticed, I’ve been experimenting with PHPUnit, and writing up notes on what I’ve learned. Here’s a biggie, but it’s such a small actual change, I didn’t want to miss it.
So, when you have your autoloader written, you’ll have a function like this (probably):
<?php
function __autoload($classname)
{
    if (file_exists(dirname(__FILE__) . '/classes/' . $classname . '.php')) {
        require_once dirname(__FILE__) . '/classes/' . $classname . '.php';
    }
}
Load this from your test, or in a bootstrap file (more to come on that particular subject, I think!), like this:
<?php
require_once dirname(__FILE__) . '/../autoloader.php';
class SomeClassTest extends ........
And you’ll probably notice the autoloader doesn’t do anything… but why is this? Because PHPUnit has it’s own autoloader, and you need to chain our autoloader to the end. So, in your autoloader file, add this line to the end:
<?php
function __autoload($classname)
{
    if (file_exists(dirname(__FILE__) . '/classes/' . $classname . '.php')) {
        require_once dirname(__FILE__) . '/classes/' . $classname . '.php';
    }
}

spl_autoload_register('__autoload');
And it all should just work, which is nice :)
A quick word on salting your hashes.
If you don’t know what hashing is in relation to coding, the long version is here: Cryptographic Hash Function but the short version is that it performs a mathermatical formula to components of the file, string or data, and returns a much shorter number with a slim chance of “collisions”.
I don’t know whether it’s immediately clear to anyone else, but I used to think this was a good idea.
<?php
$password = sha1($_POST['password']);
Then I went to a PHPNW session, and asked someone to take a look at my code, and got a thorough drubbing for not adding a cryptographic salt (wikipedia).
For those who don’t know, a salt is a set of characters you add before or after the password (or both!) to make it so that a simple “rainbow table analysis” doesn’t work (essentially a brute-force attack against the authentication data by hashing lots and lots of strings looking for another hash which matches the stored hash). In order to make it possible to actually authenticate with that string again in the future, the string should be easily repeatable, and a way to do that is to use other data that’s already in the user record.
For example, this is a simple salt:
<?php
$password = sha1('salt' . $_POST['password']);
I read in the April 2012 edition of 2600 magazine something that I should have been doing with my hashes all along. How’s this for more secure code?
<?php
$site_salt = 'pepper';
$SQL = "SELECT intUserID FROM users WHERE strUsername = ?";
$DB = new PDO($dsn);
$query = $DB->prepare($SQL);
$query->execute(array(strtolower($_POST['username'])));
$userid = $query->fetch();
if ($userid == false) {
  return false;
}
$prefix = '';
$suffix = '';
if ($userid % 2 == 0) {
  $prefix = $site_salt;
} else {
  $suffix = $site_salt;
}
if ($userid % 3 == 0) {
  $prefix .= strtolower($_POST['username']);
} else {
  $suffix .= strtolower($_POST['username']);
}
if ($userid % 4 == 0) {
  $prefix = strrev($prefix);
}
if ($userid % 5 == 0) {
  $suffix = strrev($suffix);
}
$hashedPassword = sha1($prefix . $_POST['password'] . $suffix);
So, this gives you an easily repeatable string, that’s relatively hard to calculate without easy access to the source code :)
Getting started with Unit Testing for PHP
Unit testing seems like a bit of a dark art when you’re first introduced to it. “Create this new file. Tell it what is supposed to be the result when you run a test, and it’ll tell you if you’re right nor not.”
Let’s start with a pseudocode example:
test->assertTrue(1+1 = 2); // Test returns true, huzzah!
test->assertFalse(1+1 = 3); // Test returns false. Those integers must not have been large enough
I want to use PHPUnit, and for me the easiest way to get this and the rest of the tools I’ll be referring to in this collection of posts is to install “The PHP Quality Assurance Toolchain“. On my Ubuntu install, this was done as follows:
sudo pear upgrade PEAR
sudo pear config-set auto_discover 1
sudo pear install --all-deps pear.phpqatools.org/phpqatools
Now we’ve got the tools in place, let’s set up the directory structure.
/
+ -- Classes
|    + -- Config.php
+ -- Tests
     + -- ConfigTest.php
In here, you see we’ve created two files, one contains the class we want to use, and the other contains the tests we will be running.
So, let’s slap on the veneer of coating that these two files need to be valid to test.
/Classes/Config.php
<?php
class Config
{
}
/Tests/Config.php
<?php

include dirname(__FILE__) . '/../Classes/Config.php';

class ConfigTest extends PHPUnit_Framework_TestCase
{
}
So, just to summarise, here we have two, essentially empty classes.
Let’s put some code into the test file.
<?php

include dirname(__FILE__) . '/../Classes/Config.php';

class ConfigTest extends PHPUnit_Framework_TestCase
{
  public function testCreateObject()
  {
    $config = new Config();
    $this->assertTrue(is_object($config));
  }
}
We can now run this test from the command line as follows:
phpunit Tests/ConfigTest.php
phpunit Tests/01_ConfigTest.php
PHPUnit 3.6.10 by Sebastian Bergmann.

.

Time: 1 second, Memory: 3.00Mb

OK (1 test, 1 assertion)
That was nice and straightforward!
Let’s add some more code!
In ConfigTest, let’s tell it to load some configuration, using a config file.
<?php

include dirname(__FILE__) . '/../Classes/Config.php';

class ConfigTest extends PHPUnit_Framework_TestCase
{
  public function testCreateObject()
  {
    $config = new Config();
    $this->assertTrue(is_object($config));
  }

  public function testLoadConfig()
  {
    $config = new Config();
    $config->load();
  }
}
And now when we run it?
PHP Fatal error: Call to undefined method Config::load() in /var/www/PhpBetterPractices/Tests/ConfigTest.php on line 16
Ah, perhaps we need to write some code into /Classes/Config.php
<?php
class Config
{
  public function load()
  {
    include dirname(__FILE__) . '/../Config/default_config.php';
  }
}
But, running this, again, we get an error message!
PHPUnit 3.6.10 by Sebastian Bergmann.

.E

Time: 0 seconds, Memory: 3.00Mb

There was 1 error:

1) ConfigTest::testLoadConfig
include(/var/www/PhpBetterPractices/Config/default_config.php): failed to open stream: No such file or directory

/var/www/PhpBetterPractices/Classes/Config.php:7
/var/www/PhpBetterPractices/Classes/Config.php:7
/var/www/PhpBetterPractices/Tests/ConfigTest.php:16

FAILURES!
Tests: 2, Assertions: 1, Errors: 1.
So, we actually need to check that the file exists first, perhaps we should throw an error if it doesn’t? We could also pass the name of the config file to pass to the script, which would let us test more and different configuration options, should we need them.
class Config
{
    public function load($file = null)
    {
        if ($file == null) {
            $file = 'default.config.php';
        }

        $filename = dirname(__FILE__) . '/../Config/' . $file;

        if (file_exists($filename)) {
            include $filename;
        } else {
            throw new InvalidArgumentException("File not found");
        }
    }
}
So, here’s the new UnitTest code:
class ConfigTest extends PHPUnit_Framework_TestCase
{
    public function testCreateObject()
    {
        $config = new Config();
        $this->assertTrue(is_object($config));
    }

    public function testLoadConfig()
    {
        $config = new Config();
        $config->load();
    }

    /**
     * @expectedException InvalidArgumentException
     */
    public function testFailLoadingConfig()
    {
        $config = new Config();
        @$config->load('A file which does not exist');
    }
}
This assumes the file /Config/default.config.php exists, albeit as an empty file.
So, let’s run those tests and see what happens?
PHPUnit 3.6.10 by Sebastian Bergmann.

...

Time: 0 seconds, Memory: 3.25Mb

OK (3 tests, 2 assertions)
Huzzah! That’s looking good. Notice that to handle a test of something which should throw an exception, you can either wrapper the function in a try/catch loop and, in the try side of the loop, have $this->assertTrue(false) to prevent false positives and in the catch side, do your $this->assertBlah() on the exception. Alternatively, (and much more simplely), use a documentation notation of @expectedException NameOfException and then prefix the function you are testing with the @ symbol. This is how I did it with the test “testFailLoadingConfig()”.
This obviously doesn’t handle setting and getting configuration values, so let’s add those.
Here’s the additions to the Config.php file:
    public function set($key = null, $value = null)
    {
        if ($key == null) {
            throw new BadFunctionCallException("Key not set");
        }
        if ($value == null) {
            unset ($this->arrValues[$key]);
            return true;
        } else {
            $this->arrValues[$key] = $value;
            return true;
        }
    }

    public function get($key = null)
    {
        if ($key == null) {
            throw new BadFunctionCallException("Key not set");
        }
        if (isset($this->arrValues[$key])) {
            return $this->arrValues[$key];
        } else {
            return null;
        }
    }
And the default.config.php file:
<?php
$this->set('demo', true);
And lastly, the changes to the ConfigTest.php file:
    public function testLoadConfig()
    {
        $config = new Config();
        $this->assertTrue(is_object($config));
        $config->load('default.config.php');
        $this->assertTrue($config->get('demo'));
    }

    /**
     * @expectedException BadFunctionCallException
     */
    public function testFailSettingValue()
    {
        $config = new Config();
        @$config->set();
    }

    /**
     * @expectedException BadFunctionCallException
     */
    public function testFailGettingValue()
    {
        $config = new Config();
        @$config->get();
    }
We’ve not actually finished testing this yet. Not sure how I can tell?
phpunit --coverage-text Tests/ConfigTest.php
PHPUnit 3.6.10 by Sebastian Bergmann.

....

Time: 0 seconds, Memory: 3.75Mb

OK (4 tests, 5 assertions)

Generating textual code coverage report, this may take a moment.

Code Coverage Report
  2012-05-08 18:54:16

 Summary:
  Classes: 0.00% (0/1)
  Methods: 0.00% (0/3)
  Lines:   76.19% (16/21)

@Config::Config
  Methods: 100.00% ( 3/ 3)   Lines:  76.19% ( 16/ 21)
Notice that there are 5 lines outstanding – probably around the unsetting values and using default values. If you use an IDE (like NetBeans) you can actually get the editor to show you, using coloured lines, exactly which lines you’ve not yet tested! Nice.
So, the last thing to talk about is Containers and Dependency Injection. We’ve already started with the Dependency Injection here – that $config->load(‘filename’); function handles loading config files, or you could just bypass that with $config->set(‘key’, ‘value); but once you get past a file or two, you might just end up with a lot of redundant re-loading of config files, or worse, lots of database connections open.
So, this is where Containers come in (something I horrifically failed to understand before).
Here’s a container:
class ConfigContainer
{
  protected static $config = null;

  public static function Load()
  {
    if (self::$config == null) {
      self::$config = new Config();
      self::$config->load();
    }
    return self::$Config;
  }
}
It’s purpose (in this case) is to load the config class, including any dependencies that you may need for that class, and then return that class to you. You could conceivably create a Database container, or a Request container or a User container with very little extra work, and with a few short calls, have a single function for each of your regular and routine sources of processing data, but without preventing you from being able to easily and repeatably test that data – by not going through the container.
Of course, there’s nothing to stop you just having these created in a registry class, or store them in a global from the get-go, but, I am calling these “Better Practices” after all, and these are considered to be not-so-good-practices.
Just as a note, code from this section can be seen at GitHub, if you want to use them at all.
Update 2012-05-11: Added detail to the try/catch exception catching as per frimkron’s comment. Thanks!
php-PDO-MySQL versus php-mysql
PHP and MySQL was the duo that took dynamic web development from /cgi/formmail.cgi to… well, where we are today for me. My first proper experience of working with a web application, as opposed to a static web site with a few perl scripts bolted on was PHPNuke, and I’ve not looked back since.
Almost the first lines of PHP you learn to code are
<?php
mysql_connect("localhost", "root", "");
mysql_use_db("mysite");
Followed closely by mysql_query(), then mysql_fetch_array(), mysl_num_rows(), and if the rest of us are lucky, mysql_real_escape_string().
So you see, for me, it’s really weird to find that even though this is what we’re teaching everyone to use, this weird incantation where we have to wrap every query up in a cotton wool ball of SQL injection protection… there’s an easier way where you don’t have to wrapper everything, which, even better, is more efficient at your SQL server and, if you’ve made the transition to using Classes in your code, will give you an object per-result rather than an array.
Let’s look at some examples of code, and see how we would transition things.
Here’s some rather unoriginal code to get the contents of a user table.
<?php
$db = mysql_connect("localhost", "root", "");
mysql_use_db("mysite");
$sql = "select userid, realname, lastloggedin from users "
     . "where username = '" . mysql_real_escape_string($_POST['username'])
     . "' and password = '" . mysql_real_escape_string($_POST['password']) . "'";
$query = mysql_query($sql);
$data = false;
if (mysql_num_rows($query) == 1) {
  $data = mysql_fetch_array($query);
  echo "Hello {$data['realname']}, your userid is {$data['userid']} and "
     . "you last logged in at " . date("H:i:s", strtotime($data['lastloggedin']))
     . " on " . date("d-M-Y" , strtotime($data['lastloggedin']));
}
There, now there’s not much wrong with that (ignoring the security hole of having your passwords in cleartext) is there? All pretty readable, right? Well… what happens if your database is down, how do you handle that in some kind of sensible way? You need to wrap some code around the mysql_connect to show it actually connected. What about if someone dropped the database by mistake, or you connected to the wrong database server and that table wasn’t there, now you’re wrappering the use_db line too. Did you make a typo in the SQL? Are you sure you didn’t miss a mysql_real_escape_string in there somewhere…
Here’s the same thing in PDO, protected against all (again, except the cleartext password) of those things.
<?php
try {
  $db = new PDO("mysql:host=localhost;dbname=mysite", "root", "");
  $db->setAttribute(PDO::ATTR_ERRMODE, PDO::ERRMODE_EXCEPTION);
  $sql = "select userid, realname, lastloggedin from users where username = ? and password = ?";
  $query = $db->prepare($sql);
  $query->execute(array($_POST['username'], $_POST['password']));
  $data = $query->fetch();
  if ($data != false) {
    echo "Hello {$data['realname']}, your userid is {$data['userid']} and "
       . "you last logged in at " . date("H:i:s", strtotime($data['lastloggedin']))
       . " on " . date("d-M-Y" , strtotime($data['lastloggedin']));
  }
} catch (PDOException $e) {
  error_log("User unable to login: " . $e->getMessage());
}
So, let’s look at what transforms this into something much more interesting: $query->fetchObject();
<?php
try {
  $db = new PDO("mysql:host=localhost;dbname=mysite", "root", "");
  $db->setAttribute(PDO::ATTR_ERRMODE, PDO::ERRMODE_EXCEPTION);
  $sql = "select userid, realname, lastloggedin, username, password "
       . "from users where username = ? and password = ?";
  $query = $db->prepare($sql);
  $query->execute(array($_POST['username'], $_POST['password']));
  $data = $query->fetchObject('user');
  if ($data != false) {
    echo $data;
  }
} catch (PDOException $e) {
  error_log("User unable to login: " . $e->getMessage());
}

class user
{
  // Columns from the database
  protected $userid = null;
  protected $realname = null;
  protected $lastloggedin = null;
  protected $username = null;
  protected $password = null;
  // Processed Data
  protected $transformed_lastloggedin = null

  public function __construct()
  {
    if ($this->lastloggedin != null) {
      $this->transformed_lastloggedin = date("H:i:s", strtotime($this->lastloggedin))
                             . " on " . date("d-M-Y" , strtotime($this->lastloggedin);
    }
  }

  public function toString()
  {
    echo "Hello {$this->realname}, your userid is {$this->userid} and "
       . "you last logged in at {$this->transformed_lastloggedin}";
  }
}
I’m starting to stretch the analogy here a little, but the important things here are:
- The __construct() function of the class is run after the data is inserted into it, meaning you can post-process any data you receive from the database without needing any new functions. Arguably, you could make the construct function accept the same values you’d receive from the database, and process those in the same way.
- The toString() function means you can mangle the content you want to output, without having to apparently run another function on the class you’ve just created.
- By using classes you get to do wonderful things like Unit Testing (this is a topic to follow), have automatic code documentation (err… to follow), reduce code duplication by extending classes and check on that, using “Copy and Paste Detection”.