One of the things I’m currently playing with is a project to deploy some FortiGate Firewalls into cloud platforms. I have a couple of Evaluation Licenses I can use (as we’re a partner), but when it comes to automatically scaling, you need to use the PAYG license.
To try to keep my terraform files as reusable as possible, I came up with this work around. It’s likely to be useful in other places too. Enjoy!
This next block is stored in license.tf and basically says “by default, you have no license.”
variable "license_file" {
  default = ""
  description = "Path to the license file to load, or leave blank to use a PAYG license."
}
We can either override this with a command line switch terraform apply -var 'license_file=mylicense.lic', or (more likely) the above override file named license_override.tf (ignored in Git) which has this next block in it:
This next block is also stored in license.tf and says “If var.license is not empty, load that license file [var.license != "" ? var.license] but if it is empty, check whether /dev/null exists (*nix platforms) [fileexists("/dev/null")] in which case, use /dev/null, otherwise use the NUL: device (Windows platforms).”
👉 Just as an aside, I’ve seen this “ternary” construct in a few languages. It basically looks like this: boolean_operation ? true_value : false_value
That check, logically, could have been written like this instead: "%{if boolean_operation}${true_value}%{else}${false_value}%{endif}"
By combining two of these together, while initially it looks far more messy and hard to parse, I’ve found that, especially in single-line statements, it’s much more compact and eventually easier to read than the alternative if/else/endif structure.
So, this means that we can now refer to data.local_file.license as our data source.
Next, I want to select either the PAYG (Pay As You Go) or BYOL (Bring Your Own License) licensed AMI in AWS (the same principle applies in Azure, GCP, etc), so in this block we provide a different value to the filter in the AMI Data Source, suggesting the string “FortiGate-VM64-AWS *x.y.z*” if we have a value provided license, or “FortiGate-VM64-AWSONDEMAND *x.y.z*” if we don’t.
And so that is how I can elect to provide a license, or use a pre-licensed image from AWS, and these lessons can also be applied in an Azure or GCP environment too.
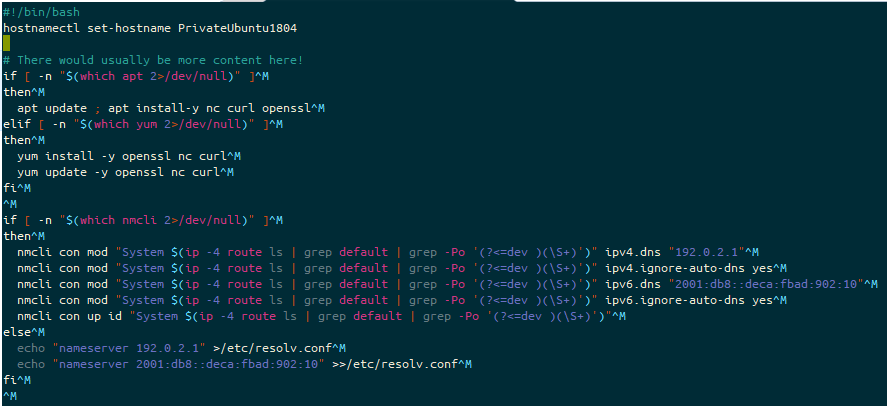
This one is more a nudge to myself. On several occasions when building Infrastructure As Code (IAC), I split out a code sections into one or more files, for readability and reusability purposes. What I tended to do, and this was more apparent with the Linux builds than the Windows builds, was to forget to set the line terminator from CRLF to LF.
While this doesn’t really impact Windows builds too much (they’re kinda designed to support people being idiots with line endings now), Linux still really struggles with CRLF endings, and you’ll only see when you’ve broken this because you’ll completely fail to run any of the user-data script.
How do you determine this is your problem? Well, actually it’s a bit tricky, as neither cat, less, more or nano spot this issue. The only two things I found that identified it were file and vi.
The first part of the combined file with mixed line endings. This part has LF termination.The second part of the combined file with mixed line endings. This part has CRLF termination.What happens when we cat these two parts into one file? A file with CRLF, LF line terminators obviously!What the combined file looks like in Vi. Note the blue ^M at the ends of the lines.
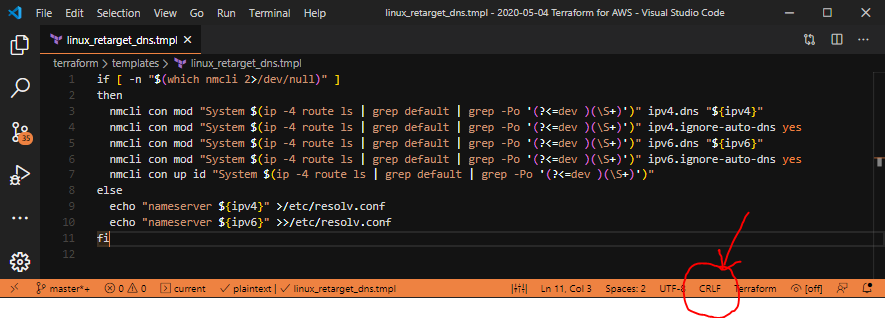
So, how to fix this? Assuming you’re using Visual Studio Code;
A failed line-ending clue in Visual Studio Code
You’ll notice this line showing “CRLF” in the status bar at the bottom of Code. Click on that, which brings up a discrete box near the top, as follows:
Oh no, it’s set to “CRLF”. That’s not what we want!
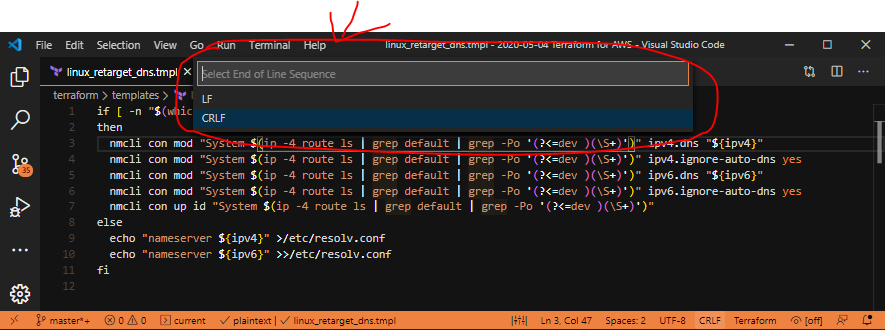
Selecting LF in that box changes the line feeds into LF for this file, but it’s not saved. Make sure you save this file before you re-run your terraform script!
Notice, we’re now using LF endings, but the file isn’t saved.
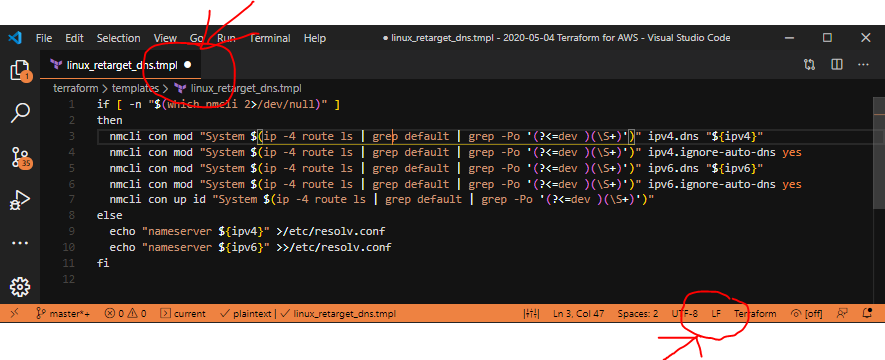
Fantastic! It’s all worked!
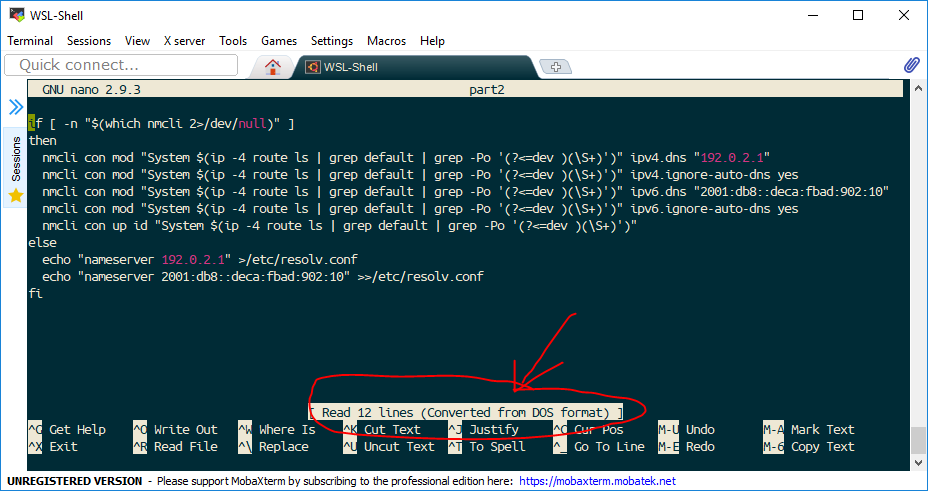
In Nano, I’ve opened the part with the invalid line endings.
Oh no! We have a “DOS Format” file. Quick, let’s fix it!
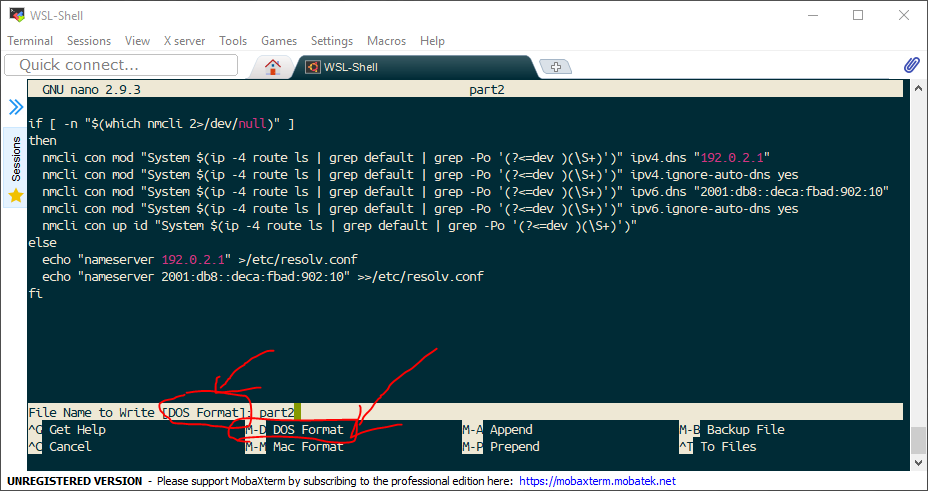
To fix this, we need to write the file out. Hit Ctrl+O. This tells us that we’re in DOS Format, and also gives us the keyboard combination to toggle “DOS Format” off – it’s Alt+D (In Unix/Linux world, the Alt key is referred to as the Meta key – hence M not A).
This is how we fix things
So, after hitting Alt+D, the “File Name to write” line changes, see below:
Yey, no pesky “DOS Format” warning here!
Using either editor (or any others, if you know how to solve line ending issues in other editors), you still need to combine your script back together before you can run it, so… do that, and your file will be fine to run! Good luck!
I’m strongly in the “Ansible is my tool, what needs fixing” camp, when it comes to Infrastructure as Code (IaC) but, I know there are other tools out there which are equally as good. I’ve been strongly advised to take a look at Terraform from HashiCorp. I’m most familiar at the moment with Azure, so this is going to be based around resources available on Azure.
Late edit: I want to credit my colleague, Pete, for his help getting started with this. While many of the code samples have been changed from what he provided me with, if it hadn’t been for these code samples in the first place, I’d never have got started!
Late edit 2: This post was initially based on Terraform 0.11, and I was prompted by another colleague, Jon, that the available documentation still follows the 0.11 layout. 0.12 was released in May, and changes how variables are reused in the code. This post now *should* follow the 0.12 conventions, but if you spot something where it doesn’t, check out this post from the Terraform team.
As with most things, there’s a learning curve, and I struggled to find a “simple” getting started guide for Terraform. I’m sure this is a failing on my part, but I thought it wouldn’t hurt to put something out there for others to pick up and see if it helps someone else (and, if that “someone else” is you, please let me know in the comments!)
Pre-requisites
You need an Azure account for this. This part is very far outside my spectrum of influence, but I’m assuming you’ve got one. If not, look at something like Digital Ocean, AWS or VMWare :) For my “controller”, I’m using Windows Subsystem for Linux (WSL), and wrote the following notes about getting my pre-requisites.
Building the file structure
One quirk with Terraform, versus other tools like Ansible, is that when you run one of the terraform commands (like terraform init, terraform plan or terraform apply), it reads the entire content of any file suffixed “tf” in that directory, so if you don’t want a file to be loaded, you need to either move it out of the directory, comment it out, or rename it so it doesn’t end .tf. By convention, you normally have three “standard” files in a terraform directory – main.tf, variables.tf and output.tf, but logically speaking, you could have everything in a single file, or each instruction in it’s own file. Because this is a relatively simple script, I’ll use this standard layout.
The actions I’ll be performing are the “standard” steps you’d perform in Azure to build a single Infrastructure as a Service (IAAS) server service:
Create your Resource Group (RG)
Create a Virtual Network (VNET)
Create a Subnet
Create a Security Group (SG) and rules
Create a Public IP address (PubIP) with a DNS name associated to that IP.
Create a Network Interface (NIC)
Create a Virtual Machine (VM), supplying a username and password, the size of disks and VM instance, and any post-provisioning instructions (yep, I’m using Ansible for that :) ).
I’m using Visual Studio Code, but almost any IDE will have integrations for Terraform. The main thing I’m using it for is auto-completion of resource, data and output types, also the fact that control+clicking resource types opens your browser to the documentation page on terraform.io.
So, creating my main.tf, I start by telling it that I’m working with the Terraform AzureRM Provider (the bit of code that can talk Azure API).
This simple statement is enough to get Terraform to load the AzureRM, but it still doesn’t tell Terraform how to get access to the Azure account. Use az login from a WSL shell session to authenticate.
Next, we create our basic resource, vnet and subnet resources.
But wait, I hear you cry, what are those var.something bits in there? I mentioned before that in the “standard” set of files is a “variables.tf” file. In here, you specify values for later consumption. I have recorded variables for the resource group name and location, as well as the VNet name and subnet name. Let’s add those into variables.tf.
When you’ve specified a resource, you can capture any of the results from that resource to use later – either in the main.tf or in the output.tf files. By creating the resource group (called “rg” here, but you can call it anything from “demo” to “myfirstresourcegroup”), we can consume the name or location with azurerm_resource_group.rg.name and azurerm_resource_group.rg.location, and so on. In the above code, we use the VNet name in the subnet, and so on.
After the subnet is created, we can start adding the VM specific parts – a security group (with rules), a public IP (with DNS name) and a network interface. I’ll create the VM itself later. So, let’s do this.
BUT WAIT, what’s that ${trimspace(data.http.icanhazip.body)}/32 bit there?? Any resources we want to load from the terraform state, but that we’ve not directly defined ourselves needs to come from somewhere. These items are classed as “data” – that is, we want to know what their values are, but we aren’t *changing* the service to get it. You can also use this to import other resource items, perhaps a virtual network that is created by another team, or perhaps your account doesn’t have the rights to create a resource group. I’ll include a commented out data block in the overall main.tf file for review that specifies a VNet if you want to see how that works.
In this case, I want to put the public IP address I’m coming from into the NSG Rule, so I can get access to the VM, without opening it up to *everyone*. I’m not that sure that my IP address won’t change between one run and the next, so I’m using the icanhazip.com service to determine my IP address. But I’ve not defined how to get that resource yet. Let’s add it to the main.tf for now.
So, we’re now ready to create our virtual machine. It’s quite a long block, but I’ll pull certain elements apart once I’ve pasted this block in.
So, this is broken into four main pieces.
Virtual Machine Details. This part is relatively sensible. Name RG, location, NIC, Size and what happens to the disks when the machine powers on. OK.
OS basics: VM Hostname, username of the first user, and it’s password. Note, if you want to use an SSH key, this must be stored for Terraform to use without passphrase. If you mention an SSH key here, as well as a password, this can cause all sorts of connection issues, so pick one or the other.
And lastly, provisioning. I want to use Ansible for my provisioning. In this example, I have a basic playbook stored locally on my Terraform host, which I transfer to the VM, install Ansible via pip, and then execute ansible-playbook against the file I uploaded. This could just as easily be a git repo to clone or a shell script to copy in, but this is a “simple” example.
This part of code is done in three parts – create upload path, copy the files in, and then execute it. If you don’t create the upload path, it’ll upload just the first file it comes to into the path specified.
Each remote-exec and file provisioner statement must include the hostname, username and either the password, or SSH private key. In this example, I provide just the password.
So, having created all this lot, you need to execute the terraform workload. Initially you do terraform init. This downloads all the provisioners and puts them into the same tree as these .tf files are stored in. It also resets the state of the terraform discovered or created datastore.
Next, you do terraform plan -out tfout. Technically, the tfout part can be any filename, but having something like tfout marks it as clearly part of Terraform. This creates the tfout file with the current state, and whatever needs to change in the Terraform state file on it’s next run. Typically, if you don’t use a tfout file within about 20 minutes, it’s probably worth removing it.
Finally, once you’ve run your plan stage, now you need to apply it. In this case you execute terraform apply tfout. This tfout is the same filename you specified in terraform plan. If you don’t include -out tfout on your plan (or even run a plan!) and tfout in your apply, then you can skip the terraform plan stage entirely.
When I ran this, with a handful of changes to the variable files, I got this result:
Once you’re done with your environment, use terraform destroy to shut it all down… and enjoy :)
The full source is available in the associated Gist. Pull requests and constructive criticism are very welcome!
Featured image is “Seca” by “Olearys” on Flickr and is released under a CC-BY license.
Recently, I’ve been migrating my POV (proof of value) and POC (proof of concept) environment from K5 to Azure to be able to test vendor products inside Azure. I ran a few tests to build the environment using the native tools (the powershell scripts) and found that the Powershell way of delivering Azure environments seems overly complicated… particularly as I’m comfortable with how Ansible works.
To be fair, I also need to look at Terraform, but that isn’t what I’m looking at today :)
So, let’s start with the scaffolding. Any Ansible Playbook which deals with creating virtual machines needs to have some extra modules installed. Make sure you’ve got ansible 2.7 or later and the python azure library 2.0.0 or later (you can get both with pip for python).
Next, let’s look at the group_vars for this playbook.
This file has several pieces. We define the project settings (anything prefixed project_ is a project setting), including the prefix used for all resources we create (in this case “env01“), and a standard password used for all VMs we create (in this case “My$uper$ecret$Passw0rd“).
Next we define the standard images to load from the Marketplace. You can extend this with other images, these are just the “easiest” ones that I’m most familiar with (your mileage may vary). Next up is the networks to build inside the VNet, and lastly we define the actual machines we want to build. If you’ve got questions about any of the values we define here, just let me know in the comments below :)
Here we start by pulling in the variables we might want to override, and we do this by reading system environment variables (ANSIBLE_PREFIX and BREAKGLASS) and using them if they’re set. If they’re not, use the project defaults, and if that hasn’t been set, use some pre-defined values… and then tell us what they are when we’re running the tasks (those are the debug: lines).
This block is where we create our “Static Assets” – individual items that we will be consuming later. This shows a clear win here over the Powershell methods endorsed by Microsoft – here you can create a Resource Group (RG) as part of the playbook! We also create a single Storage Account for this RG and a single VNET too.
These creation rules are not suitable for production use, as this defines an “Any-Any” Security group! You should tailor your security groups for your need, not for blanket access in!
This is where things start to get a bit more interesting – We’re using the “async/async_status” pattern here (and the rest of these sections) to start creating the resources in parallel. As far as I can tell, sometimes you’ll get a case where the async doesn’t quite get set up fast enough, then the async_status can’t track the resources properly, but re-running the playbook should be enough to sort that out, without slowing things down too much.
But what are we actually doing with this block of code? A UDR is a “User Defined Route” or routing table for Azure. Effectively, you treat each network interface as being plumbed directly to the router (none of this “same subnet broadcast” stuff works here!) so you can do routing at the router for all the networks.
By default there are some existing network routes (stuff to the internet flows to the internet, RFC1918 addresses are dropped with the exception of any RFC1918 addresses you have covered in your VNETs, and each of your subnets can reach each other “directly”). Adding a UDR overrides this routing table. The UDRs we’re creating here are applied at a subnet level, but currently don’t override any of the existing routes (they’re blank). We’ll start putting routes in after we’ve added the UDRs to the subnets. Talking of which….
Again, this block is not really suitable for production use, and assumes the VNET supernet of /8 will be broken down into several /24’s. In the “real world” you might deliver a handful of /26’s in a /24 VNET… or you might even have lots of disparate /24’s in the VNET which are then allocated exactly as individual /24 subnets… this is not what this model delivers but you might wish to investigate further!
Now that we’ve created our subnets, we can start adding the routing table to the UDR. This is a basic one – add a 0.0.0.0/0 route (internet access) from the “protected” network via the firewall. You can get a lot more specific than this – most people are likely to want to add the VNET range (in this case 10.0.0.0/8) via the firewall as well, except for this subnet (because otherwise, for example, 10.0.0.100 trying to reach 10.0.0.101 will go via the firewall too).
Without going too much into the intricacies of network architecture, if you are routing your traffic between subnets to the firewall, it’s probably better to get an appliance with more interfaces, so you can route traffic across the appliance, rather than going across a single interface as this will halve your traffic bandwidth (it’s currently capped 1Gb/s – so 500Mb/s).
Having mentioned “The Internet” – let’s give our firewall a public IP address, and create the rest of the interfaces as well.
This script creates a public IP address by default for each interface unless you explicitly tell it not to (see lines 40, 53 and 62 in the group_vars file I rendered above). You could easily turn this around by changing the lines which contain this:
item.1.public is not defined or (item.1.public is defined and item.1.public == 'true')
into lines which contain this:
item.1.public is defined and item.1.public == 'true'
OK, having done all that, we’re now ready to build our virtual machines. I’ve introduced a “Priority system” here – VMs with priority 0 go first, then 1, and 2 go last. The code snippet below is just for priority 0, but you can easily see how you’d extrapolate that out (and in fact, the full code sample does just that).
There are a few blocks here to draw attention to :) I’ve re-jigged them a bit here so it’s clearer to understand, but when you see them in the main playbook they’re a bit more compact. Let’s start with looking at the Network Interfaces section!
network_interfaces: |
  [
    {%- for nw in item.value.ports -%}
      '{{ prefix }}{{ item.value.name }}port{{ nw.subnet.name }}'
      {%- if not loop.last -%}, {%- endif -%}
    {%- endfor -%}
  ]
In this part, we loop over the ports defined for the virtual machine. This is because one device may have 1 interface, or four interfaces. YAML is parsed to make a JSON variable, so here we can create a JSON variable, that when the YAML is parsed it will just drop in. We’ve previously created all the interfaces to have names like this PREFIXhostnamePORTsubnetname (or aFW01portWAN in more conventional terms), so here we construct a JSON array, like this: ['aFW01portWAN'] but that could just as easily have been ['aFW01portWAN', 'aFW01portProtect', 'aFW01portMGMT', 'aFW01portSync']. This will then attach those interfaces to the virtual machine.
Next up, custom_data. This section is sometimes known externally as userdata or config_disk. My code has always referred to it as a “Provision Script” – hence the variable name in the code below!
custom_data: |
  {%- if item.value.provision_script is defined and item.value.provision_script != '' -%}
    {%- include(item.value.provision_script) -%}
  {%- elif item.value.image.provision_script is defined and item.value.image.provision_script != '' -%}
    {%- include(item.value.image.provision_script) -%}
  {%- else -%}
    {{ omit }}
  {%- endif -%}
Let’s pick this one apart too. If we’ve defined a provisioning script file for the VM, include it, if we’ve defined a provisioning script file for the image (or marketplace entry), then include that instead… otherwise, pretend that there’s no “custom_data” field before you submit this to Azure.
One last quirk to Azure, is that some images require a “plan” to go with it, and others don’t.
plan: |
  {%- if item.value.image.plan is not defined -%}{{ omit }}{%- else -%}
    {'name': '{{ item.value.image.sku }}',
     'publisher': '{{ item.value.image.publisher }}',
     'product': '{{ item.value.image.offer }}'
    }
  {%- endif -%}
So, here we say “if we’ve not got a plan, omit the value being passed to Azure, otherwise use these fields we previously specified. Weird huh?
The very last thing we do in the script is to re-render the standard password we’ve used for all these builds, so that we can check them out!