"Honey pots" by "Nicholas" on Flickr

Adding MITM (or “Trusted Certificate Authorities”) proxy certificates for Linux and Linux-like Environments

In some work environments, you may find that a “Man In The Middle” (also known as MITM) proxy may have been configured to inspect HTTPS traffic. If you work in a predominantly Windows based environment, you may have had some TLS certificates deployed to your computer when you logged in, or by group policy.

I’ve previously mentioned that if you’re using Firefox on your work machines where you’ve had these certificates pushed to your machine, then you’ll need to enable a configuration flag to make those work under Firefox (“security.enterprise_roots.enabled“), but this is talking about Linux (like Ubuntu, Fedora, CentOS, etc.) and Linux-like environments (like WSL, MSYS2)

Late edit 2021-05-06: Following a conversation with SiDoyle, I added some notes at the end of the post about using the System CA path with the Python Requests library. These notes were initially based on a post by Mohclips from several years ago!

Start with Windows

From your web browser of choice, visit any HTTPS web page that you know will be inspected by your proxy.

If you’re using Mozilla Firefox

In Firefox, click on this part of the address bar and click on the right arrow next to “Connection secure”:

Clicking on the Padlock and then clicking on the Right arrow will take you to the “Connection Security” screen.
Certification Root obscured, but this where we prove we have a MITM certificate.

Click on “More Information” to take you to the “Page info” screen

More obscured details, but click on “View Certificate”

In recent versions of Firefox, clicking on “View Certificate” takes you to a new page which looks like this:

Mammoth amounts of obscuring here! The chain runs from left to right, with the right-most blob being the Root Certificate

Click on the right-most tab of this screen, and navigate down to where it says “Miscellaneous”. Click on the link to download the “PEM (cert)”.

The details on the Certificate Authority (highly obscured!), but here is where we get our “Root” Certificate for this proxy.

Save this certificate somewhere sensible, we’ll need it in a bit!

Note that if you’ve got multiple proxies (perhaps for different network paths, or perhaps for a cloud proxy and an on-premises proxy) you might need to force yourself in into several situations to get these.

If you’re using Google Chrome / Microsoft Edge

In Chrome or Edge, click on the same area, and select “Certificate”:

This will take you to a screen listing the “Certification Path”. This is the chain of trust between the “Root” certificate for the proxy to the certificate they issue so I can visit my website:

This screen shows the chain of trust from the top of the chain (the “Root” certificate) to the bottom (the certificate they issued so I could visit this website)

Click on the topmost line of the list, and then click “View Certificate” to see the root certificate. Click on “Details”:

The (obscured) details for the root CA.

Click on “Copy to File” to open the “Certificate Export Wizard”:

In the Certificate Export Wizard, click “Next”
Select “Base-64 encoded X.509 (.CER)” and click “Next”
Click on the “Browse…” button to select a path.
Name the file something sensible, and put the file somewhere you’ll find it shortly. Click “Save”, then click “Next”.

Once you’ve saved this file, rename it to have the extension .pem. You may need to do this from a command line!

Copy the certificate into the environment and add it to the system keychain

Ubuntu or Debian based systems as an OS, or as a WSL environment

As root, copy the proxy’s root key into /usr/local/share/ca-certificates/<your_proxy_name>.crt (for example, /usr/local/share/ca-certificates/proxy.my.corp.crt) and then run update-ca-certificates to update the system-wide certificate store.

RHEL/CentOS as an OS, or as a WSL environment

As root, copy the proxy’s root key into /etc/pki/ca-trust/source/anchors/<your_proxy_name>.pem (for example, /etc/pki/ca-trust/source/anchors/proxy.my.corp.pem) and then run update-ca-trust to update the system-wide certificate store.

MSYS2 or the Ruby Installer

Open the path to your MSYS2 environment (e.g. C:\Ruby30-x64\msys64) using your file manager (Explorer) and run msys2.exe. Then paste the proxy’s root key into the etc/pki/ca-trust/source/anchors subdirectory, naming it <your_proxy_name>.pem. In the MSYS2 window, run update-ca-trust to update the environment-wide certificate store.

If you’ve obtained the Ruby Installer from https://rubyinstaller.org/ and installed it from there, assuming you accepted the default path of C:\Ruby<VERSION>-x64 (e.g. C:\Ruby30-x64) you need to perform the above step (running update-ca-trust) and then copy the file from C:\Ruby30-x64\mysys64\etc\pki\ca-trust\extracted\pem\tls-ca-bundle.pem to C:\Ruby30-x64\ssl\cert.pem

Using the keychain

Most of your Linux and Linux-Like environments will operate fine with this keychain, but for some reason, Python needs an environment variable to be passed to it for this. As I encounter more environments, I’ll update this post!

The path to the system keychain varies between releases, but under Debian based systems, it is: /etc/ssl/certs/ca-certificates.crt while under RedHat based systems, it is: /etc/pki/tls/certs/ca-bundle.crt.

Python “Requests” library

If you’re getting TLS errors in your Python applications, you need the REQUESTS_CA_BUNDLE environment variable set to the path for the system-wide keychain. You may want to add this line to your /etc/profile to include this path.

Sources:

Featured image is “Honey pots” by “Nicholas” on Flickr and is released under a CC-BY license.

Repost of The Open Sourcerer » Our Windows 7 Special Offer

Our Windows 7 Special Offer

This post is a “reprint” of an email we have just sent to the subscriber list for our Liberation newsletter. The audience is largely UK based businesses and public sector organisations. Should you wish to receive Liberation, you can subscribe here and please feel free to pass it on.


Today, Microsoft invite you to part with your hard-earned cash and upgrade your computers to Windows 7®. If you are one of the majority still using Windows XP, then moving to Windows 7 may not be a pleasant or inexpensive task…

Surprisingly there isn’t actually a way to upgrade your computer from Windows XP to Windows 7 in the traditional sense. You’ll need to back up all your data, re-format the hard-drive and start again from scratch.

Windows doesn’t store your documents, personal information, historical data, emails, passwords, cookies, preferences, settings etc. in one place. So backing up and rebuilding Windows computers is a very time-consuming and complicated process:

  • Work our how many licenses you need then go and pay for them
  • Buy some new storage for all the temporary backup space you’ll need
  • Back up everything on every computer
  • Install the basic operating system
  • Find and install the right hardware drivers for your machine(s). Much hardware may not yet have suitable Windows 7 drivers
  • Register and Activate each new computer, requires you to have network access
  • Find all the disks and license keys for the applications you use, then re-install them. If they are still compatible that is
  • Install & configure the drivers and software for printers and other peripherals. Many peripherals may also not yet have suitable drivers
  • Copy your data and settings etc. back to all the right places on the new system.

Plan for this process taking anywhere between 4 and 8 hours for each and every computer you have.

Gartner estimates that real migration costs will be between $1,035 & $1,930 per user from Windows XP to Windows 7.

Why can’t I upgrade?

Windows 7 Upgrades

Windows 7 Upgrades

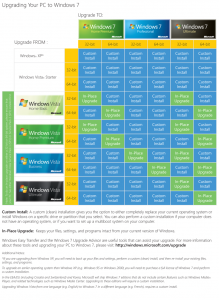
That is a good question, and one that we have not seen a good answer to. Walt Mossberg of the Wall Street Journal asked Microsoft about upgrade paths and was sent this matrix showing all the different ways you can’t upgrade from other versions of Windows to Windows 7 (Blue = No upgrade, rip out and replace. Green = in-place upgrade).

Microsoft have also provided a document explaining the same thing in words. There is no upgrade path from any of the following operating systems:

Windows 95, Windows 98, Windows Millennium Edition, Windows XP, Windows Vista® RTM, Windows Vista Starter, Windows 7 M3, Windows 7 Beta, Windows 7 RC, or Windows 7 IDS, Windows NT® Server 4.0, Windows 2000 Server, Windows Server® 2003, Windows Server 2008, or Windows Server 2008 R2.

That’s a complete mess. What can I do then?

You could do nothing and stay on Windows XP for as long as possible. Although we think this will be a very popular choice, staying on a nearly 10 year old OS probably isn’t the best policy for a forward thinking organisation.

You do have a choice

Ubuntu Solution Provider

As you are going to have to rip out and replace your computers’ operating systems anyway, now is a real Carpe Diem opportunity to investigate an alternative (or two) whilst considering your options.

The Open Learning Centre recommends that your organisation investigates the many benefits offered by a modern Linux-based desktop operating system such as Ubuntu. As an authorised Ubuntu partner we can help your organisation with evaluation, installation, testing, migration, implementation, training and support services.

Ubuntu Desktop

Ubuntu Desktop

Ubuntu is a modern, stable, reliable and secure computing platform that includes most of the applications we all use every day, such as a compatible office suite (Word-processing, Spreadsheets, Presentations) OpenOffice.org, email and calendaring, web browsing and image manipulation tools.

Best of all, Ubuntu is free:

Ubuntu is and always will be free of charge. You do not pay any licensing fees. You can download, use and share Ubuntu with your friends, family, school or business for absolutely nothing.

The retail price for a single Windows 7 Professional license is £219.99 and it’s £229.99 for the Ultimate version. This doesn’t include applications either.

Our Offer: On-Site Ubuntu Installation and Training

The Open Learning Centre will visit your premises, install Ubuntu on a suitable computer, and provide approximately 2-3 hours (i.e approx half a working day) of professional training and advice on Ubuntu for £229.991 (inc. VAT). An outline of the training is available on our website. Please contact us to book your Introduction to Ubuntu.

Open your mind to Open Source software today

A combination of this and the radio advert at http://www.archive.org/details/LinuxAdvert combined with the next Ubuntu release (only a few days off now) and maybe there’ll be more uptake?