I’ve recently been working with a network estate that was a bit hard to get a handle on. It had grown organically, and was a bit tricky to allocate new network segments in. To fix this, I deployed PHPIPAM, which was super easy to setup and configure (I used the docker-compose file on the project’s docker hub page, and put it behind an NGINX server which was pre-configured with a LetsEncrypt TLS/HTTPS certificate).
PHPIPAM is a IP Address Management tool which is self-hostable. I started by setting up the “Sections” (which was the hosting environments the estate is using), and then setup the supernets and subnets in the “Subnets” section.
Already, it was much easier to understand the network topology, but now I needed to get others in to take a look at the outcome. The team I’m working with uses a slightly dated version of Keycloak to provide Single Sign-On. PHPIPAM will use SAML for authentication, which is one of the protocols that Keycloak offers. The documentation failed me a bit at this point, but fortunately a well placed ticket helped me move it along.
Setting up Keycloak
Here’s my walk through
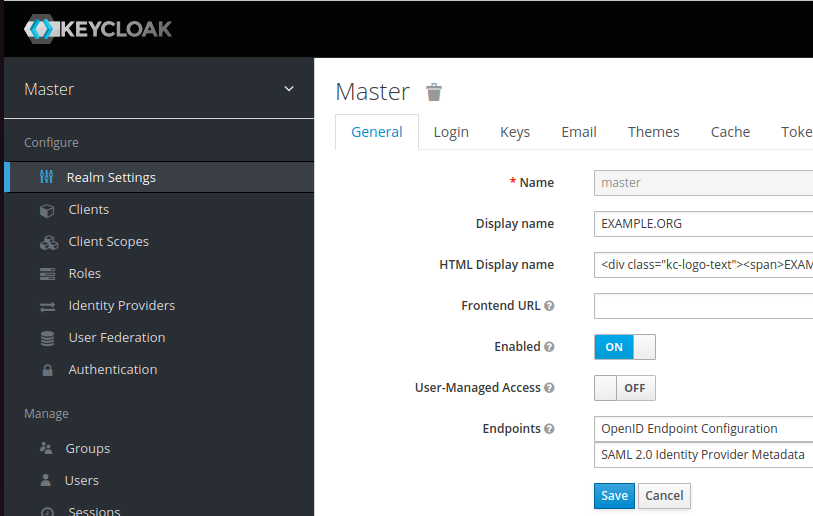
- Go to “Realm Settings” in the sidebar and find the “SAML Identity Provider Metadata” (on my system it’s on the “General” tab but it might have changed position on your system). This will be an XML file, and (probably) the largest block of continuous text will be in a section marked “ds:X509Certificate” – copy this text, and you’ll need to use this as the “IDP X.509 public cert” in PHPIPAM.
- Go to “Clients” in the sidebar and click “Create”. If you want Keycloak to offer access to PHPIPAM as a link, the client ID needs to start “urn:” If you just want to use the PHPIPAM login option, give the client ID whatever you want it to be (I’ve seen some people putting in the URL of the server at this point). Either way, this needs to be unique. The client protocol is “saml” and the client SAML endpoint is the URL that you will be signing into on PHPIPAM – in my case
https://phpipam.example.org/saml2/. It should look like this: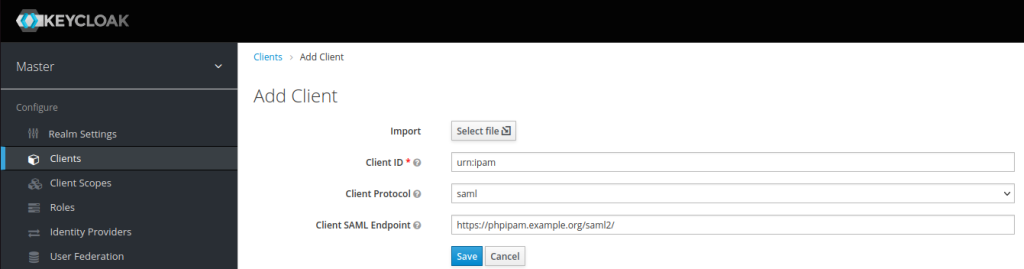
Click Save to take you to the settings for this client. - If you want Keycloak to offer a sign-in button, set the name of the button and description.
Further down the page is “Root URL” set that to the SAML Endpoint (the one ending /saml2/ from before). Also set the “Valid Redirect URIs” to that too.
Where it says “IDP Initiated SSO URL Name” put a string that will identify the client – I put phpipam, but it can be anything you want. This will populate a URL like this:https://keycloak.example.org/auth/realms/yourrealm/protocol/saml/clients/phpipam, which you’ll need as the “IDP Issuer”, “IDP Login URL” and “IDP Logout URL”. Put everything after the /auth/ in the box marked “Base URL”. It should look like this: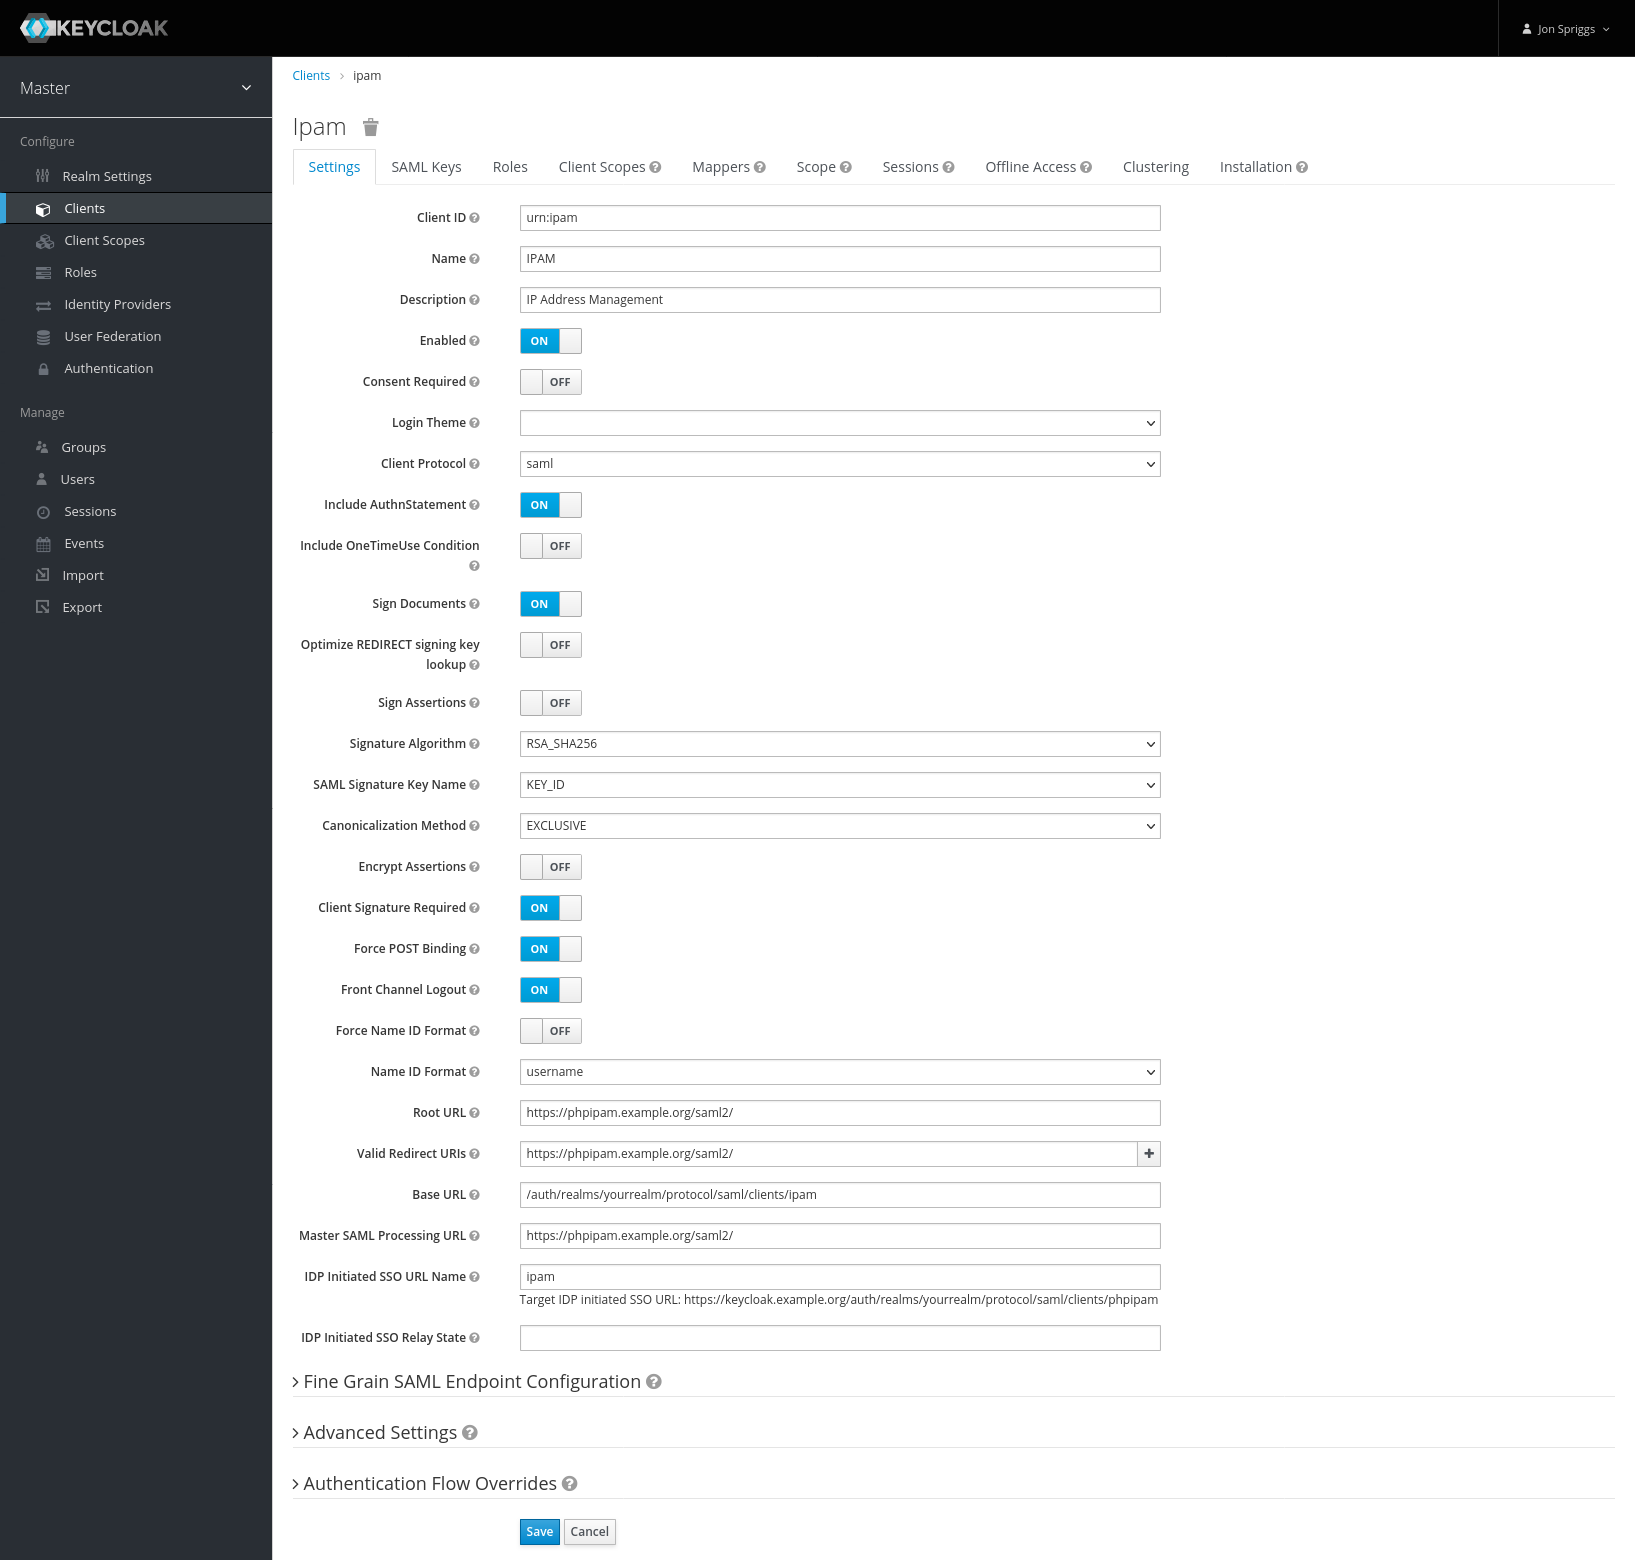
Hit Save. - Go to the “SAML Keys” tab. Copy the private key and certificate, these are needed as the “Authn X.509 signing” cert and cert key in PHPIPAM.
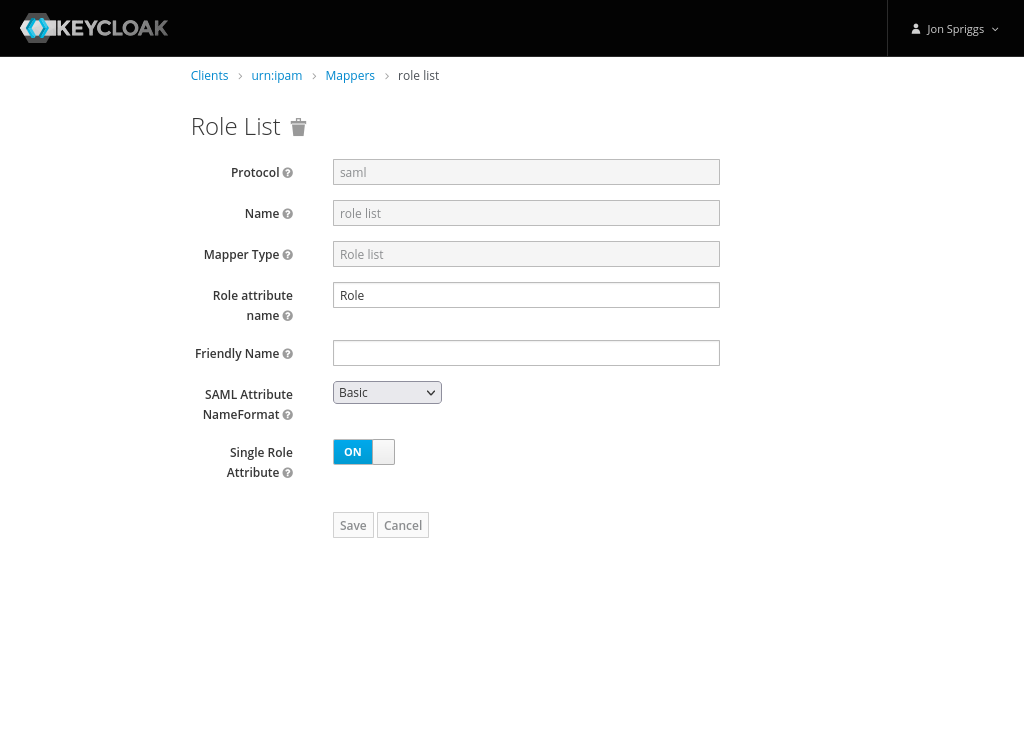
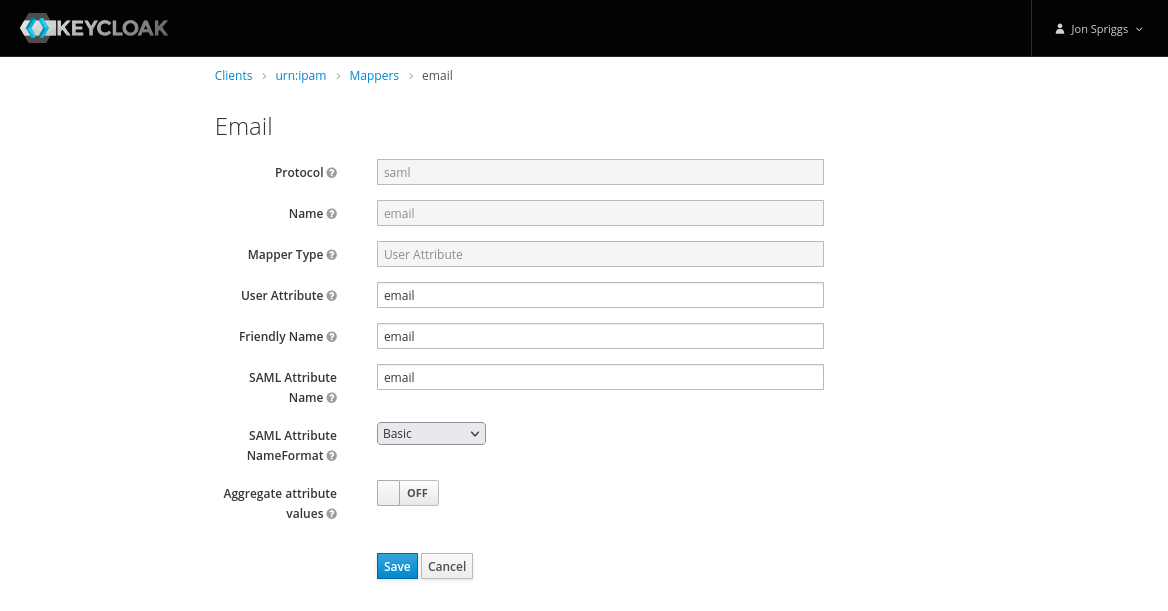
- Go to the “Mappers” tab. Create each of the following mappers;
- A Role List mapper, with the name of “role list”, Role Attribute Name of “Role”, no friendly name, the SAML Attribute NameFormat set to “Basic” and Single Role Attribute set to on.
- A User Attribute mapper, with the name, User Attribute, Friendly Name and SAML Attribute Name set to “email”, the SAML Attribute NameFormat set to “Basic” and Aggregate Attribute Values set to “off”.
- A Javascript Mapper, with the name, Friendly Name and SAML Attribute Name set to “display_name” and the SAML Attribute NameFormat set to “Basic”. The Script should be set to this single line:
user.getFirstName() + ' ' + user.getLastName().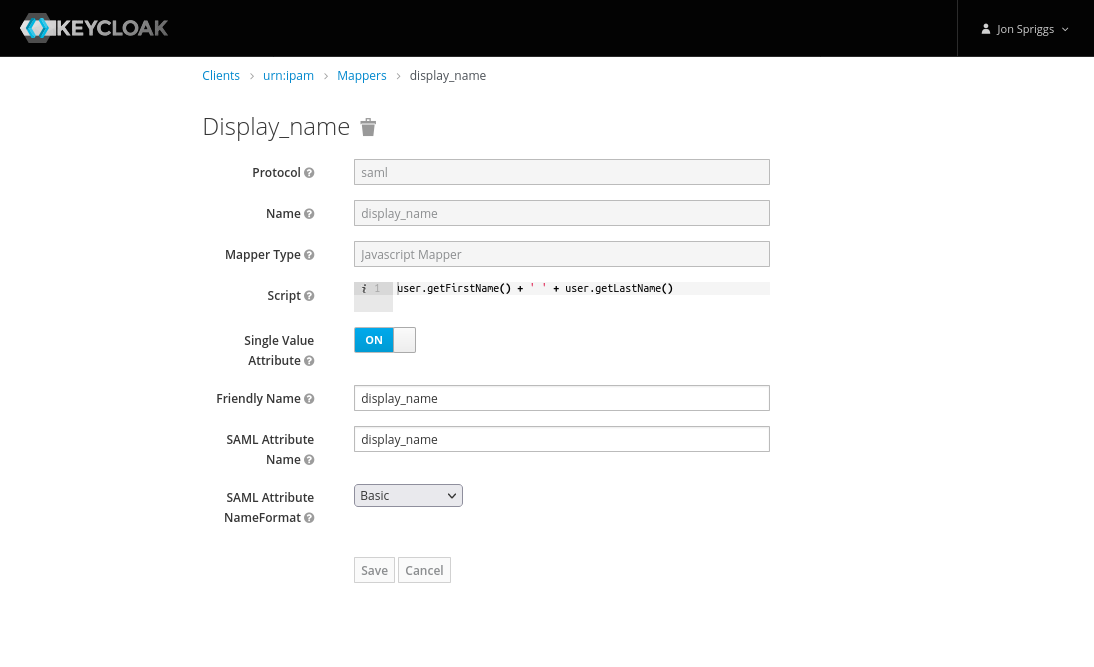
- A Javascript Mapper, with the name, Friendly Name and SAML Attribute Name set to “is_admin” and the SAML Attribute NameFormat set to “Basic”.
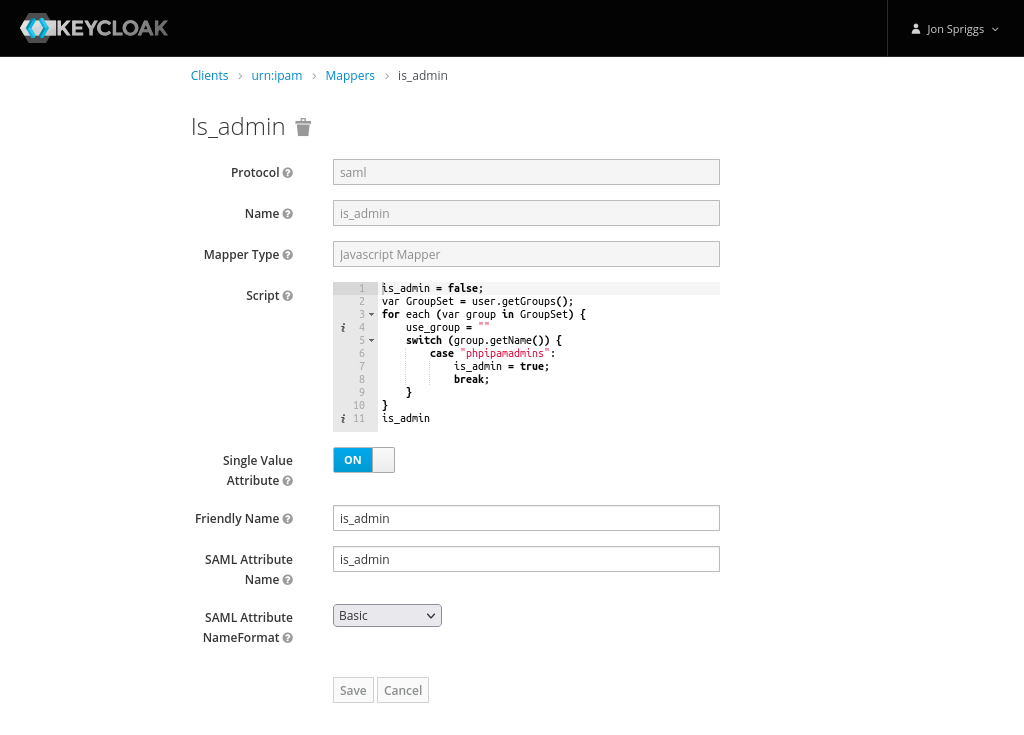
The script should be as follows:
- A Role List mapper, with the name of “role list”, Role Attribute Name of “Role”, no friendly name, the SAML Attribute NameFormat set to “Basic” and Single Role Attribute set to on.
is_admin = false;
var GroupSet = user.getGroups();
for each (var group in GroupSet) {
    use_group = ""
    switch (group.getName()) {
        case "phpipamadmins":
            is_admin = true;
            break;
    }
}
is_admin- Create one more mapper item:
- A Javascript Mapper, with the name, Friendly Name and SAML Attribute Name set to “groups” and the SAML Attribute NameFormat set to “Basic”.
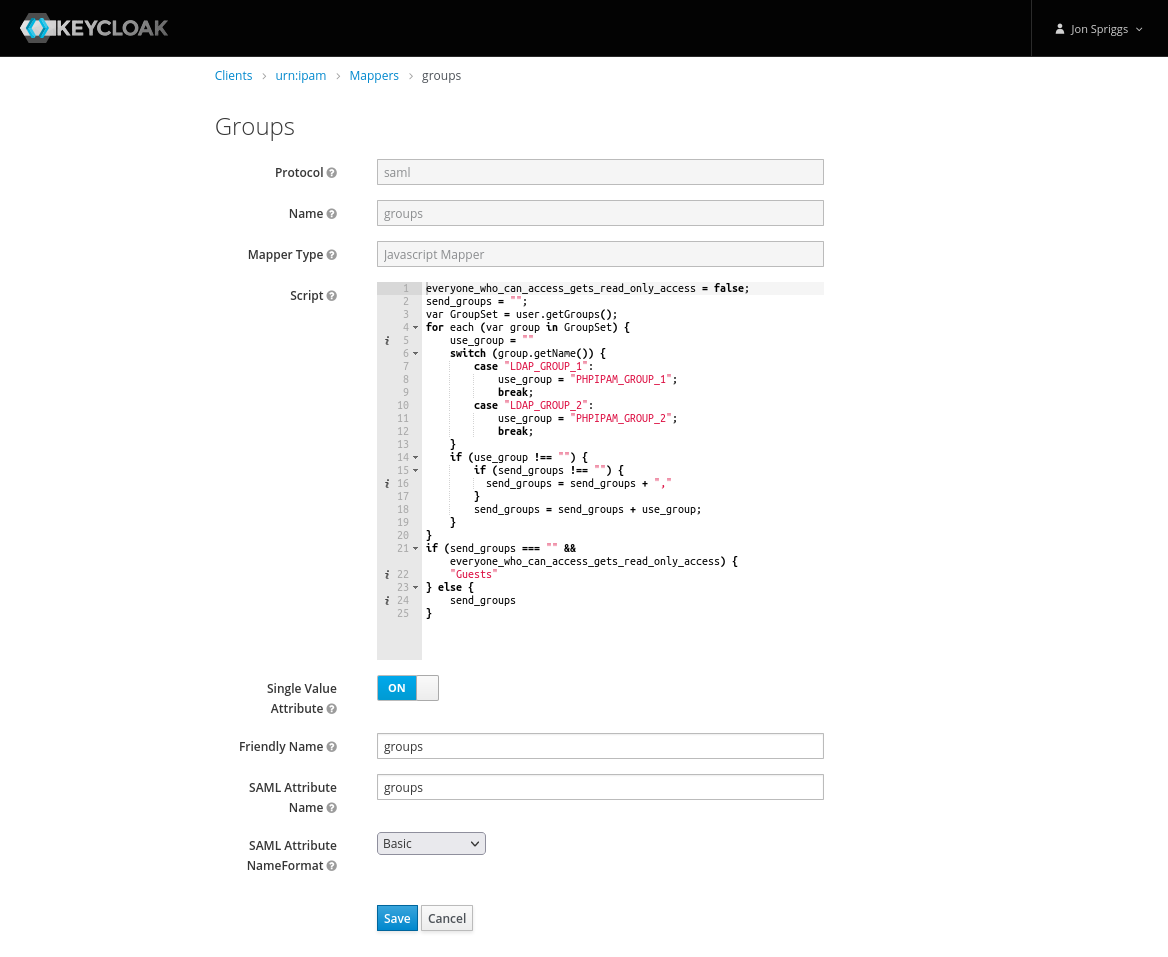
The script should be as follows:
- A Javascript Mapper, with the name, Friendly Name and SAML Attribute Name set to “groups” and the SAML Attribute NameFormat set to “Basic”.
everyone_who_can_access_gets_read_only_access = false;
send_groups = "";
var GroupSet = user.getGroups();
for each (var group in GroupSet) {
    use_group = ""
    switch (group.getName()) {
        case "LDAP_GROUP_1":
            use_group = "IPAM_GROUP_1";
            break;
        case "LDAP_GROUP_2":
            use_group = "IPAM_GROUP_2";
            break;
    }
    if (use_group !== "") {
        if (send_groups !== "") {
          send_groups = send_groups + ","
        }
        send_groups = send_groups + use_group;
    }
}
if (send_groups === "" && everyone_who_can_access_gets_read_only_access) {
    "Guests"
} else {
    send_groups
}
For context, the groups listed there, LDAP_GROUP_1 might be “Customer 1 Support Staff” or “ITSupport” or “Networks”, and the IPAM_GROUP_1 might be “Customer 1” or “WAN Links” or “DC Patching” – depending on the roles and functions of the teams. In my case they relate to other roles assigned to the staff member and the name of the role those people will perform in PHP IPAM. Likewise in the is_admin mapper, I’ve mentioned a group called “phpipamadmins” but this could be any relevant role that might grant someone admin access to PHPIPAM.
Late Update (2023-06-07): I’ve figured out how to enable modules now too. Create a Javascript mapper as per above, but named “modules” and have this script in it:
// Current modules as at 2023-06-07
// Some default values are set here.
noaccess       =  0;
readonly       =  1;
readwrite      =  2;
readwriteadmin =  3;
unsetperm      = -1;

var modules = {
    "*":       readonly,  "vlan":      unsetperm, "l2dom":    unsetperm,
    "devices": unsetperm, "racks":     unsetperm, "circuits": unsetperm,
    "nat":     unsetperm, "locations":  noaccess, "routing":  unsetperm,
    "pdns":    unsetperm, "customers": unsetperm
}

function updateModules(modules, new_value, list_of_modules) {
    for (var module in list_of_modules) {
        modules[module] = new_value;
    }
    return modules;
}

var GroupSet = user.getGroups();
for (var group in GroupSet) {
    switch (group.getName()) {
        case "LDAP_ROLE_3":
            modules = updateModules(modules, readwriteadmin, [
                'racks', 'devices', 'nat', 'routing'
            ]);
            break;
    }
}

var moduleList = '';

for (var key in modules) {
    if (modules.hasOwnProperty(key) && modules[key] !==-1) {
        if (moduleList !== '') {
            moduleList += ',';
        }
        moduleList += key + ':' + modules[key];
    }
}

moduleList;
OK, that’s Keycloak sorted. Let’s move on to PHPIPAM.
Setting up PHPIPAM
In the administration menu, select “Authentication Methods” and then “Create New” and select “Create new SAML2 authentication”.
In the description field, give it a relevant name, I chose SSO, but you could call it any SSO system name. Set “Enable JIT” to “on”, leave “Use advanced settings” as “off”. In Client ID put the Client ID you defined in Keycloak, probably starting urn: or https://. Leave “Strict mode” off. Next is the IDP Issuer, IDP Login URL and IDP Logout URL, which should all be set to the same URL – the “IDP Initiated SSO URL Name” from step 4 of the Keycloak side (that was set to something like https://keycloak.example.org/auth/realms/yourrealm/protocol/saml/clients/phpipam).
After that is the certificate section – first the IDP X.509 public cert that we got in step 1, then the “Sign Authn requests” should be set to “On” and the Authn X.509 signing cert and cert key are the private key and certificate we retrieved in step 5 above. Leave “SAML username attribute” and “SAML mapped user” blank and “Debugging” set to “Off”. It should look like this:

Hit save.
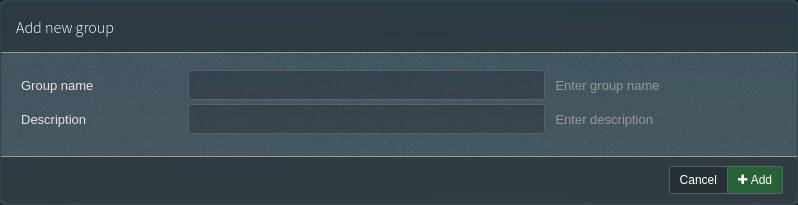
Next, any groups you specified in the groups mapper need to be defined. This is in Administration -> Groups. Create the group name and set a description.
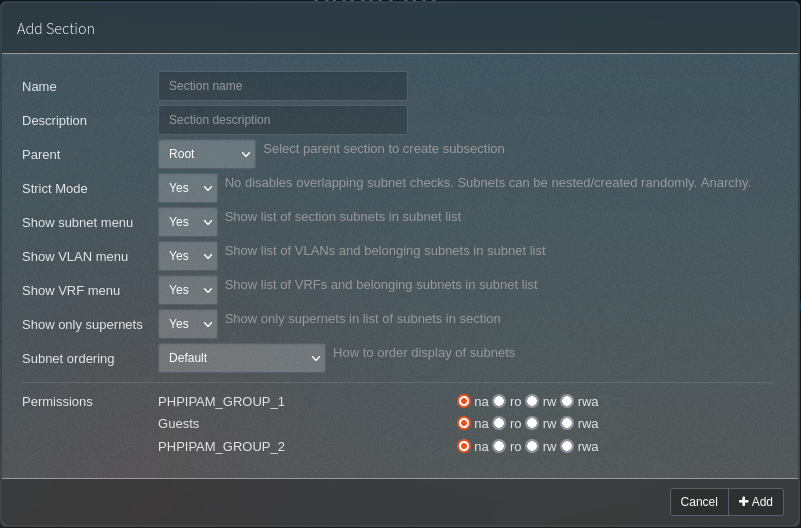
Lastly, you need to configure the sections to define whigh groups have access. Each defined group gets given four radio buttons; “na” (no access), “ro” (read only), “rw” (read write) and “rwa” (read, write and administrate).
Try logging in. It should just work!
Debugging
If it doesn’t, and checking all of the above doesn’t help, I’ve tried adding some code into the PHP file in app/saml2/index.php, currently on line 149, above where it says:
if (empty($auth->getAttribute("display_name")[0])) {
    $Result->show("danger", _("Mandatory SAML JIT attribute missing")." : display_name (string)", true);
}
This code is:
$outfile = fopen("/tmp/log.out", "w");
fwrite($outfile, var_export($auth, true));
fclose($outfile);
**REMEMBER THIS IS JUST FOR TESTING PURPOSES AND SHOULD BE REMOVED ASAP**
In here is an array called _attributes which will show you what has been returned from the Keycloak server when someone tries to log in. In my case, I got this:
   '_attributes' =>
  array (
    'groups' =>
    array (
      0 => 'PHPIPAM_GROUP_1',
    ),
    'is_admin' =>
    array (
      0 => 'false',
    ),
    'display_name' =>
    array (
      0 => 'Jon Spriggs',
    ),
    'email' =>
    array (
      0 => 'spriggsj@example.org',
    ),
  )
If you get something back here that isn’t what you expected, now at least you have a fighting chance of finding where that issue was! Good luck!!
Featured image is “Tickets” by “Becky Snyder” on Flickr and is released under a CC-BY license.