I’m in the process of building a Network Firewall for a work environment. This blog post is based on that work, but with all the identifying marks stripped off.
For this particular project, we standardised on Alma Linux 9 as the OS Base, and we’ve done some testing and proved that the RedHat default firewalling product, Firewalld, is not appropriate for this platform, but did determine that NFTables, or NetFilter Tables (the successor to IPTables) is.
I’ll warn you, I’m pretty prone to long and waffling posts, but there’s a LOT of technical content in this one. There is also a Git repository with the final code. I hope that you find something of use in here.
This document explains how it is using Vagrant with Virtualbox to build a test environment, how it installs a Puppet Server and works out how to calculate what settings it will push to it’s clients. With that puppet server, I show how to build and configure a firewall using Linux tools and services, setting up an NFTables policy and routing between firewalls using FRR to provide BGP, and then I will show how to deploy a DHCP server.
Let’s go!
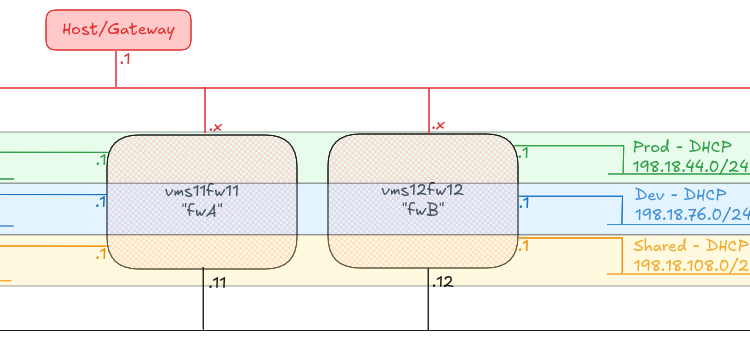
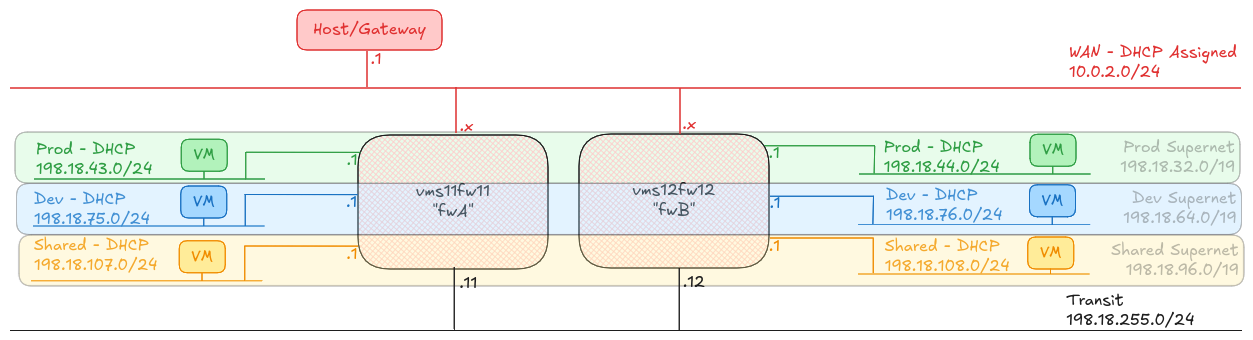
The scenario
To prove the concept, I have built two Firewall machines (A and B), plus six hosts, one attached to each of the A and B side subnets called “Prod”, “Dev” and “Shared”.
Any host on any of the “Prod” networks should be able to speak to any host on any of the other “Prod” networks, or back to the “Shared” networks. Any host on any of the “Dev” networks should be able to speak to any host on the other “Dev” networks, or back to the “Shared” networks.
Any host in Prod, Dev or Shared should be able to reach the internet, and shared can reach any of the other networks.
I’ve been working on my Decision Records open source project for a few months now, and I’ve finally settled on the cross-platform language Rust to create my script. As a result, I’ve got a build process which lets me build for Windows, Mac OS and Linux. I’m currently building a single, unsigned binary for each platform, and I wanted to make it so that Github Actions would build and release these three files for me. Most of the guidance which is currently out there points to some unmaintained actions, originally released by GitHub… but now they point to a 3rd party “release” action as their recommended alternative, so I thought I’d explain how I’m using it to release on several platforms at once.
Although I can go into detail about the release file I’m using for Rust-Decision-Records, I’m instead going to provide a much more simplistic view, based on my (finally working) initial test run.
GitHub Actions
GitHub have a built-in Continuous Integration, Continuous Deployment/Delivery (CI/CD) system, called GitHub Actions. You can have several activities it performs, and these are executed by way of instructions in .github/workflows/<somefile>.yml. I’ll be using .github/workflows/build.yml in this example. If you have multiple GitHub Action files you wanted to invoke (perhaps around issue management, unit testing and so on), these can be stored in separate .yml files.
The build.yml actions file will perform several tasks, separated out into two separate activities, a “Create Release” stage, and a “Build Release” stage. The Build stage will use a “Matrix” to execute builds on the three platforms at the same time – Linux AMD64, Windows and Mac OS.
The actual build steps? In this case, it’ll just be writing a single-line text file, stating the release it’s using.
So, let’s get started.
Create Release
A GitHub Release is typically linked to a specific “tagged” commit. To trigger the release feature, every time a commit is tagged with a string starting “v” (like v1.0.0), this will trigger the release process. So, let’s add those lines to the top of the file:
name: Create Release

on:
  push:
    tags:
      - 'v*'
You could just as easily use the filter pattern ‘v[0-9]+.[0-9]+.[0-9]+’ if you wanted to use proper Semantic Versioning, but this is a simple demo, right? 😉
Next we need the actual action we want to start with. This is at the same level as the “on” and “name” tags in that YML file, like this:
So, this is the actual “create release” job. I don’t think it matters what OS it runs on, but ubuntu-latest is the one I’ve seen used most often.
In this, you instruct it to create a simple release, using the text in the annotated tag you pushed as the release notes.
This is using a third-party release action, softprops/action-gh-release, which has not been vetted by me, but is explicitly linked from GitHub’s own action.
If you check the release at this point, (that is, without any other code working) you’d get just the source code as a zip and a .tgz file. BUT WE WANT MORE! So let’s build this mutha!
Build Release
Like with the create_release job, we have a few fields of instructions before we get to the actual actions it’ll take. Let’s have a look at them first. These instructions are at the same level as the jobs:\n create_release: line in the previous block, and I’ll have the entire file listed below.
So this section gives this job an ID (build_release) and a name (Build Release), so far, so exactly the same as the previous block. Next we say “You need to have finished the previous action (create_release) before proceeding” with the needs: create_release line.
But the real sting here is the strategy:\n matrix: block. This says “run these activities with several runners” (in this case, an unspecified Ubuntu, Mac OS and Windows release (each just “latest”). The include block asks the runners to add some template variables to the tasks we’re about to run – specifically release_suffix.
The last line in this snippet asks the runner to interpret the templated value matrix.os as the OS to use for this run.
Let’s move on to the build steps.
    steps:
      - name: Checkout code
        uses: actions/checkout@v2

      - name: Run Linux Build
        if: matrix.os == 'ubuntu-latest'
        run: echo "Ubuntu Latest" > release_ubuntu

      - name: Run Mac Build
        if: matrix.os == 'macos-latest'
        run: echo "MacOS Latest" > release_mac

      - name: Run Windows Build
        if: matrix.os == 'windows-latest'
        run: echo "Windows Latest" > release_windows
This checks out the source code on each runner, and then has a conditional build statement, based on the OS you’re using for each runner.
It should be fairly simple to see how you could build this out to be much more complex.
The final step in the matrix activity is to add the “built” file to the release. For this we use the softprops release action again.
I’ve been using HashiCorp’s Vagrant with Oracle’s VirtualBox for several years (probably since 2013, if my blog posts are anything to go by), and I’ve always been pretty comfortable with how it works.
This said, when using a Windows machine running Microsoft’s Hyper-V (built into Windows since Windows 7/2018) VirtualBox is unable (by default) to run 64 bit virtual machines (thanks to Hyper-V “stealing” the VT-x/AMD-V bit from the BIOS/EFI).
Around last year or maybe even the year before, Microsoft introduced a “Hypervisior Platform” add-on, which lets VirtualBox run 64 bit machines on a Hyper-V host (more on this later). HOWEVER, it is much slower than in native mode, and can often freeze on booting…
Meanwhile, Vagrant, (a configuration file that acts as a wrapper around various hypervisors, using VirtualBox by default) boots machines in a “headless” mode by default, so you can’t see the freezing.
I’m trying to use an Ubuntu 18.04 virtual machine for various builds I’m creating, and found that I’d get a few issues on boot, so let’s get these sorted out.
VirtualBox can’t start 64bit virtual machines when Hyper-V is installed.
You need to confirm that certain Windows features are enabled, including “Hyper-V” and “Windows Hypervisor Platform”. Confirm you’re running at least Windows 10 version 1803 which is the first release with the “Windows Hypervisor Platform”.
GUI mode
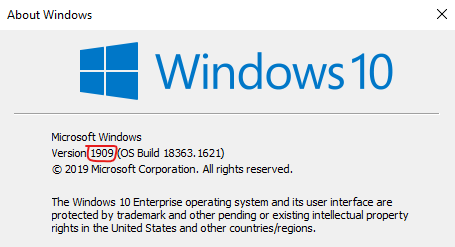
Run winver to bring up this box. Confirm the version number is greater than 1803. Mine is 1909.
A screenshot of the “winver” command, highlighting the version number, which in this case shows 1909, but needs to show at least 1803.
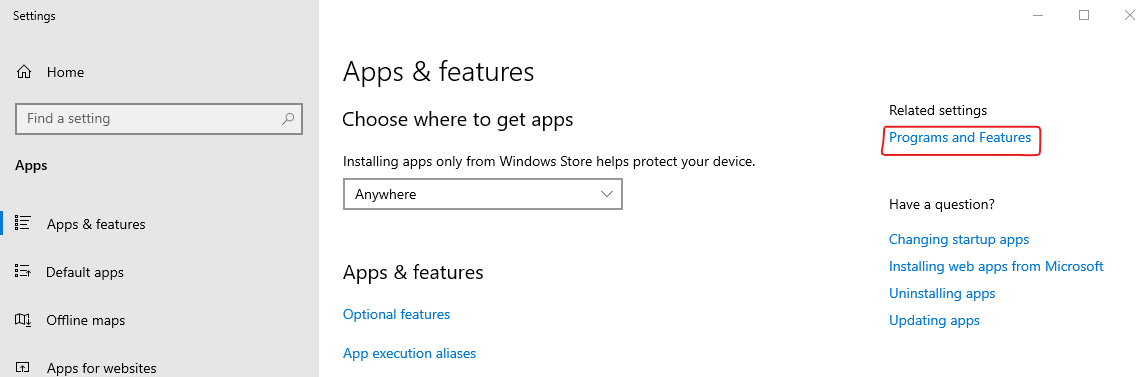
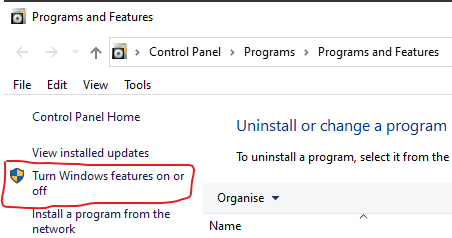
Right click on the start menu, and select “Apps and Features”. Click on “Programs and Features”.
The settings panel found by right clicking the “Start Menu” and selecting “Apps and Features”. Note the desired next step – “Programs and Features” is highlighted.
In the “Programs and Features” window, click on “Turn Windows Features on or off”. Note the shield icon here indicates that administrative access is required, and you may be required to authenticate to the machine to progress past this stage.
A fragment of the “Programs and Features” window, with the “Turn Windows features on or off” link highlighted.
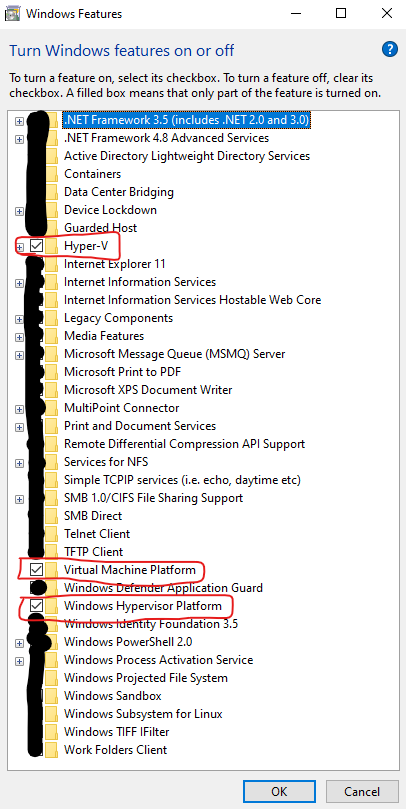
Next, ensure that the following “Windows Features” are enabled; “Hyper-V”, “Virtual Machine Platform” and “Windows Hypervisor Platform”. Click on “OK” to install these features, if they’re not already installed.
A screen capture of the “Turn Windows features on or off” dialogue box, with certain features obscured and others highlighted.
Note that once you’ve pressed “OK”, you’ll likely need to reboot your machine, if any of these features were not already installed.
CLI mode
Right click on the start menu, and start an Administrative Powershell session.
Run the command Get-ComputerInfo | select WindowsVersion. You should get a response which looks like this:
WindowsVersion
--------------
1909
Note that the version number needs to be greater than 1803.
Next, find the names of the features you need to install. These features have region specific names, so outside EN-GB, these names may not match your requirements!
Run the command Get-WindowsOptionalFeature -online | select FeatureName,State and you’re looking for the following lines (this has been cropped to just what you need):
FeatureName                                     State
-----------                                     -----
HypervisorPlatform                            Enabled
VirtualMachinePlatform                        Enabled
Microsoft-Hyper-V-All                         Enabled
If any of these three features are not enabled, run Enable-WindowsOptionalFeature -online -FeatureName x where “x” is the name of the feature, listed in the above text block, you want to install. For example: Enable-WindowsOptionalFeature -online -FeatureName HypervisorPlatform,VirtualMachinePlatform,Microsoft-Hyper-V-All. If you run this when they’re already enabled, it should return RestartNeeded : False, but otherwise you’re likely to need to reboot.
After the reboot
After you’ve rebooted, and you start a 64 bit virtual machine in VirtualBox, you’ll see this icon in the bottom corner.
A screen grab of the VirtualBox Status Bar, highlighting the “Slow Mode” icon representing the CPU
Booting the Virtual Machine with Vagrant fails because it takes too long to boot
This was historically a big issue with Vagrant and VirtualBox, particularly with Windows Vagrant boxes, but prior to the Hyper-V/VirtualBox solution, it’d been largely fixed (or at least, I wasn’t seeing it!) There is a “standard” timeout for booting a Virtual Machine, I think at approximately 5 minutes, but I might be wrong. To make this “issue” stop occurring, add this config.vm.boot_timeout = 0 line to your Vagrantfile, like this:
Vagrant.configure("2") do |config|
  config.vm.boot_timeout = 0
end
This says to Vagrant, don’t worry how long it takes to boot, just keep waiting until it does. Yes, it will be slower, but it should get there in the end!
Booting the Virtual Maching with Vagrant does not fail, but it never authenticates with your Private Key.
Your VM may sit at this block for quite a while:
==> default: Waiting for machine to boot. This may take a few minutes...
    default: SSH address: 127.0.0.1:2222
    default: SSH username: vagrant
    default: SSH auth method: private key
If this occurs, you may find that your virtual machine has hung during the boot process… but weirdly, a simple work-around to this is to ensure that the VirtualBox GUI is open, and that you’ve got a block like this (config.vm.provider / vb.gui=true / end) in your Vagrantfile:
Vagrant.configure("2") do |config|
  config.vm.provider "virtualbox" do |vb|
    vb.gui = true
  end
end
This forces VirtualBox to open a window with your Virtual Machine’s console on it (much like having a monitor attached to real hardware). You don’t need to interact with it, but any random hangs or halts on your virtual machine may be solved just by bringing this window, or the VirtualBox Machines GUI, to the foreground.
Sometimes you may see, when this happens, a coredump or section of kernel debugging code on the console. Don’t worry about this!
Vagrant refuses to SSH to your virtual machine when using the vagrant ssh command.
Provisioning works like a treat, and you can SSH into the virtual machine from any other environment, but, when you run vagrant ssh, you get an error about keys not being permitted or usable. This is fixable by adding a single line, either to your system or user -wide environment variables, or by adding a line to your Vagrantfile.
The environment variable is VAGRANT_PREFER_SYSTEM_BIN, and by setting this to 0, it will use bundled versions of ssh or rsync instead of using any versions provided by Windows.
You can add a line like this ENV['VAGRANT_PREFER_SYSTEM_BIN']="0" to your Vagrantfile, outside of the block Vagrant.configure…end, like this:
ENV['VAGRANT_PREFER_SYSTEM_BIN']="0"
Vagrant.configure("2") do |config|
end
A few posts ago I wrote about building Windows virtual machines with Terraform, and a couple of days ago, “YoureInHell” on Twitter reached out and asked what advice I’d give about having several different terraform modules use the same basic build of custom data.
They’re trying to avoid putting the same template file into several repos (I suspect so that one team can manage the “custom-data”, “user-data” or “cloud-init” files, and another can manage the deployment terraform files), and asked if I had any suggestions.
I had three ideas.
Using a New Module
This was my initial thought; create a new module called something like “Standard Build File”, and this build file contains just the following terraform file, and a template file called “build.tmpl”.
module "buildTemplate" {
  source   = "git::https://git.example.net/buildTemplate.git?ref=latestLive"
  # See https://www.terraform.io/docs/language/modules/sources.html
  #   for more details on how to specify the source of this module
  unsetVar = "Set To This String"
}

output "RenderedTemplate" {
  value = module.buildTemplate.template
}
And that means that you can use the module.buildTemplate.template anywhere you’d normally specify your templateFile, and get a consistent, yet customizable template (and note, because I specified a particular tag, you can use that to move to the “current latest” or “the version we released into live on YYYY-MM-DD” by using a tag, or a commit ref.)
Now, the downside to this is that you’ve now got a whole separate module for creating your instances that needs to be maintained. What are our other options?
Git Submodules for your template
I use Git Submodules a LOT for my code. It’s a bit easy to get into a state with them, particularly if you’re not great at keeping on top of them, but… if you are OK with them, you’d create a repo, again, let’s use “https://git.example.net/buildTemplate.git” as our git repo, and put your template in there. In your terraform git repo, you’d run this command: git submodule add https://git.example.net/buildTemplate.git and this would add a directory to your repo called “buildTemplate” that you can use your templatefile function in Terraform against (like this: templatefile("buildTemplate/build.tmpl", {someVar="var"})).
Now, this means that you’ve effectively got two git repos in one tree, and if any changes occur in your submodule repo, you’d need to do git checkout main ; git pull to get the latest updates from your main branch, and when you check it out initially on another machine, you’ll need to do git clone https://git.example.net/terraform --recurse-submodules to get the submodules populated at the same time.
A benefit to this is that because it’s “inline” with the rest of your tree, if you need to make any changes to this template, it’s clearly where it’s supposed to be in your tree, you just need to remember about the submodule when it comes to making PRs and suchforth.
How about that third idea?
Keep it simple, stupid 😁
Why bother with submodules, or modules from a git repo? Terraform can be quite easy to over complicate… so why not create all your terraform files in something like this structure:
And then in each of your terraform files (web_servers, logic_servers and database_servers) just reference the file in your project root, like this: templatefile("../build.tmpl", {someVar="var"})
The downside to this is that you can’t as easily farm off the control of that build script to another team, and they’d be making (change|pull|merge) requests against the same repo as you… but then again, isn’t that the idea for functional teams? 😃
Yesterday I was struggling a bit with a bash script I was writing. I needed to stop it from running flat out through every loop, and I wanted to see what certain values were at key points in the script.
Yes, I know I could use “read” to pause the script and “echo” to print values, but that leaves a lot of mess that I need to clean up afterwards… so I went looking for something else I could try.
You can have extensive debug statements, which are enabled with a --debug flag or environment variable… but again, messy.
You can run bash -x ./myscript.sh – and, indeed, I do frequently do that… but that shows you the commands which were run at each point, not what the outcome is of each of those commands.
If my problem had been a syntax one, I could have installed shellcheck, which is basically a linter for Bash and other shell scripting languages, but no, I needed more detail about what was happening during the processing.
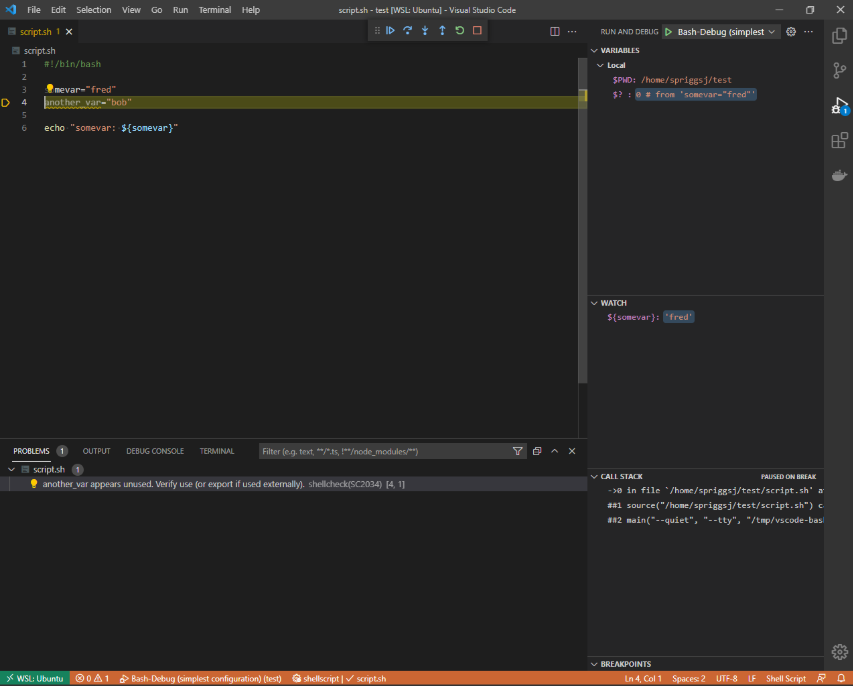
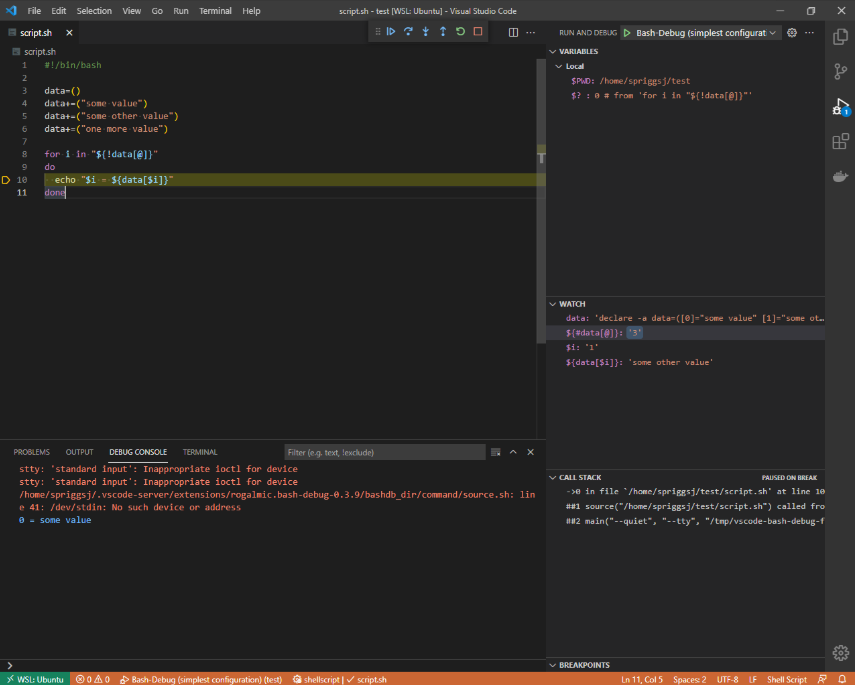
Instead, I wanted something like xdebug (from PHP)… and I found Bash Debug for VSCode. This doesn’t even need you to install any scripts or services on the target machine – it’s interactive, and has a “watch” section, where you either highlight and right-click a variable expression (like $somevar or ${somevar}) to see when it changes. You can see where in the “callstack” you are and see what values are registered by that script.
Shellcheck shows me problems in my code…But Bash Debug helps me to find out what values are at specific points in the code.
I have been playing again, recently, with Nebula, an Open Source Peer-to-Peer VPN product which boasts speed, simplicity and in-built firewalling. Although I only have a few nodes to play with (my VPS, my NAS, my home server and my laptop), I still wanted to simplify, for me, the process of onboarding devices. So, naturally, I spent a few evenings writing a bash script that helps me to automate the creation of my Nebula nodes.
Nebula Certificates
Nebula have implemented their own certificate structure. It’s similar to an x509 “TLS Certificate” (like you’d use to access an HTTPS website, or to establish an OpenVPN connection), but has a few custom fields.
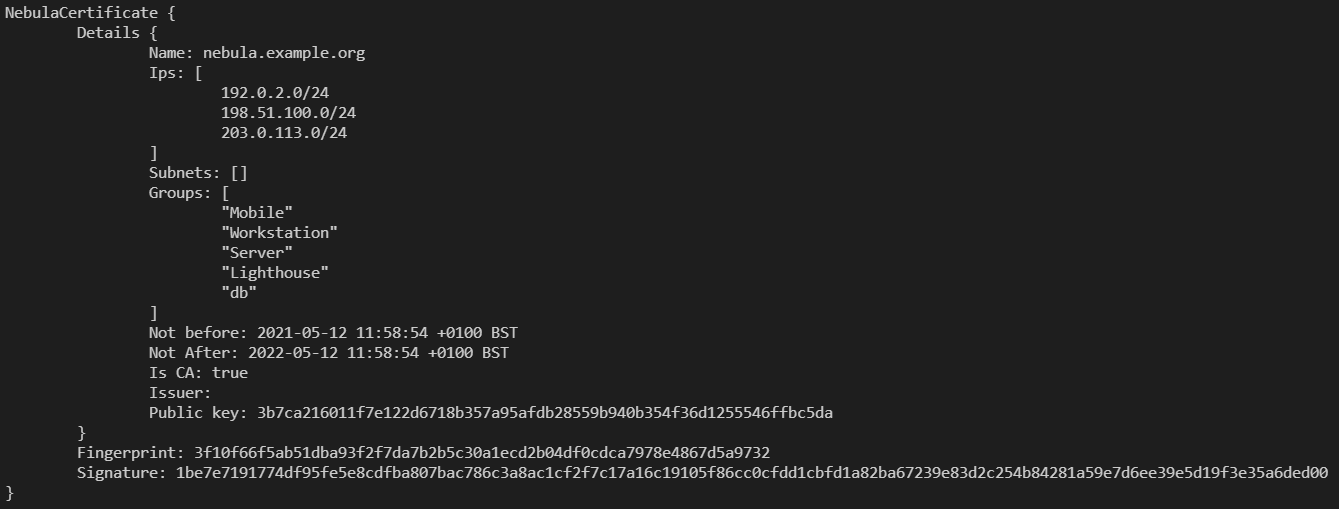
The result of typing “nebula-cert print -path ca.crt” to print the custom fields
In this context, I’ve created a nebula Certificate Authority (CA), using this command:
nebula-cert ca -name nebula.example.org -ips 192.0.2.0/24,198.51.100.0/24,203.0.113.0/24 -groups Mobile,Workstation,Server,Lighthouse,db
So, what does this do?
Well, it creates the certificate and private key files, storing the name for the CA as “nebula.example.org” (there’s a reason for this!) and limiting the subnets and groups (like AWS or Azure Tags) the CA can issue certificates with.
Here, I’ve limited the CA to only issue IP addresses in the RFC5737 “Documentation” ranges, which are 192.0.2.0/24, 198.51.100.0/24 and 203.0.113.0/24, but this can easily be expanded to 10.0.0.0/8 or lots of individual subnets (I tested, and proved 1026 separate subnets which worked fine).
Groups, in Nebula parlance, are building blocks of the Security product, and can act like source or destination filters. In this case, I limited the CA to only being allowed to issue certificates with the groups of “Mobile”, “Workstation”, “Server”, “Lighthouse” and “db”.
As this certificate authority requires no internet access, and only enough access to read and write files, I have created my Nebula CA server on a separate Micro SD card to use with a Raspberry Pi device, and this is used only to generate a new CA certificate each 6 months (in theory, I’ve not done this part yet!), and to sign keys for all the client devices as they come on board.
I copy the ca.crt file to my target machines, and then move on to creating my client certificates
Client Certificates
When you generate key materials for Public Key Cryptographic activities (like this one), you’re supposed to generate the private key on the source device, and the private key should never leave the device on which it’s generated. Nebula allows you to do this, using the nebula-cert command again. That command looks like this:
If you notice, there’s a key difference at this point between Nebula’s key signing routine, and an x509 TLS style certificate, you see, this stage would be called a “Certificate Signing Request” or CSR in TLS parlance, and it usually would specify the record details for the certificate (normally things like “region”, “organisational unit”, “subject name” and so on) before sending it to the CA for signing (marking it as trusted).
In the Nebula world, you create a key, and send the public part of that (in this case, “host.pub” but it can have any name you like) to the CA, at which point the CA defines what IP addresses it will have, what groups it is in, and so on, so let’s do that.
Let’s pick apart these options, shall we? The first four flags “-ca-crt“, “-ca-key“, “-in-pub” and “-out-crt” all refer to the CSR process – it’s reading the CA certificate and key, as well as the public part of the keypair created for the process, and then defines what the output certificate will be called. The next switch, -groups, identifies the tags we’re assigning to this node, then (the mandatory flag) -ip sets the IP address allocated to the node. Note that the certificate is using one of the valid group names, and has been allocated a valid IP address address in the ranges defined above. If you provide a value for the certificate which isn’t valid, you’ll get a warning message.
nebula-cert issues a warning when signing a certificate that tries to specify a value outside the constraints of the CA
In the above screenshot, I’ve bypassed the key generation and asked for the CA to sign with values which don’t match the constraints.
The last part is the name of the certificate. This is relevant because Nebula has a DNS service which can resolve the Nebula IPs to the hostnames assigned on the Certificates.
Anyway… Now that we know how to generate certificates the “hard” way, let’s make life a bit easier for you. I wrote a little script – Nebula Cert Maker, also known as certmaker.sh.
certmaker.sh
So, what does certmaker.sh do that is special?
It auto-assigns an IP address, based on the MD5SUM of the FQDN of the node. It uses (by default) the first CIDR mask (the IP range, written as something like 192.0.2.0/24) specified in the CA certificate. If multiple CIDR masks are specified in the certificate, there’s a flag you can use to select which one to use. You can override this to get a specific increment from the network address.
It takes the provided name (perhaps webserver) and adds, as a suffix, the name of the CA Certificate (like nebula.example.org) to the short name, to make the FQDN. This means that you don’t need to run a DNS service for support staff to access machines (perhaps you’ll have webserver1.nebula.example.org and webserver2.nebula.example.org as well as database.nebula.example.org).
Three “standard” roles have been defined for groups, these are “Server”, “Workstation” and “Lighthouse” [1] (the latter because you can configure Lighthouses to be the DNS servers mentioned in step 2.) Additional groups can also be specified on the command line.
[1] A lighthouse, in Nebula terms, is a publically accessible node, either with a static IP, or a DNS name which resolves to a known host, that can help other nodes find each other. Because all the nodes connect to it (or a couple of “it”s) this is a prime place to run the DNS server, as, well, it knows where all the nodes are!
So, given these three benefits, let’s see these in a script. This script is (at least currently) at the end of the README file in that repo.
# Create the CA
mkdir -p /tmp/nebula_ca
nebula-cert ca -out-crt /tmp/nebula_ca/ca.crt -out-key /tmp/nebula_ca/ca.key -ips 192.0.2.0/24,198.51.100.0/24 -name nebula.example.org

# First lighthouse, lighthouse1.nebula.example.org - 192.0.2.1, group "Lighthouse"
./certmaker.sh --cert_path /tmp/nebula_ca --name lighthouse1 --ip 1 --lighthouse

# Second lighthouse, lighthouse2.nebula.example.org - 192.0.2.2, group "Lighthouse"
./certmaker.sh -c /tmp/nebula_ca -n lighthouse2 -i 2 -l

# First webserver, webserver1.nebula.example.org - 192.0.2.168, groups "Server" and "web"
./certmaker.sh --cert_path /tmp/nebula_ca --name webserver1 --server --group web

# Second webserver, webserver2.nebula.example.org - 192.0.2.191, groups "Server" and "web"
./certmaker.sh -c /tmp/nebula_ca -n webserver2 -s -g web

# Database Server, db.nebula.example.org - 192.0.2.182, groups "Server" and "db"
./certmaker.sh --cert_path /tmp/nebula_ca --name db --server --group db

# First workstation, admin1.nebula.example.org - 198.51.100.205, group "Workstation"
./certmaker.sh --cert_path /tmp/nebula_ca --index 1 --name admin1 --workstation

# Second workstation, admin2.nebula.example.org - 198.51.100.77, group "Workstation"
./certmaker.sh -c /tmp/nebula_ca -d 1 -n admin2 -w

# First Mobile device - Create the private/public key pairing first
nebula-cert keygen -out-key mobile1.key -out-pub mobile1.pub
# Then sign it, mobile1.nebula.example.org - 198.51.100.217, group "mobile"
./certmaker.sh --cert_path /tmp/nebula_ca --index 1 --name mobile1 --group mobile --public mobile1.pub

# Second Mobile device - Create the private/public key pairing first
nebula-cert keygen -out-key mobile2.key -out-pub mobile2.pub
# Then sign it, mobile2.nebula.example.org - 198.51.100.22, group "mobile"
./certmaker.sh -c /tmp/nebula_ca -d 1 -n mobile2 -g mobile -p mobile2.pub
Technically, the mobile devices are simulating the local creation of the private key, and the sharing of the public part of that key. It also simulates what might happen in a more controlled environment – not where everything is run locally.
So, let’s pick out some spots where this content might be confusing. I’ve run each type of invocation twice, once with the short version of all the flags (e.g. -c instead of --cert_path, -n instead of --name) and so on, and one with the longer versions. Before each ./certmaker.sh command, I’ve added a comment, showing what the hostname would be, the IP address, and the Nebula Groups assigned to that node.
It is also possible to override the FQDN with your own FQDN, but this command option isn’t in here. Also, if the CA doesn’t provide a CIDR mask, one will be selected for you (10.44.88.0/24), or you can provide one with the -b/--subnet flag.
If the CA has multiple names (e.g. nebula.example.org and nebula.example.com), then the name for the host certificates will be host.nebula.example.org and also host.nebula.example.com.
Using Bash
So, if you’ve looked at, well, almost anything on my site, you’ll see that I like to use tools like Ansible and Terraform to deploy things, but for something which is going to be run on this machine, I’d like to keep things as simple as possible… and there’s not much in this script that needed more than what Bash offers us.
For those who don’t know, bash is the default shell for most modern Linux distributions and Docker containers. It can perform regular expression parsing (checking that strings, or specific collections of characters appear in a variable), mathematics, and perform extensive loop and checks on values.
So, take a look at the internals of the script, if you want to know some options on writing bash scripts that manipulate IP addresses and read the output of files!
If you’re looking for some simple tasks to start your portfolio of work, there are some “good first issue” tasks in the “issues” of the repo, and I’d be glad to help you work through them.
Wrap up
I hope you enjoy using this script, and I hope, if you’re planning on writing some bash scripts any time soon, that you take a look over the code and consider using some of the templates I reference.
On Wednesday, 21st April, I saw a link to a blog post in a chat group for the Linux Lads podcast. This blog post included a discount code to make the GitLab Certified Associate course and exam free. I signed up, and then shared the post to colleagues.
Free GitLab certification course and exam – until 30th April 2021.
GitLab has created a “Certified Associate” certification course which normally costs $650, but is available for free until 30th April using the discount code listed on this blog post and is available for one year after purchase (or free purchase).
I’ve signed up for the course today, and will be taking the 6 hour course, which covers:
Section 1: Self-Study – Introduction to GitLab
* GitLab Overview * GitLab Comparison * GitLab Components and Navigation * Demos and Hands On Exercises
You don’t need your own GitLab environment – you get one provided to you as part of the course.
Another benefit to this course is that you’ll learn about Git as part of the course, so if you’re looking to do any code development, infrastructure as code, documentation as code, or just learning how to store any content in a version control system – this will teach you how 😀
Good luck to everyone participating in the course!
After sharing this post, the GitLab team amended the post to remove the discount code as they were significantly oversubscribed! I’ve heard rumours that it’s possible to find the code, either on Gitlab’s own source code repository, or perhaps using Archive.org’s wayback machine, but I’ve not tried!
On Friday I started the course and completed it yesterday. The rest of this post will be my thoughts on the course itself, and the exam.
Signing up for the course and getting started
Signing up was pretty straightforward. It wasn’t clear that you had a year between when you enrolled for the course and until you first opened the content, but that once you’d opened the link to use the Gitlab demo environment, you had 21 days to use it. You’re encouraged to sign up for the demo environment on the first stage, thereby limiting you to the 21 days from that point. I suspect that if you re-visit that link on a second or third time, you’d get fresh credentials, so no real disaster there, but it does make you feel a bit under pressure to use the environment.
First impressions
The training environment is pretty standard, as far as corporate training goes. You have a side-bar showing the modules you need to complete before the end of the course, and as you scroll down through each module, you get various different media-types arriving, including youtube videos, fade-in text, flashcards which require clicking on and side-scrolling presentation cards. (Honestly, I do wonder whether this is particularly accessible to those with visual or motor impairments… I hope so, but I don’t know how I’d check!)
As you progress through each module, in the sidebar to the left, a circle outline is slowly turned from grey to purple, and when you finish a module the outline is replaced by a filled circle with a white tick in it. At the bottom of each module is a link to the next module.
The content
You have a series of 3 sections:
“Introduction to Gitlab” (aka, “Corporate Propaganda” 😉) which includes the history of the GitLab project and product, how many contributors it has, what it’s primary objective is, and so on. There’s even an “Infotainment” QVC-like advert about how amazing GitLab is in this section, which is quite cute. At the end of this first section, you get a “Hands On” section, where you’re encouraged to use GitLab to create a new Project. I’ll come back to the Hands on sections after this.
“Using Git and Gitlab”, which you’d expect to be more hands-on but is largely more flashcards and presentation cards, each with a hands on section at the end.
“Certification Assessments” has two modules to explain what needs to happen (one before, one after) and then two parts to the “assessment” – a multiple-choice section which has to be answered 100% correctly to proceed, and a “hands on” exam, which is basically a collection of “perform this task” questions, which you are expected to perform in the demo environment.
Hands-on sections focus on a specific task – “create a project”, “commit code”, “create an issue”, “create a merge request” and so-on. There are no tasks which will stretch even the freshest Git user, and seeing the sorts of things that the “Auto DevOps” function can enable might interest someone who wants to use GitLab. I was somewhat disappointed that there was barely any focus on the fact that GitLab can be self-hosted, and what it takes to set something like that up.
We also get to witness the entire power (apparently) of upgrading to the “Premium” and “Ultimate” packages of GitLab’s proprietary add-ons… Epics. I jest of course, I’ve looked and there’s loads more to that upgrade!
The final exams (No Spoilers)
This is in two parts, a multiple-choice selection on a fixed set of 14 questions, with 100% accuracy required to move on to the next stage that can be retaken indefinitely, and a hands-on set of… from memory… 14ish tasks which must be completed on a project you create.
The exam is generally things about GitLab which you’ve covered in the course, but included two questions about using Git that were not covered in any of the modules. For this reason, I’d suggest when you get to those questions, open a git environment, and try each of the commands offered given the specific scenario.
Once you’ve finished the hands-on section, using the credentials you were given, you’re asked to complete a Google Forms page which includes the URL of the GitLab Project you’ve performed your work in, and the username for your GitLab Demo Environment. You submit this form, and in 7 days (apparently, although, given the take-up of the course, I’m not convinced this is an accurate number) you’ll get your result. If you fail, apparently, you’ll be invited to re-try your hands-on exam again.
At least some of the hands-on section tasks are a bit ambiguous, suggesting you should make this change on the first question, and then “merge that change into this branch” (again, from memory) in the next task.
My final thoughts
So, was it worth $650 to take this course? No, absolutely not. I realise that people have put time and effort into the content and there will be people within GitLab Inc checking the results at the end… but at most it’s worth maybe $200, and even that is probably a stretch.
If this course was listed at any price (other than free) would I have taken it? …. Probably not. It’s useful to show you can drive a GitLab environment, but if I were going for a job that needed to use Git, I’d probably point them at a project I’ve created on GitHub or GitLab, as the basics of Git are more likely to be what I’d need to show capabilities in.
Does this course teach you anything new about Git or GitLab that just using the products wouldn’t have done? Tentatively, yes. I didn’t know anything about the “Auto DevOps” feature of GitLab, I’d never used the “Quick Actions” in either issues or merge requests, and there were a couple of git command lines that were new to me… but on the whole, the course is about using a web based version control system, which I’ve been doing for >10 years.
Would this course have taught you anything about Git and GitLab if you were new to both? Yes! But I wouldn’t have considered paying $650… or even $65 for this, when YouTube has this sort of content for free!
What changes would you make to this course? For me, I’d probably introduce more content about the CI/CD elements of GitLab, I might introduce a couple of questions or a module about self-hosting and differences about the tiers (to explain why it would be worth paying $99/user/month for the additional features in the software). I’d probably also split the course up into several pieces, where each of those pieces goes towards a larger target… so perhaps there might be a “basic user” track, which is just “GitLab inc history”, “using git” and “using Gitlab for issues and changes”, then an advanced user, covering “GitLab tiers”, “GitLab CI/CD”, “Auto DevOps”, running “Git Runners”, and perhaps a Self Hosting course which adds running the service yourself, integrating GitLab with other services, and so on. You might also (as GitLab are a very open company) have a “marketing GitLab” course (for TAMs, Pre-Sales and Sales) which could also be consumed externally.