I’m in the process of building a Network Firewall for a work environment. This blog post is based on that work, but with all the identifying marks stripped off.
For this particular project, we standardised on Alma Linux 9 as the OS Base, and we’ve done some testing and proved that the RedHat default firewalling product, Firewalld, is not appropriate for this platform, but did determine that NFTables, or NetFilter Tables (the successor to IPTables) is.
I’ll warn you, I’m pretty prone to long and waffling posts, but there’s a LOT of technical content in this one. There is also a Git repository with the final code. I hope that you find something of use in here.
This document explains how it is using Vagrant with Virtualbox to build a test environment, how it installs a Puppet Server and works out how to calculate what settings it will push to it’s clients. With that puppet server, I show how to build and configure a firewall using Linux tools and services, setting up an NFTables policy and routing between firewalls using FRR to provide BGP, and then I will show how to deploy a DHCP server.
Let’s go!
The scenario
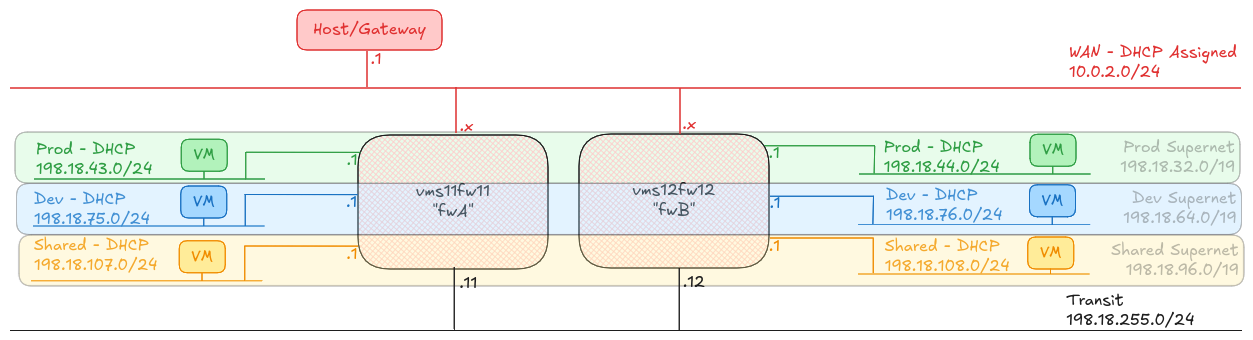
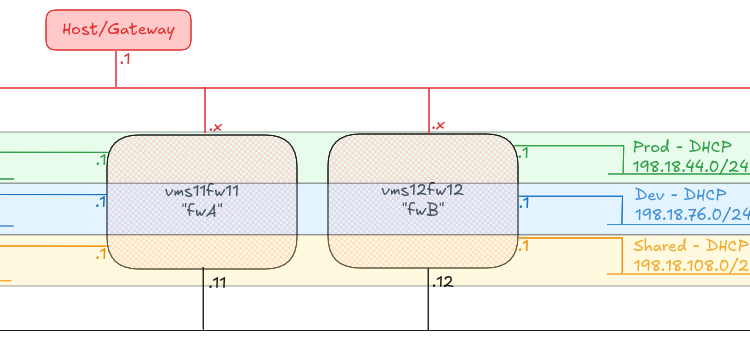
To prove the concept, I have built two Firewall machines (A and B), plus six hosts, one attached to each of the A and B side subnets called “Prod”, “Dev” and “Shared”.
Any host on any of the “Prod” networks should be able to speak to any host on any of the other “Prod” networks, or back to the “Shared” networks. Any host on any of the “Dev” networks should be able to speak to any host on the other “Dev” networks, or back to the “Shared” networks.
Any host in Prod, Dev or Shared should be able to reach the internet, and shared can reach any of the other networks.
To ensure I can guarantee the MAC addresses I will be using, I am using a standard Virtual Machine prefix: 16:0D:EC:AF: followed by an octet to identify the firewall ID, fwA is 11 and fwB is 12, and then the interface ID as the last octet. The WAN interface gets 01, prod gets 02, dev gets 03, shared 04 and transit 05. This also means that when I move from deploying this on my laptop with Vagrant, to deploying it on my actual lab environment, I can apply the same MAC addressing scheme, and guarantee that I’ll know which interface is which, no matter what order they’re detected by the guest VM.
A note on IP addresses and DNS names used in this document
In this blog post, “Private” IP addresses are using the “Inter-networking” network assignment from IANA, as documented in RFC2544, while the “Public” IP addresses are using the default Vagrant “Host” network of 10.0.2.0/24 with the host being assigned 10.0.2.2 and would provide the default gateway to the guests.
In the actual lab environment, these addresses would be replaced by assigned network segments in RFC1918 “Private” address spaces, or by ranges allocated by the upstream ISP. Please *DO NOT* build your network assuming these addresses are appropriate for your use! In addition, DNS names will use example.org following the advice of RFC2606.
Building the Proof of Concept
I’m using Vagrant with Virtualbox to build my firewall and some test boxes. The “WAN” interface will be simulated by the NAT interface provided by Vagrant’s first interface (which is required for provisioning anyway), and will receive a DHCP address. All other interfaces will be private, host-only networks using the Virtualbox network manager. Once the firewall is built and running, it will serve DHCP to all downstream clients.
All of the following code can be found on my Github repository: JonTheNiceGuy/vagrant-puppet-firewall
Working from a common base
To start with, I build out my Vagrantfile (link to the code). A Vagrantfile is used to define how Vagrant will build one or more virtual machines, similar to how you might use a Terraform HCL file to deploy some cloud assets. I’ll show several sections from this file as we go along, but here’s the start of it. This part won’t be used to provision any virtual machines, and is instead just Boilerplate for the hosts which follow.
############################################################
############################## Define variables up-front
############################################################
vms_A_number    = 11
vms_B_number    = 12
global_mac_base = "160DECAF"
vms_A_mac_base  = "#{global_mac_base}#{vms_A_number < 10 ? '0' : ''}#{vms_A_number}"
vms_B_mac_base  = "#{global_mac_base}#{vms_B_number < 10 ? '0' : ''}#{vms_B_number}"
############################################################
############################## Standard VM Settings
############################################################
Vagrant.configure("2") do |config|
  ############################ Default options for all hosts
  config.vm.box = "almalinux/9"
  config.vm.synced_folder ".", "/vagrant", type: :nfs, mount_options: ['rw', 'tcp', 'nolock']
  config.vm.synced_folder "../..", "/etc/puppetlabs/code/environments/production/src_modules/", type: :nfs, mount_options: ['rw', 'tcp', 'nolock']
  config.vm.provision "shell", path: 'client/make_mount.py'
  config.vm.provider :virtualbox do |vb|
    vb.memory = 2048
    vb.cpus = 2
    vb.linked_clone = true
  end
  ############################ Install nginx to host a simple webserver
  config.vm.provision "shell", inline: <<-SCRIPT
    # Setup useful tools
    if ! command -v fping >/dev/null
    then
      dnf install -y epel-release && dnf install -y fping mtr nano nginx && systemctl enable --now nginx
      # Configure web server to reply with servername
      printf '<!DOCTYPE html><head><title>%s</title></head><body><h1>\n%s\n</h1></body></html>' "$(hostname -f)" > /usr/share/nginx/html/index.html
    fi
SCRIPT
  ############################ Vagrant Cachier Setup
  if Vagrant.has_plugin?("vagrant-cachier")
    config.cache.scope = :box
    # Note that the DNF plugin was only finalised after the last
    # release of vagrant-cachier before it was discontinued. As such
    # you must do `vagrant plugin install vagrant-cachier` and then
    # find where it has been installed (usually
    # ~/.vagrant/gems/*/gems/vagrant-cachier-*) and replace it with
    # the latest commit from the upstream git project. Or uninstall
    # vagrant-cachier :)
    config.cache.enable :dnf
    config.cache.synced_folder_opts = {
      type: :nfs,
      mount_options: ['rw', 'tcp', 'nolock']
    }
  end
end
This does several key things. Firstly it defines the size of the virtual machines which will be deployed, and installs some common testing tools, it sets up some variables for use later in the script (around MAC addresses and IP offsets) and it makes sure that mounted directories are always remounted (because Vagrant isn’t very good at doing that following a reboot).
There’s one script in here called make_mount.py, which I won’t go into in detail, but essentially, it just creates all the NFS mounts that Vagrant setup for the subsequent reboots. Unfortunately, I couldn’t do something similar for the Virtualbox Shared Folders. Feel free to bring this up in the comments if you want to know more.
Building a Puppetserver for testing your module
As I do more with Puppet, I’ve realised that being able to test a manual deployment of a set of modules with puppet apply /path/to/manifest.pp doesn’t actually test how your manifests will work in a real environment. To solve this, each of the test environments I build deploy a puppet server as well as the test machine or machines, and then I join the devices to the puppet server to let them deploy.
Let’s setup that Puppetserver, starting with the Vagrantfile definition. This snippet goes inside the section Vagrant.configure("2") do |config| block, just at the end of the code snippet I pasted before.
  config.vm.define "puppet" do |config|
    config.vm.hostname = "puppet"
    # \/ The puppetserver needs more memory
    config.vm.provider "virtualbox" do |vb|
        vb.memory = 4096
    end
    # \/ Fixed IP address needed for Vagrant-Cachier-NFS
    config.vm.network "private_network", ip: "192.168.56.254", name: "vboxnet0"
    # \/ Install and configure the Puppet server, plus the ENC.
    config.vm.provision "shell", path: "puppetserver/setup.sh"
  end
This showcases some really useful parts about Vagrant. Firstly, you can override the memory allocation, going from 2048 (which we had set as a default), and also you can define new networks to attach the VMs to. In this case, we have a “private_network”, configured to be a “host only network” in Virtualbox lingo, which means it’s attached not-only to the Virtual Machine, but also to the host machine.
When we run vagrant up with just this machine attached, it will run the scripts defined before, and then starting this setup script. Let’s dig into that for a second.
Setting up a Puppet Server
A puppet server is basically just a Certificate Authority, plus a web server to return the contents of your manifests to your client, plus some settings to use with that. Here’s a simple setup for that.
#!/bin/bash
START_PUPPET=0
################################################################
######### Install the Puppet binary and configure it as a server
################################################################
if ! command -v puppetserver >/dev/null
then
    rpm -Uvh https://yum.puppet.com/puppet8-release-el-9.noarch.rpm
    dnf install -y puppetserver puppet-agent
    alternatives --set java "$(alternatives --list | grep -E 'jre_17.*java-17' | awk '{print $3}')/bin/java"
    /opt/puppetlabs/bin/puppet config set server puppet --section main
    /opt/puppetlabs/bin/puppet config set runinterval 60 --section main
    /opt/puppetlabs/bin/puppet config set autosign true --section server
    START_PUPPET=1
fi
Like this, we can setup the puppet server to accept, automatically, any connecting client. There are security implications here!
Getting modules into the server
In a real-world deployment, you’ll have your Puppet Server which will have modules full of manifests attached to it. You may use some sort of automation to install or refresh those manifests, for example, in our lab, we use a script called r10k to update puppet modules on the host.
Instead of doing that, for the test, in the Vagrant file I mounted my “puppet modules” directory from the host machine to the puppet server, and then link each directory from the mounted path into where the puppet modules reside. This means we can also install public released modules, like puppetlabs-stdlib which has a series of standard resources, into the puppet server, without impacting my puppet modules directory. Here’s that code:
cd /etc/puppetlabs/code/environments/production/src_modules || exit 1
for dirname in puppet-module*
do
    TARGET="/etc/puppetlabs/code/environments/production/modules/$(echo "$dirname" | sed -E -e 's/.*puppet-module-//')"
    if [ ! -e "$TARGET" ]
    then
        ln -s "/etc/puppetlabs/code/environments/production/src_modules/${dirname}" "$TARGET"
    fi
done

################################################################
######### Install common modules
################################################################
/opt/puppetlabs/bin/puppet module install puppetlabs-stdlib
Defining what the clients will get
The puppet server then needs to know which manifests and settings to deploy to any node which connects to it. This is called an “External Node Classifier” or ENC.
The ENC receives the certificate name of the connecting host, and matches that against some internal logic to work out what manifests, in what environment they are coming from, and what settings to ship to the node. It then returns this as a JSON string for the Puppet Server to compile and send to the client.
The ENC defined in this dummy puppet server is extremely naive, and basically just reads a JSON file from disk. Here’s how it’s installed from the setup script
if ! [ -e /opt/puppetlabs/enc.sh ]
then
    cp /vagrant/puppetserver/enc.sh /opt/puppetlabs/enc.sh && chmod +x /opt/puppetlabs/enc.sh
    /opt/puppetlabs/bin/puppet config set node_terminus exec --section master
    /opt/puppetlabs/bin/puppet config set external_nodes /opt/puppetlabs/enc.sh --section master
    START_PUPPET=1
fi
Then here is the enc.sh script
#!/bin/bash

if [ -e "/vagrant/enc.${1}.json" ]
then
    cat "/vagrant/enc.${1}.json"
    exit 0
fi
if [ -e "/vagrant/enc.json" ]
then
    cat "/vagrant/enc.json"
    exit 0
fi
printf '{"classes": {}, "environment": "production", "parameters": {}}'
And finally, here’s the enc.json for this test environment:
{
    "classes": {
        "nftablesfirewall": {},
        "basevm": {},
        "hardening": {}
    },
    "environment": "production",
    "parameters": {}
}
So, we now have enough to provision a device connecting into the puppet server. Now we need to build our first Firewall.
Building a firewall
First we need the Virtual Machine to build. Again, we’re using the Vagrantfile to define this.
  config.vm.define :fwA do |config|
    # eth0 mgmt via vagrant ssh, simulating "WAN", DHCP to 10.0.2.x                        # eth0 wan
    config.vm.network "private_network", auto_config: false, virtualbox__intnet: "prodA"   # eth1 prod
    config.vm.network "private_network", auto_config: false, virtualbox__intnet: "devA"    # eth2 dev
    config.vm.network "private_network", auto_config: false, virtualbox__intnet: "sharedA" # eth3 prod
    config.vm.network "private_network", auto_config: false, virtualbox__intnet: "transit" # eth4 transit
    config.vm.provider "virtualbox" do |vb|
      vb.customize ["modifyvm", :id, "--macaddress1", "#{vms_A_mac_base}01"] # wan
      vb.customize ["modifyvm", :id, "--macaddress2", "#{vms_A_mac_base}02"] # prod
      vb.customize ["modifyvm", :id, "--macaddress3", "#{vms_A_mac_base}03"] # dev
      vb.customize ["modifyvm", :id, "--macaddress4", "#{vms_A_mac_base}04"] # shared
      vb.customize ["modifyvm", :id, "--macaddress5", "#{vms_A_mac_base}05"] # transit
    end
    config.vm.network "private_network", ip: "192.168.56.#{vms_A_number}", name: "vboxnet0" # Only used in this Vagrant environment for Puppet
    config.vm.hostname = "vms#{vms_A_number}fw#{vms_A_number}"
    config.vm.provision "shell", path: "puppetagent/setup-and-apply.sh"
  end
This gives us enough to build Firewall A, to build Firewall B, replace any “A” string (like “sharedA”, “vms_A_mac_base” or “vms_A_number”) with B (so “SharedB” and so on). The firewall has 5 interfaces, which are:
-
wan; technically a NAT interface in Vagrant, but in our lab would be completely exposed to the internet for ingress and egress traffic. transit; used to pass traffic between VLANs (shared, prod and dev)shared,prodanddevwhich carry the traffic for the machines classified as “production” or “development”, or for the shared management and access to them.
The puppet manifests we’ll see in a minute rely on those interfaces having the last 4 hexadecimal digits of the MAC address defined with specific values in order to identify the machine ID and the interface association. Fortunately, Virtualbox can assign these interfaces specific MAC addresses! Another win for Vagrant+Virtualbox. As before, we also add the private network which gives access to Puppet, which would normally be accessed over the WAN interface.
In here we have another shell script, this time puppetagent/setup-and-apply.sh. This one joins the puppet worker to the server, links the build modules (like we did with the puppet server) to replicate the build process with Packer, and then applies “standard” configuration from the local machine. Finally, it asks the server to apply the server configuration (using the ENC script we setup before). The local build modules (called “basevm” and “hardening”) I won’t go into here, because in this context they’re basically just saying “I ran” and then ending. But let’s take a look at the puppet module itself
Initialising the Puppet Module
There are six files in the puppet manifests, starting with init.pp. If you’ve not written any Puppet before, a module is defined as a manifest class with some optional parameters passed to it. You can also define default values using hiera to retrieve values from the data directory. The manifest can call out so subclasses, and can also transfer files and build templates. Let’s take a look at that init.pp file.
# @summary Load various sub-manifests
class nftablesfirewall {
  # Setup interfaces
  class { 'nftablesfirewall::interfaces': }

  # make this server route traffic
  class { 'nftablesfirewall::routing':
    require => Class['nftablesfirewall::interfaces'],
  }
  class { 'nftablesfirewall::bgp':
    require => Class['nftablesfirewall::interfaces'],
  }

  # Allow traffic flows across the firewall
  class { 'nftablesfirewall::policy':
    require => Class['nftablesfirewall::interfaces'],
  }

  # make this server assign IP addresses
  class { 'nftablesfirewall::dhcpd':
    require => Class['nftablesfirewall::interfaces'],
  }
}
The class calls subclasses by using the construct class { 'class::subclass': } and in some cases, use the “meta parameters” require, before or notify to establish order of running. The subclasses are named according to the subclass name, so let’s take a look at these.
Defining the interfaces
The later subclasses need the interfaces to be defined properly first, so when we take a look at interfaces.pp, it does one of three things. Let’s pull these apart one at a time.
If there is an interface called eth0, then we’ve not renamed these interfaces, so we need to do that first of all. Let’s take a look at that:
  if ($facts['networking']['interfaces']['eth0']) {
    #################################################################
    ######## Using the MAC address we've configured, define each
    ######## network interface. On cloud platforms, we'd need to
    ######## figure out a better way of doing this!
    #################################################################
    # This relies HEAVILY on the mac address for the device on eth0
    # following this format:       16:0D:EC:AF:xx:01
    # The first 8 hex digits (160DECAF) don't really matter, but the
    # 9th and 10th are the VM number and the 11th and 12 are the
    # interface ID. This MAC prefix I found is a purposefully
    # unallocated prefix for virtual machines.
    #
    # Puppet magic to turn desired interface names etc into MAC
    # addresses, thanks to ChatGPT.
    #
    # https://chatgpt.com/share/67ae1617-a398-8002-807b-4bc4298b40bb
    $interface_map = {
      'wan'     => '01',
      'prod'    => '02',
      'dev'     => '03',
      'shared'  => '04',
      'transit' => '05',
    }
    $interfaces = $interface_map.map |$role, $suffix| {
      $match = $facts['networking']['interfaces'].filter |$iface, $details| {
        $details['mac'] and $details['mac'] =~ "${suffix}$"
      }

      if !empty($match) {
        { $role => $match.values()[0]['mac'] }  # Store the MAC address
      } else {
        {}
      }
    }.reduce |$acc, $entry| {
      $acc + $entry  # Merge all key-value pairs into a final hash
    }

    file { '/etc/udev/rules.d/70-persistent-net.rules':
      ensure  => present,
      owner   => root,
      group   => root,
      mode    => '0644',
      content => template('nftablesfirewall/etc/udev/rules.d/70-persistent-net.rules.erb'),
      notify  => Exec['Reboot'],
    } -> exec { 'Reboot':
      command     => '/bin/bash -c "(sleep 30 && reboot) &"',
      # We delay 30 seconds so the reboot doesn't kill puppet and report an error.
      refreshonly => true
    }
  }
I’m unashamed to say that I asked ChatGPT for some help here! I wanted to figure out how to name the interfaces without knowing the exact MAC address. Fortunately, Puppet identifies lots of details about the system, referred to as facts (you can read all of the facts your Puppet system knows about a node by running facter -p on a system with Puppet installed). In this case, we’re asking Puppet to parse all of the interfaces, and check the details of the MAC address to figure out which one was which. Once it knows that, it creates a file in udev, a system which identifies how to initialize the components, and in some cases, rename how they are seen by the system. When we do this, the system won’t recognise the changes until it’s been rebooted, so if we create or modify that file, sleep 30 seconds (to let the puppet module finish running) and then reboot.
What does the template for that udev file look like? Pretty simple actually.
<% @interfaces.each do |interface,mac| -%>
SUBSYSTEM=="net", ACTION=="add", ATTR{address}=="<%= mac %>", NAME="<%= interface %>"
<% end %>
Once that’s run, it looks like this:
SUBSYSTEM=="net", ACTION=="add", ATTR{address}=="16:0D:EC:AF:11:01", NAME="wan"
SUBSYSTEM=="net", ACTION=="add", ATTR{address}=="16:0D:EC:AF:11:02", NAME="prod"
SUBSYSTEM=="net", ACTION=="add", ATTR{address}=="16:0D:EC:AF:11:03", NAME="dev"
SUBSYSTEM=="net", ACTION=="add", ATTR{address}=="16:0D:EC:AF:11:04", NAME="shared"
SUBSYSTEM=="net", ACTION=="add", ATTR{address}=="16:0D:EC:AF:11:05", NAME="transit"
Once the system comes back up, Puppet will run immediately, and we take advantage of this! At the end of code block identifying if the interface is still called eth0, if it isn’t called eth0, we can set some IP addresses here. To do that, we use the MAC address allocation again! This time we’re using the second-from-last pair of hex digits to work out the firewall ID, and we use that firewall ID to identify the subnets to use, by adding this ID to the base value for the third IP octet in the local subnets (shared, prod, dev) and the last IP octet in the connecting subnets (wan and transit). Let’s take a look at just this bit. It starts at the top of the file, where we pass some parameters into the class:
class nftablesfirewall::interfaces (
  String  $network_base   = '198.18',
  Integer $prod_base      = 32, # Start of Supernet
  Integer $prod_mask      = 24,
  Integer $dev_base       = 64, # Start of Supernet
  Integer $dev_mask       = 24,
  Integer $shared_base    = 96, # Start of Supernet
  Integer $shared_mask    = 24,
  Integer $transit_actual = 255,
  Integer $transit_mask   = 24,
) {
And then later, we have this:
    #################################################################
    # This block here works out which host we are, based on the 5th
    # octet of the MAC address
    #################################################################
    $vm_offset = Integer(
      regsubst(
        $facts['networking']['interfaces']['wan']['mac'],
        '.*:([0-9A-Fa-f]{2}):[0-9A-Fa-f]{2}$',
        '\1'
      )
    )

    #################################################################
    # Next calculate the IP addresses to assign to each NIC
    #################################################################
    $transit_ip    = "${network_base}.${transit_actual}.${vm_offset}/${transit_mask}"
    $dev_actual    = $dev_base + $vm_offset
    $dev_ip        = "${network_base}.${dev_actual}.1/${dev_mask}"
    $prod_actual   = $prod_base + $vm_offset
    $prod_ip       = "${network_base}.${prod_actual}.1/${dev_mask}"
    $shared_actual = $shared_base + $vm_offset
    $shared_ip     = "${network_base}.${shared_actual}.1/${dev_mask}"
Once we have these values, we can start assigning IP addresses. In the diagram at the top of the page, I used the offsets 11 for fwA and 12 for fwB, and in the diagram it shows the IP addresses allocated to each of those networks; for fwA, wan gets a DHCP address, prod gets 198.15.43.1/24 ,dev gets 198.15.75.1/24, and shared gets 198.15.107.1/24, transit gets 198.15.255.11/24. These are all offset from the supernet allocation. If you were expecting more hosts than 32 in your supernet (the array starts at “0”, so offsets of 0 to 31) then you could allocate different ranges!
Anyway, to allocate the addresses to the interfaces, I want to use NetworkManager, as it’s built into these systems, and has some pretty good tooling around it. You can either mangle text files and re-apply them, or interact with a command line tool called nmcli. Rather than putting a whole load of work into building the text files, or executing lots of nested nmcli commands, I wrote a single python script, called configure_nm_if.py, and we execute this from the manifest, both as a test, to see if we need to make any changes, and to make the change itself.
    exec { 'Configure WAN Interface': # wan interface uses DHCP, so set to auto
      require => File['/usr/local/sbin/configure_nm_if.py'],
      command => '/usr/local/sbin/configure_nm_if.py wan auto',
      unless  => '/usr/local/sbin/configure_nm_if.py wan auto --test',
      notify  => Exec['Reboot'],
    }
    exec { 'Configure Dev Interface':
      require => File['/usr/local/sbin/configure_nm_if.py'],
      command => "/usr/local/sbin/configure_nm_if.py dev ${dev_ip}",
      unless  => "/usr/local/sbin/configure_nm_if.py dev ${dev_ip} --test",
      notify  => Exec['Reboot'],
    }
The script starts by working out which interfaces are configured by checking all the files in /etc/NetworkManager/system-connections and /run/NetworkManager/system-connections. In each of those files, lines are generally split into a key (like “interface” or “uuid”) and a value, which is what we’re looking for. Here’s that bit of code:
class nm_profile:
    file = None
    settings = {}

    def __init__(self, search_string: str):
        if search_string is None:
            raise ArgumentException('Invalid Search String')
        search = re.compile(f'^([^=]+)=(.*)\s*$')
        nm_dir = pathlib.Path("/run/NetworkManager/system-connections")
        for file_path in nm_dir.glob("*.nmconnection"):
            if file_path == search_string:
                self.file = file_path
            else:
                with open(file_path, "r") as f:
                    lines = f.readlines()
                    for line in lines:
                        compare = search.match(line)
                        if compare and compare.group(2) == search_string:
                            self.file = file_path
                            break
            if self.file is not None:
                break
        # Do the same thing for /etc/NetworkManager (cropped for brevity)
        if self.file is None:
            raise ProfileNotFound(
                f'Unable to find a profile matching the search string "{search_string}"')

        nmcli = subprocess.run(
            ["/bin/nmcli", "--terse", "connection", "show", self.file],
            capture_output=True, text=True
        )
        for line in nmcli.stdout.splitlines():
            data = line.split(":", 1)
            value = data[1].strip()
            if value == '':
                value = None
            self.settings[data[0].strip()] = value
This means that when we find the file with the configuration we want, run nmcli to get the full, calculated collection of settings for that file. Next we work out if anything would change from what it is (from the nmcli connection show command) and what we want it to be (from the arguments we pass into the script). That’s here:
def main():
    parser = argparse.ArgumentParser(
        description="Modify NetworkManager connection settings.")
    parser.add_argument("ifname", help="Interface name")
    parser.add_argument("ip", help="IP address or 'auto'")
    parser.add_argument("--dryrun", action="store_true",
                        help="Enable dry run mode")
    parser.add_argument("--test", action="store_true",
                        help="Enable test mode")
    args = parser.parse_args()

    actions = {}

    nm = nm_profile(args.ifname)

    current_id = nm.settings.get("connection.id")
    next_id = args.ifname
    if current_id != next_id:
        logging.debug(f'Change id from "{current_id}" to "{next_id}"')
        actions['connection.id'] = next_id

    current_method = nm.settings.get("ipv4.method")
    next_method = "manual" if args.ip != "auto" else "auto"

    if current_method != next_method:
        logging.debug(f'Change method from {current_method} to {next_method}')
        actions['ipv4.method'] = next_method

    current_ip = nm.settings.get("ipv4.addresses")
    next_ip = args.ip if args.ip != "auto" else None
    if next_ip is None and current_ip is not None:
        logging.debug(f'Change ipv4.address from {current_ip} to ""')
        actions['ipv4.addresses'] = ""
    elif next_ip != current_ip:
        logging.debug(
            f'Change ipv4.address from {current_ip if not None else "None"} to {next_ip}')
        actions['ipv4.addresses'] = next_ip
And then we use the fact that there are, or aren’t changes to be made, and either, if we’re testing for those changes, return a “success” or a “failure” (to provoke the manifest to trigger the change), or make the change. That’s here:
    if len(actions) > 0:
        if args.test:
            logging.debug('There are outstanding actions, exit rc 1')
            sys.exit(1)

        command = [
            '/bin/nmcli', 'connection', 'modify',
            nm.settings.get('connection.uuid', str(nm.file))
        ]

        for action in actions.keys():
            command.append(action)
            command.append(actions[action])
        logging.info(f'About to run the following command: {command}')

        if not args.dryrun:
            nmcli = subprocess.run(
                command,
                capture_output=True, text=True
            )
            if nmcli.returncode > 0:
                raise NmcliFailed(
                    f'Failed to run command {command}, RC: {nmcli.returncode} StdErr: {nmcli.stderr} StdOut: {nmcli.stdout}')
And then if we’ve made changes, we restart the connection, which provides us with a test that the change is a valid one!
        command = [
            '/bin/nmcli', 'connection', 'down', nm.settings.get(
                'connection.uuid', str(nm.file))
        ]
        logging.info(f'About to run the following command: {command}')

        if not args.dryrun:
            nmcli = subprocess.run(
                command,
                capture_output=True, text=True
            )
            if nmcli.returncode > 0:
                raise NmcliFailed(
                    f'Failed to run command {command}, RC: {nmcli.returncode} StdErr: {nmcli.stderr} StdOut: {nmcli.stdout}')

            command = [
                '/bin/nmcli', 'connection', 'up', nm.settings.get(
                    'connection.uuid', str(nm.file))
            ]
            logging.info(f'About to run the following command: {command}')
            nmcli = subprocess.run(
                command,
                capture_output=True, text=True
            )
            if nmcli.returncode > 0:
                raise NmcliFailed(
                    f'Failed to run command {command}, RC: {nmcli.returncode} StdErr: {nmcli.stderr} StdOut: {nmcli.stdout}')
Once that script has executed for each of the interfaces, we trigger a reboot (30 seconds after the Puppet agent has finished running, again). This is because the Puppet agent only gathers the details of the interfaces when it first runs, and so the subsequent manifests need these interfaces to be detected properly.
I mentioned before that the interfaces subclass needed to do three things. The last thing it “should” do is nothing, because this subclass is heavily reliant on reboots! If there are no changes it needs to make, just let the code carry on so we can start working with the other aspects, and we’ll go next to BGP.
A brief note on my understanding of BGP
I want to take a quick diversion here before I get started on the puppet code here. I’m not hugely comfortable with BGP, or, in fact, any of the dynamic routing protocols. I do understand that it’s a core and key part of the internet, and without it networking teams across the world would be lost!
That said, I’ve relied heavily on advice from a colleague at this point, so while this file does work, it may not be best practice. Please speak to someone more competent and confident with routing to help you if you have ANY issues what-so-ever at this point!
Routing with BGP and FRR
I’m using FRR to setup BGP peers. Each peer advertises it’s own network segment to all it’s peers. Like with the interface subclass manifest, we calculate the network segments in the same way for the BGP subclass manifest. We also build a list of all of the peers (the other firewalls in the supernets)
  if ($facts['networking']['interfaces']['transit'] and $facts['networking']['interfaces']['transit']['ip']) {
    $vm_lan_ip_address = $facts['networking']['interfaces']['transit']['ip']

    #################################################################
    ######## Work out the offset to get the firewall ID
    #################################################################
    $split_ip = split($vm_lan_ip_address, '[.]')
    # Extract the last octet, ensuring it exists
    if $split_ip and size($split_ip) == 4 {
      $vm_last_octet = Integer($split_ip[3])

      # Time to add the other important addresses for this device
      $dev_address    = "${network_base}.${$dev_offset + $vm_last_octet}.0/24"
      $prod_address   = "${network_base}.${$prod_offset + $vm_last_octet}.0/24"
      $shared_address = "${network_base}.${$shared_offset + $vm_last_octet}.0/24"

      # Calculate the peers from the range 0..31 (excluding this one)
      $peer_addresses = range(0, 31).map |$i| {
        "${network_base}.${transit_octet}.${i}"
      }.filter |$ip| { $ip != $vm_lan_ip_address }
We can start to build our configuration file… after we’ve defined a handful of initial variables:
class nftablesfirewall::bgp (
  String  $bgp_our_asn            = '65513',
  Boolean $bgp_our_peer_enabled   = true,
  Boolean $bgp_advertise_networks = true,
  Boolean $bgp_cloud_peer_enabled = false,
  String  $bgp_cloud_peer_asn     = '65511',
  Array   $bgp_cloud_peer_ips     = ['198.18.0.2', '198.18.0.3'],
  String  $network_base           = '198.18',
  Integer $transit_octet          = 255,
  Integer $prod_offset            = 32,
  Integer $dev_offset             = 64,
  Integer $shared_offset          = 96,
) {
The ASNs are in the range of “Private ASNs” from 64512-65535 allocated by IANA in RFC1930, and are roughly equivalent to the IP allocation 10.0.0.0/8.
FRR configuration looks a little like a Cisco Router, and starts off as a template, like this:
! ######################################################
! # Basic Setup
! ######################################################
!
log syslog informational
frr defaults traditional
!
! ######################################################
! # Our BGP side
! ######################################################
!
router bgp <%= @bgp_our_asn %>
no bgp ebgp-requires-policy
bgp router-id <%= @vm_lan_ip_address %>
!
<%- if @bgp_our_peer_enabled -%>
! ######################################################
! # Firewall BGP peers (how we find our own routes)
! ######################################################
!
neighbor FW-PEERS peer-group
neighbor FW-PEERS remote-as <%= @bgp_our_asn %>
<% @peer_addresses.each do |ip| -%>
neighbor <%= ip %> peer-group FW-PEERS
<% end -%>
!
<%- end -%>
<%- if @bgp_cloud_peer_enabled -%>
! ######################################################
! # Cloud BGP peers (how Cloud finds us)
! ######################################################
!
neighbor CLOUD-PEERS peer-group
neighbor CLOUD-PEERS remote-as <%= @bgp_cloud_peer_asn %>
<% @bgp_cloud_peer_ips.each do |ip| -%>
neighbor <%= ip %> peer-group CLOUD-PEERS
<% end -%>
!
<%- end -%>
<%- if @bgp_advertise_networks -%>
! ######################################################
! # Our local networks
! ######################################################
!
address-family ipv4 unicast
    network <%= @dev_address %>
    network <%= @prod_address %>
    network <%= @shared_address %>
!
<%- end -%>
<%- if @bgp_our_peer_enabled -%>
! ######################################################
! Firewall BGP peers
! ######################################################
!
neighbor FW-PEERS activate
!
<%- end -%>
<%- if @bgp_cloud_peer_enabled -%>
! ######################################################
! Cloud BGP peers
! ######################################################
!
neighbor CLOUD-PEERS activate
!
<%- end -%>
exit-address-family
!
! ######################################################
! We don't use IPv6 yet
! ######################################################
!
address-family ipv6 unicast
exit-address-family
!
When rendered down, it looks like this:
aaWhen FRR is running we can access the “virtual TTY” interface of FRR by running vtysh and issuing commands. The main one I’ve been using is show ip bgp summary which tells you if your peer is connected, like this:
[root@vms11fw11 frr]# vtysh

Hello, this is FRRouting (version 8.5.3).
Copyright 1996-2005 Kunihiro Ishiguro, et al.

vms11fw11# show ip bgp summary

IPv4 Unicast Summary (VRF default):
BGP router identifier 198.15.255.11, local AS number 65513 vrf-id 0
BGP table version 6
RIB entries 11, using 2112 bytes of memory
Peers 31, using 22 MiB of memory
Peer groups 1, using 64 bytes of memory

Neighbor        V         AS   MsgRcvd   MsgSent   TblVer  InQ OutQ  Up/Down State/PfxRcd   PfxSnt Desc
198.18.255.0    4      65513         0         0        0    0    0    never       Active        0 N/A
198.18.255.1    4      65513         0         0        0    0    0    never       Active        0 N/A
198.18.255.2    4      65513         0         0        0    0    0    never       Active        0 N/A
198.18.255.3    4      65513         0         0        0    0    0    never       Active        0 N/A
198.18.255.4    4      65513         0         0        0    0    0    never       Active        0 N/A
198.18.255.5    4      65513         0         0        0    0    0    never       Active        0 N/A
198.18.255.6    4      65513         0         0        0    0    0    never       Active        0 N/A
198.18.255.7    4      65513         0         0        0    0    0    never       Active        0 N/A
198.18.255.8    4      65513         0         0        0    0    0    never       Active        0 N/A
198.18.255.9    4      65513         0         0        0    0    0    never       Active        0 N/A
198.18.255.10   4      65513         0         0        0    0    0    never       Active        0 N/A
198.18.255.12   4      65513         4         4        0    0    0 00:00:27            3        3 N/A
198.18.255.13   4      65513         0         0        0    0    0    never       Active        0 N/A
198.18.255.14   4      65513         0         0        0    0    0    never       Active        0 N/A
198.18.255.15   4      65513         0         0        0    0    0    never       Active        0 N/A
198.18.255.16   4      65513         0         0        0    0    0    never       Active        0 N/A
198.18.255.17   4      65513         0         0        0    0    0    never       Active        0 N/A
198.18.255.18   4      65513         0         0        0    0    0    never       Active        0 N/A
198.18.255.19   4      65513         0         0        0    0    0    never       Active        0 N/A
198.18.255.20   4      65513         0         0        0    0    0    never       Active        0 N/A
198.18.255.21   4      65513         0         0        0    0    0    never       Active        0 N/A
198.18.255.22   4      65513         0         0        0    0    0    never       Active        0 N/A
198.18.255.23   4      65513         0         0        0    0    0    never       Active        0 N/A
198.18.255.24   4      65513         0         0        0    0    0    never       Active        0 N/A
198.18.255.25   4      65513         0         0        0    0    0    never       Active        0 N/A
198.18.255.26   4      65513         0         0        0    0    0    never       Active        0 N/A
198.18.255.27   4      65513         0         0        0    0    0    never       Active        0 N/A
198.18.255.28   4      65513         0         0        0    0    0    never       Active        0 N/A
198.18.255.29   4      65513         0         0        0    0    0    never       Active        0 N/A
198.18.255.30   4      65513         0         0        0    0    0    never       Active        0 N/A
198.18.255.31   4      65513         0         0        0    0    0    never       Active        0 N/A

Total number of neighbors 31
vms11fw11#
There is a separate block of configuration which allows for the upstream cloud provider to also offer BGP, but this is not available in Vagrant!
What’s next?
Defining your Firewall policy
I mentioned at the top of the post that I was using NFTables, which is the successor to IPTables. The policy we are defining is very simple, but you can see quite quickly how this policy can be enhanced. This isn’t a template (although it could be), it’s just a plain file that Puppet installs via the policy subclass manifest, and then configures the default value in sysconfig to load that policy file.
How does that policy look? It has four pieces, variable definitions, the input policy, the forward policy and the postrouting masquerading (or NAT) chain. Let’s pick these apart separately.
In each block (table inet filter for policy elements and table ip nat for Masquerading) we can define some variables. They are separate and distinct from each other. Here I’ll specify all of the supernets (both “this cloud” and “another cloud”) in the policy and just the relevant local supernets for the masquerading.
#!/usr/sbin/nft -f

flush ruleset

table inet filter {

    ##############################################################################
    # Define network objects to be used later
    ##############################################################################
    set management_networks {
      type ipv4_addr
      flags interval
      ##############################################
      # NOTES BELOW ON WHY EACH NETWORK IS SPECIFIED
      ##############################################
      #            Vagrant      Local          Cloud
      elements = { 10.0.2.0/24, 198.18.0.0/19, 198.19.0.0/19 }
    }

    set prod_networks {
      type ipv4_addr
      flags interval
      ##############################################
      # NOTES BELOW ON WHY EACH NETWORK IS SPECIFIED
      ##############################################
      #            Local           Cloud
      elements = { 198.18.32.0/19, 198.19.32.0/19 }
    }

    set dev_networks {
      type ipv4_addr
      flags interval
      ##############################################
      # NOTES BELOW ON WHY EACH NETWORK IS SPECIFIED
      ##############################################
      #            Local           Cloud
      elements = { 198.18.64.0/19, 198.19.64.0/19 }
    }

    set shared_networks {
      type ipv4_addr
      flags interval
      ##############################################
      # NOTES BELOW ON WHY EACH NETWORK IS SPECIFIED
      ##############################################
      #            Local           Cloud
      elements = { 198.18.96.0/19, 198.19.96.0/19 }
    }

    # ...... Chains follow

    chain output {
        type filter hook output priority 0; policy accept;
    }
}

table ip nat {
    ##############################################################################
    # Define network objects to be used later
    ##############################################################################
    set masq_networks {
      type ipv4_addr
      flags interval
      ##############################################
      # NOTES BELOW ON WHY EACH NETWORK IS SPECIFIED
      ##############################################
      #            Prod            Dev             Shared
      elements = { 198.18.32.0/19, 198.18.64.0/19, 198.18.96.0/19 }
    }

    # ...... Chain follows
}
Input refers to what traffic is connecting to the host in question. As it’s a firewall, we want as little available as possible; ICMP, SSH from management addresses, DHCP assignment for VMs attached to this firewall, and BGP, to allow the peers to see each other. We should also allow established traffic to flow, and the “loopback” lo interface, should be allowed to talk to anything on this host. This is actually combined with the previous code block, and I’ll indicate where that has happened, like I did before.
table inet filter {
    # ...... Variables as before
    chain input {
        type filter hook input priority 0; policy drop;

        # Allow loopback traffic
        iifname "lo" accept

        # Allow established and related connections
        ct state { established, related } accept

        # Allow ICMP traffic
        ip protocol icmp accept

        # Allow SSH (TCP/22) from specific subnets
        ip saddr @management_networks tcp dport 22 log prefix "A-NFT-input.management: " accept
        ip saddr @shared_networks     tcp dport 22 log prefix "A-NFT-input.shared: " accept

        # Allow DHCP and BOOTP traffic
        # This means that the nodes attached to this device can get IP addresses.
        ip protocol udp udp sport 68 udp dport 67 accept
        ip protocol udp udp sport 67 udp dport 68 accept

        # Allow BGP across the Transit interface
        iifname "transit" ip protocol tcp tcp dport 179 accept
        oifname "transit" ip protocol tcp tcp dport 179 accept

        # Drop everything else
        log prefix "DROP_ALL-NFT-input: " drop
    }
    # ...... Forward chain follows
}
Forwarding relates to what passes over this box. We want:
- all established traffic to be allowed to pass
- almost all ICMP traffic to be permitted
- the shared supernet to be able to talk to any host
- the dev supernet to be able to talk to any other host in the dev supernet, or to any host in the shared supernet
- the prod supernet to be able to talk to any other host in the prod supernet, or to any host in the shared supernet
- any host in the shared, dev and prod supernets to be able to talk to any host on the internet (except excluded network ranges)
- excluded network ranges to be dropped
Let’s take a look at that.
table inet filter {
    # ...... Variables as before
    # ...... Input chain as before
    chain forward {                                         # Forward is "What can go THROUGH this host"
        type filter hook forward priority 0; policy drop;

        # Allow established and related connections
        ct state { established, related } accept

        # ICMP rules
        ip protocol icmp icmp type { echo-reply, echo-request, time-exceeded, destination-unreachable } accept

        # Shared network can talk out to anything
        ip saddr @shared_networks log prefix "A-NFT-forward.shared-any: " accept

        # Allow intra-segment traffic
        ip saddr @dev_networks    ip daddr @dev_networks  log prefix "A-NFT-forward.dev-dev: "   accept
        ip saddr @prod_networks   ip daddr @prod_networks log prefix "A-NFT-forward.prod-prod: " accept

        # Allow Prod, Dev access to Shared
        ip saddr @dev_networks    ip daddr @shared_networks log prefix "A-NFT-forward.dev-shared: " accept
        ip saddr @prod_networks   ip daddr @shared_networks log prefix "A-NFT-forward.prod-shared: " accept

        # Allow all segments access to the Internet, block the following subnets
        ip daddr != {
          0.0.0.0/8,                                      # RFC1700 (local network)
          10.0.0.0/8, 172.16.0.0/12, 192.168.0.0/16,      # RFC1918 (private networks)
          169.254.0.0/16,                                 # RFC3300 (link local)
          192.0.0.0/24,                                   # RFC5736 ("special purpose")
          192.0.2.0/24, 198.51.100.0/24, 203.0.113.0/24,  # RFC5737 ("TEST-NET")
          192.88.99.0/24,                                 # RFC3068 ("6to4 relay")
          198.18.0.0/15,                                  # RFC2544 ("Inter-networking tests")
          224.0.0.0/4, 240.0.0.0/4                        # RFC1112, RFC6890 ("Special Purpose" and Multicast)
        } log prefix "A-NFT-forward.all-internet: " accept

        # Drop everything else
        log prefix "DROP_ALL-NFT-forward: " drop
    }
}
And lastly, we take a look at the Masquerading part of this. Here we want to masquerade (or “Hide NAT”) any traffic leaving on the WAN interface.
table ip nat {
    # ...... Variables as before
    chain postrouting {
        type nat hook postrouting priority 100; policy accept;

        # Masquerade all traffic going out of the WAN interface
        ip saddr @masq_networks oifname "wan" masquerade
    }
}
As you can see, the language of these policies is quite easy:
iifnamethe interface the traffic came in onoifnamethe interface the traffic exits onip saddrthe IP address, subnets or variable name the source address is inip daddrthe IP address, subnets or variable name the destination address is inip protocol {udp|tcp|icmp}the protocol that the service travels over{tcp|udp} sportThe source TCP or UDP port{tcp|udp} dportThe destination TCP or UDP portct statethe connection status of a packetacceptPermit the traffic to flowdropStop the traffic from flowinglog prefix "Some String"Add a prefix to the log line
By making this file executable, the #!/usr/sbin/nft -f at the start of the file means that to apply this policy, you just need to execute it! Dead simple.
The only thing left to do is to setup DHCP for the nodes and to test it!
DHCPd
DHCP is a protocol for automatically assigning IP addresses to nodes. In this case, we’re using dnsmasq, which is a small server that performs DNS resolution, as well as DHCP and, if we need it later, TFTP. This is a simple package-install away, and a very simple configuration file template too.
dhcp-option=option:dns-server,<%= @dns_servers %>

# Listen only on the specified interfaces
interface=<%= @dev_nic %>
dhcp-range=<%= @dev_nic %>,<%= @dev_subnet %>.10,<%= @dev_subnet %>.250,255.255.255.0,6h
dhcp-option=<%= @dev_nic %>,option:router,<%= @dev_gateway %>

interface=<%= @prod_nic %>
dhcp-range=<%= @prod_nic %>,<%= @prod_subnet %>.10,<%= @prod_subnet %>.250,255.255.255.0,6h
dhcp-option=<%= @prod_nic %>,option:router,<%= @prod_gateway %>

interface=<%= @shared_nic %>
dhcp-range=<%= @shared_nic %>,<%= @shared_subnet %>.10,<%= @shared_subnet %>.250,255.255.255.0,6h
dhcp-option=<%= @shared_nic %>,option:router,<%= @shared_gateway %>
Here we define the network interface to listen on (ending _nic) and the subnet range to allocate (ending _subnet) as well as the gateway address of this host (ending _gateway). We’ve also told it where to get it’s DNS records from too (dns_servers).
Building the testing hosts
Back to our Vagrantfile. We define the “VM” entries in the diagram at the top, attached to each of the networks, (Prod, Dev and Shared) on the A and B sides. The configuration is largely the same between each of these items, so I’ll only show one of them:
  config.vm.define :prodA do |config|
    config.vm.network "private_network", auto_config: false, virtualbox__intnet: "prodA"
    config.vm.network "private_network", ip: "192.168.56.#{vms_A_number + 10}", name: "vboxnet0"
    config.vm.hostname = "prod-#{vms_A_number}"
    config.vm.provision "shell", path: "client/manage_routes.sh"
  end
Honestly, the hostname didn’t need to be set, but makes life easier, and the private_network on vboxnet0 is just there for the DNF Cache, as we’re not using Puppet here. The only thing the client/manage_routes.sh script does is to remove the default route that Vagrant puts in to connect the node to the host for outbound NAT, ensuring it all goes through the firewall!
So, once we’ve got all of that, we can test it!
Testing your Lab
Running vagrant up will start all the VMs. Each node has 2GB of RAM, plus the puppet server which has 4GB, so make sure your host OS has at least 20GB RAM. Once you’re done with your test, destroy it with vagrant destroy and it will ask you if you’re sure. If you’ve done some tweaking, and need to re-provision something, run vagrant provision or vagrant up --provision. You can also just do vagrant up hostname (like vagrant up puppet, vagrant up puppet fwA or vagrant up puppet fwA fwB, for example) or vagrant destroy hostname to manage individual nodes.
Because of how Puppet works, if you do this, be aware you may need to remove puppet certificates with puppetserver ca clean --certname hostname.as.fqdn (you’ll see the hostnames when puppet agent is run). Honestly, I ended up recreating everything if I was doing that much tweaking!
Once you’ve got nodes up and running, you can run vagrant ssh hostname (like vagrant ssh prodA) and execute commands on there. Remember up near the top of this, I created an nginx server? With this, and running for node in prodA prodB devA devB sharedA sharedB; do echo $node ; vagrant ssh $node -- ip -4 -br a ; done to get a list of the IP addresses, you can run vagrant ssh prodA -- curl http://ip.for.sharedA.node (like vagrant ssh prodA -- curl http://198.18.107.123) to make sure that your traffic across the firewalls is working right.
You can also do vagrant ssh fwA and then run sudo journalctl -k | grep A-NFT-forward to see packets flowing across the firewall, sudo journalctl -k | grep DROP_ALL-NFT to see packets being dropped, and sudo journalctl -k | grep A-NFT-input to see packets destined for the firewall. Beware with that last one, you’ll also see all your new SSH connections into it!
Wow! This is a BIG one! I hope you’ve found it useful. It took a while to build, and even longer to test! Enjoy!!