A note to myself; resetting error status on proxmox HA workloads after a crash

I’ve had a couple of issues with brown-outs recently which have interrupted my Proxmox server, and stopped my connected disks from coming back up cleanly (yes, I’m working on that separately!) but it’s left me in a state where several of my containers and virtual machines on the cluster are down.

It’s possible to point-and-click your way around this, but far easier to script it!

A failed state may look like this:

root@proxmox1:~# ha-manager status
quorum OK
master proxmox2 (active, Fri Mar 22 10:40:49 2024)
lrm proxmox1 (active, Fri Mar 22 10:40:52 2024)
lrm proxmox2 (active, Fri Mar 22 10:40:54 2024)
service ct:101 (proxmox1, error)
service ct:102 (proxmox2, error)
service ct:103 (proxmox2, error)
service ct:104 (proxmox1, error)
service ct:105 (proxmox1, error)
service ct:106 (proxmox2, error)
service ct:107 (proxmox2, error)
service ct:108 (proxmox1, error)
service ct:109 (proxmox2, error)
service vm:100 (proxmox2, error)

Once you’ve fixed your issue, you can do this on each node:

for worker in $(ha-manager status | grep "($(hostnamectl hostname), error)" | cut -d\  -f2)
do
  echo "Disabling $worker"
  ha-manager set $worker --state disabled
  until ha-manager status | grep "$worker" | grep -q disabled ; do sleep 1 ; done
  echo "Restarting $worker"
  ha-manager set $worker --state started
  until ha-manager status | grep "$worker" | grep -q started ; do sleep 1 ; done
done

Note that this hasn’t been tested, but a scan over it with those nodes working suggests it should. I guess I’ll be updating this the next time I get a brown-out!

A padlock and chain on a rusted gate

Using #NetworkFirewall and #Route53 #DNS #Firewall to protect a private subnet’s egress traffic in #AWS

I wrote this post in January 2023, and it’s been languishing in my Drafts folder since then. I’ve had a look through it, and I can’t see any glaring reasons why I didn’t publish it so… it’s published… Enjoy 😁

If you’ve ever built a private subnet in AWS, you know it can be a bit tricky to get updates from the Internet – you end up having a NAT gateway or a self-managed proxy, and you can never be 100% certain that the egress traffic isn’t going somewhere you don’t want it to.

In this case, I wanted to ensure that outbound HTTPS traffic was being blocked if the SNI didn’t explicitly show the DNS name I wanted to permit through, and also, I only wanted specific DNS names to resolve. To do this, I used AWS Network Firewall and Route 53 DNS Firewall.

I’ve written this blog post, and followed along with this, I’ve created a set of terraform files to represent the steps I’ve taken.

The Setup

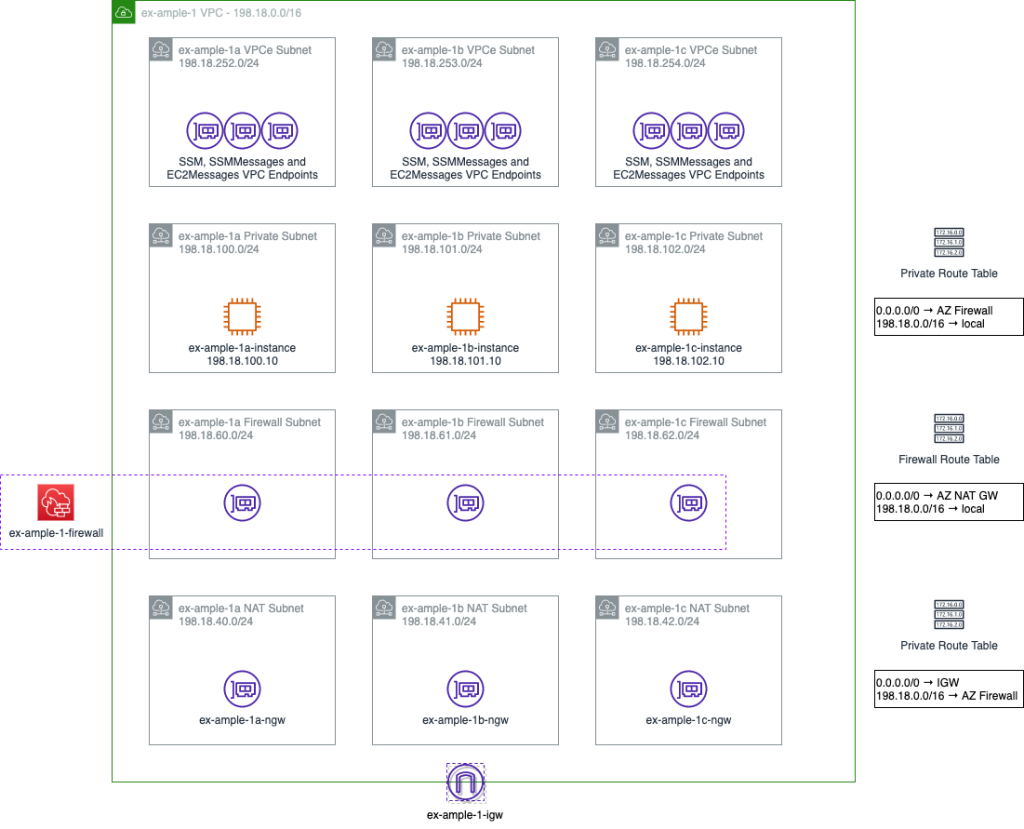
Let’s start this story from a simple VPC with three private subnets for my compute resources, and three private subnets for the VPC Endpoints for Systems Manager (SSM).

Here’s our network diagram, with the three subnets containing the VPC Endpoints at the top, and the three instances at the bottom.

I’ve created a tag in my Github repo at this “pre-changes” state, called step 1.

At this point, none of those instances can reach anything outside the network, with the exception of the SSM environment. So, we can’t install any packages, we can’t get data from outside the network or anything similar.

Getting Protected Internet Access

In order to get internet access, we need to add 4 things;

  1. An internet gateway
  2. A NAT gateway in each AZ
  3. Which needs three new subnets
  4. And three Elastic IP addresses
  5. Route tables in all the subnets

To clarify, a NAT gateway acts like a DSL router. It hides the source IP address of outbound traffic behind a single, public IP address (using an Elastic IP from AWS), and routes any return traffic back to wherever that traffic came from. To reduce inter-AZ data transfer rates, I’m putting one in each AZ, but if there’s not a lot of outbound traffic or the outbound traffic isn’t critical enough to require resiliency, this could all be centralised to a single NAT gateway. To put a NAT gateway in each AZ, you need a subnet in each AZ, and to get out to the internet (by whatever means you have), you need an internet gateway and route tables for how to reach the NAT and internet gateways.

We also should probably add, at this point, four additional things.

  1. The Network Firewall
  2. Subnets for the Firewall interfaces
  3. Stateless Policy
  4. Stateful Policy

The Network Firewall acts like a single appliance, and uses a Gateway Load Balancer to present an interface into each of the availability zones. It has a stateless policy (which is very fast, but needs to address both inbound and outbound traffic flows) to do IP and Port based filtering (referred to as “Layer 3” filtering) and then specific traffic can be passed into a stateful policy (which is slower) to do packet and flow inspection.

In this case, I only want outbound HTTPS traffic to be passed, so my stateless rule group is quite simple;

  • VPC range on any port → Internet on TCP/443; pass to Stateful rule groups
  • Internet on TCP/443 → VPC range on any port; pass to Stateful rule groups

I have two stateful rule groups, one is defined to just allow access out to example.com and any relevant subdomains, using the “Domain List” stateful policy item. The other allows access to example.org and any relevant subdomains, using a Suricata stateful policy item, to show the more flexible alternative route. (Suricata has lots more filters than just the SNI value, you can check for specific SSH versions, Kerberos CNAMEs, SNMP versions, etc. You can also add per-rule logging this way, which you can’t with the Domain List route).

These are added to the firewall policy, which also defines that if a rule doesn’t match a stateless rule group, or an established flow doesn’t match a stateful rule group, then it should be dropped.

New network diagram with more subnets and objects, but essentially, as described in the paragraphs above. Traffic flows from the instances either down towards the internet, or up towards the VPCe.

I’ve created a tag in my Github repo at this state, with the firewall, NAT Gateway and Internet Gateway, called step 2.

So far, so good… but why let our users even try to resolve the DNS name of a host they’re not permitted to reach. Let’s turn on DNS Firewalling too.

Turning on Route 53 DNS Firewall

You’ll notice that in the AWS Network Firewall, I didn’t let DNS out of the network. This is because, by default, AWS enables Route 53 as it’s local resolver. This lives on the “.2” address of the VPC, so in my example environment, this would be 198.18.0.2. Because it’s a local resolver, it won’t cross the Firewall exiting to the internet. You can also make Route 53 use your own DNS servers for specific DNS resolution (for example, if you’re running an Active Directory service inside your network).

Any Network Security Response team members you have working with you would appreciate it if you’d turn on DNS Logging at this point, so I’ll do it too!

In March 2021, AWS announced “Route 53 DNS Firewall”, which allow this DNS resolver to rewrite responses, or even to completely deny the existence of a DNS record. With this in mind, I’m going to add some custom DNS rules.

The first thing I want to do is to only permit traffic to my specific list of DNS names – example.org, example.com and their subdomains. DNS quite likes to terminate DNS names with a dot, signifying it shouldn’t try to resolve any higher up the chain, so I’m going to make a “permitted domains” DNS list;

example.com.
example.org.
*.example.com.
*.example.org.

Nice and simple! Except, this also stops me from being able to access the instances over SSM, so I’ll create a separate “VPCe” DNS list:

ssm.ex-ample-1.amazonaws.com.
*.ssm.ex-ample-1.amazonaws.com.
ssmmessages.ex-ample-1.amazonaws.com.
*.ssmmessages.ex-ample-1.amazonaws.com.
ec2messages.ex-ample-1.amazonaws.com.
*.ec2messages.ex-ample-1.amazonaws.com.

Next I create a “default deny” DNS list:

*.

And then build a DNS Firewall Policy which allows access to the “permitted domains”, “VPCe” lists, but blocks resolution of any “default deny” entries.

I’ve created a tag in my Github repo at this state, with the Route 53 DNS Firewall configured, called step 3.

In conclusion…

So there we have it. While the network is not “secure” (there’s still a few gaps here) it’s certainly MUCH more secure than it was, and it certainly would take a lot more work for anyone with malicious intent to get your content out.

Feel free to have a poke around, and leave comments below if this has helped or is of interest!

"Fishing fleet" by "Nomad Tales" on Flickr

Using Terraform to select multiple Instance Types for an Autoscaling Group in AWS

Tale as old as time, the compute instance type you want to use in AWS is highly contested (or worse yet, not as available in every availability zone in your region)! You plead with your TAM or AM “Please let us have more of that instance type” only to be told “well, we can put in a request, but… haven’t you thought about using a range of instance types”?

And yes, I’ve been on both sides of that conversation, sadly.

The commented terraform

# This is your legacy instance_type variable. Ideally we'd have
# a warning we could raise at this point, telling you not to use
# this variable, but... it's not ready yet.
variable "instance_type" {
  description = "The legacy single-instance size, e.g. t3.nano. Please migrate to instance_types ASAP. If you specify instance_types, this value will be ignored."
  type        = string
  default     = null
}

# This is your new instance_types value. If you don't already have
# some sort of legacy use of the instance_type variable, then don't
# bother with that variable or the locals block below!
variable "instance_types" {
  description = "A list of instance sizes, e.g. [t2.nano, t3.nano] and so on."
  type        = list(string)
  default     = null
}

# Use only this locals block (and the value further down) if you
# have some legacy autoscaling groups which might use individual
# instance_type sizes.
locals {
  # This means if var.instance_types is not defined, then use it,
  # otherwise create a new list with the single instance_type
  # value in it!
  instance_types = var.instance_types != null ? var.instance_types : [ var.instance_type ]
}

resource "aws_launch_template" "this" {
  # The prefix for the launch template name
  # default "my_autoscaling_group"
  name_prefix = var.name

  # The AMI to use. Calculated outside this process.
  image_id = data.aws_ami.this.id

  # This block ensures that any new instances are created
  # before deleting old ones.
  lifecycle {
    create_before_destroy = true
  }

  # This block defines the disk size of the root disk in GB
  block_device_mappings {
    device_name = data.aws_ami.centos.root_device_name
    ebs {
      volume_size = var.disksize # default "10"
      volume_type = var.disktype # default "gp2"
    }
  }

  # Security Groups to assign to the instance. Alternatively
  # create a network_interfaces{} block with your
  # security_groups = [ var.security_group ] in it.
  vpc_security_group_ids = [ var.security_group ]

  # Any on-boot customizations to make.
  user_data = var.userdata
}

resource "aws_autoscaling_group" "this" {
  # The name of the Autoscaling Group in the Web UI
  # default "my_autoscaling_group"
  name = var.name

  # The list of subnets into which the ASG should be deployed.
  vpc_zone_identifier = var.private_subnets
  # The smallest and largest number of instances the ASG should scale between
  min_size            = var.min_rep
  max_size            = var.max_rep

  mixed_instances_policy {
    launch_template {
      # Use this template to launch all the instances
      launch_template_specification {
        launch_template_id = aws_launch_template.this.id
        version            = "$Latest"
      }

      # This loop can either use the calculated value "local.instance_types"
      # or, if you have no legacy use of this module, remove the locals{}
      # and the variable "instance_type" {} block above, and replace the
      # for_each and instance_type values (defined as "local.instance_types")
      # with "var.instance_types".
      #
      # Loop through the whole list of instance types and create a
      # set of "override" values (the values are defined in the content{}
      # block).
      dynamic "override" {
        for_each = local.instance_types
        content {
          instance_type = local.instance_types[override.key]
        }
      }
    }

    instances_distribution {
      # If we "enable spot", then make it 100% spot.
      on_demand_percentage_above_base_capacity = var.enable_spot ? 0 : 100
      spot_allocation_strategy                 = var.spot_allocation_strategy
      spot_max_price                           = "" # Empty string is "on-demand price"
    }
  }
}

So what is all this then?

This is two Terraform resources; an aws_launch_template and an aws_autoscaling_group. These two resources define what should be launched by the autoscaling group, and then the settings for the autoscaling group.

You will need to work out what instance types you want to use (e.g. “must have 16 cores and 32 GB RAM, have an x86_64 architecture and allow up to 15 Gigabit/second throughput”)

When might you use this pattern?

If you have been seeing messages like “There is no Spot capacity available that matches your request.” or “We currently do not have sufficient <size> capacity in the Availability Zone you requested.” then you need to consider diversifying the fleet that you’re requesting for your autoscaling group. To do that, you need to specify more instance types. To achieve this, I’d use the above code to replace (something like) one of the code samples below.

If you previously have had something like this:

resource "aws_launch_configuration" "this" {
  iam_instance_profile        = var.instance_profile_name
  image_id                    = data.aws_ami.this.id
  instance_type               = var.instance_type
  name_prefix                 = var.name
  security_groups             = [ var.security_group ]
  user_data_base64            = var.userdata
  spot_price                  = var.spot_price

  root_block_device {
    volume_size = var.disksize
  }

  lifecycle {
    create_before_destroy = true
  }
}

resource "aws_autoscaling_group" "this" {
  capacity_rebalance   = false
  launch_configuration = aws_launch_configuration.this.id
  max_size             = var.max_rep
  min_size             = var.min_rep
  name                 = var.name
  vpc_zone_identifier  = var.private_subnets
}

Or this:

resource "aws_launch_template" "this" {
  lifecycle {
    create_before_destroy = true
  }

  block_device_mappings {
    device_name = data.aws_ami.this.root_device_name
    ebs {
      volume_size = var.disksize
    }
  }

  iam_instance_profile {
    name = var.instance_profile_name
  }

  network_interfaces {
    associate_public_ip_address = true
    security_groups             = local.node_security_groups
  }

  image_id      = data.aws_ami.this.id
  name_prefix   = var.name
  instance_type = var.instance_type
  user_data     = var.userdata

  instance_market_options {
    market_type = "spot"
    spot_options {
      spot_instance_type = "one-time"
    }
  }

  metadata_options {
    http_tokens                 = var.imds == 1 ? "optional" : "required"
    http_endpoint               = "enabled"
    http_put_response_hop_limit = 1
  }
}

resource "aws_autoscaling_group" "this" {
  name                = var.name
  vpc_zone_identifier = var.private_subnets
  min_size            = var.min_rep
  max_size            = var.max_rep

  launch_template {
    id      = aws_launch_template.this.id
    version = "$Latest"
  }
}

Then this new method is a much better idea :) Even more so if you had two launch templates to support spot and non-spot instance types!

Hat-tip to former colleague Paul Moran who opened my eyes to defining your fleet of variable instance types, as well as to my former customer (deliberately unnamed) and my current employer who both stumbled into the same documentation issue. Without Paul’s advice with my prior customer’s issue I’d never have known what I was looking for this time around!

Featured image is “Fishing fleet” by “Nomad Tales” on Flickr and is released under a CC-BY-SA license.

A text dialogue from a web page showing "Uh oh. Something really just went wrong. Good thing we know about it and have our crack team of squirrels getting their nuts out of the system!"

How to capture stdout and stderr from a command in a shellscript without preventing piped processes from seeing them

I love the tee command – it captures stdout [1] and puts it in a file, while then returning that output to stdout for the next process in a pipe to consume, for example:

$ ls -l | tee /tmp/output
total 1
xrwxrwxrw 1 jonspriggs jonspriggs 0 Jul 27 11:16 build.sh
$ cat /tmp/output
total 1
xrwxrwxrw 1 jonspriggs jonspriggs 0 Jul 27 11:16 build.sh

But wait, why is that useful? Well, in a script, you don’t always want to see the content scrolling past, but in the case of a problem, you might need to catch up with the logs afterwards. Alternatively, you might do something like this:

if some_process | tee /tmp/output | grep -q "some text"
then
  echo "Found 'some text' - full output:"
  cat /tmp/output
fi

This works great for stdout but what about stderr [2]? In this case you could just do:

some_process 2>&1 | tee /tmp/output

But that mashes all of stdout and stderr into the same blob.

In my case, I want to capture all the output (stdout and stderr) of a given process into a file. Only stdout is forwarded to the next process, but I still wanted to have the option to see stderr as well during processing. Enter process substitution.

TEMP_DATA_PATH="$(mktemp -d)"
capture_out() {
  base="${TEMP_DATA_PATH}/${1}"
  mkdir "${base}"
  shift
  "$@" 2> >(tee "${base}/stderr" >&2) 1> >(tee "${base}/stdout")
}

With this, I run capture_out step-1 do_a_thing and then in /tmp/tmp.sometext/step-1/stdout and /tmp/tmp.sometext/step-1/stderr are the full outputs I need… but wait, I can also do:

$ capture_out step-1 do_a_thing | \
  capture_out step-2 process --the --thing && \
  capture_out step-3 echo "..." | capture_out step-4 profit
$ find /tmp/tmp.sometext -type f
/tmp/tmp.sometext/step-1/stdout
/tmp/tmp.sometext/step-1/stderr
/tmp/tmp.sometext/step-2/stdout
/tmp/tmp.sometext/step-2/stderr
/tmp/tmp.sometext/step-4/stdout
/tmp/tmp.sometext/step-4/stderr
/tmp/tmp.sometext/step-3/stderr
/tmp/tmp.sometext/step-3/stdout

Or

if capture_out has_an_error something-wrong | capture_out handler check_output
then
  echo "It all went great"
else
  echo "Process failure"
  echo "--Initial process"
  # Use wc -c to check the number of characters in the file
  if [ -e "${TEMP_DATA_PATH}/has_an_error/stdout"] && [ 0 -ne "$(wc -c "${TEMP_DATA_PATH}/has_an_error/stdout")" ]
  then
    echo "----stdout:"
    cat "${TEMP_DATA_PATH}/has_an_error/stdout"
  fi
  if [ -e "${TEMP_DATA_PATH}/has_an_error/stderr"] && [ 0 -ne "$(wc -c "${TEMP_DATA_PATH}/has_an_error/stderr")" ]
  then
    echo "----stderr:"
    cat "${TEMP_DATA_PATH}/has_an_error/stderr"
  fi
  echo "--Second stage"
  if [ -e "${TEMP_DATA_PATH}/handler/stdout"] && [ 0 -ne "$(wc -c "${TEMP_DATA_PATH}/handler/stdout")" ]
  then
    echo "----stdout:"
    cat "${TEMP_DATA_PATH}/handler/stdout"
  fi
  if [ -e "${TEMP_DATA_PATH}/handler/stderr"] && [ 0 -ne "$(wc -c "${TEMP_DATA_PATH}/handler/stderr")" ]
  then
    echo "----stderr:"
    cat "${TEMP_DATA_PATH}/handler/stderr"
  fi
fi

This has become part of my normal toolkit now for logging processes. Thanks bash!

Also, thanks to ChatGPT for helping me find this structure that I’d seen before, but couldn’t remember how to do it! (it almost got it right too! Remember kids, don’t *trust* what ChatGPT gives you, use it as a research starting point, test *that* against your own knowledge, test *that* against your environment and test *that* against expected error cases too! Copy & Paste is not the best idea with AI generated code!)

Footnotes

[1] stdout is the name of the normal output text we see in a shell, it’s also sometimes referred to as “file descriptor 1” or “fd1”. You can also output to &1 with >&1 which means “send to fd1”

[2] stderr is the name of the output in a shell when an error occurs. It isn’t caught by things like some_process > /dev/null which makes it useful when you don’t want to see output, just errors. Like stdout, it’s also referred to as “file descriptor 2” or “fd2” and you can output to &2 with >&2 if you want to send stdout to stderr.

Featured image is “WordPress Error” by “tara hunt” on Flickr and is released under a CC-BY-SA license.

A series of gold blocks, each crossed, and one of the lower blocks has engraved "Eduardo Nery 1995-1998 Aleluia - Secla"

Deploying the latest build of a template (machine) image with #Xen #Orchestrator

In my current role we are using Packer to build images on a Xen Orchestrator environment, use a CI/CD system to install that image into both a Xen Template and an AWS AMI, and then we use Terraform to use that image across our estate. The images we build with Packer have this stanza in it:

locals {
  timestamp = regex_replace(timestamp(), "[- TZ:]", "")
}
variable "artifact_name" {
  default = "SomeLinux-version.iso"
}
source "xenserver-iso" "this" {
  vm_name = "${var.artifact_name}-${local.timestamp}"
  # more config below
}

As a result, the built images include a timestamp.

When we use the AMI in Terraform, we can locate it with this code:

variable "ami_name" {
  default = "SomeLinux-version.iso-"
}

data "aws_ami" "this" {
  most_recent = true

  filter {
    name   = "name"
    values = [var.ami_name]
  }

  filter {
    name   = "virtualization-type"
    values = ["hvm"]
  }

  owners = [var.owner]
}

But, because Xen doesn’t track when a template is created, instead I needed to do something different. Enter get_xoa_template.sh.

#!/bin/bash
trap cleanup SIGINT SIGTERM EXIT
exit_message=""
set_exit=0
fail() {
[ -n "$1" ] && echo "$1" >&2
[ "$2" -gt 0 ] && exit $2
}
cleanup() {
trap – SIGINT SIGTERM EXIT
[ "$UNREGISTER" -eq 1 ] && [ "$STATE" == "signed_in" ] && xo-cli –unregister 2>&1
[ -n "$exit_message" ] && fail "$exit_message" $set_exit
}
log_debug() {
[ -n "$DEBUG" ] && echo "$1" >> "$DEBUG"
}
parse_params() {
UNREGISTER=1
DEBUG=""
while :; do
case "${1-}" in
-h | –help)
echo "usage: get_xoa_template.sh –template SomeTemplatePrefix" >&2
echo "" >&2
echo "Options:" >&2
echo " -t | –template MyTemplatePrefix = The template to look for (required)" >&2
echo " -s | –server ws://192.0.2.1 = Sign into Xen Orchestrator on 192.0.2.1" >&2
echo " [Default to using XOA_URL environment variable]" >&2
echo " -u | –user username@example.org = Sign into Xen Orchestrator using this username" >&2
echo " [Default to using XOA_USER environment variable]" >&2
echo " -p | –password hunter2 = Sign into Xen Orchestrator using this password" >&2
echo " [Default to using XOA_PASSWORD environment variable]" >&2
echo " -l | –pool MyXenPool1 = Use this pool when looking for the template." >&2
echo " [Omit to ignore]" >&2
echo " -x | –no-unregister = Don't log out from the XOA server once connected." >&2
echo " -d | –debug = Log output to /tmp/xocli_output" >&2
echo " -d | –debug /path/to/debug = Log output to the specified path" >&2
echo " –debug=/path/to/debug = Log output to the specified path" >&2
exit 255
;;
-s | –server)
XOA_URL="${2-}"
shift
;;
-u | –user)
XOA_USER="${2-}"
shift
;;
-p | –password)
XOA_PASSWORD="${2-}"
shift
;;
-l | –pool)
XOA_POOL="${2-}"
shift
;;
-t | –template)
TEMPLATE="${2-}"
shift
;;
-x | –no-unregister)
UNREGISTER=0
;;
-d | –debug)
DEBUG=/tmp/xocli_output
[ -n "${2-}" ] && [ "$(echo "${2-}" | cut -c1)" != "-" ] && DEBUG="${2-}" && shift
;;
–debug=*)
DEBUG="$(echo $1 | sed -E -e 's/^[^=]+=//')"
;;
*)
break
;;
esac
shift
done
}
sign_in() {
[ -z "$XOA_URL" ] || [ -z "$XOA_USER" ] || [ -z "$XOA_PASSWORD" ] && fail "Missing sign-in details" 1
log_debug "Logging in"
if [ -n "$DEBUG" ]
then
xo-cli –register –au "$XOA_URL" "$XOA_USER" "$XOA_PASSWORD" 2>&1 | tee -a "$DEBUG" | grep -q 'Successfully' || fail "Login failed" 2
else
xo-cli –register –au "$XOA_URL" "$XOA_USER" "$XOA_PASSWORD" 2>&1 | grep -q 'Successfully' || fail "Login failed" 2
fi
STATE="signed_in"
}
get_pool() {
[ -z "$XOA_POOL" ] && log_debug "No Pool" && return 0
log_debug "Getting Pool ID"
if [ -n "$DEBUG" ]
then
POOL_ID="\$pool=$(xo-cli –list-objects type=pool | jq -c -r ".[] | select(.name_label | match(\"${XOA_POOL}\")) | .uuid" | sort | tail -n 1 | tee -a "$DEBUG")"
else
POOL_ID="\$pool=$(xo-cli –list-objects type=pool | jq -c -r ".[] | select(.name_label | match(\"${XOA_POOL}\")) | .uuid" | sort | tail -n 1)"
fi
[ "$POOL_ID" == "\$pool=" ] && fail "Pool provided but no ID received" 3
}
get_template() {
log_debug "Getting template"
if [ -n "$DEBUG" ]
then
TEMPLATE_IS="$(xo-cli –list-objects type=VM-template "${POOL_ID-}" | jq -c ".[] | select(.name_label | match(\"${TEMPLATE}\")) | .name_label" | sort | tail -n 1 | tee -a "$DEBUG")"
else
TEMPLATE_IS="$(xo-cli –list-objects type=VM-template "${POOL_ID-}" | jq -c ".[] | select(.name_label | match(\"${TEMPLATE}\")) | .name_label" | sort | tail -n 1)"
fi
[ -z "$TEMPLATE_IS" ] && fail "Could not match this template" 4
if [ -n "$DEBUG" ]
then
echo "{\"is\": ${TEMPLATE_IS}}" | tee -a "$DEBUG"
else
echo "{\"is\": ${TEMPLATE_IS}}"
fi
}
[ -n "$(command -v xo-cli)" ] || fail "xo-cli is missing, and is a required dependency for this script. Please install it; \`sudo npm -g install xo-cli\`" 5
parse_params "$@"
if [ -n "$DEBUG" ]
then
rm -f "$DEBUG"
log_debug "Invoked: $(date)"
log_debug "Template: $TEMPLATE"
log_debug "Pool: $XOA_POOL"
fi
sign_in
get_pool
get_template

This script is invoked from your terraform like this:

variable "template_name" {
  default     = "SomeLinux-version.iso-"
  description = "A regex, partial or full string to match in the template name"
}

variable "poolname" {
  default = "MyPool"
}

data "external" "get_xoa_template" {
  program = [
    "/bin/bash", "${path.module}/get_xoa_template.sh",
    "--template", var.template_name,
    "--pool", var.poolname
  ]
}

data "xenorchestra_pool" "pool" {
  name_label = var.poolname
}

data "xenorchestra_template" "template" {
  name_label = data.external.get_xoa_template.result.is
  pool_id    = data.xenorchestra_pool.pool.id
}

And that’s how you do it. Oh, and if you need to pin to a specific version? Change the template_name value from the partial or regex version to the full version, like this:

variable "template_name" {
  # This assumes your image was minted at midnight on 1970-01-01
  default     = "SomeLinux-version.iso-19700101000000"
}

Featured image is “Barcelos and Braga-18” by “Graeme Churchard” on Flickr and is released under a CC-BY license.

A photo of a door with the focus on the handle which has a lock in the centre of the knob. The lock has a key in it, with a bunch of keys dangling from the central ring.

Using direnv with terraform, terragrunt, saml2aws, SOPS and AWS KMS

In my current project I am often working with Infrastructure as Code (IoC) in the form of Terraform and Terragrunt files. Before I joined the team a decision was made to use SOPS from Mozilla, and this is encrypted with an AWS KMS key. You can only access specific roles using the SAML2AWS credentials, and I won’t be explaining how to set that part up, as that is highly dependant on your SAML provider.

While much of our environment uses AWS, we do have a small presence hosted on-prem, using a hypervisor service. I’ll demonstrate this with Proxmox, as this is something that I also use personally :)

Firstly, make sure you have all of the above tools installed! For one stage, you’ll also require yq to be installed. Ensure you’ve got your shell hook setup for direnv as we’ll need this later too.

Late edit 2023-07-03: There was a bug in v0.22.0 of the terraform which didn’t recognise the environment variables prefixed PROXMOX_VE_ – a workaround by using TF_VAR_PROXMOX_VE and a variable "PROXMOX_VE_" {} block in the Terraform code was put in place for the inital publication of this post. The bug was fixed in 0.23.0 which this post now uses instead, and so as a result the use of TF_VAR_ prefixed variables was removed too.

Set up AWS Vault

AWS KMS

AWS Key Management Service (KMS) is a service which generates and makes available encryption keys, backed by the AWS service. There are *lots* of ways to cut that particular cake, but let’s do this a quick and easy way… terraform

variable "name" {
  default = "SOPS"
  type    = string
}
resource "aws_kms_key" "this" {
  tags                     = {
    Name : var.name,
    Owner : "Admins"
  }
  key_usage                = "ENCRYPT_DECRYPT"
  customer_master_key_spec = "SYMMETRIC_DEFAULT"
  deletion_window_in_days  = 30
  is_enabled               = true
  enable_key_rotation      = false
  policy                   = <<EOF
{
  "Version": "2012-10-17",
  "Id": "key-default-1",
  "Statement": [
    {
      "Sid": "Root Access",
      "Effect": "Allow",
      "Principal": {
        "AWS": "arn:aws:iam::${get_aws_account_id()}:root"
      },
      "Action": "kms:*",
      "Resource": "*"
    },
    {
      "Sid": "Estate Admin Access",
      "Effect": "Allow",
      "Principal": {
        "AWS": "arn:aws:iam::${get_aws_account_id()}:role/estateadmins"
      },
      "Action": [
        "kms:Describe*",
        "kms:List*",
        "kms:Get*",
        "kms:Encrypt*"
      ],
      "Resource": "*"
    }
  ]
}
EOF
}

resource "aws_kms_alias" "this" {
  target_key_id = aws_kms_key.this.key_id
  name          = "alias/${var.name}"
}

output "key" {
  value = aws_kms_alias.this.arn
}

After running this, let’s assume that we get an output for the “key” value of:

arn:aws:kms:us-east-1:123456789012:alias/main

Setup Sops

In your terragrunt tree, create a file called .sops.yaml, which contains:

---
creation_rules:
  - kms: arn:aws:kms:us-east-1:123456789012:alias/main

And a file called secrets.enc.yaml which contains:

---
PROXMOX_VE_USERNAME: root@pam
PROXMOX_VE_PASSWORD: deadb33f@2023

Test that your KMS works by assuming your IAM role via SAML2AWS like this:

$ saml2aws login --skip-prompt --quiet
$ saml2aws exec -- sops --verbose --encrypt --in-place secrets.enc.yaml
[AWSKMS]	 INFO[0000] Encryption succeeded                          arn="arn:aws:kms:us-east-1:123456789012:alias/main"
[CMD]		 INFO[0000] File written successfully

Setup direnv

Outside your tree, in ~/.config/direnv/lib create a file called use_sops.sh (does not need to be chmod +x or chmod 755!) containing this:

# Based on https://github.com/direnv/direnv/wiki/Sops
use_sops() {
    local path=${1:-$PWD/secrets.enc.yaml}
    if [ -e "$path" ]
    then
        if grep -q -E '^sops:' "$path"
        then
            eval "$(sops --decrypt --output-type dotenv "$path" 2>/dev/null | direnv dotenv bash /dev/stdin || false)"
        else
            if [ -n "$(command -v yq)" ]
            then
                eval "$(yq eval --output-format props "$path" | direnv dotenv bash /dev/stdin)"
                export SOPS_WARNING="unencrypted $path"
            fi
        fi
    fi
    watch_file "$path"
}

There are two key lines here, the first of which is:

eval "$(sops -d --output-type dotenv "$path" 2>/dev/null | direnv dotenv bash /dev/stdin || false)"

This line asks sops to decrypt the secrets file, using the “dotenv” output type, however, the dotenv format looks like this:

some_key = "some value"

So, as a result, we then pass that value to direnv and ask it to rewrite it in the format it expects, which looks like this:

export some_key="some value"

The second key line is this:

eval "$(yq eval --output-format props "$path" | direnv dotenv bash /dev/stdin)"

This asks yq to parse the secrets file, using the “props” formatter, which results in lines just like the dotenv output we saw above.

However, because we used yq to parse the file, it means that we know this file isn’t encrypted, so we also add an extra export value:

export SOPS_WARNING="unencrypted $path"

This can be picked up as part of your shell prompt to put a warning in! Anyway… let’s move on.

Now that you have your reusable library file, we now configure the direnv file, .envrc for the root of your proxmox cluster:

use sops

Oh, ok, that was simple. You can add several files here if you wish, like this:

use sops file1.enc.yaml
use sops file2.enc.yml
use sops ~/.core_sops

But, we don’t need that right now!

Open your shell in that window, and you’ll get this warning:

direnv: error /path/to/demo/.envrc is blocked. Run `direnv allow` to approve its content

So, let’s do that!

$ direnv allow
direnv: loading /path/to/demo/.envrc
direnv: using sops
direnv: export +PROXMOX_VE_USERNAME +PROXMOX_VE_PASSWORD
$

So far, so good… but wait, you’ve authenticated to your SAML access to AWS. Let’s close that shell, and go back in again

$ cd /path/to/demo
direnv: loading /path/to/demo/.envrc
direnv: using sops
$

Ah, now we don’t have our values exported. That’s what we wanted!

What now?!

Configuring the details of the proxmox cluster

We have our .envrc file which provides our credentials (let’s pretend we’re using a shared set of credentials across all the boxes), but now we need to setup access to each of the boxes.

Let’s make our two cluster directories;

mkdir cluster_01
mkdir cluster_02

And in each of these clusters, we need to put an .envrc file with the right IP address in. This needs to check up the tree for any credentials we may have already loaded:

source_env "$(find_up ../.envrc)"
export PROXMOX_VE_ENDPOINT="https://192.0.2.1:8006" # Documentation IP address for the first cluster - change for the second cluster.

The first line works up the tree, looking for a parent .envrc file to inject, and then, with the second line, adds the Proxmox API endpoint to the end of that chain. When we run direnv allow (having logged back into our saml2aws session), we get this:

$ direnv allow
direnv: loading /path/to/demo/cluster_01/.envrc
direnv: loading /path/to/demo/.envrc
direnv: using sops
direnv: export +PROXMOX_VE_ENDPOINT +PROXMOX_VE_USERNAME +PROXMOX_VE_PASSWORD
$

Great, now we can setup the connection to the cluster in the terragrunt file!

Set up Terragrunt

In /path/to/demo/terragrunt.hcl put this:

remote_state {
  backend = "s3"
  config  = {
    encrypt                = true
    bucket                 = "example-inc-terraform-state"
    key                    = "${path_relative_to_include()}/terraform.tfstate"
    region                 = "us-east-1"
    dynamodb_table         = "example-inc-terraform-state-lock"
    skip_bucket_versioning = false
  }
}
generate "providers" {
  path      = "providers.tf"
  if_exists = "overwrite"
  contents  = <<EOF
terraform {
  required_providers {
    proxmox = {
      source = "bpg/proxmox"
      version = "0.23.0"
    }
  }
}

provider "proxmox" {
  insecure = true
}
EOF
}

Then in the cluster_01 directory, create a directory for the code you want to run (e.g. create a VLAN might be called “VLANs/30/“) and put in it this terragrunt.hcl

terraform {
  source = "${get_terragrunt_dir()}/../../../terraform-module-network//vlan"
  # source = "git@github.com:YourProject/terraform-module-network//vlan?ref=production"
}

include {
  path = find_in_parent_folders()
}

inputs = {
  vlan_tag    = 30
  description = "VLAN30"
}

This assumes you have a terraform directory called terraform-module-network/vlan in a particular place in your tree or even better, a module in your git repo, which uses the input values you’ve provided.

That double slash in the source line isn’t a typo either – this is the point in that tree that Terragrunt will copy into the directory to run terraform from too.

A quick note about includes and provider blocks

The other key thing is that the “include” block loads the values from the first matching terragrunt.hcl file in the parent directories, which in this case is the one which defined the providers block. You can’t include multiple different parent files, and you can’t have multiple generate blocks either.

Running it all together!

Now we have all our depending files, let’s run it!

user@host:~$ cd test
direnv: loading ~/test/.envrc
direnv: using sops
user@host:~/test$ saml2aws login --skip-prompt --quiet ; saml2aws exec -- bash
direnv: loading ~/test/.envrc
direnv: using sops
direnv: export +PROXMOX_VE_USERNAME +PROXMOX_VE_PASSWORD
user@host:~/test$ cd cluster_01/VLANs/30
direnv: loading ~/test/cluster_01/.envrc
direnv: loading ~/test/.envrc
direnv: using sops
direnv: export +PROXMOX_VE_ENDPOINT +PROXMOX_VE_USERNAME +PROXMOX_VE_PASSWORD
user@host:~/test/cluster_01/VLANs/30$ terragrunt apply
data.proxmox_virtual_environment_nodes.available_nodes: Reading...
data.proxmox_virtual_environment_nodes.available_nodes: Read complete after 0s [id=nodes]

Terraform used the selected providers to generate the following execution
plan. Resource actions are indicated with the following symbols:
  + create

Terraform will perform the following actions:

  # proxmox_virtual_environment_network_linux_bridge.this[0] will be created
  + resource "proxmox_virtual_environment_network_linux_bridge" "this" {
      + autostart  = true
      + comment    = "VLAN30"
      + id         = (known after apply)
      + mtu        = (known after apply)
      + name       = "vmbr30"
      + node_name  = "proxmox01"
      + ports      = [
          + "enp3s0.30",
        ]
      + vlan_aware = (known after apply)
    }

Plan: 1 to add, 0 to change, 0 to destroy.

Do you want to perform these actions?
  Terraform will perform the actions described above.
  Only 'yes' will be accepted to approve.

  Enter a value: yes
proxmox_virtual_environment_network_linux_bridge.this[0]: Creating...
proxmox_virtual_environment_network_linux_bridge.this[0]: Creation complete after 2s [id=proxmox01:vmbr30]
user@host:~/test/cluster_01/VLANs/30$

Winning!!

Featured image is “2018/365/1 Home is Where The Key Fits” by “Alan Levine” on Flickr and is released under a CC-0 license.

Quick tip: How to stop package installations from auto-starting server services with Debian based distributions (like Ubuntu)

I’m working on another toy project to understand a piece of software a little better, and to make it work, I needed to install dnsmasq inside an Ubuntu-based virtual machine. The problem with this is that Ubuntu already runs systemd-resolved to perform DNS lookups, and Debian likes to start server services as soon as it’s installed them. So how do we work around this? Well, actually, it’s pretty simple.

Thanks to this blog post from 2013, I found out that if you create an executable script called /usr/sbin/policy-rc.d with the content:

exit 101

This will stop all services in the dpkg/apt process from running on install, so I was able to do this:

echo 'exit 101' >> /usr/sbin/policy-rc.d
chmod +x /usr/sbin/policy-rc.d
apt update
apt install dnsmasq -y
systemctl disable --now systemd-resolved
# Futz with dnsmasq config
systemctl enable --now dnsmasq
dig example.com

Brilliant

(Don’t do this!) Note to self; Is your shutdown command causing an error for your packer build? Try this.

Don’t do this! Turns out I was doing this wrong. The below code is only needed if you’ve got things wrong, and you should instead be using keep_vm = "on_success". The more you know, eh?

If you’ve got a command in your packer script that looks like this:

provisioner "shell" {
  inline = ["shutdown -h now"]
}

Try running this instead:

provisioner "shell" {
  inline = [
    "echo Provisioning complete. Shutting down.",
    "(sleep 5 ; shutdown -h now) &"
  ]
}

This will force packer to execute a command which is pushed into the background, returning a return code (RC) of 0, which the system will interpret as a successful result. 5 seconds later the machine will shut itself down by itself.

Using Github Actions to create Debian (DEB) and RedHat (RPM) Packages and Repositories

Last week I created a post talking about the new project I’ve started on Github called “Terminate-Notice” (which in hindsight isn’t very accurate – at best it’s ‘spot-instance-responses’ and at worst it’s ‘instance-rebalance-and-actions-responder’ but neither work well)… Anyway, I mentioned how I was creating RPM and DEB packages for my bash scripts and that I hadn’t put it into a repo yet.

Well, now I have, so let’s wander through how I made this work.

TL;DR:

Please don’t hesitate to use the .github directory I’m using for terminate-notice, which is available in the -skeleton repo and then to make it into a repo, you can reuse the .github directory in the terminate-notice.github.io repo to start your adventure.

Start with your source tree

I have a the following files in my shell script, which are:

  • /usr/sbin/terminate-notice (the actual script which will run)
  • /usr/lib/systemd/system/terminate-notice.service (the SystemD Unit file to start and stop the script)
  • /usr/share/doc/terminate-notice/LICENSE (the license under which the code is released)
  • /etc/terminate-notice.conf.d/service.conf (the file which tells the script how to run)

These live in the root directory of my repository.

I also have the .github directory (where the things that make this script work will live), a LICENSE file (so Github knows what license it’s released under) and a README.md file (so people visiting the repo can find out about it).

A bit about Github Actions

Github Actions is a CI/CD pipeline built into Github. It responds to triggers – in our case, pushes (or uploads, in old fashioned terms) to the repository, and then runs commands or actions. The actions which will run are stored in a simple YAML formatted file, referred to as a workflow which contains some setup fields and then the “jobs” (collections of actions) themselves. The structure is as follows:

# The pretty name rendered by Actions to refer to this workflow
name: Workflow Name

# Only run this workflow when the push is an annotated tag starting v
on:
  push:
    tags:
      - 'v*'

# The workflow contains a collection of jobs, each of which has
# some actions (or "steps") to run
jobs:
  # This is used to identify the output in other jobs
  Unique_Name_For_This_Job:
    # This is the pretty name rendered in the Github UI for this job
    name: Job Name
    # This is the OS that the job will run on - typically
    # one of: ubuntu-latest, windows-latest, macos-latest
    runs-on: runner-os
    # The actual actions to perform
    steps:
      # This is a YAML list, so note where the hyphens (-) are
        # The pretty name of this step
      - name: Checkout Code
        # The name of the public collection of actions to perform
        uses: actions/checkout@v3
        # Any variables to pass into this action module
        with:
          path: "REPO"

      # This action will run a shell command
      - name: Run a command
        run: echo "Hello World"

Build a DEB package

At the simplest point, creating a DEB package is;

  1. Create the directory structure (as above) that will unpack from your package file and put the files in the right places.
  2. Create a DEBIAN/control file which provides enough details for your package manager to handle it.
  3. Run dpkg-deb --build ${PATH_TO_SOURCE} ${OUTPUT_FILENAME}

The DEBIAN/control file looks like this:

Package: PACKAGE_NAME
Version: VERSION_ID
Section: misc
Priority: optional
Architecture: all
Maintainer: YOUR_NAME <your_email@example.org>
Description: SOME_TEXT

Section, Priority and Architecture have specifically defined dictionaries you can choose from.

Assuming the DEBIAN/control file was static and also lived in the repo, and I were just releasing the DEB file, then I could make the above work with the following steps:

name: Create the DEB

permissions:
  contents: write

on:
  push:
    tags:
      - 'v*'

jobs:
  Create_Packages:
    name: Create Package
    runs-on: ubuntu-latest
    steps:
      - name: Checkout code
        uses: actions/checkout@v3
        with:
          path: "REPO"

      - name: Copy script files around to stop .github from being added to the package then build the package
        run: |
          mkdir PKG_SOURCE
          cp -Rf REPO/usr REPO/etc REPO/DEBIAN PKG_SOURCE
          dpkg-deb --build PKG_SOURCE package.deb

      - name: Release the Package
        uses: softprops/action-gh-release@v1
        with:
          files: package.deb

But no, I had to get complicated and ALSO build an RPM file… and put some dynamic stuff in there.

Build an RPM file

RPMs are a little more complex, but not by much. RPM takes a spec file, which starts off looking like the DEBIAN/control file, and adds some “install” instructions. Let’s take a look at that spec file:

Name: PACKAGE_NAME
Version: VERSION_ID
Release: 1
Summary: SOME_TEXT
BuildArch: noarch
Source0: %{name}
License: YOUR_LICENSE

%description
SOME_TEXT
MORE_DETAIL

%prep

%build

%install
install -D -m 600 -o root -g root %{SOURCE0}etc/config/file ${RPM_BUILD_ROOT}%{_sysconfdir}/config/file
install -D -m 755 -o root -g root %{SOURCE0}usr/sbin/script ${RPM_BUILD_ROOT}%{_sbindir}/script

%files
etc/config/file
usr/sbin/script

The “Name”, “Version”, “Release” and “BuildArch” values in the top of that file define what the resulting filename is (NAME_VERSION-RELEASE.BUILDARCH.rpm).

Notice that there are some “macros” which replace /etc with %{_sysconfdir}, /usr/sbin with %{_sbindir} and so on, which means that, theoretically, this RPM could be installed in an esoteric tree… but most people won’t bother.

The one quirk with this is that %{name} bit there – RPM files need to have all these sources in a directory named after the package name, which in turn is stored in a directory called SOURCES (so SOURCES/my-package for example), and then it copies the files to wherever they need to go. I’ve listed etc/config/file and usr/sbin/script but these could just have easily been file and script for all that the spec file cares.

Once you have the spec file, you run sudo rpmbuild --define "_topdir $(pwd)" -bb file.spec to build the RPM.

So, again, how would that work from a workflow YAML file perspective, assuming a static spec and source tree as described above?

name: Create the DEB

permissions:
  contents: write

on:
  push:
    tags:
      - 'v*'

jobs:
  Create_Packages:
    name: Create Package
    runs-on: ubuntu-latest
    steps:
      - name: Checkout code
        uses: actions/checkout@v3
        with:
          path: "REPO"

      - name: Copy script files around to stop .github from being added to the package then build the package
        run: |
          mkdir -p SOURCES/my-package-name
          cp -Rf REPO/usr REPO/etc SOURCES/my-package-name
          sudo rpmbuild --define "_topdir $(pwd)" -bb my-package-name.spec

      - name: Release the Package
        uses: softprops/action-gh-release@v1
        with:
          files: RPMS/my-package-name_0.0.1-1.noarch.rpm

But again, I want to be fancy (and I want to make resulting packages as simple to repeat as possible)!

So, this is my release.yml as of today:

name: Run the Release

permissions:
  contents: write

on:
  push:
    tags:
      - 'v*'

jobs:
  Create_Packages:
    name: Create Packages
    runs-on: ubuntu-latest
    steps:
      - name: Checkout code
        uses: actions/checkout@v3
        with:
          path: "REPO"

      - name: Calculate some variables
        run: |
          (
            echo "GITHUB_REPO_NAME=$(echo "${GITHUB_REPOSITORY}" | cut -d/ -f2)"
            echo "VERSION=$(echo "${GITHUB_REF_NAME}" | sed -e 's/^v//')"
            echo "DESCRIPTION=A script which polls the AWS Metadata Service looking for an 'instance action', and triggers scripts in response to the termination notice."
            echo "DEB_ARCHITECTURE=${ARCHITECTURE:-all}"
            echo "RPM_ARCHITECTURE=${ARCHITECTURE:-noarch}"
            echo "RELEASE=1"
            cd REPO
            echo "FIRST_YEAR=$(git log $(git rev-list --max-parents=0 HEAD) --date="format:%Y" --format="format:%ad")"
            echo "THIS_COMMIT_YEAR=$(git log HEAD -n1 --date="format:%Y" --format="format:%ad")"
            echo "THIS_COMMIT_DATE=$(git log HEAD -n1 --format="format:%as")"
            if [ "$FIRST_YEAR" = "$THIS_COMMIT_YEAR" ]
            then
              echo "YEAR_RANGE=$FIRST_YEAR"
            else
              echo "YEAR_RANGE=${FIRST_YEAR}-${THIS_COMMIT_YEAR}"
            fi
            cd ..
          ) >> $GITHUB_ENV

      - name: Make Directory Structure
        run: mkdir -p "SOURCES/${GITHUB_REPO_NAME}" SPECS release

      - name: Copy script files into SOURCES
        run: |
          cp -Rf REPO/[a-z]* "SOURCES/${GITHUB_REPO_NAME}"
          cp REPO/LICENSE REPO/README.md "SOURCES/${GITHUB_REPO_NAME}/usr/share/doc/${GITHUB_REPO_NAME}/"
          if grep -lr '#TAG#' SOURCES
          then
            sed -i -e "s/#TAG#/${VERSION}/" $(grep -lr '#TAG#' SOURCES)
          fi
          if grep -lr '#TAG_DATE#' SOURCES
          then
            sed -i -e "s/#TAG_DATE#/${THIS_COMMIT_YEAR}/" $(grep -lr '#TAG_DATE#' SOURCES)
          fi
          if grep -lr '#DATE_RANGE#' SOURCES
          then
            sed -i -e "s/#DATE_RANGE#/${YEAR_RANGE}/" $(grep -lr '#DATE_RANGE#' SOURCES)
          fi
          if grep -lr '#MAINTAINER#' SOURCES
          then
            sed -i -e "s/#MAINTAINER#/${MAINTAINER:-Jon Spriggs <jon@sprig.gs>}/" $(grep -lr '#MAINTAINER#' SOURCES)
          fi

      - name: Create Control File
        # Fields from https://www.debian.org/doc/debian-policy/ch-controlfields.html#binary-package-control-files-debian-control
        run: |
          mkdir -p SOURCES/${GITHUB_REPO_NAME}/DEBIAN
          (
            echo "Package:      ${GITHUB_REPO_NAME}"
            echo "Version:      ${VERSION}"
            echo "Section:      ${SECTION:-misc}"
            echo "Priority:     ${PRIORITY:-optional}"
            echo "Architecture: ${DEB_ARCHITECTURE}"
            if [ -n "${DEPENDS}" ]
            then
              echo "Depends: ${DEPENDS}"
            fi
            echo "Maintainer: ${MAINTAINER:-Jon Spriggs <jon@sprig.gs>}"
            echo "Description: ${DESCRIPTION}"
            if [ -n "${HOMEPAGE}" ]
            then
              echo "Homepage: ${HOMEPAGE}"
            fi
          ) | tee SOURCES/${GITHUB_REPO_NAME}/DEBIAN/control
          (
            echo "Files:"
            echo " *"
            echo "Copyright: ${YEAR_RANGE} ${MAINTAINER:-Jon Spriggs <jon@sprig.gs>}"
            echo "License: MIT"
            echo ""
            echo "License: MIT"
            sed 's/^/ /' "SOURCES/${GITHUB_REPO_NAME}/usr/share/doc/${GITHUB_REPO_NAME}/LICENSE"
          ) | tee SOURCES/${GITHUB_REPO_NAME}/DEBIAN/copyright

      - name: Create Spec File
        run: PATH="REPO/.github/scripts:${PATH}" create_spec_file.sh

      - name: Build DEB Package
        run: dpkg-deb --build SOURCES/${GITHUB_REPO_NAME} "${{ env.GITHUB_REPO_NAME }}_${{ env.VERSION }}_${{ env.DEB_ARCHITECTURE }}.deb"

      - name: Build RPM Package
        run: sudo rpmbuild --define "_topdir $(pwd)" -bb SPECS/${GITHUB_REPO_NAME}.spec

      - name: Confirm builds complete
        run: sudo install -m 644 -o runner -g runner $(find . -type f -name *.deb && find . -type f -name *.rpm) release/

      - name: Release
        uses: softprops/action-gh-release@v1
        with:
          files: release/*

So this means I can, within reason, drop this workflow (plus a couple of other scripts to generate the slightly more complex RPM file – see the other files in that directory structure) into another package to release it.

OH WAIT, I DID! (for the terminate-notice-slack repo, for example!) All I actually needed to do there was to change the description line, and off it went!

So, this is all well and good, but how can I distribute these? Enter Repositories.

Making a Repository

Honestly, I took most of the work here from two fantastic blog posts for creating an RPM repo and a DEB repo.

First you need to create a GPG key.

To do this, I created the following pgp-key.batch file outside my repositories tree

%echo Generating an example PGP key
Key-Type: RSA
Key-Length: 4096
Name-Real: YOUR_ORG_NAME
Name-Email: your_org_name@users.noreply.github.com
Expire-Date: 0
%no-ask-passphrase
%no-protection
%commit

To make the key, I used this set of commands:

export GNUPGHOME="$(mktemp -d /tmp/pgpkeys-XXXXXX)"
gpg --no-tty --batch --gen-key pgp-key.batch
gpg --armor --export YOUR_ORG_NAME > public.asc
gpg --armor --export-secret-keys YOUR_ORG_NAME > private.asc
rm -Rf "$GNUPGHOME"

Store the public.asc file to one side (you’ll need it later) and keep the private.asc safe because we need to put that into Github.

Creating Github Pages

Create a new Git repository in your organisation called your-org.github.io. This marks the repository as being a Github Pages repository. Just to make that more explicit, in the settings for the repository, go to the pages section. (Note that yes, the text around this may differ, but are accurate as of 2023-03-28 in EN-GB localisation.)

Under “Source” select “GitHub Actions”.

Clone this repository to your local machine, and copy public.asc into the root of the tree with a sensible name, ending .asc.

In the Github settings, find “Secrets and variables” under “Security” and pick “Actions”.

Select “New repository secret” and call it “PRIVATE_KEY”.

Now you can use this to sign things (and you will sign *SO MUCH* stuff)

Building the HTML front to your repo (I’m using Jekyll)

I’ve elected to use Jekyll because I know it, and it’s quite easy, but you should pick what works for you. My workflow for deploying these repos into the website rely on Jekyll because Github built that integration, but you’ll likely find other tools for things like Eleventy or Hugo.

Put a file called _config.yml into the root directory, and fill it with relevant content:

title: your-org
email: email_address@example.org
description: >- 
  This project does stuff.
baseurl: ""
url: "https://your-org.github.io"
github_username: your-org

# Build settings
theme: minima
plugins:
  - jekyll-feed
exclude:
  - tools/
  - doc/

Naturally, make “your-org” “email_address@example.org” and the descriptions more relevant to your environment.

Next, create an index.md file with whatever is relevant for your org, but it must start with something like:

---
layout: home
title: YOUR-ORG Website
---
Here is the content for the front page.

Building the repo behind your static content

We’re back to working with Github Actions workflow files, so let’s pop that open.

.github/workflows/repo.yml

name: Deploy Debian and RPM Repo plus Jekyll homepage

on:
  push:
    branches: ["main"]
  # Allows you to run this workflow manually from the Actions tab
  workflow_dispatch:

permissions:
  contents: read
  pages: write
  id-token: write

concurrency:
  group: "pages"
  cancel-in-progress: false

jobs:
  build:
    runs-on: ubuntu-latest
    steps:
      - name: Checkout
        uses: actions/checkout@v3

      - name: [REPO] Install required packages
        run: |
          until sudo apt update
          do
            sleep 1
          done
          sudo apt install -y jq createrepo-c coreutils gnupg2 dpkg-dev

      - name: [REPO] Insert environment variables
        run: |
          echo GNUPGHOME="$(mktemp -d /tmp/pgpkeys-XXXXXX)" >> $GITHUB_ENV
          echo REPO_OWNER="$(echo "${GITHUB_REPOSITORY}" | cut -d/ -f1)" >> $GITHUB_ENV
          echo REPO_NAME="$(echo "${GITHUB_REPOSITORY}" | cut -d/ -f2)" >> $GITHUB_ENV

      - name: [REPO] Import GPG key
        id: import_gpg
        uses: crazy-max/ghaction-import-gpg@v5
        with:
          gpg_private_key: ${{ secrets.PRIVATE_KEY }}

      - name: [JEKYLL] Setup Pages
        uses: actions/configure-pages@v3

      - name: [JEKYLL] Build with Jekyll
        uses: actions/jekyll-build-pages@v1
        with:
          source: ./
          destination: ./_site

      - name: [REPO] Set permissions on the _site directory
        run: sudo chown -R runner:docker _site

      - name: [REPO] Build DEB and RPM Repos
        run: |
          export GPG_FINGERPRINT="${{ steps.import_gpg.outputs.fingerprint }}"
          export ORIGIN="${{ steps.import_gpg.outputs.name }}"
          .github/scripts/build_repos.sh

      - name: [JEKYLL] Upload artifact
        uses: actions/upload-pages-artifact@v1

  deploy:
    environment:
      name: github-pages
      url: ${{ steps.deployment.outputs.page_url }}
    runs-on: ubuntu-latest
    needs: build
    steps:
      - name: [JEKYLL] Deploy to GitHub Pages
        id: deployment
        uses: actions/deploy-pages@v1

I’ve basically changed the “stock” Jekyll static site Github Actions file and added every step that starts [REPO] to make the repository stuff fit in around the steps that start [JEKYLL] which build and deploy the Jekyll based site.

The key part to all this though is the step Build DEB and RPM repos which calls a script that downloads all the RPM and DEB files from the various other repository build stages and does some actions to them. Now yes, I could have put all of this into the workflow.yml file, but I think it would have made it all a bit more confusing! So, let’s work through those steps!

Making an RPM Repo

To build a RPM repo you get and sign each of the RPM packages you want to offer. You do this with this command:

rpm --define "%_signature gpg" --define "%_gpg_name ${FINGERPRINT}" --addsign FILENAME.rpm

Then, once you have all your RPM files signed, you then run a command called createrepo_c (available in Debian archives – Github Actions doesn’t have a RedHat based distro available at this time, so I didn’t look for the RPM equivalent). This creates the repository metadata, and finally you sign that file, like this:

gpg --detach-sign --armor repodata/repomd.xml

Making a DEB Repo

To build a DEB repo you get each of the DEB packages you want to offer in a directory called pool/main (you can also call “main” something else – for example “contrib”, “extras” and so on).

Once you have all your files, you create another directory called dists/stable/main/binary-all into which we’ll run a command dpkg-scanpackages to create the list of the available packages. Yes, “main” could also be called “contrib”, “extras” and “stable” could be called “testing” or “preprod” or the name of your software release (like “jaunty”, “focal” or “warty”). The “all” after the word “binary” is the architecture in question.

dpkg-scanpackages creates an index of the packages in that directory including the version number, maintainer and the cryptographic hashes of the DEB files.

We zip (using gzip and bzip2) the Packages file it creates to improve the download speeds of these files, and then make a Release file. This in turn has the cryptographic hashes of each of the Packages and zipped Packages files, which in turn is then signed with GPG.

Ugh, that was MESSY

Making the repository available to your distributions

RPM repos have it quite easy here – there’s a simple file, that looks like this:

[org-name]
name=org-name Repository
baseurl=https://org-name.github.io/rpm
enabled=1
gpgcheck=1
gpgkey=https://org-name.github.io/public.asc

The distribution user simply downloads this file, puts it into /etc/yum.sources.d/org-name.repo and now all the packages are available for download. Woohoo!

DEB repos are a little harder.

First, download the public key – https://org-name.github.io/public.asc and put it in /etc/apt/keyrings/org-name.asc. Next, create file in /etc/apt/sources.list.d/org-name.list with this line in:

deb [arch=all signed-by=/etc/apt/keyrings/org-name.asc] https://org-name.github.io/deb stable main

And now they can install whatever packages they want too!

Doing this the simple way

Of course, this is all well-and-good, but if you’ve got a simple script you want to package, please don’t hesitate to use the .github directory I’m using for terminate-notice, which is available in the -skeleton repo and then to make it into a repo, you can reuse the .github directory in the terminate-notice.github.io repo to start your adventure.

Good luck, and let me know how it goes!

Featured image is “Some Math” by “Behdad Esfahbod” on Flickr and is released under a CC-BY license.

Responding to AWS Spot Instance “Instance Actions” (like terminate and stop)

During some debugging of an issue with our AWS Spot Instances at work, a colleague noticed that we weren’t responding to the Instance Actions that AWS sends when it’s due to shut down a spot instance.

We had a bit of a poke around, and found that no-one seems to have a service solution to respond to these events, to shut things down cleanly… so I wrote a set of shell scripts and a SystemD service to react to them.

On the journey, I discovered that there is a metadata mocking service that AWS provides, I learned how to create both RPM and DEB packages with Github actions (still not got them into a repo yet though!) and found that my new employer is really nice because they let me write this and release it as open source 😀

So, if this seems like something that might help you, or perhaps you’ve found a better way of doing this, let me know!

A screen shot of the github organisation for the terminate-notice script (link)

Project logo: Target icons created by Freepik – Flaticon