I wrote this post in January 2023, and it’s been languishing in my Drafts folder since then. I’ve had a look through it, and I can’t see any glaring reasons why I didn’t publish it so… it’s published… Enjoy 😁
If you’ve ever built a private subnet in AWS, you know it can be a bit tricky to get updates from the Internet – you end up having a NAT gateway or a self-managed proxy, and you can never be 100% certain that the egress traffic isn’t going somewhere you don’t want it to.
In this case, I wanted to ensure that outbound HTTPS traffic was being blocked if the SNI didn’t explicitly show the DNS name I wanted to permit through, and also, I only wanted specific DNS names to resolve. To do this, I used AWS Network Firewall and Route 53 DNS Firewall.
I’ve written this blog post, and followed along with this, I’ve created a set of terraform files to represent the steps I’ve taken.
The Setup
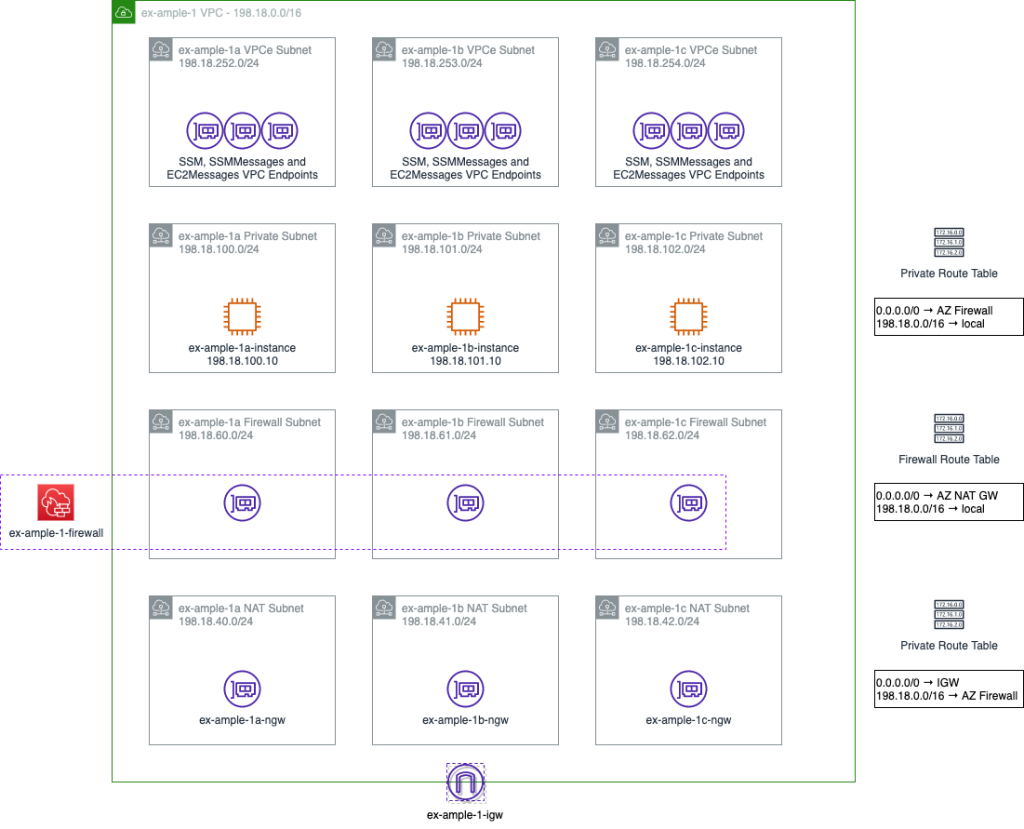
Let’s start this story from a simple VPC with three private subnets for my compute resources, and three private subnets for the VPC Endpoints for Systems Manager (SSM).

I’ve created a tag in my Github repo at this “pre-changes” state, called step 1.
At this point, none of those instances can reach anything outside the network, with the exception of the SSM environment. So, we can’t install any packages, we can’t get data from outside the network or anything similar.
Getting Protected Internet Access
In order to get internet access, we need to add 4 things;
- An internet gateway
- A NAT gateway in each AZ
- Which needs three new subnets
- And three Elastic IP addresses
- Route tables in all the subnets
To clarify, a NAT gateway acts like a DSL router. It hides the source IP address of outbound traffic behind a single, public IP address (using an Elastic IP from AWS), and routes any return traffic back to wherever that traffic came from. To reduce inter-AZ data transfer rates, I’m putting one in each AZ, but if there’s not a lot of outbound traffic or the outbound traffic isn’t critical enough to require resiliency, this could all be centralised to a single NAT gateway. To put a NAT gateway in each AZ, you need a subnet in each AZ, and to get out to the internet (by whatever means you have), you need an internet gateway and route tables for how to reach the NAT and internet gateways.
We also should probably add, at this point, four additional things.
- The Network Firewall
- Subnets for the Firewall interfaces
- Stateless Policy
- Stateful Policy
The Network Firewall acts like a single appliance, and uses a Gateway Load Balancer to present an interface into each of the availability zones. It has a stateless policy (which is very fast, but needs to address both inbound and outbound traffic flows) to do IP and Port based filtering (referred to as “Layer 3” filtering) and then specific traffic can be passed into a stateful policy (which is slower) to do packet and flow inspection.
In this case, I only want outbound HTTPS traffic to be passed, so my stateless rule group is quite simple;
- VPC range on any port → Internet on TCP/443; pass to Stateful rule groups
- Internet on TCP/443 → VPC range on any port; pass to Stateful rule groups
I have two stateful rule groups, one is defined to just allow access out to example.com and any relevant subdomains, using the “Domain List” stateful policy item. The other allows access to example.org and any relevant subdomains, using a Suricata stateful policy item, to show the more flexible alternative route. (Suricata has lots more filters than just the SNI value, you can check for specific SSH versions, Kerberos CNAMEs, SNMP versions, etc. You can also add per-rule logging this way, which you can’t with the Domain List route).
These are added to the firewall policy, which also defines that if a rule doesn’t match a stateless rule group, or an established flow doesn’t match a stateful rule group, then it should be dropped.

So far, so good… but why let our users even try to resolve the DNS name of a host they’re not permitted to reach. Let’s turn on DNS Firewalling too.
Turning on Route 53 DNS Firewall
You’ll notice that in the AWS Network Firewall, I didn’t let DNS out of the network. This is because, by default, AWS enables Route 53 as it’s local resolver. This lives on the “.2” address of the VPC, so in my example environment, this would be 198.18.0.2. Because it’s a local resolver, it won’t cross the Firewall exiting to the internet. You can also make Route 53 use your own DNS servers for specific DNS resolution (for example, if you’re running an Active Directory service inside your network).
Any Network Security Response team members you have working with you would appreciate it if you’d turn on DNS Logging at this point, so I’ll do it too!
In March 2021, AWS announced “Route 53 DNS Firewall”, which allow this DNS resolver to rewrite responses, or even to completely deny the existence of a DNS record. With this in mind, I’m going to add some custom DNS rules.
The first thing I want to do is to only permit traffic to my specific list of DNS names – example.org, example.com and their subdomains. DNS quite likes to terminate DNS names with a dot, signifying it shouldn’t try to resolve any higher up the chain, so I’m going to make a “permitted domains” DNS list;
example.com.
example.org.
*.example.com.
*.example.org.
Nice and simple! Except, this also stops me from being able to access the instances over SSM, so I’ll create a separate “VPCe” DNS list:
ssm.ex-ample-1.amazonaws.com.
*.ssm.ex-ample-1.amazonaws.com.
ssmmessages.ex-ample-1.amazonaws.com.
*.ssmmessages.ex-ample-1.amazonaws.com.
ec2messages.ex-ample-1.amazonaws.com.
*.ec2messages.ex-ample-1.amazonaws.com.
Next I create a “default deny” DNS list:
*.And then build a DNS Firewall Policy which allows access to the “permitted domains”, “VPCe” lists, but blocks resolution of any “default deny” entries.
In conclusion…
So there we have it. While the network is not “secure” (there’s still a few gaps here) it’s certainly MUCH more secure than it was, and it certainly would take a lot more work for anyone with malicious intent to get your content out.
Feel free to have a poke around, and leave comments below if this has helped or is of interest!

Hi Jon, quick question. Would this solution stop outbound traffic that only has an IP address in the host header? i.e. the compromised service is trying to reach a C&C server using its IP address rather than a host/domain name which can be caught at either of the DNS filtering points in the architecture?
Hi Roshan, no, it wouldn’t. Good spot though! 😃
Thanks Jon. At which point, the basic DNS filtering solution you’ve described can be built using just AWS Route53 DNS Firewall and the allow / deny listing it supports. No need to use AWS Network Firewall to do the same.
We’re grappling with how to implement a strict egress control solution that only allows outbound connections ‘if’ it has been resolved by the approved DNS resolution provider.
Looking at Adamnet.works as an option, but wondering how to cobble the logic using a combination of AWS Network Firewall and AWS Route 53 DNS Firewall :)
Ah, the one extra thing it does, is that it stops your users from doing `dig bad.domain @1.1.1.1` which may be useful, depending on your threat model.
Good point. Thank you :) If you do find a neat way to implement strict egress control, please do post :)
I’ve been playing with Netbird recently, and one of the policy options it has is that you can permit a specific resolved DNS name down the mesh. I’ve not tried that part yet (it’s outside the scope I’ve been playing with) but it could really work, particularly if you control the relay and stun points, and setup only designated exit nodes… Again, I’ve not done this, nor approached this type of methodology as my current employer doesn’t “need” that level of protection yet.
Thinking on this further, NGFW (“Next Generation Firewall”) products I’ve seen doing DNS based protections will run the DNS Resolver at the gateway, and then use the DNS response to open a timed outbound policy. It might be that you could implement something like this perhaps? I’ve not seen anything other than commercial vendors doing this, outside Netbird.
A home-grown option we’re going to try is to build a dynamic IP address allow-list based on a list of approved host/domain names. We could run an overnight batch script to create a ‘daily’ IP address allow-list, and we could further improve that with a more frequent running script, e.g. hourly or half-hourly, to accommodate for changing IP addresses. We could even combine these IP address allow-lists for greater firewall inspection efficiency.
The NGFW’s you mention do this much better and in near-real time. But it’s an external purchase cost which we’ll have to justify, which we may do if the cost of building internally becomes infeasible. The leader in this DNS firewalling capability using a proprietary protocol called ‘dont talk to strangers’ is adamnet.works. I’m trying to make a case internally to explore their solution instead of building internally. They seem to have a subscription model which makes the solution really cost effective.