Some notes on OpenSSH

At the hackspace recently, I was asked for a brief rundown of what SSH can do, and how to do it.

Just as an aside, for one-off connections to hosts, you probably don’t need to use a public/private key pair, but for regular access, it’s probably best to have a key pair, if not per-host, then per-group of hosts (for example, home servers, work servers, friends machines, web servers, code repositories). We’ll see how to keep these straight later in this entry. For some reasons, you may want to have multiple keys for one host even!

If you want to create a public/private key pair, you run a very simple command. There are some tweaks you can make, but here’s the basic command

ssh-keygen

Generating public/private key pair
Enter the file in which to save the key (/home/bloggsf/.ssh/id_rsa): /home/bloggsf/.ssh/hostname
Enter passphrase (empty for no passphrase): A Very Complex Passphrase
Enter same passphrase again: A Very Complex Passphrase
Your identification has been saved in /home/bloggsf/.ssh/hostname.
Your public key has been saved in /home/bloggsf/.ssh/hostname.pub.
The key fingerprint is:
00:11:22:33:44:55:66:77:88:99:aa:bb:cc:dd:ee:ff bloggsf@ur-main-machine

See that wasn’t too hard was it? Transfer the PUBLIC portion (the .pub file) to your destination box, as securely as possible, whether that’s by SFTP, putting them on a pen drive and posting it to your remote server, or something else… but those .pub files should be appended to the end of /home/USERNAME/.ssh/authorized_keys

You achieve that by typing:

cat /path/to/file.pub >> /home/username/.ssh/authorized_keys

Note that, if you don’t spell it the American way (authoriZed), it’ll completely fail to work, and you’ll stress out!

So, now that key is on your remote host, how do we do stuff with it?

1) SSH to a console (this won’t try to use the public/private key pair, unless you left the default filename when you made your key)

ssh user@host

2) SSH to a host on an unusual port

ssh user@host -p 12345

3) SSH using a private key (see towards the end of the document about public and private keys)

ssh user@host -i /path/to/private_key

4) SSH on a new port and with a private key

ssh user@host -p 54321 -i /home/user/.ssh/private_key

5) Pulling a port (e.g. VNC service) back to your local machine

ssh user@host -L 5900:127.0.0.1:5900

The format of the portion starting -L is local-port:destination-host:destination-port.

Note, I would then connect to localhost on port 5900. If you are already running a VNC service on port 5900, you would make the first port number something not already in use – I’ll show an example of this next.

6) Pulling multiple ports from different remote hosts to your local machine.
This one I do for my aunt! It forwards the VNC service to a port I’m not using at home, and also gives me access to her router from her laptop.

ssh user@host -L 1443:192.168.1.1:443 -L 5901:localhost:5900

Here I’ve used two formats for selecting what host to forward the ports from – I’ve asked the SSH server to transfer connections I make to my port 1443 to the host 192.168.1.1 on port 443. I’ve also asked it to transfer connections I make on port 5901 to the machine it resolves the name “localhost” as (probably 127.0.0.1 – a virtual IP address signifying my local machine) and to it’s port 5901.

7) Reverse Port Forwarding… offering services from the client end to the server end.

ssh user@host -R 1080:localhost:80

I’ve identified here the most common reason you’ll do a reverse port forward – if you’re not permitted to run sftp (in case you transfer files out of the system), but you need to transfer a file to the target host. In that case, you’d run a web server on your local machine (port 80) and access the web server over port 1080 from your destination host.

8) Running a command instead of a shell on the remote host

ssh user@host run-my-very-complex-script –with-options

9) If you only want your user to be able to use a specific command when they SSH to your host, edit their authorized_keys file, and add at the beginning:

command=”/the/only/command/that/key/can/run $SSH_ORIGINAL_COMMAND” ssh-rsa ……

This command will be run instead of any commands they try to run, with the command they tried to run as options passed to it.

10) Make a file to make it easier for you to connect to lots of different machines without needing to remember all this lot!

The file I’m talking about is called config and is stored in /home/bloggsf/.ssh/config

If it’s not already there, create it and then start putting lines into it. Here’s what mine looks like (hosts and files changed to protect the innocent!)

Host home external.home.server.name
Hostname external.home.server.name
User jon
Port 12345
LocalForward 1080 localhost:1080
LocalForward 9080 router:80
LocalForward 9443 router:443
Host github github.com
Hostname github.com
User git
IdentityFile /home/jon/.ssh/github_key
Host main.projectsite.com
User auser
RemoteForward 1080:localhost:80
Host *.projectsite.com
User projectowner
IdentityFile /home/jon/.ssh/supersecretproject
Host *
IdentityFile /home/jon/.ssh/default_ssh_key
Compression yes

The config file parser steps through it from top to bottom, and will ignore any subsequent lines which it matches already (with the exception of LocalForward and RemoteForward), so if I try to SSH to a box, and my SSH key isn’t already specified, it’ll use the default_ssh_key. Likewise, it’ll always try and use compression when connecting to the remote server.
Using the recursive_import.php script for importing photos to the #Horde module Ansel with subdirectories

I have a problem with the excellent Horde module “Ansel” – their photo
display and manipulation application – which I’m
documenting-until-I-fix-it.

If you have a lot of photos and you want to import the lot in one go,
there’s a script called recursive_import.php – you’ll find this under
/path/to/your/horde/install/ansel/scripts/recursive_import.php and it
takes the following arguments: -d /path/to/directory -u USERNAME -p
PASSWORD

I’d been using it thinking it would handle directory navigation a bit
better than it did, by running it as follows:

php recursive_import.php -d import_dir -u fred -p bloggs

Infact, I needed to do it like this:

php recursive_import.php -d `pwd`/import_dir -u fred -p bloggs

This is because the script navigates up and down the directory
structure as it works out the contents of each directory, instead of
handling the referencing properly. I plan to look at this properly
tomorrow when I’ve got a day off, but if I don’t, or if the patch
doesn’t get accepted, at least you know how to fix it now! :)

Posted via email from Jon’s posterous

Use GMail’s SMTP gateway using the command line from Ubuntu without lots of config tips

I’m writing a few little scripts at the moment, and one of them needed to be able to send an e-mail. I’d not got around to sorting out what my SMTP gateway was from my ISP – but I do tend to use GMail’s SMTP gateway for non-essential stuff.

I thought I could easily setup sendmail, but no, that’s SCARY stuff, and then I thought of Postfix, but that needs an awful lot of configuration for an TLS based SMTP connection, so I did a bit of digging.

Thanks to this post over at the Ubuntu Forums, I worked out how to get a local port 10025 to run, but PHP kept complaining, so I next looked for a “sendmail replacement”, in comes nullmailer.

So, thankfully this is all rather easy.

  • sudo apt-get install openssl xinetd nullmailer
  • sudo tee /usr/bin/gmail-smtp <<EOF >/dev/null
    #!/bin/sh
    # Thanks to http://ubuntuforums.org/showthread.php?t=918335 for this install guide
    /usr/bin/openssl s_client -connect smtp.gmail.com:465 -quiet 2>/dev/null
    EOF
    sudo chmod +x /usr/bin/gmail-smtp
  • sudo tee /etc/xinetd.d/gmail-smtp <<EOF >/dev/null
    # default: on
    # description: Gmail SMTP wrapper for clients without SSL support
    # Thanks to http://ubuntuforums.org/showthread.php?t=918335 for this install guide
    service gmail-smtp
    {
        disable         = no
        bind            = localhost
        port            = 10025
        socket_type     = stream
        protocol        = tcp
        wait            = no
        user            = root
        server          = /usr/bin/gmail-smtp
        type            = unlisted
    }
    EOF
    sudo /etc/init.d/xinetd reload
  • sudo tee /etc/nullmailer/remotes <<EOF >/dev/null
    127.0.0.1 smtp --port=10025 --user=your@user.tld --pass=Y0urC0mp3xGM@ilP@ssw0rd
    EOF
    sudo /etc/init.d/nullmailer reload

Setting all this lot up was pretty easy with these guides. There’s no reason why it wouldn’t work on any other version of Linux (provided you can install all these packages).

Good luck with your project!

Posted via web from Jon’s posterous

Supporting multiple machines in GNOME using VNC

I was recently asked how to configure VNC for user support across a series of machines running GNOME. I’m in the process of trying out a few different platforms at the moment, and didn’t have my GNOME machine to hand and working right, so I decided to work it out from what I’ve done in the past. Here’s the bulk of the e-mail I sent him to try and help him out. Maybe this will help you at some point.

If you find any errors (especially around the option names in the actual dialogue boxes) please post a note so I can correct this!

Thanks!

On most GNOME based systems (which includes Fedora), you can active “Remote Desktop Sharing” for users.

Go to System -> Preferences -> Remote Desktop Sharing (or something similar). I’m afraid I’ve just recently moved my systems to KDE, so I don’t know the exact options, but I believe it’ll say something like “Enable remote connections” (tick that), and “User is prompted to permit connection” (this will be down to policy) and “Remote user needs to enter a password” (this will need some text to be entered).

Once you have these for one system, you can automatically set this for all the other computers.

From the command line, type
  gconftool-2 -R /desktop/gnome/remote_access

This will return all the settings you have made. Here’s mine:

 view_only = false                                         
 alternative_port = 5900                                   
 prompt_enabled = false                                    
 icon_visibility = client                                  
 lock_screen_on_disconnect = false                         
 disable_xdamage = false                                   
 mailto =                                                  
 use_alternative_port = false                              
 enabled = true                                            
 disable_background = false                                
 network_interface =                                       
 require_encryption = false                                
 authentication_methods = [vnc]                            
 vnc_password = &&&&&&&&&&&&                               
 use_upnp = false

(I’ve removed the password for my box)

You can use this gconftool to set the same variables on your computers you’ve already deployed, either per-user, as a default policy for each machine, or as a mandatory policy for each machine.

This article from Sun’s GNOME configuration guide explains how to set variables: http://docs.sun.com/app/docs/doc/806-6878/6jfpqt2t5?a=view while this is an overview of all of the GNOME configuration tool (including that article): http://docs.sun.com/app/docs/doc/806-6878/6jfpqt2sv?a=view and lastly, this is how “Vino” the VNC client for GNOME works: http://www.gnome.org/~markmc/remote-desktop.html

I hope this helps you!

Posted via web from Jon’s posterous

Repost of The Open Sourcerer » Our Windows 7 Special Offer

Our Windows 7 Special Offer

This post is a “reprint” of an email we have just sent to the subscriber list for our Liberation newsletter. The audience is largely UK based businesses and public sector organisations. Should you wish to receive Liberation, you can subscribe here and please feel free to pass it on.


Today, Microsoft invite you to part with your hard-earned cash and upgrade your computers to Windows 7®. If you are one of the majority still using Windows XP, then moving to Windows 7 may not be a pleasant or inexpensive task…

Surprisingly there isn’t actually a way to upgrade your computer from Windows XP to Windows 7 in the traditional sense. You’ll need to back up all your data, re-format the hard-drive and start again from scratch.

Windows doesn’t store your documents, personal information, historical data, emails, passwords, cookies, preferences, settings etc. in one place. So backing up and rebuilding Windows computers is a very time-consuming and complicated process:

  • Work our how many licenses you need then go and pay for them
  • Buy some new storage for all the temporary backup space you’ll need
  • Back up everything on every computer
  • Install the basic operating system
  • Find and install the right hardware drivers for your machine(s). Much hardware may not yet have suitable Windows 7 drivers
  • Register and Activate each new computer, requires you to have network access
  • Find all the disks and license keys for the applications you use, then re-install them. If they are still compatible that is
  • Install & configure the drivers and software for printers and other peripherals. Many peripherals may also not yet have suitable drivers
  • Copy your data and settings etc. back to all the right places on the new system.

Plan for this process taking anywhere between 4 and 8 hours for each and every computer you have.

Gartner estimates that real migration costs will be between $1,035 & $1,930 per user from Windows XP to Windows 7.

Why can’t I upgrade?

Windows 7 Upgrades

Windows 7 Upgrades

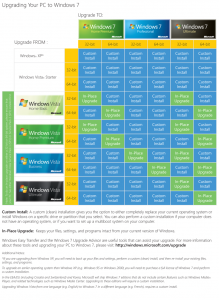
That is a good question, and one that we have not seen a good answer to. Walt Mossberg of the Wall Street Journal asked Microsoft about upgrade paths and was sent this matrix showing all the different ways you can’t upgrade from other versions of Windows to Windows 7 (Blue = No upgrade, rip out and replace. Green = in-place upgrade).

Microsoft have also provided a document explaining the same thing in words. There is no upgrade path from any of the following operating systems:

Windows 95, Windows 98, Windows Millennium Edition, Windows XP, Windows Vista® RTM, Windows Vista Starter, Windows 7 M3, Windows 7 Beta, Windows 7 RC, or Windows 7 IDS, Windows NT® Server 4.0, Windows 2000 Server, Windows Server® 2003, Windows Server 2008, or Windows Server 2008 R2.

That’s a complete mess. What can I do then?

You could do nothing and stay on Windows XP for as long as possible. Although we think this will be a very popular choice, staying on a nearly 10 year old OS probably isn’t the best policy for a forward thinking organisation.

You do have a choice

Ubuntu Solution Provider

As you are going to have to rip out and replace your computers’ operating systems anyway, now is a real Carpe Diem opportunity to investigate an alternative (or two) whilst considering your options.

The Open Learning Centre recommends that your organisation investigates the many benefits offered by a modern Linux-based desktop operating system such as Ubuntu. As an authorised Ubuntu partner we can help your organisation with evaluation, installation, testing, migration, implementation, training and support services.

Ubuntu Desktop

Ubuntu Desktop

Ubuntu is a modern, stable, reliable and secure computing platform that includes most of the applications we all use every day, such as a compatible office suite (Word-processing, Spreadsheets, Presentations) OpenOffice.org, email and calendaring, web browsing and image manipulation tools.

Best of all, Ubuntu is free:

Ubuntu is and always will be free of charge. You do not pay any licensing fees. You can download, use and share Ubuntu with your friends, family, school or business for absolutely nothing.

The retail price for a single Windows 7 Professional license is £219.99 and it’s £229.99 for the Ultimate version. This doesn’t include applications either.

Our Offer: On-Site Ubuntu Installation and Training

The Open Learning Centre will visit your premises, install Ubuntu on a suitable computer, and provide approximately 2-3 hours (i.e approx half a working day) of professional training and advice on Ubuntu for £229.991 (inc. VAT). An outline of the training is available on our website. Please contact us to book your Introduction to Ubuntu.

Open your mind to Open Source software today

A combination of this and the radio advert at http://www.archive.org/details/LinuxAdvert combined with the next Ubuntu release (only a few days off now) and maybe there’ll be more uptake?

XRDP

I recently was asked how to provide an RDP session to a Linux Machine. Phoowey! I replied, you can’t RDP to a Linux box, and yet, someone I work with pointed me in the direction of XRDP – a package on Sourceforge.

I performed the following steps on a VMWare host running Ubuntu 8.10, but there’s no reason why it shouldn’t work on 9.04 or even 8.04.

Why would you want to RDP to a Linux machine? If you’ve got a windows host, you don’t always want to be running more and more different software to access that remote host – like VNC or X over SSH, so this seems like an effective solution if you don’t want your client machines to need additional software.

Some people don’t like to permit SSH through their firewalls as you can do an awful lot with a badly configured SSHd. In another situation, we have been using a device (which I don’t manage I should add) to access a development network. This device acts as a reverse proxy, and permits access to various websites, but most importantly, also proxies access to RDP systems, so this request was driven by that need.

Here’s what I did to configure up the XRDP on this Ubuntu 8.10 desktop

# apt-get install build-essential libpam0g-dev libssl-dev tightvncserver

Visit https://sourceforge.net/projects/xrdp/ then click on Download, Browse all packages, click on the latest release (currently 0.4.1), Copy the link for filename xrdp-x.x.x.tar.gz

# wget http://path/to/file/xrdp-x.x.x.tar.gz
# tar xfz xrdp-x.x.x.tar.gz
# cd xrdp-x.x.x
# make
# sudo make install
# cp /usr/local/xrdp/xrdp_control.sh /etc/init.d/
# update-rc.d -f xrdp_control.sh defaults