During some debugging of an issue with our AWS Spot Instances at work, a colleague noticed that we weren’t responding to the Instance Actions that AWS sends when it’s due to shut down a spot instance.
For some of my projects, I run a Dynamic DNS server service attached to one of the less-standard DNS Names I own, and use that to connect to the web pages I’m spinning up. In a recent demo, I noticed that the terraform “changes” log where it shows what things are being updated showed the credentials I was using, because I was using “simple” authentication, like this:
For context, that would ask the DDNS service running at ddns.example.org to create a DNS record for web.ddns.example.org with an A record of 192.0.2.1.
While this is fine for my personal projects, any time this goes past, anyone who spots that update line would see the credentials I use for this service. Not great.
I had a quick look at the other options I had for authentication, and noticed that the DDNS server I’m running also supports the DynDNS update mechanism. In that case, we need to construct things a little differently!
So now, we change the URL to include the /nic/ path fragment, we use different names for the variables and we’re using Basic Authentication which is a request header. It’s a little frustrating that the http data source doesn’t also have a query type or a path constructor we could have used, but…
In this context the request header of “Authorization” is a string starting “Basic” but then with a Base64 encoded value of the username (which for this DDNS service, can be anything, so I’ve set it as the word “user”), then a colon and then the password. By setting the ddns_secret variable as being “sensitive”, if I use terraform console, and ask it for the value of data.http.ddns_web I get
Note that if your DDNS service has a particular username requirement, this can also be entered, in the same way, by changing the string “user” to something like ${var.ddns_user}.
I’ve been working on my Decision Records open source project for a few months now, and I’ve finally settled on the cross-platform language Rust to create my script. As a result, I’ve got a build process which lets me build for Windows, Mac OS and Linux. I’m currently building a single, unsigned binary for each platform, and I wanted to make it so that Github Actions would build and release these three files for me. Most of the guidance which is currently out there points to some unmaintained actions, originally released by GitHub… but now they point to a 3rd party “release” action as their recommended alternative, so I thought I’d explain how I’m using it to release on several platforms at once.
Although I can go into detail about the release file I’m using for Rust-Decision-Records, I’m instead going to provide a much more simplistic view, based on my (finally working) initial test run.
GitHub Actions
GitHub have a built-in Continuous Integration, Continuous Deployment/Delivery (CI/CD) system, called GitHub Actions. You can have several activities it performs, and these are executed by way of instructions in .github/workflows/<somefile>.yml. I’ll be using .github/workflows/build.yml in this example. If you have multiple GitHub Action files you wanted to invoke (perhaps around issue management, unit testing and so on), these can be stored in separate .yml files.
The build.yml actions file will perform several tasks, separated out into two separate activities, a “Create Release” stage, and a “Build Release” stage. The Build stage will use a “Matrix” to execute builds on the three platforms at the same time – Linux AMD64, Windows and Mac OS.
The actual build steps? In this case, it’ll just be writing a single-line text file, stating the release it’s using.
So, let’s get started.
Create Release
A GitHub Release is typically linked to a specific “tagged” commit. To trigger the release feature, every time a commit is tagged with a string starting “v” (like v1.0.0), this will trigger the release process. So, let’s add those lines to the top of the file:
name: Create Release

on:
  push:
    tags:
      - 'v*'
You could just as easily use the filter pattern ‘v[0-9]+.[0-9]+.[0-9]+’ if you wanted to use proper Semantic Versioning, but this is a simple demo, right? 😉
Next we need the actual action we want to start with. This is at the same level as the “on” and “name” tags in that YML file, like this:
So, this is the actual “create release” job. I don’t think it matters what OS it runs on, but ubuntu-latest is the one I’ve seen used most often.
In this, you instruct it to create a simple release, using the text in the annotated tag you pushed as the release notes.
This is using a third-party release action, softprops/action-gh-release, which has not been vetted by me, but is explicitly linked from GitHub’s own action.
If you check the release at this point, (that is, without any other code working) you’d get just the source code as a zip and a .tgz file. BUT WE WANT MORE! So let’s build this mutha!
Build Release
Like with the create_release job, we have a few fields of instructions before we get to the actual actions it’ll take. Let’s have a look at them first. These instructions are at the same level as the jobs:\n create_release: line in the previous block, and I’ll have the entire file listed below.
So this section gives this job an ID (build_release) and a name (Build Release), so far, so exactly the same as the previous block. Next we say “You need to have finished the previous action (create_release) before proceeding” with the needs: create_release line.
But the real sting here is the strategy:\n matrix: block. This says “run these activities with several runners” (in this case, an unspecified Ubuntu, Mac OS and Windows release (each just “latest”). The include block asks the runners to add some template variables to the tasks we’re about to run – specifically release_suffix.
The last line in this snippet asks the runner to interpret the templated value matrix.os as the OS to use for this run.
Let’s move on to the build steps.
    steps:
      - name: Checkout code
        uses: actions/checkout@v2

      - name: Run Linux Build
        if: matrix.os == 'ubuntu-latest'
        run: echo "Ubuntu Latest" > release_ubuntu

      - name: Run Mac Build
        if: matrix.os == 'macos-latest'
        run: echo "MacOS Latest" > release_mac

      - name: Run Windows Build
        if: matrix.os == 'windows-latest'
        run: echo "Windows Latest" > release_windows
This checks out the source code on each runner, and then has a conditional build statement, based on the OS you’re using for each runner.
It should be fairly simple to see how you could build this out to be much more complex.
The final step in the matrix activity is to add the “built” file to the release. For this we use the softprops release action again.
Several months ago, I wrote a post talking about Architectural Decision Records with adr-tools, but since then I’ve moved on a bit with things, so I wanted to write about alternatives.
Late edit 2021-12-14: I released (v0.0.1) my own rust-based application for creating Decision Records. Please feel free to make pull requests, raise issues, etc :)
I also wanted to comment a bit on why I use the term “Decision Records” (always “decision record”, never “DR” due to the overloading of that particular abbreviation) rather than “Architectural Decision Records” (ADR), but I’ll get to that towards the end of the post 😊
Using Decision Records the Manual Way
A decision record is usually basically a text file, using the “Markdown” format, which has several “standard” blocks of text in it. The “npryce” version, which most people use, has the following sections in it:
Title (as a “level 1” heading) which also holds the date of the record.
A (level 2 heading) status section, holding the status of this decision (and any links to documents which supersede or relate to this decision).
The context of the decision.
The decision.
The consequences of that decision.
So, somewhat understandably, your organisational tooling should support you making your own documents, without using those tools.
There are conventions about how the index-critical details will be stored:
Your title block should follow the format # 1. Decision Title. The # symbol means it is the primary heading for the document, then the number, which should probably be lower than 9999, is used as an index for linking to other records and then the text of the title should also be the name of the file you’ve created. In this case, it will likely be 0001-decision-title.md.
The status will usually be one of: Approved or Proposed. If a document is superseded, it should remove this status. Any other link type will live under the line showing the current status.
So, there’s no reason why you couldn’t just use this template for any files you create:
# NUMBER. TITLE

Date: yyyy-mm-dd

## Status

Accepted
Superseded by [2. Another Decision](0002-another-decision.md)

## Context

The context of the decision.

## Decision

The decision.

## Consequences

The consequences of that decision.
BUT, that’s not very automated, is it?
ADRs using Bash
Of course, most people making decision records use the Bash command line….. right? Oh, perhaps not. I’ll get back to you in a tic. If you’re using Bash, the “npryce” tooling I mentioned above is the same one I wrote about those months ago. So, read that, and then crack on with your ADRs.
ADRs using Powershell
So, if you’re using Windows, you might be tempted to find a decision record tool for Powershell. If so, I found “ajoberstar” on Github had produced just such a thing, and you “just”, as an administrator, run:
Then edit the script you installed (in C:\Program Files\WindowsPowerShell\Modules\ArchitectureDecisionRecords\0.1.1\ArchitectureDecisionRecords.psm1) and search-and-replace UTF8NoBOM for UTF8 and then save it…
And then you can run commands like Initialize-Adr or New-Adr -Title 'Use a database'. However, this script was last touched on 2nd July 2018, and although I’ve raised a few issues, they don’t seem to have been resolved (see also replacing UTF8NoBOM above).
ADRs using VSCode
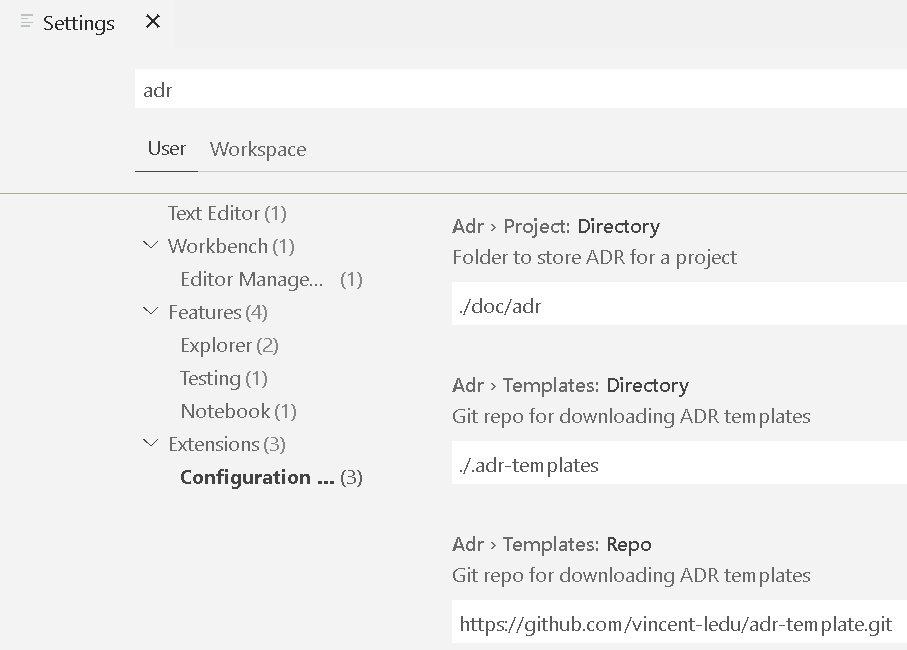
By far, so far, the best tooling I’ve seen in this space is the adr-tools extension for VSCode. It too, however, has it’s own caveats, but these are not disastrous. Essentially, you need to create a path in which you store the template to use. You can get this from his own repo, here: https://github.com/vincent-ledu/adr-template.git and put it in .adr-templates in the root directory of your project. This, however, is customizable, by going to the settings for your user or workspace, searching for ADR and adjusting the paths accordingly.
A settings pane showing the Adr paths in your project’s tree
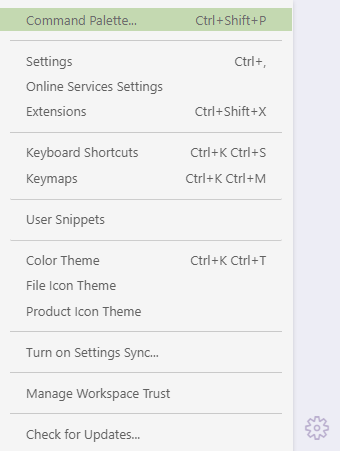
To add a new decision record, press Ctrl+Shift+P or click the cog icon in the sidebar, and select “Command Palette…”
Opening the Command Palette in VS Code
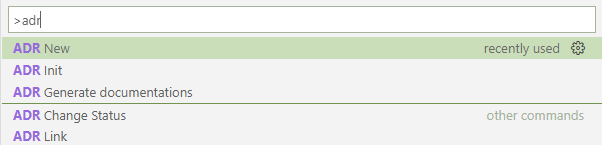
Then start typing “adr” to select from “ADR New”, “ADR Init”, “ADR Change Status” or “ADR Link”.
The Command Palette showing your options for commands to run
All of these will walk you through some options at the top of the screen, either asking for some text input, or asking you to select between options.
You may be tempted to just run this up now, and select “ADR New”, and it’ll look like it’s working, but, you first need to have obtained the template and create the directory structure. Selecting “ADR Init” will create the directory structure for your project and will try to perform a git clone of the repo mentioned above, but if you are already in a git repository, or you have some form of MITM proxy in the way, this will also break silently. The easiest thing to do is to either manually create the paths in your tree, according to what you have set or selected, or just run the ADR init, and then obtain the template from the git repo.
Talking of templates, in the previous scripts, the script would come with a template file built-in, and it would do a simple string replacement of the values “NUMBER”, “TITLE” and “STATUS”. With this script it instead uses it’s own template, which is stored in your project’s file tree, and uses parameter substitution, finding strings wrapped in pairs of curled braces (like {{ this }}). The downside to this is that you can’t just reuse the template I listed above… but no worries, get the file from the repo and stick it in your tree where it’s expecting it, or let the adr init function clone the template into your path – job done.
What other options are there?
Well, actually, this comes down to why I’m using the term “decision records” rather than “architectural decision record”, because I’m writing my own tool, and all the “adr” namespaces on Github were taken, and I’d seen a fair amount of posts suggesting that the “A” in “ADR” should stand for “Any”.. and I figured why should it exist at all?
Why Javascript? Frankly, I needed to learn a modern programming language, and wanted to apply it to a domain I was interested in. It’s currently not complete, it creates the record path and a configuration file, and I’m currently writing the functions to create new records. Also, because it’s Javascript, in theory I can also use the internals to create a VSCode extension with this later… MUCH later!
Why re-implement this at all? Firstly, it looks like most of the development work on those projects halted around 3-4 years ago, with no further interest in updating them to resolve bugs and issues. I didn’t want to fork the projects as-is, as I think they were largely written to scratch a particular itch (which is fine!) but they all miss key things I want to provide, like proper unit testing (only the npryce project comes close to this), internationalisation (none of them have this) and the ability to use a company- or project-wide template (only the VSCode extension does this). I also saw requests to support alternative file formats (like Restructured Text, which was completely rejected) and realised that if you built the script in such a way that these alternate formats could be used, then there was no reason not to support that.
In summary
There are tools you can use, whatever platform you’re using. My preference is the VSCode extension, and eventually will (hopefully!!) be the script I’m writing… but it’s not ready, yet.
I’ve been using HashiCorp’s Vagrant with Oracle’s VirtualBox for several years (probably since 2013, if my blog posts are anything to go by), and I’ve always been pretty comfortable with how it works.
This said, when using a Windows machine running Microsoft’s Hyper-V (built into Windows since Windows 7/2018) VirtualBox is unable (by default) to run 64 bit virtual machines (thanks to Hyper-V “stealing” the VT-x/AMD-V bit from the BIOS/EFI).
Around last year or maybe even the year before, Microsoft introduced a “Hypervisior Platform” add-on, which lets VirtualBox run 64 bit machines on a Hyper-V host (more on this later). HOWEVER, it is much slower than in native mode, and can often freeze on booting…
Meanwhile, Vagrant, (a configuration file that acts as a wrapper around various hypervisors, using VirtualBox by default) boots machines in a “headless” mode by default, so you can’t see the freezing.
I’m trying to use an Ubuntu 18.04 virtual machine for various builds I’m creating, and found that I’d get a few issues on boot, so let’s get these sorted out.
VirtualBox can’t start 64bit virtual machines when Hyper-V is installed.
You need to confirm that certain Windows features are enabled, including “Hyper-V” and “Windows Hypervisor Platform”. Confirm you’re running at least Windows 10 version 1803 which is the first release with the “Windows Hypervisor Platform”.
GUI mode
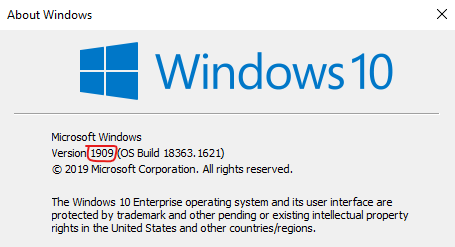
Run winver to bring up this box. Confirm the version number is greater than 1803. Mine is 1909.
A screenshot of the “winver” command, highlighting the version number, which in this case shows 1909, but needs to show at least 1803.
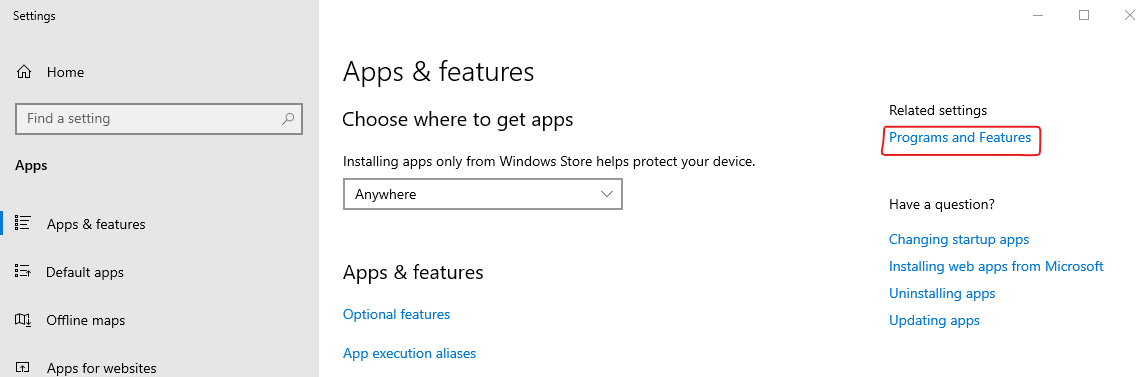
Right click on the start menu, and select “Apps and Features”. Click on “Programs and Features”.
The settings panel found by right clicking the “Start Menu” and selecting “Apps and Features”. Note the desired next step – “Programs and Features” is highlighted.
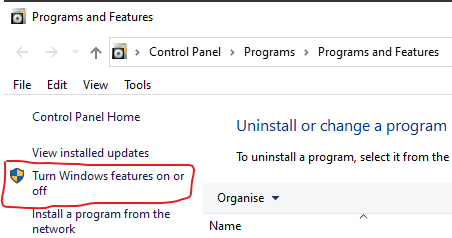
In the “Programs and Features” window, click on “Turn Windows Features on or off”. Note the shield icon here indicates that administrative access is required, and you may be required to authenticate to the machine to progress past this stage.
A fragment of the “Programs and Features” window, with the “Turn Windows features on or off” link highlighted.
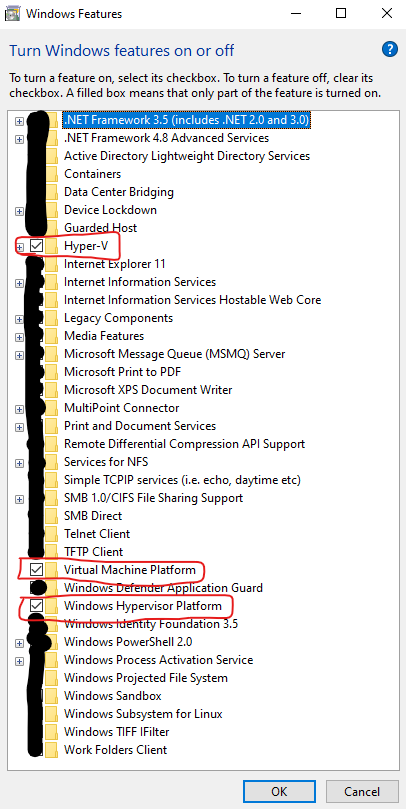
Next, ensure that the following “Windows Features” are enabled; “Hyper-V”, “Virtual Machine Platform” and “Windows Hypervisor Platform”. Click on “OK” to install these features, if they’re not already installed.
A screen capture of the “Turn Windows features on or off” dialogue box, with certain features obscured and others highlighted.
Note that once you’ve pressed “OK”, you’ll likely need to reboot your machine, if any of these features were not already installed.
CLI mode
Right click on the start menu, and start an Administrative Powershell session.
Run the command Get-ComputerInfo | select WindowsVersion. You should get a response which looks like this:
WindowsVersion
--------------
1909
Note that the version number needs to be greater than 1803.
Next, find the names of the features you need to install. These features have region specific names, so outside EN-GB, these names may not match your requirements!
Run the command Get-WindowsOptionalFeature -online | select FeatureName,State and you’re looking for the following lines (this has been cropped to just what you need):
FeatureName                                     State
-----------                                     -----
HypervisorPlatform                            Enabled
VirtualMachinePlatform                        Enabled
Microsoft-Hyper-V-All                         Enabled
If any of these three features are not enabled, run Enable-WindowsOptionalFeature -online -FeatureName x where “x” is the name of the feature, listed in the above text block, you want to install. For example: Enable-WindowsOptionalFeature -online -FeatureName HypervisorPlatform,VirtualMachinePlatform,Microsoft-Hyper-V-All. If you run this when they’re already enabled, it should return RestartNeeded : False, but otherwise you’re likely to need to reboot.
After the reboot
After you’ve rebooted, and you start a 64 bit virtual machine in VirtualBox, you’ll see this icon in the bottom corner.
A screen grab of the VirtualBox Status Bar, highlighting the “Slow Mode” icon representing the CPU
Booting the Virtual Machine with Vagrant fails because it takes too long to boot
This was historically a big issue with Vagrant and VirtualBox, particularly with Windows Vagrant boxes, but prior to the Hyper-V/VirtualBox solution, it’d been largely fixed (or at least, I wasn’t seeing it!) There is a “standard” timeout for booting a Virtual Machine, I think at approximately 5 minutes, but I might be wrong. To make this “issue” stop occurring, add this config.vm.boot_timeout = 0 line to your Vagrantfile, like this:
Vagrant.configure("2") do |config|
  config.vm.boot_timeout = 0
end
This says to Vagrant, don’t worry how long it takes to boot, just keep waiting until it does. Yes, it will be slower, but it should get there in the end!
Booting the Virtual Maching with Vagrant does not fail, but it never authenticates with your Private Key.
Your VM may sit at this block for quite a while:
==> default: Waiting for machine to boot. This may take a few minutes...
    default: SSH address: 127.0.0.1:2222
    default: SSH username: vagrant
    default: SSH auth method: private key
If this occurs, you may find that your virtual machine has hung during the boot process… but weirdly, a simple work-around to this is to ensure that the VirtualBox GUI is open, and that you’ve got a block like this (config.vm.provider / vb.gui=true / end) in your Vagrantfile:
Vagrant.configure("2") do |config|
  config.vm.provider "virtualbox" do |vb|
    vb.gui = true
  end
end
This forces VirtualBox to open a window with your Virtual Machine’s console on it (much like having a monitor attached to real hardware). You don’t need to interact with it, but any random hangs or halts on your virtual machine may be solved just by bringing this window, or the VirtualBox Machines GUI, to the foreground.
Sometimes you may see, when this happens, a coredump or section of kernel debugging code on the console. Don’t worry about this!
Vagrant refuses to SSH to your virtual machine when using the vagrant ssh command.
Provisioning works like a treat, and you can SSH into the virtual machine from any other environment, but, when you run vagrant ssh, you get an error about keys not being permitted or usable. This is fixable by adding a single line, either to your system or user -wide environment variables, or by adding a line to your Vagrantfile.
The environment variable is VAGRANT_PREFER_SYSTEM_BIN, and by setting this to 0, it will use bundled versions of ssh or rsync instead of using any versions provided by Windows.
You can add a line like this ENV['VAGRANT_PREFER_SYSTEM_BIN']="0" to your Vagrantfile, outside of the block Vagrant.configure…end, like this:
ENV['VAGRANT_PREFER_SYSTEM_BIN']="0"
Vagrant.configure("2") do |config|
end
A few posts ago I wrote about building Windows virtual machines with Terraform, and a couple of days ago, “YoureInHell” on Twitter reached out and asked what advice I’d give about having several different terraform modules use the same basic build of custom data.
They’re trying to avoid putting the same template file into several repos (I suspect so that one team can manage the “custom-data”, “user-data” or “cloud-init” files, and another can manage the deployment terraform files), and asked if I had any suggestions.
I had three ideas.
Using a New Module
This was my initial thought; create a new module called something like “Standard Build File”, and this build file contains just the following terraform file, and a template file called “build.tmpl”.
module "buildTemplate" {
  source   = "git::https://git.example.net/buildTemplate.git?ref=latestLive"
  # See https://www.terraform.io/docs/language/modules/sources.html
  #   for more details on how to specify the source of this module
  unsetVar = "Set To This String"
}

output "RenderedTemplate" {
  value = module.buildTemplate.template
}
And that means that you can use the module.buildTemplate.template anywhere you’d normally specify your templateFile, and get a consistent, yet customizable template (and note, because I specified a particular tag, you can use that to move to the “current latest” or “the version we released into live on YYYY-MM-DD” by using a tag, or a commit ref.)
Now, the downside to this is that you’ve now got a whole separate module for creating your instances that needs to be maintained. What are our other options?
Git Submodules for your template
I use Git Submodules a LOT for my code. It’s a bit easy to get into a state with them, particularly if you’re not great at keeping on top of them, but… if you are OK with them, you’d create a repo, again, let’s use “https://git.example.net/buildTemplate.git” as our git repo, and put your template in there. In your terraform git repo, you’d run this command: git submodule add https://git.example.net/buildTemplate.git and this would add a directory to your repo called “buildTemplate” that you can use your templatefile function in Terraform against (like this: templatefile("buildTemplate/build.tmpl", {someVar="var"})).
Now, this means that you’ve effectively got two git repos in one tree, and if any changes occur in your submodule repo, you’d need to do git checkout main ; git pull to get the latest updates from your main branch, and when you check it out initially on another machine, you’ll need to do git clone https://git.example.net/terraform --recurse-submodules to get the submodules populated at the same time.
A benefit to this is that because it’s “inline” with the rest of your tree, if you need to make any changes to this template, it’s clearly where it’s supposed to be in your tree, you just need to remember about the submodule when it comes to making PRs and suchforth.
How about that third idea?
Keep it simple, stupid 😁
Why bother with submodules, or modules from a git repo? Terraform can be quite easy to over complicate… so why not create all your terraform files in something like this structure:
And then in each of your terraform files (web_servers, logic_servers and database_servers) just reference the file in your project root, like this: templatefile("../build.tmpl", {someVar="var"})
The downside to this is that you can’t as easily farm off the control of that build script to another team, and they’d be making (change|pull|merge) requests against the same repo as you… but then again, isn’t that the idea for functional teams? 😃
In my last post in this series I mentioned that I’d got my Raspberry Pi Zero W to act as a USB Ethernet adaptor via libComposite, and that I was using DNSMasq to provide a DHCP service to the host computer (the one you plug the Pi into). In this part, I’m going to extend what local services I could provide on this device, and start to use this as a router.
Here’s what you missed last time… When you plug the RPi in (to receive power on the data line), it powers up the RPi Zero, and uses a kernel module called “libComposite” to turn the USB interface into an Ethernet adaptor. Because of how Windows and non-Windows devices handle network interfaces, we use two features of libComposite to create an ECM/CDC interface and a RNDIS interface, called usb0 and usb1, and whichever one of these two is natively supported in the OS, that’s which interface comes up. As a result, we can then use DNSMasq to “advertise” a DHCP address for each interface, and use that to advertise services on, like an SSH server.
By making this device into a router, we can use it to access the network, without using the in-built network adaptor (which might be useful if your in-built WiFi adaptors isn’t detected under Linux or Windows without a driver), or to protect your computer from malware (by adding a second firewall that doesn’t share the same network stack as it’s host), or perhaps to ensure that your traffic is sent over a VPN tunnel.
A few months ago, I was working on a personal project that needed a separate, offline linux environment. I tried various different schemes to run what I was doing in the confines of my laptop and I couldn’t make what I was working on actually achieve my goals. So… I bought a Raspberry Pi Zero W and a “Solderless Zero Dongle“, with the intention of running Docker containers on it… unfortunately, while Docker runs on a Pi Zero, it’s really hard to find base images for the ARMv6/armhf platform that the Pi Zero W… so I put it back in the drawer, and left it there.
Roll forwards a month or so, and I was doing some experiments with Nebula, and only had an old Chromebook to test it on… except, I couldn’t install the Nebula client for Linux on there, and the Android client wouldn’t give me some features I wanted… so I broke out that old Pi Zero W again…
Now, while the tests with Nebula I was working towards will be documented later, I found that a lot of the documentation about using a Raspberry Pi Zero as a USB gadget were rough and unexplained. So, this post breaks down much of the content of what I found, what I tried, and what did and didn’t work.
Late Edit 2021-06-04: I spotted some typos around providing specific DHCP options for interfaces, based on work I’m doing elsewhere with this script. I’ve updated these values accordingly. I’ve also created a specific branch for this revision.
Late Edit 2021-06-06: I’ve noticed this document doesn’t cover IPv6 at all right now. I started to perform some tweaks to cover IPv6, but as my ISP has decided not to bother with IPv6, and won’t support Hurricane Electric‘s Tunnelbroker system, I can’t test any of it, without building out an IPv6 test environment… maybe soon, eh?
Over the last week, I discovered a new tool for my arsenal called Architectural Decision Records (ADR). They were first written about in 2011, in a post called “Documenting Architecture Decisions“, where the author, Michael Nygard, advocates for short documents explaining each decision that influences the architecture of an environment.
I found this via a Github repository, created by the team at gov.uk, which includes their ADR library, and references the tool they use to manage these documents – adr-tools.
Late edit 2021-12-14: I released (v0.0.1) my own rust-based application for making Decision Records. Yes, Decision Records – not Architecture Decision Records… because I think you should be able to apply the same logic to all decisions, not just architectural ones.
Installing adr-tools on Linux
Currently adr-tools are easier to install under OSX rather than Linux or Windows Subsystem for Linux (WSL) (I’m working on this – bear with me! 😃 ).
The current installation notes suggest for Linux (which would also work on WSL) is to download the latest release tar.gz or zip file and unpack it into your path somewhere. This isn’t exactly the best way to deploy anything on Linux, but… I guess it works right now?
For me, I downloaded the file, and unpacked the whole tar.gz file (as root) into /usr/local/bin/, giving me a directory of /usr/local/bin/adr-tools-3.0.0/. There’s a subdirectory in here, called src which contains a large number of files – mostly starting _adr or adr- and two additional files, init.md and template.md.
Rather than putting all of these files into /usr/local/bin directly, instead I leave them in the adr-tools-3.0.0 directory, and create a symbolic link (symlink) to the /usr/local/bin directory with this command:
cd /usr/local/bin
ln -s adr-tools-3.0.0/src/* .
This gives me all those files in one place, so I can refer to them later.
An aside – why link everything in that src directory? (Feel free to skip this block!)
Now, why, you might ask, do all of these unrelated files need to be in the same place? Well…. the author of the script has put this in at the top of almost all the files:
#!/bin/bash
set -e
eval "$($(dirname $0)/adr-config)"
There are, technically, good reasons for this! This is designed to be run in, what in the Windows world, you might call as a “Portable Script”. So, you bung adr-tools into some directory somewhere, and then just call adr somecommand and it knows that all the files are where they need to be. The (somewhat) down side to this is that if you just want to call adr somecommand rather than path/to/my/adr somecommand then all those files need to be there
I’m currently looking to see if I can improve this somewhat, so that it’s not quite so complex to install, but for now, that’s what you need.
Anyway…
Using adr-tools to document your decisions
I’ll start documenting a fictional hosted web service project, and note down some of the decisions which have been made.
Initializing your ADR directory
Start by running adr init. You may want to specify a directory where you want to put these records, so instead use: adr init path/to/adr, like this:
Initializing the ADR in “documentation/architecture-decisions” with adr init documentation/architecture-decisions
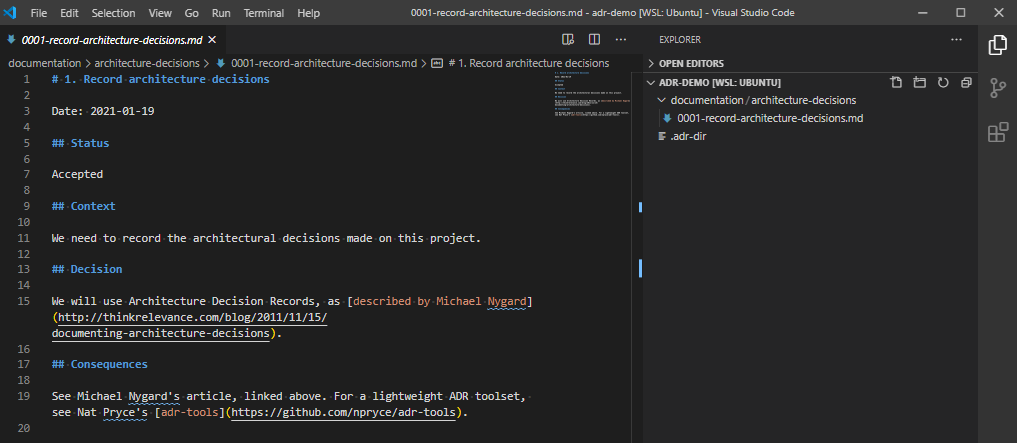
You’ll notice that when I run this command, it creates a new entry, called 0001-record-architecture-decisions.md. Let’s open this up, and see what’s in here.
The VSCode record for the choice to use ADR. It is a markdown file, with the standard types of data recorded.
In here we have the record ID (1.), the title of the record Record architecture decisions, the date the choice was made Date: 2021-01-19, a status of Accepted, the context on why we made this choice, the decision, and the consequences of making this decision. Make changes, if needed, and save it. Let’s move on.
Creating our first own record
This all is quite straightforward thus far. Let’s create our next record.
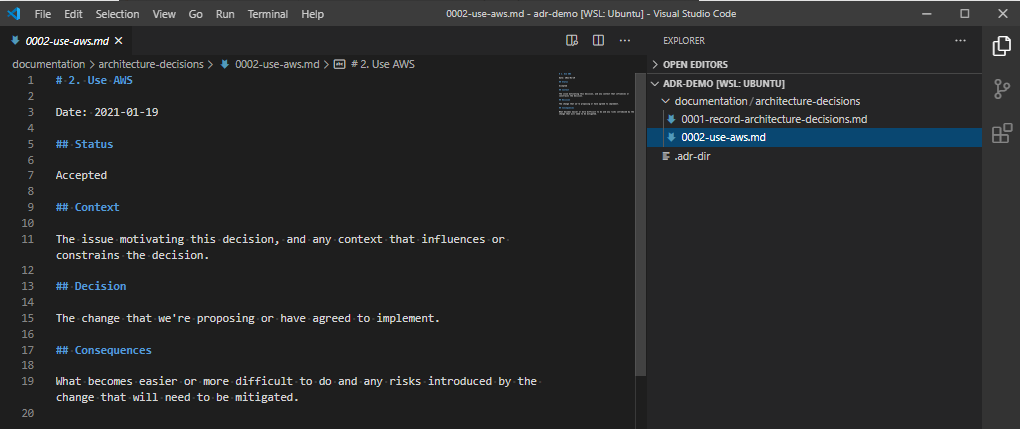
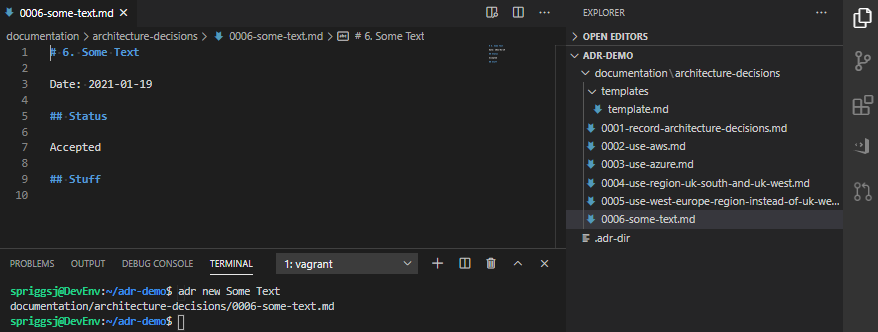
Issuing the command adr new <sometitle> you create the next ADR record.
Let’s open up that record.
The template for the ADR record for “Use AWS”.
Like the first record, we have a title, a status, a context, decision and consequences. Let’s define these.
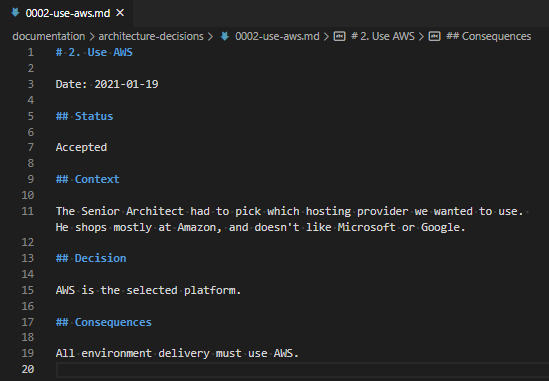
A “finished” brief ADR record.
This document shouldn’t be very long! It just describes why a choice was made and what that entails.
Changing decisions – completely replacing (superseding) a decision
Of course, over time, decisions will be replaced due to various decisions elsewhere.
You can ask adr to supersede a previous record, using the “-s” flag, and the record number.
Let’s look at how that works on the second ADR record.
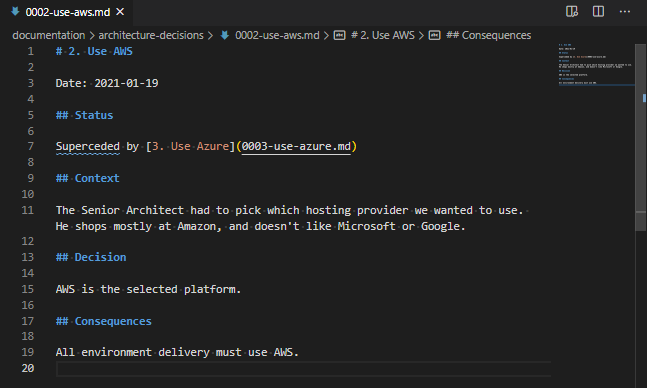
After the command adr new -s 2 Use Azure, the ADR record number 2 has a new status, “Superceded by” and the superseded linked document. Yes, “Superceded” is a typo. There is an open PR for it
So, under the “Status”, where is previously said “Approved”, it now says “Superceded by [3. Use Azure](0003-use-azure.md)“. This is a markdown statement which indicates where the superseded document is located. As I mentioned in the comment below the above image, there is an open Pull Request to fix this on the adr-tools, so hopefully that typo won’t last long!
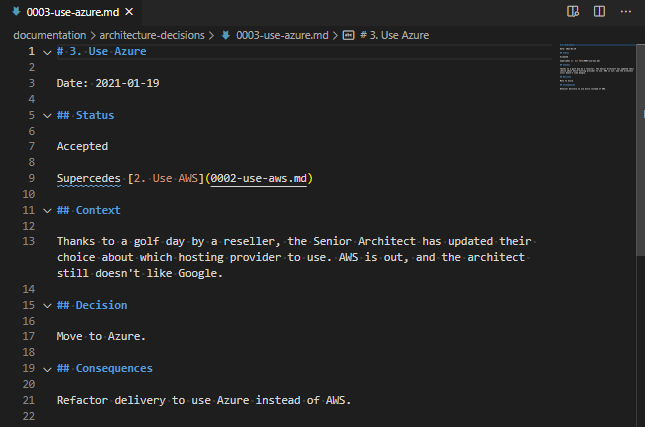
We’ve got our new ADR too – let’s take a look at that one?
Our new ADR shows that it “supercedes” the previous record. Which is good! Typo aside :)
Other references
Of course, you don’t always completely overrule a decision. Sometimes your decision is influenced by, or has a dependency on something else, like this one.
We know which provider we’re using at long last, now let’s pick a region. Use the -l flag to “link” between the referenced and new ADR. The context for the -l flag is “<number>:<text for link to number>:<text for link in targetted document>”.
The command here is:
adr new -l '3:Dependency:Influences' Use Region UK South and UK West
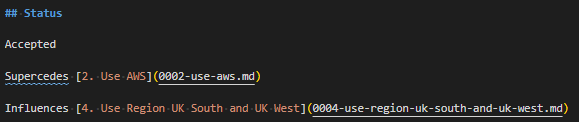
I’m just going to crop from the “Status” block on both the referenced ADR (3) and the ADR which references it (4):
Status block in ADR 0003 which is referenced by ADR 0004Status block in the new ADR 0004 which references ADR 0003
And of course, you can also use the same switch to mark documents as partially obsoleted, like this:
adr new -l '4:Partially obsoletes:Partially obsoleted by' Use West Europe region instead of UK West region
Status block in ADR 0004 indicating it’s partially obsoleted. Probably worth updating the status properly to show it’s not just “Accepted”.
If you forget to add the referencing in, you can also use the adr link command, like this:
adr link 3 Influences 5 Dependency
To be clear, that command adds a (complete) line to ADR 0003 saying “Influences [5. ADR Title](link)” and a separate (complete) line to ADR 0005 saying “Dependency [3. ADR Title](link)“.
What else can we do?
There are four other “things” that it’s worth doing at this point.
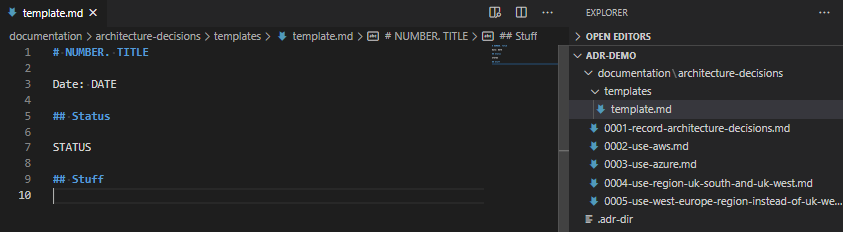
Note that you can change the template per-ADR directory.
Create a directory called “templates” in the ADR directory, and put a file in there called “template.md“. Tweak this as you need. Ensure you have AT LEAST the line ## Status and # NUMBER. TITLE as these are required by the script.
A much abbreviated template file, containing just “Number”, “Title”, “Date”, “Status”, and a new dummy heading called “Stuff”.And the result of running adr new Some Text once you’ve created that template.
As you can see, it’s possible to add all sorts of content in this template as a result. Bear in mind, before your template turns into something like this, that it’s supposed to be a short document explaining why each decision was made, not a funding proposal, or a complex epic of your user stories!
Be careful not to let your template run away with you!
Note that you can automatically open an editor, by setting the EDITOR (where the process is expected to finish before returning control, like using nano, emacs or vim, for example) or VISUAL (where the process is expected to “fork”, like for example, gedit or vscode) environment variable, and then running adr new A Title, like this:
We can create “Table of Contents” files, using the adr generate toc command, like this:
Generating the table of contents, for injecting into other files.
This can be included into your various other markdown files. There are switches, so you can set the link path, but your best bet is to find that using adr help generate toc.
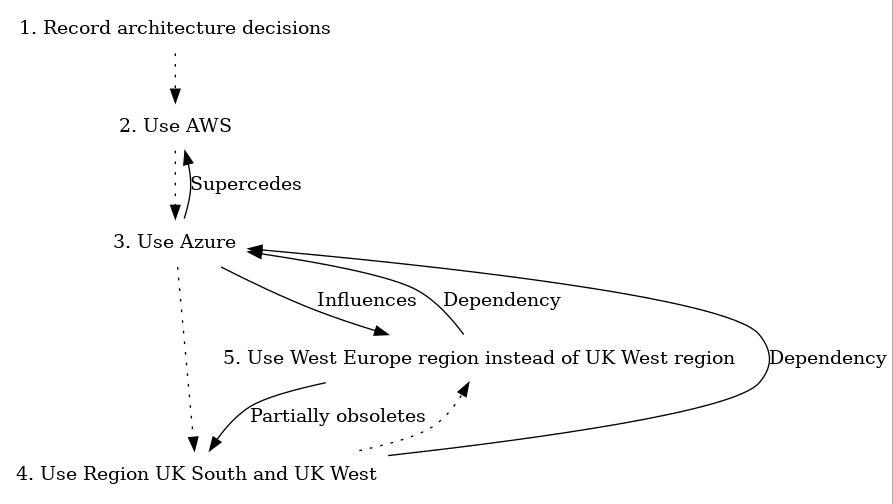
We can also generate graphviz files of the link maps between elements of the various ADRs, like this: adr generate graph | dot -Tjpg > graph.jpg
If you omit the “| dot -Tjpg > graph.jpg” part, then you’ll see the graphviz output, which looks like this: (I’ve removed the documents 6 and 7).
digraph {
  node [shape=plaintext];
  subgraph {
    _1 [label="1. Record architecture decisions"; URL="0001-record-architecture-decisions.html"];
    _2 [label="2. Use AWS"; URL="0002-use-aws.html"];
    _1 -> _2 [style="dotted", weight=1];
    _3 [label="3. Use Azure"; URL="0003-use-azure.html"];
    _2 -> _3 [style="dotted", weight=1];
    _4 [label="4. Use Region UK South and UK West"; URL="0004-use-region-uk-south-and-uk-west.html"];
    _3 -> _4 [style="dotted", weight=1];
    _5 [label="5. Use West Europe region instead of UK West region"; URL="0005-use-west-europe-region-instead-of-uk-west-region.html"];
    _4 -> _5 [style="dotted", weight=1];
  }
  _3 -> _2 [label="Supercedes", weight=0]
  _3 -> _5 [label="Influences", weight=0]
  _4 -> _3 [label="Dependency", weight=0]
  _5 -> _4 [label="Partially obsoletes", weight=0]
  _5 -> _3 [label="Dependency", weight=0]
}
To make the graphviz part work, you’ll need to install graphviz, which is just an apt get away.
Any caveats?
adr-tools is not actively maintained. I’ve contacted the author, about seeing if I can help out with the maintenance, but… we’ll see, and given some fairly high profile malware takeovers of projects like this sort of thing on Github, Docker, NPM, and more… I can see why there might be some reluctance to consider it! Also, I’m an unknown entity, I’ve just dropped in on the project and offered to help, with no previous exposure to the lead dev or the project… so, we’ll see. Worst case, I’ll fork it!
Working with this also requires an understanding of markdown files, and why these might be a useful document format for records like this. There was a PR submitted to support multiple file formats (like asciidoc and rst) but these were not approved by the author.
There is no current intention to support languages other than English. The tool is hard-coded to look for strings like “status” and “superceded” which is hard. Part of the reason I raised the PRs I did was to let me fix some of these sorts of issues. Again, we’ll see what happens.
Lastly, it can be overwhelming to see a lot of documents in one place, particularly if they’re as granular as the documents I produced in this demo. If the project supported categories, or could be broken down into components (like doc/adr/networking and doc/adr/server_builds and doc/adr/applications) then this might help, but it’s not on the roadmap right now!
Late edit 2021-01-25: If you don’t think these templates have enough context or content, there are lots of others listed on Joel Parker Henderson’s repo of examples and templates. If you want a python based viewer of ADR records, take a look at adr-viewer.
TL;DR: Linux is usually awesome, but it doesn’t work for my niche case.
Why was I in the market for a new computer?
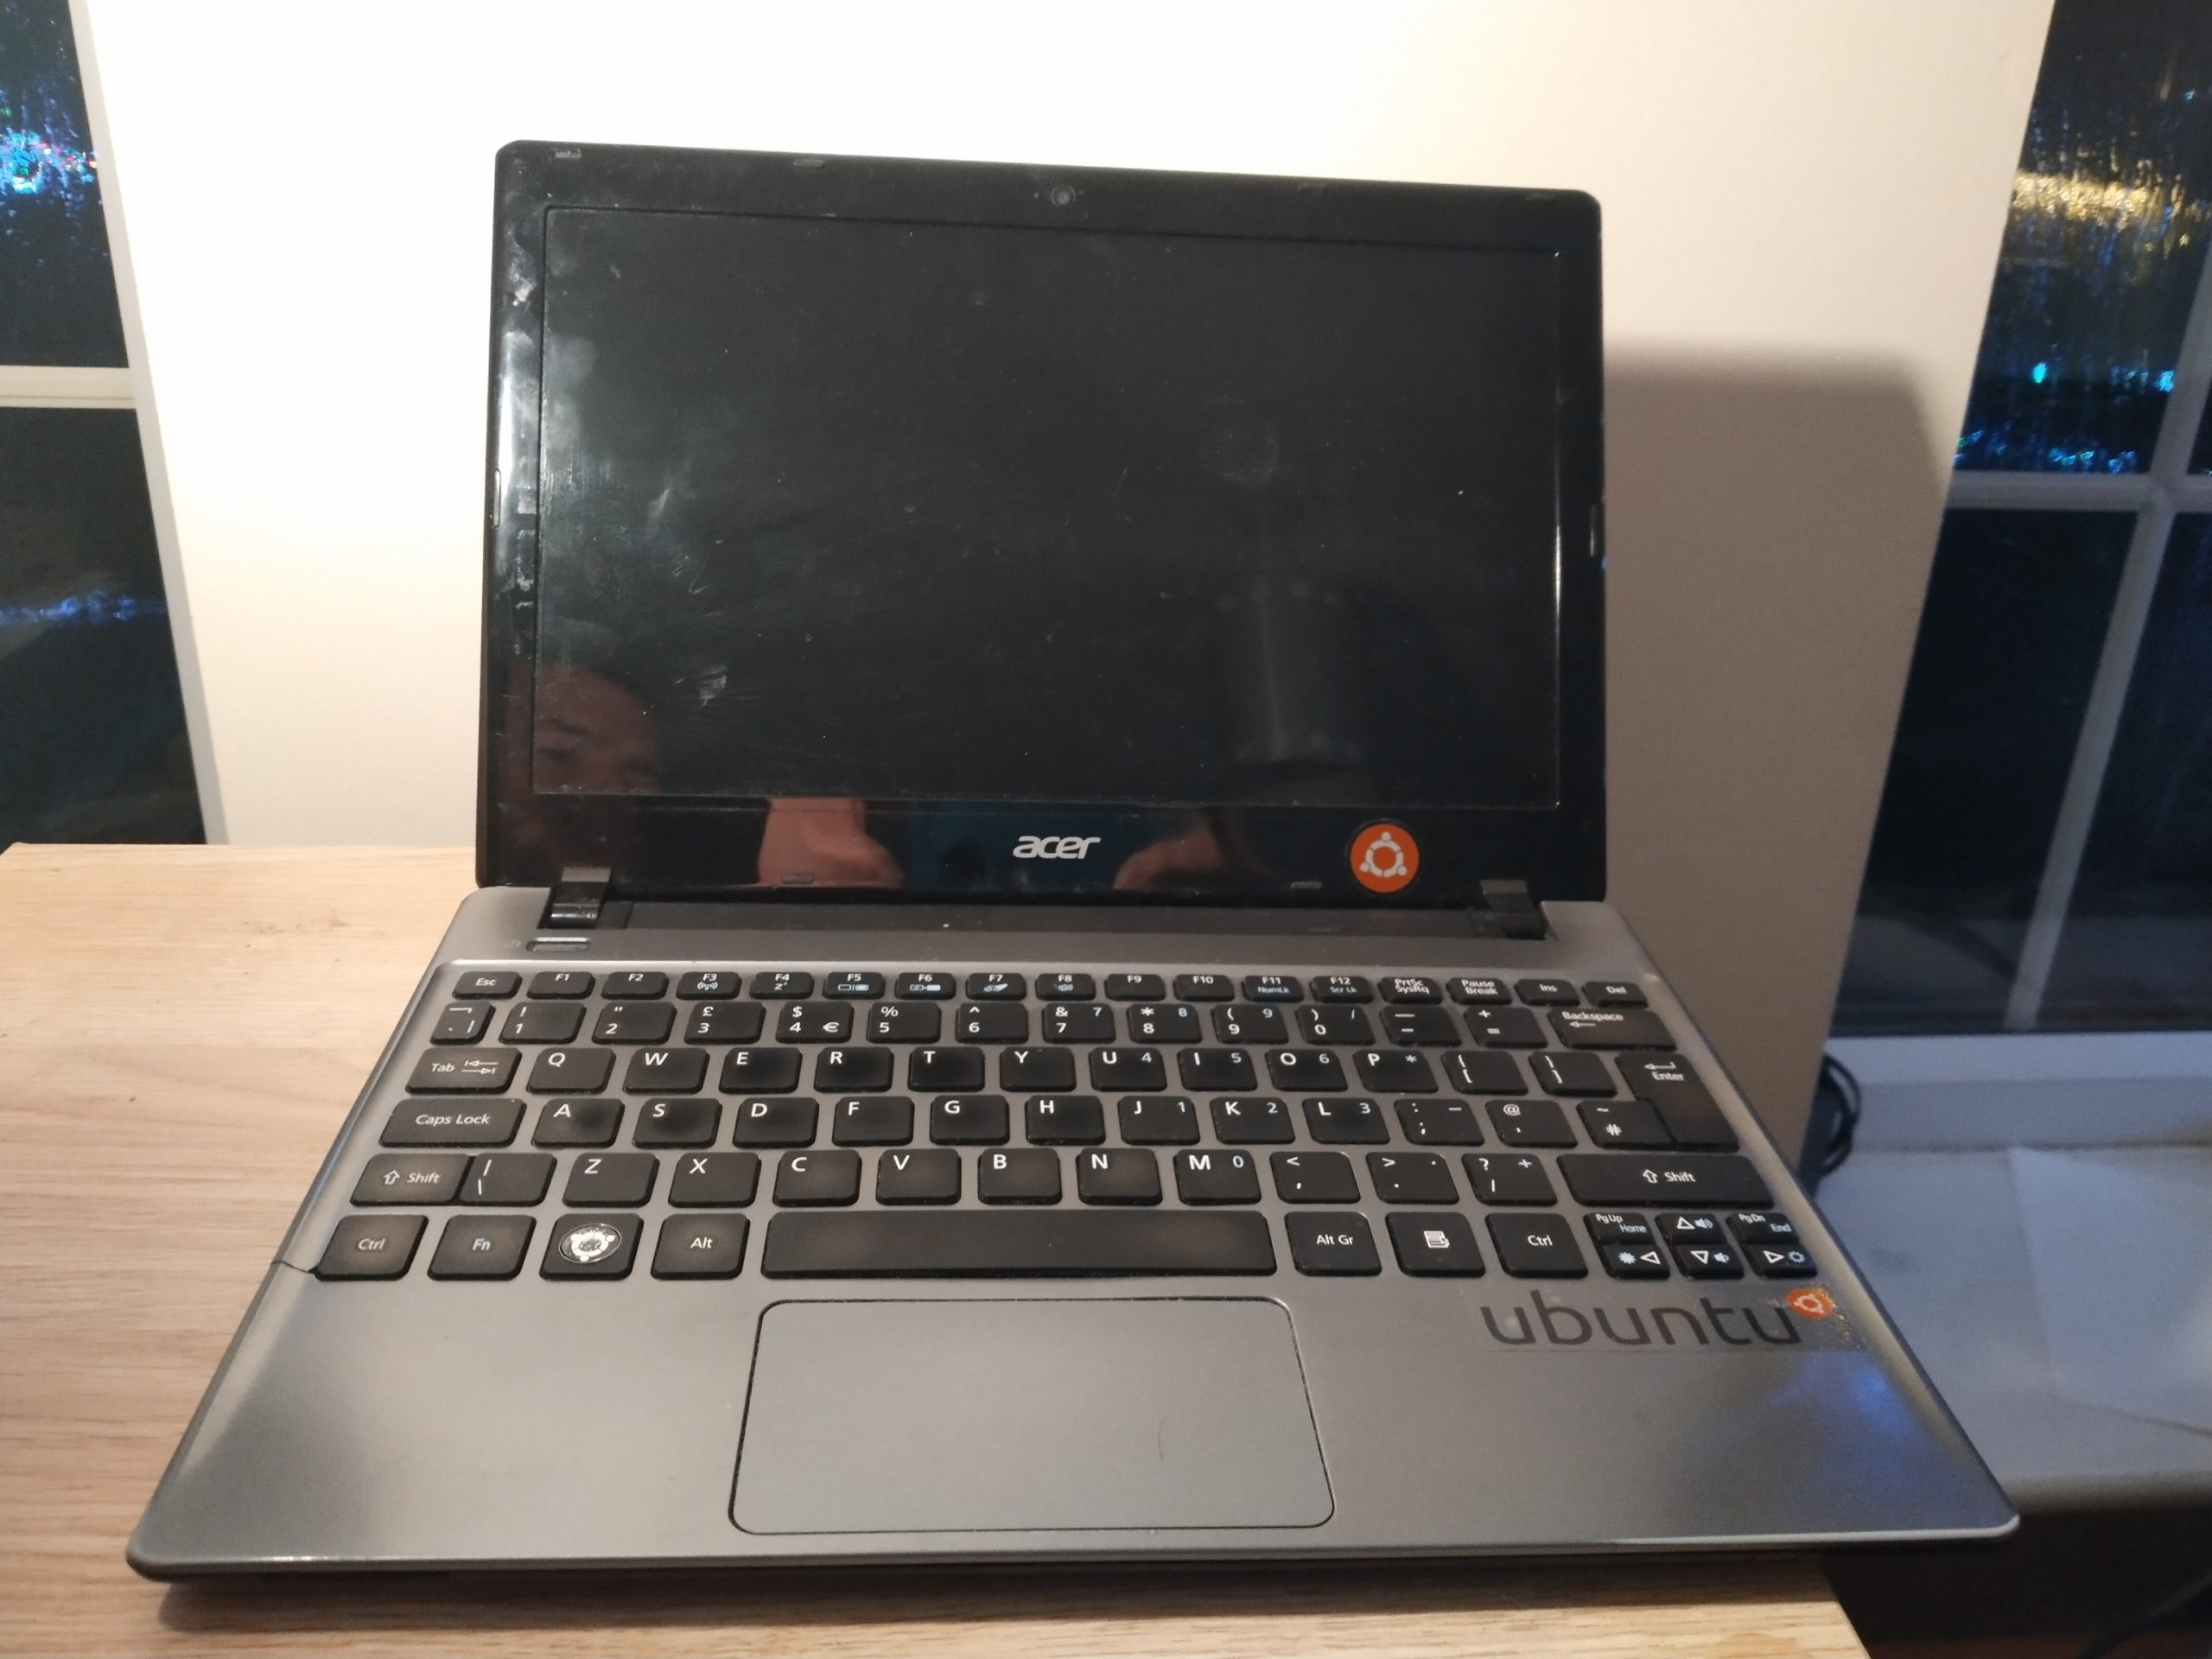
October 2019 my beloved (but 7 year old) Acer V5-171, “Minilith” (so named because it was smaller than it’s predecessor, a 17″ monster of a black slab that was named “Monolith”) started exhibiting signs of having a dead battery. I replaced the battery with an 3rd party replacement, and while it charged OK for a few runs, it stopped charging all together (I could get a maximum of 5% charge), so I put the old battery in, and it started working better. Huzzah. All was going well until around 6 months ago when the hard drive failed, so I replaced it with an SSD, and that gave it a new lease of life… and this month, well, it just wouldn’t boot reliably. I finally decided that it was time to let it go and play with Timmy the dog at the farm, and replace it with something newer.
The back of “Minilith”, my 7 year old Laptop.
Minilith’s Keyboard and Screen
Fortunately, this co-incided with a small win on the company social Prize Draw of a reasonable sized pay out, enough to consider looking at the Ex-Demo staff sales list made available to me by dint of my employer.
Making my choice.
There weren’t a lot of options, to be fair, but one item stood out to me. A Stylistic Tablet Computer. I’d previously had an Asus Transformer TF300T – a tablet-come-computer which had a detachable keyboard. I’d loved that, even though it didn’t really do what I wanted it for (and, I think I’d paid quite a bit over what it was worth, really)… but what I really wanted to do was have a tablet I could use for computing… Hence, the Stylistic.
Image of the tablet view of the Stylistic V727 computer from a German blog.
Fujitsu are in a bit of an odd place, at least in the UK (I’ve not looked elsewhere) for personal computers – we sell quite well (apparently) to business, but we moved out of the “selling to the public” market probably around 2010, and so it was pretty hard to gauge how well this laptop performed. Oh, and of course, being a “Linux Enthusiast”, I wanted to be able to run Ubuntu, Fedora or others on it.
Because it was an internal sale, and I wanted to test Ubuntu on it before I bought it, I was able to get the sales team to let me evaluate it before I bought it.
It arrives!
It arrived as the tablet and keyboard, with a dock for setting it on your desk. I tested it with Windows, where the dock worked well, but the keyboard by itself didn’t so much. You see, the keyboard is an optional accessory, and had been sold with the laptop, all good thus far. Except what you also need to get, when you get the keyboard, is the case. The case gives you the sturdy back to give the “laptop” a frame. It’s basically the hinge that the top-heavy screen needs to keep itself upright.
A screen capture of the Fujitsu Stylistic V727 from the datasheet. Note this image shows the optional keyboard and the optional case.
The sales team were very understanding, and found a case to ship to me as well, but it wouldn’t come for a few days, so I was left to try out the rest of the hardware.
What do you get for your money?
The processor is an Intel i5-7Y57 dual core CPU with four threads, running at 1.2GHz.
It has 8GB of RAM and a 256GB m2 SATA drive.
The 12.3″ touch-or-pen (included) enabled screen has a maximum resolution of 1920×1280 pixels. The surface of the tablet is considered a WACOM tablet, and the pen can be sensed from a reasonable distance away. There are two buttons on the side of the pen, which turns a tap on the screen from a “normal” left click to a right click, or a center click.
On the rear is a fingerprint sensor.
From a network perspective, the WIFI supports 802.11ac, Bluetooth 4.2, and under the battery there is a LTE module onboard (although, I’ve not tested that).
On the side is a USB3.1 A connector, and a USB C connector (the specs sheet I linked to above suggests there is a single USB 3 and a USB 2 interface, but I doubt the USB C is USB 2).
There is also a MicroSD slot, which is detected by the booted OS as an MMC device, but it is not detected as a bootable device.
There’s a combined 3.5mm audio in and out jack, which I’ve not tried and a power socket.
There are two cameras, a 5 megapixel front-facing camera and an 8 megapixel rear facing camera with a flash.
The detachable keyboard has an integrated touchpad. It’s all good, and compared to my poor Acer V5, it’s a massive step up ❤
When you add in the desk dock (where, to be fair, it’s spent most of it’s time since I got it), the connections also then include Gigabit Ethernet, a Display Port interface, a VGA port and three USB 3 A interfaces, and a power socket.
The OS Comparison starts
Windows first
I booted it in Windows, and found it really rather responsive, especially once I’d reinstalled Windows without all the customizations the demo team had put on…
My previous install of Windows on Minilith had been the Home edition, and I’d found the semi-constant nagging to install games and the like rather annoying. I’ve had a couple of Windows 10 Professional installs at work, and, while those builds came with their own fair share of corporately mandated bloat (after all, their threat models are somewhat different to mine) they usually felt more slim than the Windows 10 home install I’d had, so when I saw this had Windows 10 Professional, I was looking forward to seeing something a bit leaner… and I wasn’t let down. All the hardware worked fine, I had the fingerprint reader working, no worries and the dock was great.
Docking and undocking is relatively seamless, although the first try was a bit tricky, I’ve got used to it. I had two screens attached via my work-supplied Fujitsu PR08 DisplayLink adaptor, plugged through the dock, and again, that all worked fine.
I could use the pen in the tablet mode really well. It makes selecting items on the screen easy, and if you don’t want to use the virtual keyboard, in some cases, it pops up a handwriting recognition box, although the time I showed this to my wife (where I’d been using it successfully for some time), it didn’t recognise half the words I wrote… but I’m sure that’s just my dreadful scrawl, and not the tablet’s fault!
Even using the tablet without the pen worked really well. Tapping the screen is a left click, and a long press on an area is a right click, similar to how Android handles left-and-right clicks in RDP and VNC sessions. The keyboard has several “modes” – a reduced character set, a thumb typing set or a full keyboard. The reduced set has a control key and an escape key, but no alt, windows or arrow keys. I didn’t try the thumb typing set (this thing is 12″ across!) but the full keyboard is an “ISO layout” 75% keyboard (I discovered by matching the image to this website!) which means I still get my Control, Alt, and Windows keys.
Next, Ubuntu
I booted from a USB stick that had the Ubuntu 20.04 installer on it. Ubuntu booted fine, allowed me to repartition the Windows partition into approximately half the drive, and install away. During the install, I was asked to provide a password to setup the SecureBoot keys, and instructed that it’d prompt me for it on the next reboot. Most of the hardware worked fine. Dock, keyboard, Wifi, Bluetooth… all good. The fingerprint sensor wasn’t detected, and still isn’t, but I’m OK with that, it was always just a nice-to-have. The install worked fine, and yes, on reboot, I got a blue screen asking me to set up my “MOK” (which, I guessed eventually, was the SecureBoot setup). I realised that the SecureBoot install stage of the Linux install copies a private key to the UEFI space, and on the next boot, it spots there’s a key there and asks you to unlock that private key, so it can install it into the boot keys. All good!
I was working away on it with the tablet in the dock. I tried using it with the detachable keyboard, but it was a bit tricky to use without the rigid back, so I kept it in the dock. The pen works a treat too.
The problem came when I tried to use it as a tablet.
You see, where Windows has a selection of keyboard layouts for their “On Screen Keyboard” (OSK), the Gnome one only lets you use this layout:
While this is passable for tapping stuff into a URL bar in your browser, entering a password for logging in, or typing simple statements into dialogue boxes, there are some key things it’s missing. The first (for me) is a Control, Alt or Super (Windows) key. This means I can’t do any programming, of any sort, in Tablet mode. Note, this just works on Windows, and is possible on Android with an extended keyboard called “Hacker Keyboard”. There are also no cursor keys, which seems like it’s less important, but it makes editing things you’ve typed (or mistyped) MUCH harder.
“Well, OK then, let’s have a look around and see what our options are?”
I’d heard good things about “OnBoard”, a predecessor to Gnome OSK, but because OSK is registered as “The” on screen keyboard, and runs as a system process, and OnBoard is a user process, Gnome OSK pops up any time you want to do on screen keyboard things, even if you’ve got OnBoard loaded. Ahah! I found an extension which blocks Gnome OSK… except that stops it from being able to be used for logging in.
You see, that whole “system” versus “user” process thing I mentioned before. The Gnome lock screen is considered a system process, not a user one, which means that if you’ve disabled Gnome OSK, then you can’t put your password in, but equally, if you’re typing in a box with OnBoard, change focus and change back again, up pops Gnome OSK.
Breaking down and turning it around.
I should confess, I didn’t spend a lot of time wondering about this. I booted a Kubuntu environment instead, and found that this really didn’t work for me either (although I now don’t remember what stopped me from liking it – I might have to revisit this!) By this point, I’d spent several hours “messing” around with this, and I just wanted to give something a try. So I booted back into Windows.
I gave the on screen keyboard another try. It worked great. I tried doing some sketches in Paint 3D (the replacement for Windows Paint) with the pen, and it was very easy (so much so, I need to work out how to use it for my next design call with work!)
All the familiar tools I use in my work or personal environment are there.
VSCode. Check.
A usable shell (via Windows Subsystem for Linux). Check.
File synchronization (via Syncthing). Check.
Web browser (Firefox). Check.
Audio recording software (Audacity). Check.
Image editor (GIMP). Check.
Voice chat for the podcast software (Mumble). Check.
And the fingerprint reader works… so I stuck with Windows 10.
The only last catch, whether it was Windows or Linux? There’s no HDMI or VGA out without the dock… so I need to start looking into “cheap” display adaptors that I can use for presenting things, whenever we get back to “normal” and I can start attending and speaking at conferences again.
What about the case?
Oh yehr, so a few days after I get the computer, the case turns up. It attaches to the back of the computer with tape, and feels like leather (although, I’m sure it’s not leather). It definitely makes it feel like a “quality” product 😀. It’s a little bit more tricky to drop into the dock, but it makes it feel like a Laptop when you’re using it like one. The detachable keyboard is interesting. I’ve used it in the car, waiting for children to finish activities, and it’s fine, because it goes flat. I’ve detached the keyboard from the screen to just do tablet-y things with it, and that’s fine too.
So in summary
I think if I didn’t want it to be a tablet as much as a computer, I’d have been fine.
If you want a Windows Tablet that turns into a Laptop, it’s fine. If you want a low-profile desktop computer (in a dock) that can become a laptop, it’s fine.
But until Gnome or one of the other flavours gets a handle on how to do a reasonable on-screen keyboard… I don’t think I’ll be using Linux on here (because it’s also a tablet) for the next few months… and I think that’s going to be OK.
All of that said, if you use any Linux distributions with a tablet style mode, and you’ve got a working OSK, please contact me (via one of the links at the top of the site) to let me know what and how you did it, and I’ll give it a try too!
Edit 2025-07: Five years later
I used this tablet as a keyboard-attached-with-Ubuntu affair for several years. It was only (around 4 years later) when Ubuntu 24.04 rolled around that the On Screen Keyboard became good enough to use it for more than just entering passwords… by which time I’d effectively stopped using it as the fixed RAM and Storage meant it wasn’t really useful for anything other than a remote terminal to other things. In addition, the battery life was getting slowly worse. Taking it to a conference, I found myself back in the state where I was always finding a seat next to the mains sockets. Talking of which, it did come with me to some fab events but there was nowhere to put stickers (unlike my beloved Minilith) and without taking the docking station to give me an HDMI output method, it made it really hard to present anything. Later on I managed to get USB HDMI out adaptors, but by this point it was just too late.
This year I got involved in some activities where I kinda needed a computer, so dragged this out of a drawer, and found the battery was giving me 5-10 minutes off mains, so went looking for a replacement battery… and discovered that this model, as it’s a niche product anyway, you can’t get a replacement battery. So, it’s now resigned back to the drawer-o-doom.
If I had a do-over, would I have bought this? Probably not. The heavy screen and light keyboard meant if you didn’t have the stand on it you couldn’t really use it. The case made putting it into the docking station really hard, and the fact I couldn’t upgrade the RAM or storage was a big negative. I never got the fingerprint sensor to work under Linux. Lack of HDMI out should have been a red-flag too, but… I guess you learn that by having that experience. I don’t regret having got this laptop, but I wouldn’t have done it again.