The last post I made was about using submodules to work with code that is being developed, either in isolation from other aspects of a project, or so components can be reused without requiring lots of copy-and-paste activities. It was inspired by a question from a colleague. After asking a few more questions, it turns out that may be what that colleague needed was to consume code from other repositories and store them in their own project.
In this case, I’ve created two repositories, both on GitHub (which will both be removed by the time this post is published) called JonTheNiceGuy/Git_Demo (the “upstream”, open source project) and JonTheNiceGuy-Inc/Git_Demo (the private project, referred to as “mine”).
Getting the “Open Source” project started
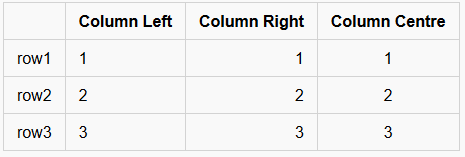
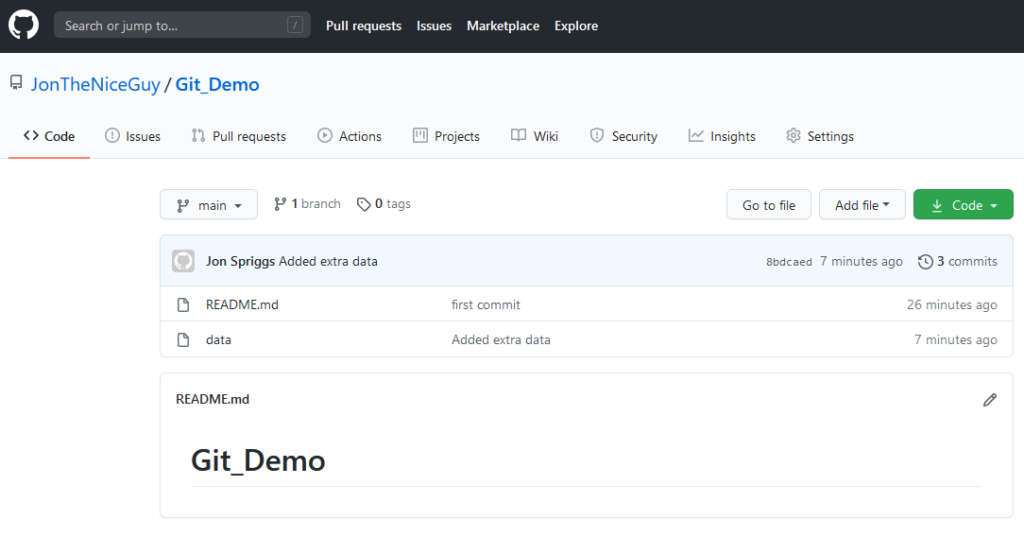
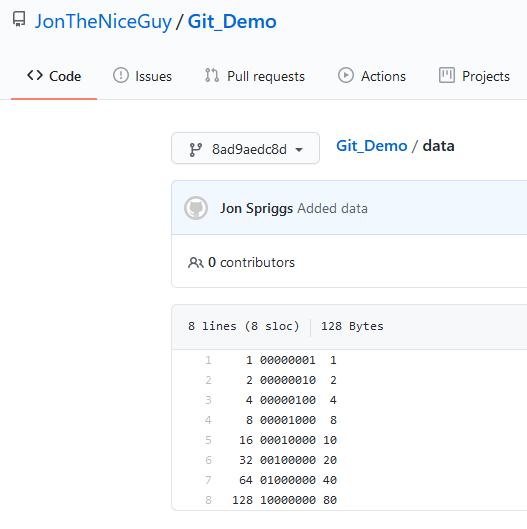
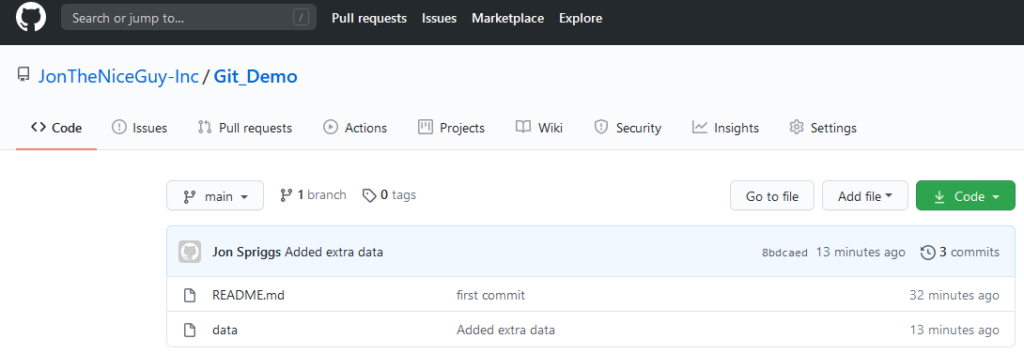
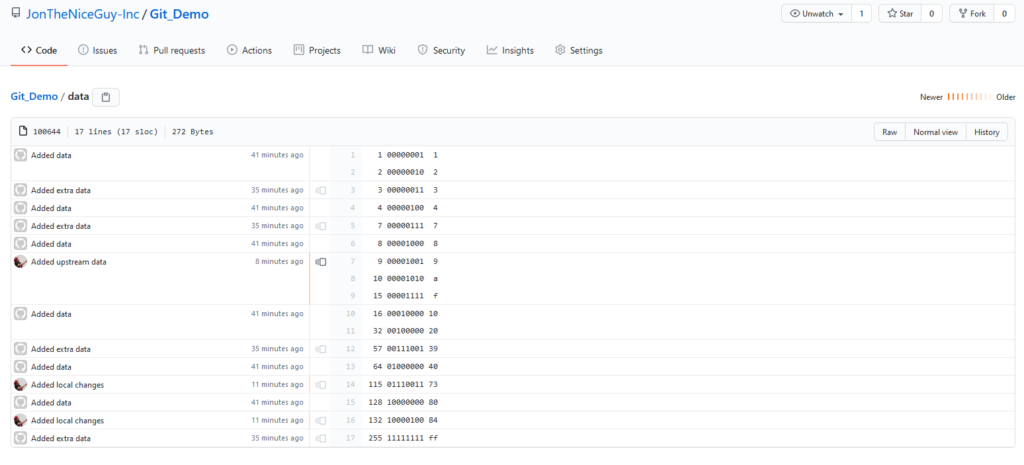
Here we have a simple repository, showing the README file for the project (which is likely, in the real world, to show what license that code has been released under, some explaination on what it’s for, etc.) and the actual data source. In this demo, the data source is a series of numbers, showing the decimal number in the first column, the binary representation of that number in the second column, and the hexedecimal representation in the third column.
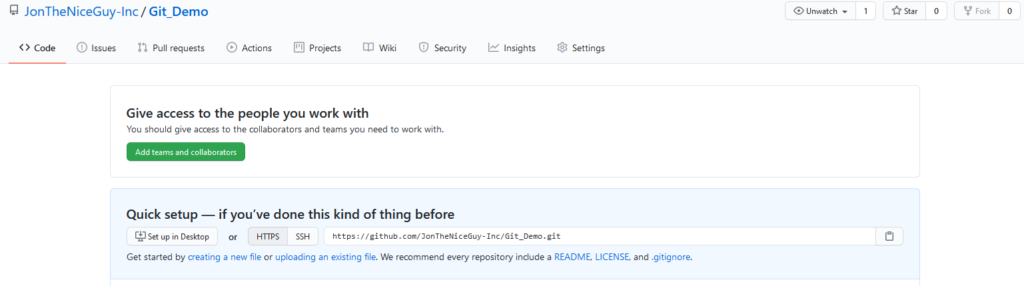
Elsewhere in the world, a private project has started! It’s going to use this data source as some element of this project, and to ensure that the code they’re relying on doesn’t go away, they create their own repository which this code will go into.
Preparing the private project
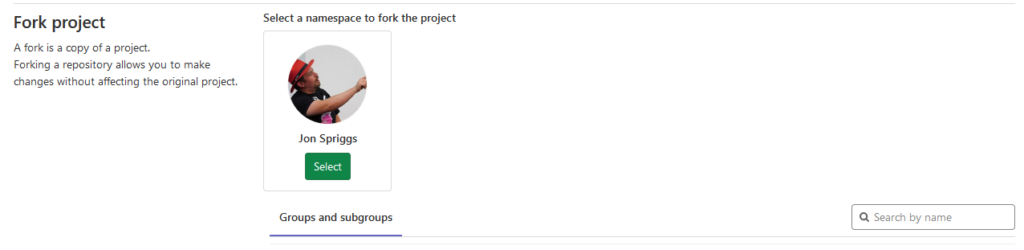
If both repositories are using GitHub, or if both repositories are using GitLab, then you should be able to “just” Fork the repository, using the “Fork” button in the top right corner:

And then select the organisation or account to place the forked repo into.

Gitlab has a similar workflow – they have a similar “fork” button, but the list of potential targets is different (but still works the same way).
Note that you can’t “easily” fork between different Version Control Services! To do something similar, you need to create a new repository in the target service, and then, run some commands to move the code over.

If you’re using the command line method, here’s the commands you issue:
git clone http://service/user/repo– This command clones the repository from your service of choice to your local file system. It usually places it into the name of the repository you specified. In this case, “repo”, but in the above context (cloning fromGit_Demo.git) it goes into “Git_Demo”. Note, HTTP(S) isn’t the only git transport, another common one is SSH, so if you prefer using SSH instead of HTTP, the URL in this case will be something likegit@service:user/repoorservice:user/repo. If you’re using submodules, however, I’d strongly recommend using HTTP(S) over SSH for at least the initial pull, as this is much easier for clients to navigate.cd repo– Move into the directory where the cloned repository has been placed.- OPTIONAL:
git remote rename origin upstream– Rename the remote source of the repository. By default, when yougit cloneor usegit submodule add, the name of the remote resource is called “origin”. I prefer to give a descriptive name for my remote sources, so using “upstream” makes more sense to me. In later commands, I’ll use the remote name “upstream” again. If you don’t want to run this command, and leave the remote name as “origin”, you’ll just have to remember to change it back to “origin”. git remote add mine http://new-service/user/repo– this adds a new remote source, to which you can push new commits, or pull code from your peers. Again, like in thegit clonecommand above, you may use another URL format instead of HTTP(S). You may want to use a different name for the new remote, but again, I tend to prefer “mine” for anything I’m personally working on.git push --set-upstream mine main– This sends the entire commit tree for the branch you’re currently on to your remote source.
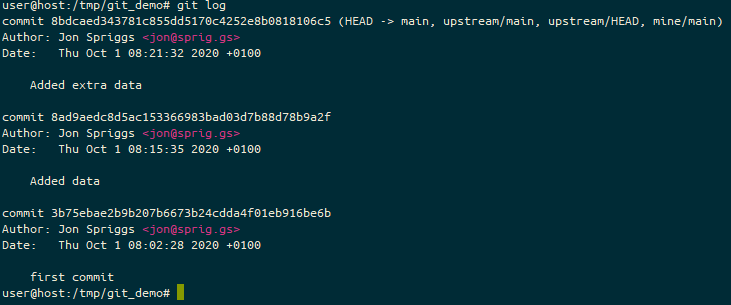
git log command, shows the current tip on the branch “main” in the “upstream” repository is equal to the current tip on the branch “main” in the “mine” repository, as well as the tip of the “main” repository locally.Making your local changes
So, while you could just keep using just the upstream project’s code (and doing the above groundwork is good practice to keep you from putting yourself into the situation that the NPM world got into with “left-pad”). What’s more likely is that you want to make your own, local changes to this repository. I’ve done this in the past where I wanted to demonstrate a software build using a public machine image, but internally at work we used our own images. Using this method, I can consume the code I’ve created in public, and just update the assets we use at work.
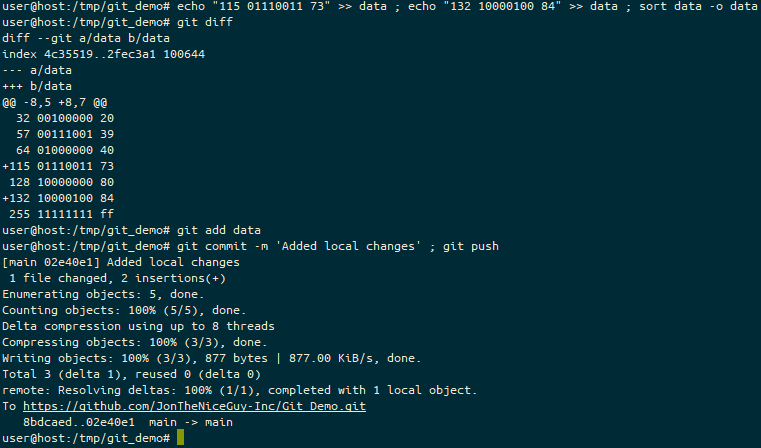
In this example, let’s update that data file. I’ve added two new lines, “115” (and it’s binary/hex representations) and “132”. I can use the git diff command to confirm the changes I want to make – it’s all good!
Next, I stage the changes with git add, use git commit to write it to the branch, and git push to push it up to my repository. This is all fairly standard stuff in the Git world.
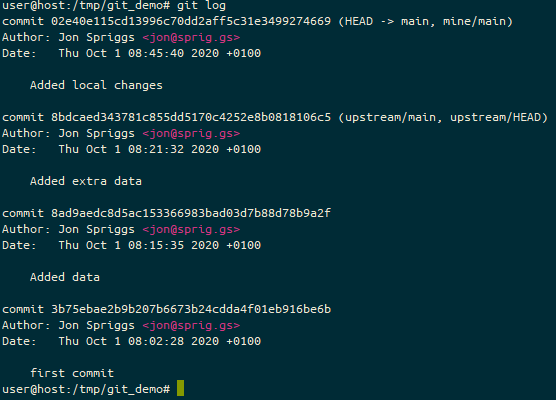
When I then check the git log, we see that there’s a divergence, between my local main branch and the upstream main branch. You could also use git log -p to see the exact code changes, if you wanted… but we know what’s changed already.
Bringing data from the upstream source
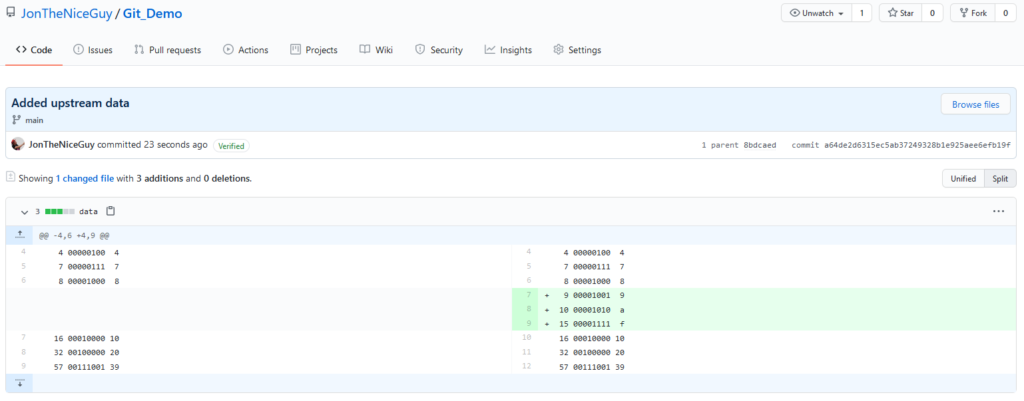
Oh joy! The upstream project (“JonTheNiceGuy” not “JonTheNiceGuy-Inc”) have updated their Git_Demo repository – they’ve had the audacity to add three new numbers – 9, 10 and 15 – to the data source.
Well, actually we want to use that data, so let’s start bringing it in. We use the git pull command.

Because this makes a change to a file that you’ve amended as part of your work, it can’t perform a “Fast forward” of these changes, so Git has to perform a merge commit. This means there’s a new commit in the log, so it’s clear that we’ve updated files because of this merge.
If there were a conflict in this file (which, fortunately, there isn’t!) you’d also be prompted to fix the merge conflicts too. This is a bit bigger than what I’m trying to explain, so instead, I’ll link to a tutorial by Atlassian on merge conflicts. You may also want to take a quick look at the rebasing page on the Git Project’s documentation site, and see whether this might have made your life easier in the case of a conflict!
Anyway, let’s use the default merge message.

Once the merge message is done, the merge completes. Yey!

And to prove it, we can now see that we have all the changes from the upstream (commits starting 3b75eb, 8ad9ae, 8bdcae and the new one at a64de2) and our local changes (starting 02e40e).
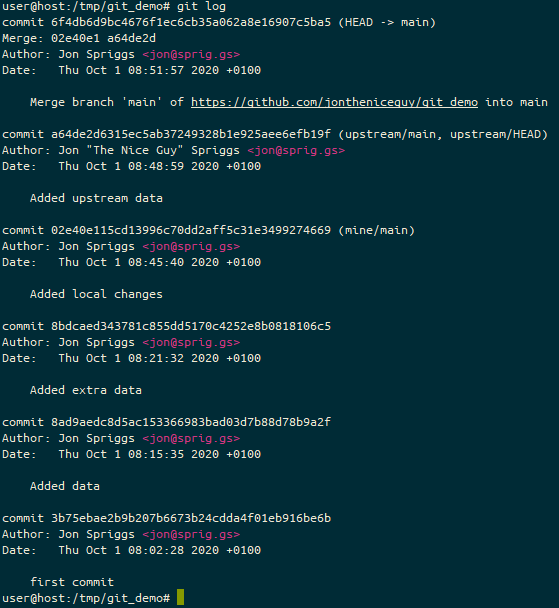
Because we performed a merge, not a fast forward, our local branch is at a different commit than either of our remote sources – the commit starting 6f4db6 is on our local version, “upstream” is at a64de2 and “mine” is at 02e40e. So we need to fix at least our “mine/main” branch. We do this with a git push.
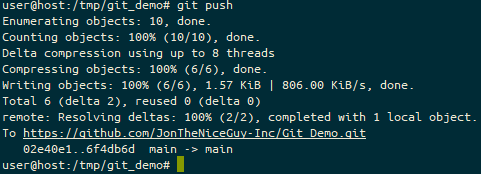
git push here to get the code into our “mine/main” branch.And now we can see the git log on our service.

And locally, we can see that the remote state has changed too. Let’s look at that git log again.
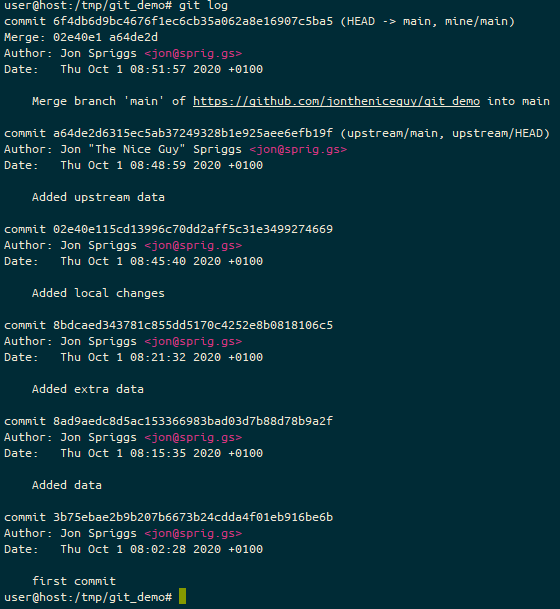
git log command on our local machine, showing the new position of the pointers for “upstream/main”, “mine/main” and the local “main” branches.We can also look at the git blame on the service.
git blame screen on GitHub, showing who made the various commits.Or on our local machine.
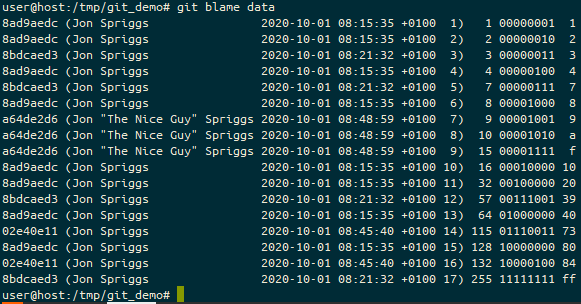
git blame run locally, showing the commit reference, the author, the date and time of the commit, and the line number, followed by the line in question.Featured image is “Salmon leaping” by “openpad” on Flickr and is released under a CC-BY license.