What we do here is to start an action with an “async” time (to give the Schedule an opportunity to register itself) and a “poll” time of 0 (to prevent the Schedule from waiting to be finished). We then tell it that it’s “never changed” (changed_when: False) because otherwise it always shows as changed, and to register the scheduled item itself as a “sleeper”.
After all the async jobs get queued, we then check the status of all the scheduled items with the async_status module, passing it the registered job ID. This lets me spin up a lot more items in parallel, and then “just” confirm afterwards that they’ve been run properly.
It’s not perfect, and it can make for rather messy code. But, it does work, and it’s well worth giving it the once over, particularly if you’ve got some slow-to-run tasks in your playbook!
An Ansible project I’ve been working on has tripped me up this week. I’m working with some HTTP APIs and I need to check early whether I can reach the host. To do this, I used a simple Ansible Core Module which lets you call an HTTP URI.
And this breaks the uri module, because it tries to punt everything through the proxy if the “no_proxy” contains CIDR values (like 192.0.2.0/24) (there’s a bug raised for this)… So here’s my fix!
The key part to this script is that we need to override the no_proxy environment variable with the IP address that we’re trying to address (so that we’re not putting 16M addresses for 10.0.0.0/8 into no_proxy, for example). To do that, we use the exact same URI block, except for the environment line at the end.
In turn, the set_fact block steps through the no_proxy values, looking for IP Addresses to check ({% if no_proxy | ipaddr ... %} says “if the no_proxy value is an IP Address, return it, but if it isn’t, return a ‘None’ value”) and if it’s an IP address or subnet mask, it checks to see whether the IP address of the host you’re trying to reach falls inside that IP Address or Subnet Mask ({% if ansible_host | ipaddr(no_proxy) ... %} says “if the ansible_host address falls inside the no_proxy range, then return it, otherwise return a ‘None’ value”). Both of these checks say “If this previous check returns anything other than a ‘None’ value, do the next thing”, and on the last check, the “next” thing is to set the flag ‘match’ to ‘true’. When we get to the environment variable, we say “if match is not true, it’s false, so don’t put a value in there”.
So that’s that! Yes, I could merge the set_fact block into the environment variable, but I do end up using that a fair amount. And really, if it was merged, that would be even MORE complicated to pick through.
One of the things I like to do is to explain how I set things up, but a firewall is one of those things that’s a bit complicated, because it depends on your situation, and what you’re trying to do in your environment. That said, there’s a template that you can probably get away with deploying, and see if it works for your content, and then you’ll see where to add the extra stuff from there. Firewall policies typically work from the top down.
This document will assume you have a simple boundary firewall. This simple firewall has two interfaces, the first being an “Outside” interface, connected to your ISP, with an IPv4 address of 192.0.2.2/24 and a default gateway of 192.0.2.1, it also has a IPv6 address of 2001:db8:123c:abd::2/64 and a default gateway address of 2001:db8:123c:abd::1. The second “Inside” interface, where your protected network is attached, has an IPv4 address of 198.51.100.1/24 and an IPv6 address of 2001:db8:123d:abc::1/64. On this inside interface, the firewall is the default gateway for the inside network.
I’ll be using simple text rules to describe firewall policies, following this format:
In this model, if you want to describe HTTP access to a web server, you might write the following policy:
Source Interface: outside
Source IP Address: 0.0.0.0/0 (Any IP)
NAT Source IP Address: no
Destination Interface: inside
Destination IP Address: 192.0.2.2 (External IP)
NAT Destination IP Address: 198.51.100.2 (Internal IP)
Destination Port: tcp/80
Action: allow
Log: yes
So, without further waffling, let’s build a policy. By default all traffic will be logged. In high-traffic environments, you may wish to prevent certain traffic from being logged, but on the whole, I think you shouldn’t really lose firewall logs unless you need to!
Allowing established, related and same-host traffic
This rule is only really needed on iptables based firewalls, as all the commercial vendors (as far as I can tell, at least) already cover this as “standard”. If you’re using UFW (a wrapper to iptables), this rule is covered off already, but essentially it goes a bit like this:
Source Interface: lo (short for "local", where the traffic never leaves the device)
Source IP Address: any
NAT Source IP Address: no
Destination Interface: lo
Destination IP Address: any
NAT Destination IP Address: no
Destination Port: any
Action: allow
Log: no
Notes: This above rule permits traffic between localhost addresses (127.0.0.0/8) or between public addresses on the same host, for example, between two processes without being blocked.
flags: Established OR Related
Action: allow
Log: no
Notes: This above rule is somewhat special, as it looks for specific flags on the packet, that says "If we've already got a session open, let it carry on talking".
Dropping Noisy Traffic
In a network, some proportion of the traffic is going to be “noisy”. Whether it’s broadcast traffic from your application that uses mDNS, or the Windows File Share trying to find like-minded hosts to exchange data… these can fill up your logs, so lets drop the broadcast and multicast IPv4 traffic, and not log them.
Source Interface: any
Source IP Address: 0.0.0.0/0
NAT Source IP Address: no
Destination Interface: any
Destination IP Address: 255.255.255.255 (global broadcast), 192.0.2.255 ("outside" broadcast), 198.51.100.255 ("inside" broadcast) and 224.0.0.0/4 (multicast)
NAT Destination IP Address: no
Destination Port: any
Action: deny
Log: no
Notes: The global and local broadcast addresses are used to "find" other hosts in a network, whether that's a DHCP server or something like mDNS. Dropping this prevents the traffic from appearing in your logs later.
Permitting Management Traffic
Typically you want to trust certain machines to access or be accessed by this host – whether it’s your SYSLOG collector, or the box that can manage the firewall policy, so here we’ll create a policy that lets these in.
Source Interface: inside
Source IP Address: 198.51.100.2 and 2001:db8:123d:abc::2 (Management IP)
NAT Source IP Address: no
Destination Interface: inside
Destination IP Address: 198.51.100.1 and 2001:db8:123d:abc::1 (Firewall IP)
NAT Destination IP Address: no
Destination Port: SSH (tcp/22)
Action: permit
Log: yes
Notes: Allow inbound SSH access. You're unlikely to need more inbound ports, but if you do - customise them here.
Source Interface: inside
Source IP Address: 198.51.100.1 and 2001:db8:123d:abc::1 (Firewall IP)
NAT Source IP Address: no
Destination Interface: inside
Destination IP Address: 198.51.100.2 and 2001:db8:123d:abc::2 (Management IP)
NAT Destination IP Address: no
Destination Port: SYSLOG (udp/514)
Action: permit
Log: yes
Notes: Allow outbound SYSLOG access. Tailor this to outbound ports you need.
Allowing Control Traffic
ICMP is a protocol that is fundamental to IPv4 and IPv6. Commonly used for Traceroute and Ping, but also used to perform REJECT responses and that sort of thing. We’re only going to let it be initiated *out* not in. Some people won’t allow this rule, or tailor it to more specific destinations.
Source Interface: inside
Source IP Address: any
NAT Source IP Address: 192.0.2.2 (The firewall IP address which may be replaced with 0.0.0.0 indicating "whatever IP address is bound to the outbound interface")
Destination Interface: outside
Destination IP Address: any
NAT Destination IP Address: no
Destination Port: icmp
Action: allow
Log: yes
Notes: ICMPv4 and ICMPv6 are different things. This is just the ICMPv4 version. IPv4 does require NAT, hence the difference from the IPv6 version below.
Source Interface: inside
Source IP Address: any
NAT Source IP Address: no
Destination Interface: outside
Destination IP Address: any
NAT Destination IP Address: no
Destination Port: icmpv6
Action: allow
Log: yes
Notes: ICMPv4 and ICMPv6 may be treated as different things. This is just the ICMPv6 version. IPv6 does not require NAT.
Protect the Firewall
There should be no other traffic going to the Firewall, so let’s drop everything. There are two types of “Deny” message – a “Reject” and a “Drop”. A Reject sends a message back from the host which is refusing the connection – usually the end server to say that the service didn’t want to reply to you, but if there’s a box in the middle – like a firewall – this reject (actually an ICMP packet) comes from the firewall instead. In this case it’s identifying that the firewall was refusing the connection for the node, so it advertises the fact the end server is protected by a security box. Instead, firewall administrators tend to use Drop, which just silently discards the initial request, leaving the initiating end to “Time Out”. You’re free to either “Reject” or “Drop” whenever we show “Deny” in the below policies, but bear it in mind that it’s less secure to use Reject than it is to Drop.
Source Interface: any
Source IP Address: any
NAT Source IP Address: no
Destination Interface: any
Destination IP Address: 192.0.2.2, 2001:db8:123c:abd::2, 198.51.100.1 and 2001:db8:123d:abc::1 (may also be represented as :: or 0.0.0.0 depending on the platform)
NAT Destination IP Address: no
Destination Port: any
Action: deny
Log: no
Notes: Drop everything targetted at the firewall IPs. If you have more NICs or additional IP addresses on the firewall, these will also need blocking.
“Normal” Inbound Traffic
After you’ve got your firewall protected, now you can sort out your “normal” traffic flows. I’m going to add a single inbound policy to represent the sort of traffic you might want to configure (in this case a simple web server), but bear in mind some environments don’t have any “inbound” rules (for example, most homes would be in this case), and some might need lots and lots of inbound rules. This is just to give you a flavour on what you might see here.
Source Interface: outside
Source IP Address: any
NAT Source IP Address: no
Destination Interface: inside
Destination IP Address: 192.0.2.2 (External IP)
NAT Destination IP Address: 198.51.100.2 (Internal IP)
Destination Port: tcp/80 (HTTP), tcp/443 (HTTPS)
Action: allow
Log: yes
Notes: This is the IPv4-only rule. Note a NAT MUST be applied here.
Source Interface: outside
Source IP Address: any
NAT Source IP Address: no
Destination Interface: inside
Destination IP Address: 2001:db8:123d:abc::2
NAT Destination IP Address: no
Destination Port: tcp/80 (HTTP), tcp/443 (HTTPS)
Action: allow
Log: yes
Notes: This is the IPv6-only rule. Note that NO NAT is required (but, you may wish to perform NAT, depending on your environment).
“Normal” Outbound Traffic
If you’re used to a DSL router, that basically just allows all outbound traffic. We’re going to implement that here. If you want to be more specific about things, you’d define your outbound rules like the inbound rules in the block above… but if you’re not that worried, then this rule below is generally going to be all OK :)
Source Interface: inside
Source IP Address: any
NAT Source IP Address: 192.0.2.2 (The firewall IP address which may be replaced with 0.0.0.0 indicating "whatever IP address is bound to the outbound interface")
Destination Interface: outside
Destination IP Address: any
NAT Destination IP Address: no
Destination Port: any
Action: allow
Log: yes
Notes: This is just the IPv4 version. IPv4 does require NAT, hence the difference from the IPv6 version below.
Source Interface: inside
Source IP Address: any
NAT Source IP Address: no
Destination Interface: outside
Destination IP Address: any
NAT Destination IP Address: no
Destination Port: any
Action: allow
Log: yes
Notes: This is just the IPv6 version. IPv6 does not require NAT.
Drop Rule
Following your permit rules above, you now need to drop everything else. Fortunately, by now, you’ve “white-listed” all the permitted traffic, so now we can just drop “everything”. So, let’s do that!
Source Interface: any
Source IP Address: any
NAT Source IP Address: no
Destination Interface: any
Destination IP Address: any
NAT Destination IP Address: no
Destination Port: any
Action: deny
Log: yes
And so that is a basic firewall policy… or at least, it’s the template I tend to stick to! :)
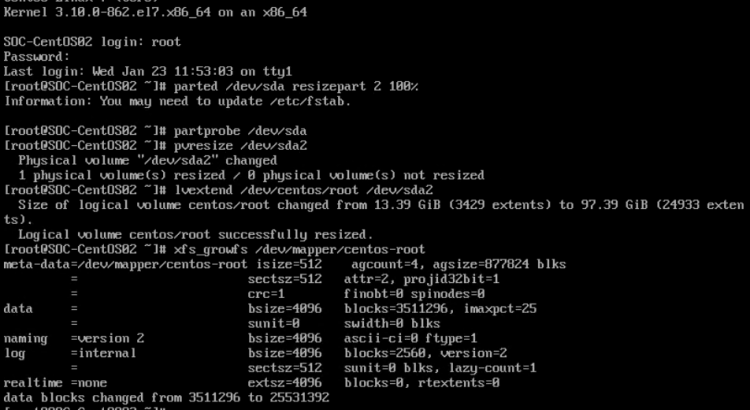
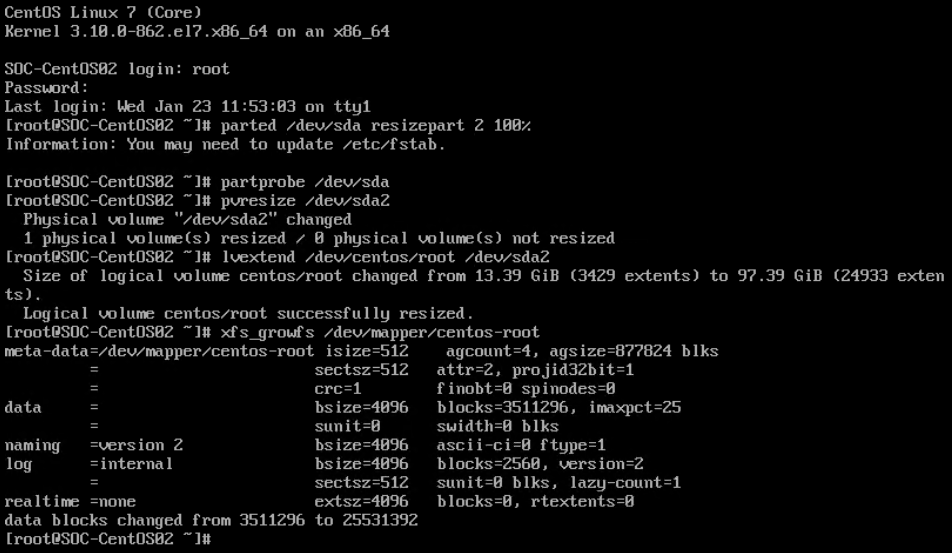
Say, for example, you’ve got a lovely CentOS VM (using XFS by default) which has a disk that isn’t quite big enough. Fair enough, your VM Hypervisor is sensible enough to resize that disk without question… How do you resize the XFS partition? Assuming you’ve got your disk mounted as /dev/sda, and you’ve got a boot volume as partition 1 and a root volume as partition 2 (the standard install model)
If you follow any of the content I postaround the internet, you might have seen me asking questions about trying to get data out of azure_rm_*_facts into something that’s usable. I can’t go into why I needed that data yet (it’s a little project I’m working on), but the upshot is that trying to manipulate data using “set_fact” with jinja is *doable* but *messy*. In the end, I decided to hand it all off to a new ansible module I’m writing. So, here are the things I learned about this.
There’s lots more documentation about writing a module (a plugin that let’s you do stuff) than there is about writing filters (things that change text inline) or lookups (things that let you search other data stores). In the end, while I could have spent the time to figure out how better to write a filter or a lookup, it actually makes more sense in my context to hand a module all my data, and say “Parse this” and register the result than it would have done to have the playbook constantly check whether things were in other things. I still might have to do that, but… you know, for now, I’ve got the bits I want! :)
I did start looking at writing a filter, and discovered that the “debugging advice” on the ansible site is all geared up to enable more modules than enabling filters… but I did discover that modules execute on their target (e.g. WebHost01) while filters and lookups execute on the local machine. Why does this matter? Well…..
While I was looking for documentation about debugging Ansible code, I stumbled over this page on debugging modules that makes it all look easy. Except, it’s only for debugging *MODULES* (very frustrating. Well, what does it actually mean? The modules get zipped up and sent to the host that will be executing the code, which means that with an extra flag to your playbook (ANSIBLE_KEEP_REMOTE_FILES – even if it’s going to be run on “localhost”), you get the combined output of the script placed into a path on your machine, which means you can debug that specific play. That doesn’t work for filters…
Oh man, this is the motherlode. So, q makes life *VERY* easy. Assuming this is valid code: All you’d need to do would be to add two lines, as you’ll see here: This then dumps the output from each of the q(something) lines into /tmp/q for you to read at your leisure! (To be fair, I’d probably remove it after you’ve finished, so you don’t fill a disk :) )
And that’s when I discovered that it’s actually easier to use q() for all my python debugging purposes than it is to follow the advice above about debugging modules. Yehr, it’s basically a load of print statements, so you don’t get to see stack traces, or read all the variables, and you don’t get to step through code to see why decisions were taken… but for the rubbish code I produce, it’s easily enough for me!
Recently, I’ve been migrating my POV (proof of value) and POC (proof of concept) environment from K5 to Azure to be able to test vendor products inside Azure. I ran a few tests to build the environment using the native tools (the powershell scripts) and found that the Powershell way of delivering Azure environments seems overly complicated… particularly as I’m comfortable with how Ansible works.
To be fair, I also need to look at Terraform, but that isn’t what I’m looking at today :)
So, let’s start with the scaffolding. Any Ansible Playbook which deals with creating virtual machines needs to have some extra modules installed. Make sure you’ve got ansible 2.7 or later and the python azure library 2.0.0 or later (you can get both with pip for python).
Next, let’s look at the group_vars for this playbook.
This file has several pieces. We define the project settings (anything prefixed project_ is a project setting), including the prefix used for all resources we create (in this case “env01“), and a standard password used for all VMs we create (in this case “My$uper$ecret$Passw0rd“).
Next we define the standard images to load from the Marketplace. You can extend this with other images, these are just the “easiest” ones that I’m most familiar with (your mileage may vary). Next up is the networks to build inside the VNet, and lastly we define the actual machines we want to build. If you’ve got questions about any of the values we define here, just let me know in the comments below :)
Here we start by pulling in the variables we might want to override, and we do this by reading system environment variables (ANSIBLE_PREFIX and BREAKGLASS) and using them if they’re set. If they’re not, use the project defaults, and if that hasn’t been set, use some pre-defined values… and then tell us what they are when we’re running the tasks (those are the debug: lines).
This block is where we create our “Static Assets” – individual items that we will be consuming later. This shows a clear win here over the Powershell methods endorsed by Microsoft – here you can create a Resource Group (RG) as part of the playbook! We also create a single Storage Account for this RG and a single VNET too.
These creation rules are not suitable for production use, as this defines an “Any-Any” Security group! You should tailor your security groups for your need, not for blanket access in!
This is where things start to get a bit more interesting – We’re using the “async/async_status” pattern here (and the rest of these sections) to start creating the resources in parallel. As far as I can tell, sometimes you’ll get a case where the async doesn’t quite get set up fast enough, then the async_status can’t track the resources properly, but re-running the playbook should be enough to sort that out, without slowing things down too much.
But what are we actually doing with this block of code? A UDR is a “User Defined Route” or routing table for Azure. Effectively, you treat each network interface as being plumbed directly to the router (none of this “same subnet broadcast” stuff works here!) so you can do routing at the router for all the networks.
By default there are some existing network routes (stuff to the internet flows to the internet, RFC1918 addresses are dropped with the exception of any RFC1918 addresses you have covered in your VNETs, and each of your subnets can reach each other “directly”). Adding a UDR overrides this routing table. The UDRs we’re creating here are applied at a subnet level, but currently don’t override any of the existing routes (they’re blank). We’ll start putting routes in after we’ve added the UDRs to the subnets. Talking of which….
Again, this block is not really suitable for production use, and assumes the VNET supernet of /8 will be broken down into several /24’s. In the “real world” you might deliver a handful of /26’s in a /24 VNET… or you might even have lots of disparate /24’s in the VNET which are then allocated exactly as individual /24 subnets… this is not what this model delivers but you might wish to investigate further!
Now that we’ve created our subnets, we can start adding the routing table to the UDR. This is a basic one – add a 0.0.0.0/0 route (internet access) from the “protected” network via the firewall. You can get a lot more specific than this – most people are likely to want to add the VNET range (in this case 10.0.0.0/8) via the firewall as well, except for this subnet (because otherwise, for example, 10.0.0.100 trying to reach 10.0.0.101 will go via the firewall too).
Without going too much into the intricacies of network architecture, if you are routing your traffic between subnets to the firewall, it’s probably better to get an appliance with more interfaces, so you can route traffic across the appliance, rather than going across a single interface as this will halve your traffic bandwidth (it’s currently capped 1Gb/s – so 500Mb/s).
Having mentioned “The Internet” – let’s give our firewall a public IP address, and create the rest of the interfaces as well.
This script creates a public IP address by default for each interface unless you explicitly tell it not to (see lines 40, 53 and 62 in the group_vars file I rendered above). You could easily turn this around by changing the lines which contain this:
item.1.public is not defined or (item.1.public is defined and item.1.public == 'true')
into lines which contain this:
item.1.public is defined and item.1.public == 'true'
OK, having done all that, we’re now ready to build our virtual machines. I’ve introduced a “Priority system” here – VMs with priority 0 go first, then 1, and 2 go last. The code snippet below is just for priority 0, but you can easily see how you’d extrapolate that out (and in fact, the full code sample does just that).
There are a few blocks here to draw attention to :) I’ve re-jigged them a bit here so it’s clearer to understand, but when you see them in the main playbook they’re a bit more compact. Let’s start with looking at the Network Interfaces section!
network_interfaces: |
  [
    {%- for nw in item.value.ports -%}
      '{{ prefix }}{{ item.value.name }}port{{ nw.subnet.name }}'
      {%- if not loop.last -%}, {%- endif -%}
    {%- endfor -%}
  ]
In this part, we loop over the ports defined for the virtual machine. This is because one device may have 1 interface, or four interfaces. YAML is parsed to make a JSON variable, so here we can create a JSON variable, that when the YAML is parsed it will just drop in. We’ve previously created all the interfaces to have names like this PREFIXhostnamePORTsubnetname (or aFW01portWAN in more conventional terms), so here we construct a JSON array, like this: ['aFW01portWAN'] but that could just as easily have been ['aFW01portWAN', 'aFW01portProtect', 'aFW01portMGMT', 'aFW01portSync']. This will then attach those interfaces to the virtual machine.
Next up, custom_data. This section is sometimes known externally as userdata or config_disk. My code has always referred to it as a “Provision Script” – hence the variable name in the code below!
custom_data: |
  {%- if item.value.provision_script is defined and item.value.provision_script != '' -%}
    {%- include(item.value.provision_script) -%}
  {%- elif item.value.image.provision_script is defined and item.value.image.provision_script != '' -%}
    {%- include(item.value.image.provision_script) -%}
  {%- else -%}
    {{ omit }}
  {%- endif -%}
Let’s pick this one apart too. If we’ve defined a provisioning script file for the VM, include it, if we’ve defined a provisioning script file for the image (or marketplace entry), then include that instead… otherwise, pretend that there’s no “custom_data” field before you submit this to Azure.
One last quirk to Azure, is that some images require a “plan” to go with it, and others don’t.
plan: |
  {%- if item.value.image.plan is not defined -%}{{ omit }}{%- else -%}
    {'name': '{{ item.value.image.sku }}',
     'publisher': '{{ item.value.image.publisher }}',
     'product': '{{ item.value.image.offer }}'
    }
  {%- endif -%}
So, here we say “if we’ve not got a plan, omit the value being passed to Azure, otherwise use these fields we previously specified. Weird huh?
The very last thing we do in the script is to re-render the standard password we’ve used for all these builds, so that we can check them out!
Work very generously sent me on a training course today about a cloud based technology we’re considering deploying.
During the course, the organiser threw a question to the audience about “who can explain what a container does?” and a small number of us ended up talking about Docker (primarily for Linux) and CGroups, and this then turned into a conversation about the exceedingly high rate of changes deployed by Amazon, Etsy and others who have completely embraced microservices and efficient CI/CD pipelines… and then I mentioned the parable of Pets versus Cattle.
The link above points to where the story comes from, but the short version is…
When you get a pet, it comes as a something like a puppy or kitten, you name it, you nurture it, bring it up to live in your household, and when it gets sick, because you’ve made it part of your family, you bring in a vet who nurses it back to health.
When you have cattle, it doesn’t have a name, it has a number, and if it gets sick, you isolate it from the herd and if it doesn’t get better, you take it out back and shoot it, and get a new one.
A large number of the audience either hadn’t heard of the parable, or if they had, hadn’t heard it delivered like this.
We later went on to discuss how this applies in a practical sense, not just in docker or kubernetes containers, but how it could be applied to Infrastructure as a Service (IaaS), even down to things like vendor supplied virtual firewalls where you have Infrastructure as Code (IaC).
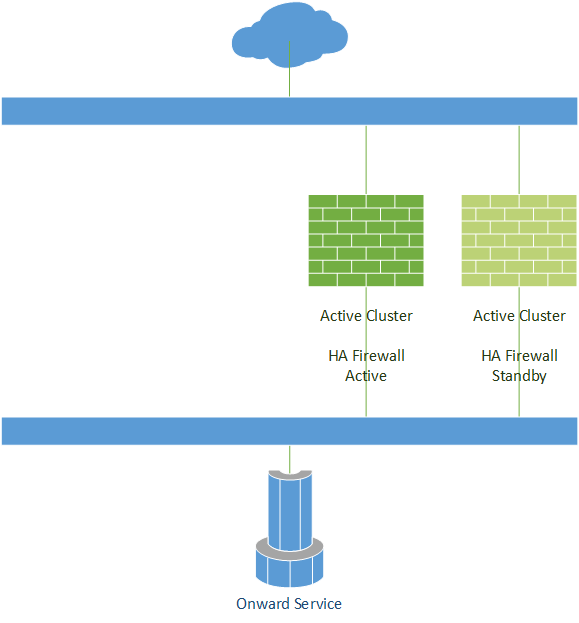
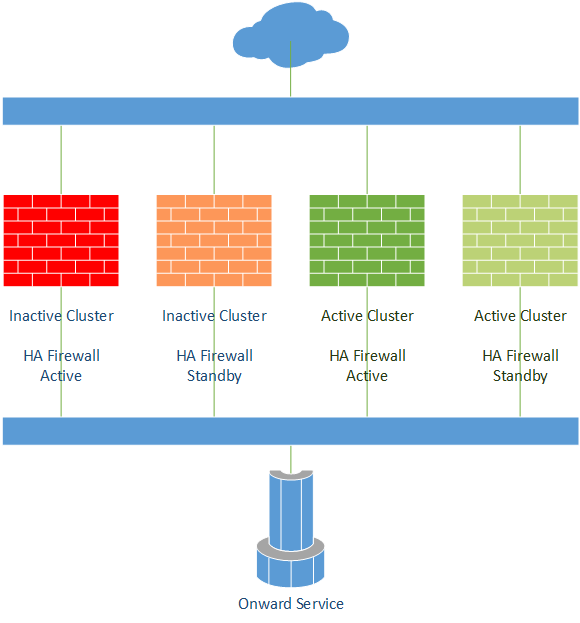
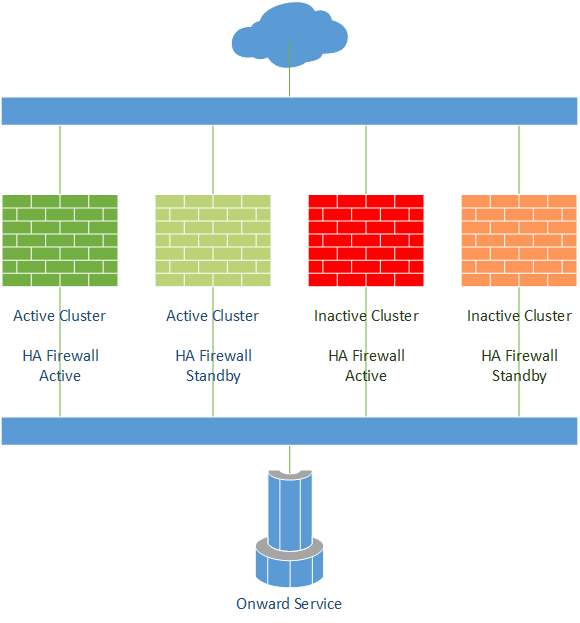
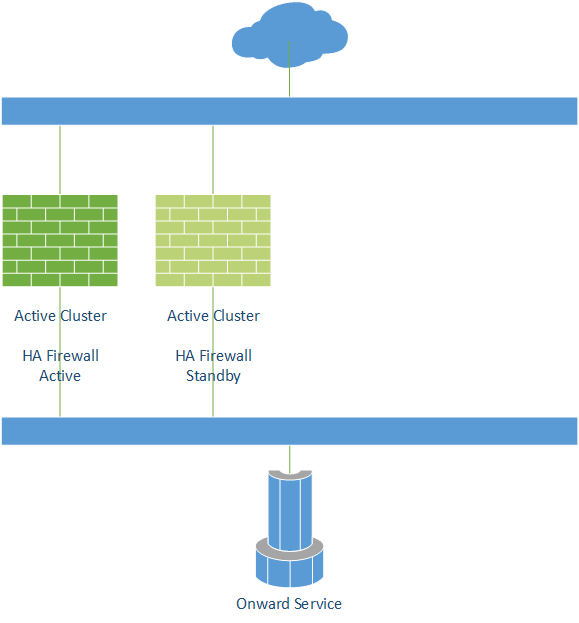
If, in your environment, you have some service you treat like cattle – perhaps a cluster of firewalls behind a load balancer or a floating IP address and you need to upgrade it (because it isn’t well, or it’s not had the latest set of policy deployed to it). You don’t amend the policy on the boxes in question… No! You stand up a new service using your IaC with the latest policy deployed upon it, and then you would test it (to make sure it’s stood up right), and then once you’re happy it’s ready, you transition your service to the new nodes. Once the connections have drained from your old nodes, you take them out and shoot them.
Or, if you want this in pictures…
Stage 1 – Before the new service deploymentStage 2 – The new service deployment is built and testedStage 3 – Service transitions to the new service deploymentStage 4 – The old service is demised, and any resources (including licenses) return to the pool
I was advised (by a very enthusiastic Mike until he realised that I intended to follow through with it) that the name for this should be as per the title. So, the next time someone asks me to explain how they could deploy, I’ll suggest they look for the Abattoir in my blog, because, you know, that’s normal, right? :)
One of my colleagues has asked me for some help with an Ansible script he’s writing to push some policy to a cloud hosted FortiGate appliance. Unfortunately, he kept getting some very weird error messages, like this one:
This same colleague came across a post on the Fortinet Developer Network site (access to the site requires vendor approval), which said “this might be an internal bug, but to debug it, use the following”
fgt # diagnose debug enable

fgt # diagnose debug cli 8
Debug messages will be on for 30 minutes.
And then run your API commands. Your error message will be surfaced there… so here’s mine! (Mapped port doesn’t match extport in a vip).
0: config firewall vip
0: edit "vip8080"
0: unset src-filter
0: unset service
0: set extintf "port1"
0: set portforward enable
0: unset srcintf-filter
0: set mappedip "192.0.2.1-192.0.2.1"
0: unset extport
0: set extport 8080-8081
0: unset mappedport
0: set mappedport 8080
-651: end
Late edit 2020-03-27: I spotted a bug in the Ansible issues tracker today, and I added a note to the end of that bug mentioning that as well as diagnose debug cli 8, if that doesn’t give you enough logs to figure out what’s up, you can also try diagnose debug application httpsd -1 but this enables LOTS AND LOTS of logs, so really think twice before turning that one on!
Oh, and if 30 minutes isn’t enough, try diagnose debug duration 480 or however many minutes you think you need. Beware that it will write event logs out to the serial console even when you’ve logged out.
In my day job, I sometimes need to use a self-signed certificate when building a box. As I love using Ansible, I wanted to make the self-signed certificate piece something that was part of my Ansible workflow.
Here follows a bit of basic code that you could use to work through how the process of creating a self-signed certificate would work. I would strongly recommend using something more production-ready (e.g. LetsEncrypt) when you’re looking to move from “development” to “production” :)
I recently was asked to describe what happens in a penetration test (pentest), how it’s organised and what happens after the test is completed.
Some caveats first:
While I’ve been involved in escorting penetration testers in controlled areas, and helping to provide environments for the tests to occur in, I’ve not been heavily involved in the set-up of one, so some of the details in that area are likely to be a bit fuzzy.
I’m not involved in procurement in any way, so I can’t endorse or discredit any particular testing organisations.
This is a personal viewpoint and doesn’t represent a professional recommendation of how a penetration test should or typically does occur.
So, what actually happens?…
Before the pentest begins, a testing firm would be sourced and the “Terms of Engagement” (TOE), or perhaps a list of requirements would be defined. This might result in a list of tasks that are expected to be performed, and some idea on resources required. It would also be the point where the initiator (the organisation getting the test performed) defines what is “In Scope” (is available to be tested) and what is “Out Of Scope” (and must not be tested).
Some of the usual tasks are:
Internet Scan (the testers will have a testing appliance that will scan all IPs provided to them, and all open ports on those IPs, looking for vulnerable services, servers and responding applications).
Black Box [See note below] Red Team test (the testers are probing the network as though they were malicious outsiders with no knowledge of the system, similar to the sorts of things you might see in hacker movies – go through discovered documentation, socially engineer access to environments, run testing applications like NMAP and Metasploit, and generally see what stuff appears to be publicly accessible, and from there see how the environment appears once you have a foothold).
White Box test (the testers have access to internal documentation and/or source code about the environment they’re testing, and thus can run customised and specific tests against the target environment).
Configuration Analysis (access to servers, source code, firewall policies or network topology documentation intending to check where flaws may have been introduced).
Social Engineering test (see how amenable staff, customers and suppliers are to providing access to the target environment for your testing team).
Physical access test (prove whether the testing team can gain physical access to elements of your target, e.g. servers, documentation, management stations, signing keys, etc).
Some testing firms will also stress test any Denial Of Service Mitigations you may have in-place, but these must be carefully negotiated first with your bandwidth providers, their peering firms and so on, as they will more-than-likely disrupt more than just your services! DO NOT ENGAGE A DOS TEST LIGHTLY!
Once the Terms have been agreed and the duration of these tests have been ironed out (some tests could go on indefinitely, but you wouldn’t *really* want to pay the bills for an indefinite Black Box test, for example!), a project plan is usually defined showing these stages. Depending on the complexity of your environment, I might expect a reasonable duration for a small estate being approximately a day or two for each test. In a larger estate, particularly where little-to-no automation has been implemented, you may find (for example) a thorough Configuration Analysis of your server configurations taking weeks or even months.
Depending on how true-to-life the test “should” be, you may have the Physical Security assessment and Social Engineering tests be considered part of the Black Box test, or perhaps you may purposefully provide some entry point for the testing team to reduce the entry time. Most of the Black Box tests I’ve been involved in supporting have started from giving the testers access to a point inside your trusted network (e.g. a server which has been built for the purpose of giving access to testers or a VPN entry point with a “lax” firewall policy). Others will provide a “standard” asset (e.g. laptop) and user credential to the testing firm. Finally, some environments will put the testing firm through “recruitment” and put them in-situ in the firm for a week or two to bed them in before the testing starts… this is pretty extreme however!!
The Black Box test will typically be run before any others (except perhaps the Social Engineering and Physical Access tests) and without the knowledge of the “normal” administrators. This will also test the responses of the “Blue Team” (the system administrators and any security operations centre teams) to see whether they would notice an in-progress, working attack by a “Red Team” (the attackers).
After the Black Box test is completed, the “Blue Team” may be notified that there was a pentest, and then (providing it is being run) the testing organisation will start a White Box test will be given open access to the tested environment.
The Configuration Check will normally start with hands-on time with members of the “Blue Team” to see configuration and settings, and will compare these settings against known best practices. If there is an application being tested where source code is available to the testers, then they may check the source code against programming bad practices.
Once these tests are performed, the testing organisation will write a report documenting the state of the environment and rate criticality of the flaws against current recommendations.
The report would be submitted to the organisation who requested the test, and then the *real* fun begins – either fixing the flaws, or finger pointing at who let the flaws occur… Oh, and then scheduling the next pentest :)
I hope this has helped people who may be wondering what happens during a pentest!
Just to note – If you want to know more about pentests, and how they work in the real world, check out the podcast “Darknet Diaries“, and in particular episode 6 – “The Beirut Bank Job”. To get an idea of what the pentest is supposed to simulate, (although it’s a fictional series) “Mr Robot” (<- Amazon affiliate link) is very close to how I would imagine a sequence of real-world “Red Team” attacks might look like, and experts seem to agree!
Additional note; 2018-12-12: Following me posting this to the #security channel on the McrTech Slack group, one of the other members of that group (Jay Harris from Digital Interruption) mentioned that I’d conflated a black box test and a red team test. A black box test is like a white box test, but with no documentation or access to the implementing team. It’s much slower than a white box test, because you don’t have access to the people to ask “why did you do this” or “what threat are you trying to mitigate here”. He’s right. This post was based on a previous experience I had with a red team test, but that they’d referred to it as a black box test, because that’s what the engagement started out as. Well spotted Jay!