'Geocache "Goodies"' by 'sk' on Flickr

Caching online data sources in Ansible for later development or testing

My current Ansible project relies on me collecting a lot of data from AWS and then checking it again later, to see if something has changed.

This is great for one-off tests (e.g. terraform destroy ; terraform apply ; ansible-playbook run.yml) but isn’t great for repetitive tests, especially if you have to collect data that may take many minutes to run all the actions, or if you have slow or unreliable internet in your development environment.

To get around this, I wrote a wrapper for caching this data.

At the top of my playbook, run.yml, I have these tasks:

- name: Set Online Status.
  # This stores the value of run_online, unless run_online
  # is not set, in which case, it defines it as "true".
  ansible.builtin.set_fact:
    run_online: |-
      {{- run_online | default(true) | bool -}}

- name: Create cache_data path.
  # This creates a "cached_data" directory in the same
  # path as the playbook.
  when: run_online | bool and cache_data | default(false) | bool
  delegate_to: localhost
  run_once: true
  file:
    path: "cached_data"
    state: directory
    mode: 0755

- name: Create cache_data for host.
  # This creates a directory under "cached_data" in the same
  # path as the playbook, with the name of each of the inventory
  # items.
  when: run_online | bool and cache_data | default(false) | bool
  delegate_to: localhost
  file:
    path: "cached_data/{{ inventory_hostname }}"
    state: directory
    mode: 0755

Running this sets up an expectation for the normal operation of the playbook, that it will be “online”, by default.

Then, every time I need to call something “online”, for example, collect EC2 Instance Data (using the community.aws.ec2_instance_info module), I call out to (something like) this set of tasks, instead of just calling the task by itself.

- name: List all EC2 instances in the regions of interest.
  when: run_online | bool
  community.aws.ec2_instance_info:
    region: "{{ item.region_name }}"
  loop: "{{ regions }}"
  loop_control:
    label: "{{ item.region_name }}"
  register: regional_ec2

- name: "NOTE: Set regional_ec2 data path"
  when: not run_online | bool or cache_data | default(false) | bool
  set_fact:
    regional_ec2_cached_data_file_loop: "{{ regional_ec2_cached_data_file_loop | default(0) | int + 1 }}"
    cached_data_filename: "cached_data/{{ inventory_hostname }}/{{ cached_data_file | default('regional_ec2') }}.{{ regional_ec2_cached_data_file_loop | default(0) | int + 1 }}.json"

- name: "NOTE: Cache/Get regional_ec2 data path"
  when: not run_online | bool or cache_data | default(false) | bool
  debug:
    msg: "File: {{ cached_data_filename }}"

- name: Cache all EC2 instances in the regions of interest.
  when: run_online | bool and cache_data | default(false) | bool
  delegate_to: localhost
  copy:
    dest: "{{ cached_data_filename }}"
    mode: "0644"
    content: "{{ regional_ec2 }}"

- name: "OFFLINE: Load all EC2 instances in the regions of interest."
  when: not run_online | bool
  set_fact:
    regional_ec2: "{% include( cached_data_filename ) %}"

The first task, if it’s still set to being “online” will execute the task, and registers the result for later. If cache_data is configured, we generate a filename for the caching, record the filename to the log (via the debug task) and then store it (using the copy task). So far, so online… but what happens when we don’t need the instance to be up and running?

In that case, we use the set_fact module, triggered by running the playbook like this: ansible-playbook run.yml -e run_online=false. This reads the cached data out of that locally stored pool of data for later use.

Featured image is ‘Geocache “Goodies”‘ by ‘sk‘ on Flickr and is released under a CC-BY-ND license.

My Fujitsu Stylistic V727

Review of my Fujitsu Stylistic V727 Laptop/Tablet.

TL;DR: Linux is usually awesome, but it doesn’t work for my niche case.

Why was I in the market for a new computer?

October 2019 my beloved (but 7 year old) Acer V5-171, “Minilith” (so named because it was smaller than it’s predecessor, a 17″ monster of a black slab that was named “Monolith”) started exhibiting signs of having a dead battery. I replaced the battery with an 3rd party replacement, and while it charged OK for a few runs, it stopped charging all together (I could get a maximum of 5% charge), so I put the old battery in, and it started working better. Huzzah. All was going well until around 6 months ago when the hard drive failed, so I replaced it with an SSD, and that gave it a new lease of life… and this month, well, it just wouldn’t boot reliably. I finally decided that it was time to let it go and play with Timmy the dog at the farm, and replace it with something newer.

The back of "Minilith", my 7 year old Laptop.
The back of “Minilith”, my 7 year old Laptop.
Minilith's Keyboard and Screen
Minilith’s Keyboard and Screen

Fortunately, this co-incided with a small win on the company social Prize Draw of a reasonable sized pay out, enough to consider looking at the Ex-Demo staff sales list made available to me by dint of my employer.

Making my choice.

There weren’t a lot of options, to be fair, but one item stood out to me. A Stylistic Tablet Computer. I’d previously had an Asus Transformer TF300T – a tablet-come-computer which had a detachable keyboard. I’d loved that, even though it didn’t really do what I wanted it for (and, I think I’d paid quite a bit over what it was worth, really)… but what I really wanted to do was have a tablet I could use for computing… Hence, the Stylistic.

Image of the TF300T, a tablet model I’d previously owned, from the Asus Transformer Marketing Pages
Der obere Teil des Stylistic V727 ist ein Tablet.
Image of the tablet view of the Stylistic V727 computer from a German blog.

Fujitsu are in a bit of an odd place, at least in the UK (I’ve not looked elsewhere) for personal computers – we sell quite well (apparently) to business, but we moved out of the “selling to the public” market probably around 2010, and so it was pretty hard to gauge how well this laptop performed. Oh, and of course, being a “Linux Enthusiast”, I wanted to be able to run Ubuntu, Fedora or others on it.

Because it was an internal sale, and I wanted to test Ubuntu on it before I bought it, I was able to get the sales team to let me evaluate it before I bought it.

It arrives!

It arrived as the tablet and keyboard, with a dock for setting it on your desk. I tested it with Windows, where the dock worked well, but the keyboard by itself didn’t so much. You see, the keyboard is an optional accessory, and had been sold with the laptop, all good thus far. Except what you also need to get, when you get the keyboard, is the case. The case gives you the sturdy back to give the “laptop” a frame. It’s basically the hinge that the top-heavy screen needs to keep itself upright.

A screen capture of the Fujitsu Stylistic V727 from the datasheet. Note this image shows the optional keyboard and the optional case.

The sales team were very understanding, and found a case to ship to me as well, but it wouldn’t come for a few days, so I was left to try out the rest of the hardware.

What do you get for your money?

The processor is an Intel i5-7Y57 dual core CPU with four threads, running at 1.2GHz.

It has 8GB of RAM and a 256GB m2 SATA drive.

The 12.3″ touch-or-pen (included) enabled screen has a maximum resolution of 1920×1280 pixels. The surface of the tablet is considered a WACOM tablet, and the pen can be sensed from a reasonable distance away. There are two buttons on the side of the pen, which turns a tap on the screen from a “normal” left click to a right click, or a center click.

On the rear is a fingerprint sensor.

From a network perspective, the WIFI supports 802.11ac, Bluetooth 4.2, and under the battery there is a LTE module onboard (although, I’ve not tested that).

On the side is a USB3.1 A connector, and a USB C connector (the specs sheet I linked to above suggests there is a single USB 3 and a USB 2 interface, but I doubt the USB C is USB 2).

There is also a MicroSD slot, which is detected by the booted OS as an MMC device, but it is not detected as a bootable device.

There’s a combined 3.5mm audio in and out jack, which I’ve not tried and a power socket.

There are two cameras, a 5 megapixel front-facing camera and an 8 megapixel rear facing camera with a flash.

The detachable keyboard has an integrated touchpad. It’s all good, and compared to my poor Acer V5, it’s a massive step up ❤

When you add in the desk dock (where, to be fair, it’s spent most of it’s time since I got it), the connections also then include Gigabit Ethernet, a Display Port interface, a VGA port and three USB 3 A interfaces, and a power socket.

The OS Comparison starts

Windows first

I booted it in Windows, and found it really rather responsive, especially once I’d reinstalled Windows without all the customizations the demo team had put on…

My previous install of Windows on Minilith had been the Home edition, and I’d found the semi-constant nagging to install games and the like rather annoying. I’ve had a couple of Windows 10 Professional installs at work, and, while those builds came with their own fair share of corporately mandated bloat (after all, their threat models are somewhat different to mine) they usually felt more slim than the Windows 10 home install I’d had, so when I saw this had Windows 10 Professional, I was looking forward to seeing something a bit leaner… and I wasn’t let down. All the hardware worked fine, I had the fingerprint reader working, no worries and the dock was great.

Docking and undocking is relatively seamless, although the first try was a bit tricky, I’ve got used to it. I had two screens attached via my work-supplied Fujitsu PR08 DisplayLink adaptor, plugged through the dock, and again, that all worked fine.

I could use the pen in the tablet mode really well. It makes selecting items on the screen easy, and if you don’t want to use the virtual keyboard, in some cases, it pops up a handwriting recognition box, although the time I showed this to my wife (where I’d been using it successfully for some time), it didn’t recognise half the words I wrote… but I’m sure that’s just my dreadful scrawl, and not the tablet’s fault!

Even using the tablet without the pen worked really well. Tapping the screen is a left click, and a long press on an area is a right click, similar to how Android handles left-and-right clicks in RDP and VNC sessions. The keyboard has several “modes” – a reduced character set, a thumb typing set or a full keyboard. The reduced set has a control key and an escape key, but no alt, windows or arrow keys. I didn’t try the thumb typing set (this thing is 12″ across!) but the full keyboard is an “ISO layout” 75% keyboard (I discovered by matching the image to this website!) which means I still get my Control, Alt, and Windows keys.

Next, Ubuntu

I booted from a USB stick that had the Ubuntu 20.04 installer on it. Ubuntu booted fine, allowed me to repartition the Windows partition into approximately half the drive, and install away. During the install, I was asked to provide a password to setup the SecureBoot keys, and instructed that it’d prompt me for it on the next reboot. Most of the hardware worked fine. Dock, keyboard, Wifi, Bluetooth… all good. The fingerprint sensor wasn’t detected, and still isn’t, but I’m OK with that, it was always just a nice-to-have. The install worked fine, and yes, on reboot, I got a blue screen asking me to set up my “MOK” (which, I guessed eventually, was the SecureBoot setup). I realised that the SecureBoot install stage of the Linux install copies a private key to the UEFI space, and on the next boot, it spots there’s a key there and asks you to unlock that private key, so it can install it into the boot keys. All good!

I was working away on it with the tablet in the dock. I tried using it with the detachable keyboard, but it was a bit tricky to use without the rigid back, so I kept it in the dock. The pen works a treat too.

The problem came when I tried to use it as a tablet.

You see, where Windows has a selection of keyboard layouts for their “On Screen Keyboard” (OSK), the Gnome one only lets you use this layout:

GNOME 3.28 OSK
Screenshot taken from an article at OMG Ubuntu.

While this is passable for tapping stuff into a URL bar in your browser, entering a password for logging in, or typing simple statements into dialogue boxes, there are some key things it’s missing. The first (for me) is a Control, Alt or Super (Windows) key. This means I can’t do any programming, of any sort, in Tablet mode. Note, this just works on Windows, and is possible on Android with an extended keyboard called “Hacker Keyboard”. There are also no cursor keys, which seems like it’s less important, but it makes editing things you’ve typed (or mistyped) MUCH harder.

“Well, OK then, let’s have a look around and see what our options are?”

I’d heard good things about “OnBoard”, a predecessor to Gnome OSK, but because OSK is registered as “The” on screen keyboard, and runs as a system process, and OnBoard is a user process, Gnome OSK pops up any time you want to do on screen keyboard things, even if you’ve got OnBoard loaded. Ahah! I found an extension which blocks Gnome OSK… except that stops it from being able to be used for logging in.

You see, that whole “system” versus “user” process thing I mentioned before. The Gnome lock screen is considered a system process, not a user one, which means that if you’ve disabled Gnome OSK, then you can’t put your password in, but equally, if you’re typing in a box with OnBoard, change focus and change back again, up pops Gnome OSK.

Breaking down and turning it around.

I should confess, I didn’t spend a lot of time wondering about this. I booted a Kubuntu environment instead, and found that this really didn’t work for me either (although I now don’t remember what stopped me from liking it – I might have to revisit this!) By this point, I’d spent several hours “messing” around with this, and I just wanted to give something a try. So I booted back into Windows.

I gave the on screen keyboard another try. It worked great. I tried doing some sketches in Paint 3D (the replacement for Windows Paint) with the pen, and it was very easy (so much so, I need to work out how to use it for my next design call with work!)

All the familiar tools I use in my work or personal environment are there.

  • VSCode. Check.
  • A usable shell (via Windows Subsystem for Linux). Check.
  • File synchronization (via Syncthing). Check.
  • Web browser (Firefox). Check.
  • Audio recording software (Audacity). Check.
  • Image editor (GIMP). Check.
  • Voice chat for the podcast software (Mumble). Check.
  • Screencasting software (OBS). Check.
  • Virtual Machine software (VirtualBox, Vagrant, Terraform). Check.

And the fingerprint reader works… so I stuck with Windows 10.

The only last catch, whether it was Windows or Linux? There’s no HDMI or VGA out without the dock… so I need to start looking into “cheap” display adaptors that I can use for presenting things, whenever we get back to “normal” and I can start attending and speaking at conferences again.

What about the case?

Oh yehr, so a few days after I get the computer, the case turns up. It attaches to the back of the computer with tape, and feels like leather (although, I’m sure it’s not leather). It definitely makes it feel like a “quality” product 😀. It’s a little bit more tricky to drop into the dock, but it makes it feel like a Laptop when you’re using it like one. The detachable keyboard is interesting. I’ve used it in the car, waiting for children to finish activities, and it’s fine, because it goes flat. I’ve detached the keyboard from the screen to just do tablet-y things with it, and that’s fine too.

So in summary

I think if I didn’t want it to be a tablet as much as a computer, I’d have been fine.

If you want a Windows Tablet that turns into a Laptop, it’s fine. If you want a low-profile desktop computer (in a dock) that can become a laptop, it’s fine.

But until Gnome or one of the other flavours gets a handle on how to do a reasonable on-screen keyboard… I don’t think I’ll be using Linux on here (because it’s also a tablet) for the next few months… and I think that’s going to be OK.

All of that said, if you use any Linux distributions with a tablet style mode, and you’ve got a working OSK, please contact me (via one of the links at the top of the site) to let me know what and how you did it, and I’ll give it a try too!

"Main console" by "Steve Parker" on Flickr

Running services (like SSH, nginx, etc) on Windows Subsystem for Linux (WSL1) on boot

I recently got a new laptop, and for various reasons, I’m going to be primarily running Windows on that laptop. However, I still like having a working SSH server, running in the context of my Windows Subsystem for Linux (WSL) environment.

Initially, trying to run service ssh start failed with an error, because you need to re-execute the ssh configuration steps which are missed in a WSL environment. To fix that, run sudo apt install --reinstall openssh-server.

Once you know your service runs OK, you start digging around to find out how to start it on boot, and you’ll see lots of people saying things like “Just run a shell script that starts your first service, and then another shell script for the next service.”

Well, the frustration for me is that Linux already has this capability – the current popular version is called SystemD, but a slightly older variant is still knocking around in modern linux distributions, and it’s called SystemV Init, often referred to as just “sysv” or “init.d”.

The way that those services work is that you have an “init” file in /etc/init.d and then those files have a symbolic link into a “runlevel” directory, for example /etc/rc3.d. Each symbolic link is named S##service or K##service, where the ## represents the order in which it’s to be launched. The SSH Daemon, for example, that I want to run is created in there as /etc/rc3.d/S01ssh.

So, how do I make this work in the grander scheme of WSL? I can’t use SystemD, where I could say systemctl enable --now ssh, instead I need to add a (yes, I know) shell script, which looks in my desired runlevel directory. Runlevel 3 is the level at which network services have started, hence using that one. If I was trying to set up a graphical desktop, I’d instead be looking to use Runlevel 5, but the X Windows system isn’t ported to Windows like that yet… Anyway.

Because the rc#.d directory already has this structure for ordering and naming services to load, I can just step over this directory looking for files which match or do not match the naming convention, and I do that with this script:

#! /bin/bash
function run_rc() {
  base="$(basename "$1")"
  if [[ ${base:0:1} == "S" ]]
  then
    "$1" start
  else
    "$1" stop
  fi
}

if [ "$1" != "" ] && [ -e "$1" ]
then
  run_rc "$1"
else
  rc=3
  if [ "$1" != "" ] && [ -e "/etc/rc${$1}.d/" ]
  then
    rc="$1"
  fi
  for digit1 in {0..9}
  do
    for digit2 in {0..9}
    do
      find "/etc/rc${rc}.d/" -name "[SK]${digit1}${digit2}*" -exec "$0" '{}' \; 2>/dev/null
    done
  done
fi

I’ve put this script in /opt/wsl_init.sh

This does a bit of trickery, but basically runs the bottom block first. It loops over the digits 0 to 9 twice (giving you 00, 01, 02 and so on up to 99) and looks in /etc/rc3.d for any file containing the filename starting S or K and then with the two digits you’ve looped to by that point. Finally, it runs itself again, passing the name of the file it just found, and this is where the top block comes in.

In the top block we look at the “basename” – the part of the path supplied, without any prefixed directories attached, and then extract just the first character (that’s the ${base:0:1} part) to see whether it’s an “S” or anything else. If it’s an S (which everything there is likely to be), it executes the task like this: /etc/rc3.d/S01ssh start and this works because it’s how that script is designed! You can run one of the following instances of this command: service ssh start, /etc/init.d/ssh start or /etc/rc3.d/S01ssh start. There are other options, notably “stop” or “status”, but these aren’t really useful here.

Now, how do we make Windows execute this on boot? I’m using NSSM, the “Non-sucking service manager” to add a line to the Windows System services. I placed the NSSM executable in C:\Program Files\nssm\nssm.exe, and then from a command line, ran C:\Program Files\nssm\nssm.exe install WSL_Init.

I configured it with the Application Path: C:\Windows\System32\wsl.exe and the Arguments: -d ubuntu -e sudo /opt/wsl_init.sh. Note that this only works because I’ve also got Sudo setup to execute this command without prompting for a password.

Here I invoke C:\Windows\System32\wsl.exe -d ubuntu -e sudo /opt/wsl_init.sh
I define the name of the service, as Services will see it, and also the description of the service.
I put in MY username and My Windows Password here, otherwise I’m not running WSL in my user context, but another one.

And then I rebooted. SSH was running as I needed it.

Featured image is “Main console” by “Steve Parker” on Flickr and is released under a CC-BY license.

"2009.01.17 - UNKNOWN, Unknown" by "Adrian Clark" on Flickr

Creating tagged AWS EC2 resources (like Elastic IPs) with Ansible

This is a quick note, having stumbled over this one today.

Mostly these days, I’m used to using Terraform to create Elastic IP (EIP) items in AWS, and I can assign tags to them during creation. For various reasons in $Project I’m having to create my EIPs in Ansible.

To make this work, you can’t just create an EIP with tags (like you would in Terraform), instead what you need to do is to create the EIP and then tag it, like this:

  - name: Allocate a new elastic IP
    community.aws.ec2_eip:
      state: present
      in_vpc: true
      region: eu-west-1
    register: eip

  - name: Tag that resource
    amazon.aws.ec2_tag:
      region: eu-west-1
      resource: "{{ eip.allocation_id }}"
      state: present
      tags:
        Name: MyTag
    register: tag

Notice that we create a VPC associated EIP, and assign the allocation_id from the result of that module to the resource we want to tag.

How about if you’re trying to be a bit more complex?

Here I have a list of EIPs I want to create, and then I pass this into the ec2_eip module, like this:

- name: Create list of EIPs
  set_fact:
    region: eu-west-1
    eip_list:
    - demo-eip-1
    - demo-eip-2
    - demo-eip-3

  - name: Allocate new elastic IPs
    community.aws.ec2_eip:
      state: present
      in_vpc: true
      region: "{{ region }}"
    register: eip
    loop: "{{ eip_list | dict2items }}"
    loop_control:
      label: "{{ item.key }}"

  - name: Tag the EIPs
    amazon.aws.ec2_tag:
      region: "{{ item.invocation.module_args.region }}"
      resource: "{{ item.allocation_id }}"
      state: present
      tags:
        Name: "{{ item.item.key }}"
    register: tag
    loop: "{{ eip.results }}"
    loop_control:
      label: "{{ item.item.key }}"

So, in this instance we pass the list of EIP names we want to create as a list with the loop instruction. Now, at the point we create them, we don’t actually know what they’ll be called, but we’re naming them there because when we tag them, we get the “item” (from the loop) that was used to create the EIP. When we then tag the EIP, we can use some of the data that was returned from the ec2_eip module (region, EIP allocation ID and the name we used as the loop key). I’ve trimmed out the debug statements I created while writing this, but here’s what you get back from ec2_eip:

"eip": {
        "changed": true,
        "msg": "All items completed",
        "results": [
            {
                "allocation_id": "eipalloc-decafbaddeadbeef1",
                "ansible_loop_var": "item",
                "changed": true,
                "failed": false,
                "invocation": {
                    "module_args": {
                        "allow_reassociation": false,
                        "aws_access_key": null,
                        "aws_ca_bundle": null,
                        "aws_config": null,
                        "aws_secret_key": null,
                        "debug_botocore_endpoint_logs": false,
                        "device_id": null,
                        "ec2_url": null,
                        "in_vpc": true,
                        "private_ip_address": null,
                        "profile": null,
                        "public_ip": null,
                        "public_ipv4_pool": null,
                        "region": "eu-west-1",
                        "release_on_disassociation": false,
                        "reuse_existing_ip_allowed": false,
                        "security_token": null,
                        "state": "present",
                        "tag_name": null,
                        "tag_value": null,
                        "validate_certs": true,
                        "wait_timeout": null
                    }
                },
                "item": {
                    "key": "demo-eip-1",
                    "value": {}
                },
                "public_ip": "192.0.2.1"
            }
     ]
}

So, that’s what I’m doing next!

Featured image is “2009.01.17 – UNKNOWN, Unknown” by “Adrian Clark” on Flickr and is released under a CC-BY-ND license.

"pharmacy" by "Tim Evanson" on Flickr

AWX – The Gateway Drug to Ansible Tower

A love letter to Ansible Tower

I love Ansible… I mean, I really love Ansible. You can ask anyone, and they’ll tell you my first love is my wife, then my children… and then it’s Ansible.

OK, maybe it’s Open Source and then Ansible, but either way, Ansible is REALLY high up there.

But, while I love Ansible, I love what Ansible Tower brings to an environment. See, while you get to easily and quickly manage a fleet of machines with Ansible, Ansible Tower gives you the fine grained control over what you need to expose to your developers, your ops team, or even, in a fit of “what-did-you-just-do”-ness, your manager. (I should probably mention that Ansible Tower is actually part of a much larger portfolio of products, called Ansible Automation Platform, and there’s some hosted SaaS stuff that goes with it… but the bit I really want to talk about is Tower, so I’ll be talking about Tower and not Ansible Automation Platform. Sorry!)

Ansible Tower has a scheduling engine, so you can have a “Go” button, for deploying the latest software to your fleet, or just for the 11PM patching cycle. It has a credential store, so your teams can’t just quickly go and perform an undocumented quick fix on that “flaky” box – they need to do their changes via Ansible. And lastly, it has an inventory, so you can see that the last 5 jobs failed to deploy on that host, so maybe you’ve got a problem with it.

One thing that people don’t so much love to do, is to get a license to deploy Tower, particularly if they just want to quickly spin up a demonstration for some colleagues to show how much THEY love Ansible. And for those people, I present AWX.

The first hit is free

One of the glorious and beautiful things that RedHat did, when they bought Ansible, was to make the same assertion about the Ansible products that they make to the rest of their product line, which is… while they may sell a commercial product, underneath it will be an Open Source version of that product, and you can be part of developing and improving that version, to help improve the commercial product. Thus was released AWX.

Now, I hear the nay-sayers commenting, “but what if you have an issue with AWX at 2AM, how do you get support on that”… and to those people, I reply: “If you need support at 2AM for your box, AWX is not the tool for you – what you need is Tower.”… Um, I mean Ansible Automation Platform. However, Tower takes a bit more setting up than what I’d want to do for a quick demo, and it has a few more pre-requisites. ANYWAY, enough about dealing with the nay-sayers.

AWX is an application inside Docker containers. It’s split into three parts, the AWX Web container, which has the REST API. There’s also a PostgreSQL database inside there too, and one “Engine”, which is the separate container which gets playbooks from your version control system, asks for any dynamic inventories, and then runs those playbooks on your inventories.

I like running demos of Tower, using AWX, because it’s reasonably easy to get stood up, and it’s reasonably close to what Tower looks and behaves like (except for the logos)… and, well, it’s a good gateway to getting people interested in what Tower can do for them, without them having to pay (or spend time signing up for evaluation licenses) for the environment in the first place.

And what’s more, it can all be automated

Yes, folks, because AWX is just a set of docker containers (and an install script), and Ansible knows how to start Docker containers (and run an install script), I can add an Ansible playbook to my cloud-init script, Vagrantfile or, let’s face it, when things go really wrong, put it in a bash script for some poor keyboard jockey to install for you.

If you’re running a demo, and you don’t want to get a POC (proof of concept) or evaluation license for Ansible Tower, then the chances are you’re probably not running this on RedHat Enterprise Linux (RHEL) either. That’s OK, once you’ve sold the room on using Tower (by using AWX), you can sell them on using RHEL too. So, I’ll be focusing on using CentOS 8 instead. Partially because there’s a Vagrant box for CentOS 8, but also because I can also use CentOS 8 on AWS, where I can prove that the Ansible Script I’m putting into my Vagrantfile will also deploy nicely via Cloud-Init too. With a very small number of changes, this is likely to work on anything that runs Docker, so everything from Arch to Ubuntu… probably 😁

“OK then. How can you work this magic, eh?” I hear from the back of the room. OK, pipe down, nay-sayers.

First, install Ansible on your host. You just need to run dnf install -y ansible.

Next, you need to install Docker. This is a marked difference between AWX and Ansible Tower, as AWX is based on Docker, but Ansible Tower uses other magic to make it work. When you’re selling the benefits of Tower, note that it’s not a 1-for-1 match at this point, but it’s not a big issue. Fortunately, CentOS can install Docker Community edition quite easily. At this point, I’m swapping to using Ansible playbooks. At the end, I’ll drop a link to where you can get all this in one big blob… In fact, we’re likely to use it with our Cloud-Init deployment.

Aw yehr, here’s the good stuff

tasks:
- name: Update all packages
  dnf:
    name: "*"
    state: latest

- name: Add dependency for "yum config-manager"
  dnf:
    name: yum-utils
    state: present

- name: Add the Docker Repo
  shell: yum config-manager --add-repo https://download.docker.com/linux/centos/docker-ce.repo
  args:
    creates: /etc/yum.repos.d/docker-ce.repo
    warn: false

- name: Install Docker
  dnf:
    name:
    - docker-ce
    - docker-ce-cli
    - containerd.io
    state: present
  notify: Start Docker

That first stanza – update all packages? Well, that’s because containerd.io relies on a newer version of libseccomp, which hasn’t been built in the CentOS 8 Vagrantbox I’m using.

The next one? That ensures I can run yum config-manager to add a repo. I could use the copy module in Ansible to create the repo files so yum and/or dnf could use that instead, but… meh, this is a single line shell command.

And then we install the repo, and the docker-ce packages we require. We use the “notify” statement to trigger a handler call to start Docker, like this:

handlers:
- name: Start Docker
  systemd:
    name: docker
    state: started

Fab. We’ve got Docker. Now, let’s clone the AWX repo to our machine. Again, we’re doing this with Ansible, naturally :)

tasks:
- name: Clone AWX repo to local path
  git:
    repo: https://github.com/ansible/awx.git
    dest: /opt/awx

- name: Get latest AWX tag
  shell: |
    if [ $(git status -s | wc -l) -gt 0 ]
    then
      git stash >/dev/null 2>&1
    fi
    git fetch --tags && git describe --tags $(git rev-list --tags --max-count=1)
    if [ $(git stash list | wc -l) -gt 0 ]
    then
      git stash pop >/dev/null 2>&1
    fi
  args:
    chdir: /opt/awx
  register: latest_tag
  changed_when: false

- name: Use latest released version of AWX
  git:
    repo: https://github.com/ansible/awx.git
    dest: /opt/awx
    version: "{{ latest_tag.stdout }}"

OK, there’s a fair bit to get from this, but essentially, we clone the repo from Github, then ask (using a collection of git commands) for the latest released version (yes, I’ve been bitten by just using the head of “devel” before), and then we check out that released version.

Fab, now we can configure it.

tasks:
- name: Set or Read admin password
  set_fact:
    admin_password_was_generated: "{{ (admin_password is defined or lookup('env', 'admin_password') != '') | ternary(false, true) }}"
    admin_password: "{{ admin_password | default (lookup('env', 'admin_password') | default(lookup('password', 'pw.admin_password chars=ascii_letters,digits length=20'), true) ) }}"

- name: Configure AWX installer
  lineinfile:
    path: /opt/awx/installer/inventory
    regexp: "^#?{{ item.key }}="
    line: "{{ item.key }}={{ item.value }}"
  loop:
  - key: "awx_web_hostname"
    value: "{{ ansible_fqdn }}"
  - key: "pg_password"
    value: "{{ lookup('password', 'pw.pg_password chars=ascii_letters,digits length=20') }}"
  - key: "rabbitmq_password"
    value: "{{ lookup('password', 'pw.rabbitmq_password chars=ascii_letters,digits length=20') }}"
  - key: "rabbitmq_erlang_cookie"
    value: "{{ lookup('password', 'pw.rabbitmq_erlang_cookie chars=ascii_letters,digits length=20') }}"
  - key: "admin_password"
    value: "{{ admin_password }}"
  - key: "secret_key"
    value: "{{ lookup('password', 'pw.secret_key chars=ascii_letters,digits length=64') }}"
  - key: "create_preload_data"
    value: "False"
  loop_control:
    label: "{{ item.key }}"

If we don’t already have a password defined, then create one. We register the fact we’ve had to create one, as we’ll need to tell ourselves it once the build is finished.

After that, we set a collection of values into the installer – the hostname, passwords, secret keys and so on. It loops over a key/value pair, and passes these to a regular expression rewrite command, so at the end, we have the settings we want, without having to change this script between releases.

When this is all done, we execute the installer. I’ve seen this done two ways. In an ideal world, you’d throw this into an Ansible shell module, and get it to execute the install, but the problem with that is that the AWX install takes quite a while, so I’d much rather actually be able to see what’s going on… and so, instead, we exit our prepare script at this point, and drop back to the shell to run the installer. Let’s look at both options, and you can decide which one you want to do. In my script, I’m doing the first, but just because it’s a bit neater to have everything in one place.

- name: Run the AWX install.
  shell: ansible-playbook -i inventory install.yml
  args:
    chdir: /opt/awx/installer
cd /opt/awx/installer
ansible-playbook -i inventory install.yml

When this is done, you get a prepared environment, ready to access using the username admin and the password of … well, whatever you set admin_password to.

AWX takes a little while to stand up, so you might want to run this next Ansible stanza to see when it’s ready to go.

- name: Test access to AWX
  tower_user:
    tower_host: "http://{{ ansible_fqdn }}"
    tower_username: admin
    tower_password: "{{ admin_password }}"
    email: "admin@{{ ansible_fqdn }}"
    first_name: "admin"
    last_name: ""
    password: "{{ admin_password }}"
    username: admin
    superuser: yes
    auditor: no
  register: _result
  until: _result.failed == false
  retries: 240 # retry 240 times
  delay: 5 # pause for 5 sec between each try

The upshot to using that command there is that it sets the email address of the admin account to “admin@your.awx.example.org“, if the fully qualified domain name (FQDN) of your machine is your.awx.example.org.

Moving from the Theoretical to the Practical

Now we’ve got our playbook, let’s wrap this up in both a Vagrant Vagrantfile and a Terraform script, this means you can deploy it locally, to test something internally, and in “the cloud”.

To simplify things, and because the version of Ansible deployed on the Vagrant box isn’t the one I want to use, I am using a single “user-data.sh” script for both Vagrant and Terraform. Here that is:

#!/bin/bash
if [ -e "$(which yum)" ]
then
  yum install git python3-pip -y
  pip3 install ansible docker docker-compose
else
  echo "This script only supports CentOS right now."
  exit 1
fi

git clone https://gist.github.com/JonTheNiceGuy/024d72f970d6a1c6160a6e9c3e642e07 /tmp/Install_AWX
cd /tmp/Install_AWX
/usr/local/bin/ansible-playbook Install_AWX.yml

While they both have their differences, they both can execute a script once the machine has finished booting. Let’s start with Vagrant.

Vagrant.configure("2") do |config|
  config.vm.box = "centos/8"

  config.vm.provider :virtualbox do |v|
    v.memory = 4096
  end

  config.vm.provision "shell", path: "user-data.sh"

  config.vm.network "forwarded_port", guest: 80, host: 8080, auto_correct: true
end

To boot this up, once you’ve got Vagrant and Virtualbox installed, run vagrant up and it’ll tell you that it’s set up a port forward from the HTTP port (TCP/80) to a “high” port – TCP/8080. If there’s a collision (because you’re running something else on TCP/8080), it’ll tell you what port it’s forwarded the HTTP port to instead. Once you’ve finished, run vagrant destroy to shut it down. There are lots more tricks you can play with Vagrant, but this is a relatively quick and easy one. Be aware that you’re not using HTTPS, so traffic to the AWX instance can be inspected, but if you’re running this on your local machine, it’s probably not a big issue.

How about running this on a cloud provider, like AWS? We can use the exact same scripts – both the Ansible script, and the user-data.sh script, using Terraform, however, this is a little more complex, as we need to create a VPC, Internet Gateway, Subnet, Security Group and Elastic IP before we can create the virtual machine. What’s more, the Free Tier (that “first hit is free” thing that Amazon Web Services provide to you) does not have enough horsepower to run AWX, so, if you want to look at how to run up AWX in EC2 (or to tweak it to run on Azure, GCP, Digital Ocean or one of the fine offerings from IBM or RedHat), then click through to the gist I’ve put all my code from this post into. The critical lines in there are to select a “CentOS 8” image, open HTTP and SSH into the machine, and to specify the user-data.sh file to provision the machine. Everything else is cruft to make the virtual machine talk to, and be seen by, hosts on the Internet.

To run this one, you need to run terraform init to load the AWS plugin, then terraform apply. Note that this relies on having an AWS access token defined, so if you don’t have them set up, you’ll need to get that sorted out first. Once you’ve finished with your demo, you should run terraform destroy to remove all the assets created by this terraform script. Again, when you’re running that demo, note that you ONLY have HTTP access set up, not HTTPS, so don’t use important credentials on there!

Once you’ve got your AWX environment running, you’ve got just enough AWX there to demo what Ansible Tower looks like, what it can bring to your organisation… and maybe even convince them that it’s worth investing in a license, rather than running AWX in production. Just in case you have that 2AM call-out that we all dread.

Featured image is “pharmacy” by “Tim Evanson” on Flickr and is released under a CC-BY-SA license.

"Status" by "Doug Letterman" on Flickr

Adding your Git Status to your Bash prompt

I was watching Lorna Mitchell‘s Open Source Hour twitch stream this morning, and noticed that she had a line in her prompt showing what her git status was.

A snip from Lorna’s screen during the Open Source Hour stream.

Git, for those of you who aren’t aware, is the version control software which has dominated software development and documentation for over 10 years now. It’s used for almost everything now, supplanting it’s competitors like Subversion, Visual Source Safe, Mercurial and Bazaar. While many people are only aware of Git using GitHub, before there was GitHub, there was the Git command line. I’m using the git command in a Bash shell all the time because I find it easier to use that for the sorts of things I do, than it is to use the GUI tools.

However, the thing that often stumbles me is what state I’m in with the project, and this line showed me just how potentially powerful this command can be.

During the video, I started researching how I could get this prompt set up on my machine, and finally realised that actually, git prompt was installed as part of the git package on my Ubuntu 20.04 install. To use it, I just had to add this string $(__git_ps1) into my prompt. This showed me which branch I was on, but I wanted more detail than that!

So, then I started looking into how to configure this prompt. I found this article from 2014, called “Git Prompt Variables” which showed me how to configure which features I wanted to enable:

GIT_PS1_DESCRIBE_STYLE='contains'
GIT_PS1_SHOWCOLORHINTS='y'
GIT_PS1_SHOWDIRTYSTATE='y'
GIT_PS1_SHOWSTASHSTATE='y'
GIT_PS1_SHOWUNTRACKEDFILES='y'
GIT_PS1_SHOWUPSTREAM='auto'

To turn this on, I edited ~/.bashrc (again, this is Ubuntu 20.04, I’ve not tested this on CentOS, Fedora, Slackware or any other distro). Here’s the lines I’m looking for:

The lines in the middle, between the two red lines are the lines in question – the lines above and below are for context in the standard .bashrc file shipped with Ubuntu 20.04

I edited each line starting PS1=, to add this: $(__git_ps1), so this now looks like this:

The content of those two highlighted lines in .bashrc

I’m aware that line is pretty hard to read in many cases, so here’s just the text for each PS1 line:

PS1='${debian_chroot:+($debian_chroot)}\[\033[01;32m\]\u@\h\[\033[00m\]:\[\033[01;34m\]\w$(__git_ps1)\[\033[00m\]\$ '
PS1='${debian_chroot:+($debian_chroot)}\u@\h:\w$(__git_ps1)\$ '

The first of those is the version that is triggered when if [ "$color_prompt" = yes ] is true, the second is when it isn’t.

What does this look like?

Let’s run through a “standard” work-flow of “conditions”. Yes, this is a really trivial example, and quite (I would imagine) different from how most people approach things like this… but it gives you a series of conditions so you can see what it looks like.

Note, as I’m still running a slightly older version of git, and I’ve not adjusted my defaults, the “initial” branch created is still called “master”, not “main”. For the purposes of this demonstration, it’s fine, but I should really have fixed this from the outset. My apologies.

First, we create and git init a directory, called git_test in /tmp.

Following a git init, the prompt ends (master #). Following the git init of the master branch, we are in a state where there is “No HEAD to compare against”, so the git prompt fragment ends #.

Next, we create a file in here. It’s unstaged.

Following the creation of an empty file, using the touch command, the prompt ends (master #%). We’re on the master branch, with no HEAD to compare against (#), and we have an untracked file (%).

And then we add that to the staging area.

Following a git add, the prompt ends (master +). We’re on the master branch, with a staged change (+).

Next we commit the file to the repository.

Following a git commit, the prompt ends (master). We’re on the master branch with a clean staging and unstaged area.

We add some content to the README file.

Following the change of a tracked file, by echoing content into the file, the prompt ends (master *). We’re on the master branch with an unstaged change (*).

We realise that we can’t use this change right now, let’s stash it for later.

Following the git stash of a tracked file, the prompt ends (master $). We’re on the master branch with stashed files ($).

We check out a new branch, so we can use that stash in there.

Following the creation of a new branch with git checkout -b, the prompt ends (My-New-Feature $). We’re on the My-New-Feature branch with stashed files ($).

And then pop the stashed file out.

Following the restoration of a stashed file, using git stash pop, the prompt ends (My-New-Feature *). We’re on the My-New-Feature branch with stashed files (*).

We then add the file and commit it.

Following a git add and git commit of the previously stashed file, the prompt ends (My-New-Feature). We’re on the My-New-Feature branch with a clean staged and unstaged area.

How about working with remote sources? Let’s change to back to the /tmp directory and fork git_test to git_local_fork.

Following the clone of the repository in a new path using git clone, and then changing into that directory with the cd command, the prompt ends (My-New-Feature=). We’re on the My-New-Feature branch, which is in an identical state to it’s default remote tracked branch (=).

We’ve checked it out at the feature branch instead of master, let’s check out master instead.

Subsequent to checking out the master branch in the repository using git checkout master, the prompt ends (master=). We’re on the master branch, which is in an identical state to it’s default remote tracked branch (=).

In the meantime, upstream, someone merged “My-New-Feature” into “master” on our original git_test repo.

Following the merge of a feature branch, using git merge, the prompt ends (master). We’re on the master branch with a clean staged and unstaged area.

On our local branch again, let’s fetch the state of our “upstream” into git_local_fork.

After we fetch the state of our default upstream repository, the prompt ends (master<). We’re on the master branch with a clean staged and unstaged area, but we’re behind the default remote tracked branch (<).

And then pull, to make sure we’re in-line with upstream’s master branch.

Once we perform a git pull to bring this branch up-to-date with the upstream repository, the prompt ends (master=). We’re on the master branch, which is back in an identical state to it’s default remote tracked branch (=).

We should probably make some local changes to this repository.

The prompt changes from (master=) to (master *=) to (master +=) and then (master>) as we create an unstaged change (*), stage it (+) and then bring the branch ahead of the default remote tracked branch (>).

Meanwhile, someone made some changes to the upstream repository.

The prompt changes from (master) to (master *) to (master +) and then (master) as we create an unstaged change (*) with echo, stage it (+) with git add and then end up with a clear staged and unstaged area following a git commit.

So, before we try and push, let’s quickly fetch their tree to see what’s going on.

After a git fetch to pull the latest state from the remote repository, the prompt ends (master <>). We’re on the master branch, but our branch has diverged from the default remote and won’t merge cleanly (<>).

Oh no, we’ve got a divergence. We need to fix this! Let’s pull the upstream master branch.

We do git pull and end up with the prompt ending (master *+|MERGING<>). We have unstaged (*) and staged (+) changes, and we’re in a “merging” state (MERGING) to try to resolve our diverged branches (<>).

Let’s fix the failed merge.

We resolve the merge conflict with nano, and confirm it has worked with cat, and then stage the merge resolution change using git add. The prompt ends (master +|MERGING<>). We have staged (+) changes, and we’re in a “merging” state (MERGING) to try to resolve our diverged branches (<>).

I think we’re ready to go with the merge.

We perform a git commit and the prompt ends as (master>). We have resolved our diverged master branches, have exited the “merging” state and are simply ahead of the default remote branch (>).

If the remote were a system like github, at this point we’d just do a git push. But… it’s not, so we’d need to do a git pull /tmp/git_local_fork in /tmp/git_test and then a git fetch in /tmp/git_local_fork… but that’s an implementation detail 😉

Featured image is “Status” by “Doug Letterman” on Flickr and is released under a CC-BY license.

"#security #lockpick" by "John Jones" on Flickr

Auto-starting an SSH Agent in Windows Subsystem for Linux

I tend to use Windows Subsystem for Linux (WSL) as a comprehensive SSH client, mostly for running things like Ansible scripts and Terraform. One of the issues I’ve had with it though is that, on a Linux GUI based system, I would start my SSH Agent on login, and then the first time I used an SSH key, I would unlock the key using the agent, and it would be cached for the duration of my logged in session.

While I was looking for something last night, I came across this solution on Stack Overflow (which in turn links to this blog post, which in turn links to this mailing list post) that suggests adding the following stanza to ~/.profile in WSL. I’m running the WSL version of Ubuntu 20.04, but the same principles apply on Cygwin, or, probably, any headless-server installation of a Linux distribution, if that’s your thing.

SSH_ENV="$HOME/.ssh/agent-environment"
function start_agent {
    echo "Initialising new SSH agent..."
    /usr/bin/ssh-agent | sed 's/^echo/#echo/' > "${SSH_ENV}"
    echo succeeded
    chmod 600 "${SSH_ENV}"
    . "${SSH_ENV}" > /dev/null
}
# Source SSH settings, if applicable
if [ -f "${SSH_ENV}" ]; then
    . "${SSH_ENV}" > /dev/null
    ps -ef | grep ${SSH_AGENT_PID} | grep ssh-agent$ > /dev/null || {
        start_agent;
    }
else
    start_agent;
fi

Now, this part is all well-and-good, but what about that part where you want to SSH using a key, and then that being unlocked for the duration of your SSH Agent being available?

To get around that, in the same solution page, there is a suggestion of adding this line to your .ssh/config: AddKeysToAgent yes. I’ve previously suggested using dynamically included SSH configuration files, so in this case, I’d look for your file which contains your “wildcard” stanza (if you have one), and add the line there. This is what mine looks like:

Host *
  AddKeysToAgent yes
  IdentityFile ~/.ssh/MyCurrentKey

How does this help you? Well, if you’re using jump hosts (using ProxyJump MyBastionHost, for example) you’ll only be prompted for your SSH Key once, or if you typically do a lot of SSH sessions, you’ll only need to unlock your session once.

BUT, and I can’t really stress this enough, don’t use this on a shared or suspected compromised system! If you’ve got a root account which can access the content of your Agent’s Socket and PID, then any protections that private key may have held for your system is compromised.

Featured image is “#security #lockpick” by “John Jones” on Flickr and is released under a CC-BY-ND license.

"inventory" by "Lee" on Flickr

Using a AWS Dynamic Inventory with Ansible 2.10

In Ansible 2.10, Ansible started bundling modules and plugins as “Collections”, basically meaning that Ansible didn’t need to make a release every time a vendor wanted to update the libraries it required, or API changes required new fields to be supplied to modules. As part of this split between “Collections” and “Core”, the AWS modules and plugins got moved into a collection.

Now, if you’re using Ansible 2.9 or earlier, this probably doesn’t impact you, but there are some nice features in Ansible 2.10 that I wanted to use, so… buckle up :)

Getting started with Ansible 2.10, using a virtual environment

If you currently are using Ansible 2.9, it’s probably worth creating a “python virtual environment”, or “virtualenv” to try out Ansible 2.10. I did this on my Ubuntu 20.04 machine by typing:

sudo apt install -y virtualenv
mkdir -p ~/bin
cd ~/bin
virtualenv -p python3 ansible_2.10

The above ensures that you have virtualenv installed, creates a directory called “bin” in your home directory, if it doesn’t already exist, and then places the virtual environment, using Python3, into a directory there called “ansible_2.10“.

Whenever we want to use this new environment you must activate it, using this command:

source ~/bin/ansible_2.10/bin/activate

Once you’ve executed this, any binary packages created in that virtual environment will be executed from there, in preference to the file system packages.

You can tell that you’ve “activated” this virtual environment, because your prompt changes from user@HOST:~$ to (ansible_2.10) user@HOST:~$ which helps 😀

Next, let’s create a requirements.txt file. This will let us install the environment in a repeatable manner (which is useful with Ansible). Here’s the content of this file.

ansible>=2.10
boto3
botocore

So, this isn’t just Ansible, it’s also the supporting libraries we’ll need to talk to AWS from Ansible.

We execute the following command:

pip install -r requirements.txt

Note, on Windows Subsystem for Linux version 1 (which I’m using) this will take a reasonable while, particularly if it’s crossing from the WSL environment into the Windows environment, depending on where you have specified the virtual environment to be placed.

If you get an error message about something to do with being unable to install ffi, then you’ll need to install the package libffi-dev with sudo apt install -y libffi-dev and then re-run the pip install command above.

Once the installation has completed, you can run ansible --version to see something like the following:

ansible 2.10.2
  config file = None
  configured module search path = ['/home/user/.ansible/plugins/modules', '/usr/share/ansible/plugins/modules']
  ansible python module location = /home/user/ansible_2.10/lib/python3.8/site-packages/ansible
  executable location = /home/user/ansible_2.10/bin/ansible
  python version = 3.8.2 (default, Jul 16 2020, 14:00:26) [GCC 9.3.0]

Configuring Ansible for local collections

Ansible relies on certain paths in the filesystem to store things like collections, roles and modules, but I like to circumvent these things – particularly if I’m developing something, or moving from one release to the next. Fortunately, Ansible makes this very easy, using a single file, ansible.cfg to tell the code that’s running in this path where to find things.

A quick note on File permissions with ansible.cfg

Note that the POSIX file permissions for the directory you’re in really matter! It must be set to 775 (-rwxrwxr-x) as a maximum – if it’s “world writable” (the last number) it won’t use this file! Other options include 770, 755. If you accidentally set this as world writable, or are using a directory from the “Windows” side of WSL, then you’ll get an error message like this:

[WARNING]: Ansible is being run in a world writable directory (/home/user/ansible_2.10_aws), ignoring it as an ansible.cfg source. For more information see
https://docs.ansible.com/ansible/devel/reference_appendices/config.html#cfg-in-world-writable-dir

That link is this one: https://docs.ansible.com/ansible/devel/reference_appendices/config.html#cfg-in-world-writable-dir and has some useful advice.

Back to configuring Ansible

In ansible.cfg, I have the following configured:

[defaults]
collections_paths = ./collections:~/.ansible/collections:/usr/share/ansible/collections

This file didn’t previously exist in this directory, so I created that file.

This block asks Ansible to check the following paths in order:

  • collections in this path (e.g. /home/user/ansible_2.10_aws/collections)
  • collections in the .ansible directory under the user’s home directory (e.g. /home/user/.ansible/collections)
  • and finally /usr/share/ansible/collections for system-wide collections.

If you don’t configure Ansible with the ansible.cfg file, the default is to store the collections in ~/.ansible/collections, but you can “only have one version of the collection”, so this means that if you’re relying on things not to change when testing, or if you’re running multiple versions of Ansible on your system, then it’s safest to store the collections in the same file tree as you’re working in!

Installing Collections

Now we have Ansible 2.10 installed, and our Ansible configuration file set up, let’s get our collection ready to install. We do this with a requirements.yml file, like this:

---
collections:
- name: amazon.aws
  version: ">=1.2.1"

What does this tell us? Firstly, that we want to install the Amazon AWS collection from Ansible Galaxy. Secondly that we want at least the most current version (which is currently version 1.2.1). If you leave the version line out, it’ll get “the latest” version. If you replace ">=1.2.1" with 1.2.1 it’ll install exactly that version from Galaxy.

If you want any other collections, you add them as subsequent lines (more details here), like this:

collections:
- name: amazon.aws
  version: ">=1.2.1"
- name: some.other
- name: git+https://example.com/someorg/somerepo.git
  version: 1.0.0
- name: git@example.com:someorg/someotherrepo.git

Once we’ve got this file, we run this command to install the content of the requirements.yml: ansible-galaxy collection install -r requirements.yml

In our case, this installs just the amazon.aws collection, which is what we want. Fab!

Getting our dynamic inventory

Right, so we’ve got all the pieces now that we need! Let’s tell Ansible that we want it to ask AWS for an inventory. There are three sections to this.

Configuring Ansible, again!

We need to open up our ansible.cfg file. Because we’re using the collection to get our Dynamic Inventory plugin, we need to tell Ansible to use that plugin. Edit ./ansible.cfg in your favourite editor, and add this block to the end:

[inventory]
enable_plugins = aws_ec2

If you previously created the ansible.cfg file when you were setting up to get the collection installed alongside, then your ansible.cfg file will look (something) like this:

[defaults]
collections_paths     = ./collections:~/.ansible/collections:/usr/share/ansible/collections

[inventory]
enable_plugins = amazon.aws.aws_ec2

Configure AWS

Your machine needs to have access tokens to interact with the AWS API. These are stored in ~/.aws/credentials (e.g. /home/user/.aws/credentials) and look a bit like this:

[default]
aws_access_key_id = A1B2C3D4E5F6G7H8I9J0
aws_secret_access_key = A1B2C3D4E5F6G7H8I9J0a1b2c3d4e5f6g7h8i9j0

Set up your inventory

In a bit of a change to how Ansible usually does the inventory, to have a plugin based dynamic inventory, you can’t specify a file any more, you have to specify a directory. So, create the file ./inventory/aws_ec2.yaml (having created the directory inventory first). The file contains the following:

---
plugin: amazon.aws.aws_ec2

Late edit 2020-12-01: Further to the comment by Giovanni, I’ve amended this file snippet from plugin: aws_ec2 to plugin: amazon.aws.aws_ec2.

By default, this just retrieves the hostnames of any running EC2 instance, as you can see by running ansible-inventory -i inventory --graph

@all:
  |--@aws_ec2:
  |  |--ec2-176-34-76-187.eu-west-1.compute.amazonaws.com
  |  |--ec2-54-170-131-24.eu-west-1.compute.amazonaws.com
  |  |--ec2-54-216-87-131.eu-west-1.compute.amazonaws.com
  |--@ungrouped:

I need a bit more detail than this – I like to use the tags I assign to AWS assets to decide what I’m going to target the machines with. I also know exactly which regions I’ve got my assets in, and what I want to use to get the names of the devices, so this is what I’ve put in my aws_ec2.yaml file:

---
plugin: amazon.aws.aws_ec2
keyed_groups:
- key: tags
  prefix: tag
- key: 'security_groups|json_query("[].group_name")'
  prefix: security_group
- key: placement.region
  prefix: aws_region
- key: tags.Role
  prefix: role
regions:
- eu-west-1
hostnames:
- tag:Name
- dns-name
- public-ip-address
- private-ip-address

Late edit 2020-12-01: Again, I’ve amended this file snippet from plugin: aws_ec2 to plugin: amazon.aws.aws_ec2.

Now, when I run ansible-inventory -i inventory --graph, I get this output:

@all:
  |--@aws_ec2:
  |  |--euwest1-firewall
  |  |--euwest1-demo
  |  |--euwest1-manager
  |--@aws_region_eu_west_1:
  |  |--euwest1-firewall
  |  |--euwest1-demo
  |  |--euwest1-manager
  |--@role_Firewall:
  |  |--euwest1-firewall
  |--@role_Firewall_Manager:
  |  |--euwest1-manager
  |--@role_VM:
  |  |--euwest1-demo
  |--@security_group_euwest1_allow_all:
  |  |--euwest1-firewall
  |  |--euwest1-demo
  |  |--euwest1-manager
  |--@tag_Name_euwest1_firewall:
  |  |--euwest1-firewall
  |--@tag_Name_euwest1_demo:
  |  |--euwest1-demo
  |--@tag_Name_euwest1_manager:
  |  |--euwest1-manager
  |--@tag_Role_Firewall:
  |  |--euwest1-firewall
  |--@tag_Role_Firewall_Manager:
  |  |--euwest1-manager
  |--@tag_Role_VM:
  |  |--euwest1-demo
  |--@ungrouped:

To finish

Now you have your dynamic inventory, you can target your playbook at any of the groups listed above (like role_Firewall, aws_ec2, aws_region_eu_west_1 or some other tag) like you would any other inventory assignment, like this:

---
- hosts: role_Firewall
  gather_facts: false
  tasks:
  - name: Show the name of this device
    debug:
      msg: "{{ inventory_hostname }}"

And there you have it. Hope this is useful!

Late edit: 2020-11-23: Following a conversation with Andy from Work, we’ve noticed that if you’re trying to do SSM connections, rather than username/password based ones, you might want to put this in your aws_ec2.yml file:

---
plugin: amazon.aws.aws_ec2
hostnames:
  - tag:Name
compose:
  ansible_host: instance_id
  ansible_connection: 'community.aws.aws_ssm'

Late edit 2020-12-01: One final instance, I’ve changed plugin: aws_ec2 to plugin: amazon.aws.aws_ec2.

This will keep your hostnames “pretty” (with whatever you’ve tagged it as), but will let you connect over SSM to the Instance ID. Good fun :)

Featured image is “inventory” by “Lee” on Flickr and is released under a CC-BY-SA license.

"Salmon leaping" by "openpad" on Flickr

Using public #git sources in private projects

The last post I made was about using submodules to work with code that is being developed, either in isolation from other aspects of a project, or so components can be reused without requiring lots of copy-and-paste activities. It was inspired by a question from a colleague. After asking a few more questions, it turns out that may be what that colleague needed was to consume code from other repositories and store them in their own project.

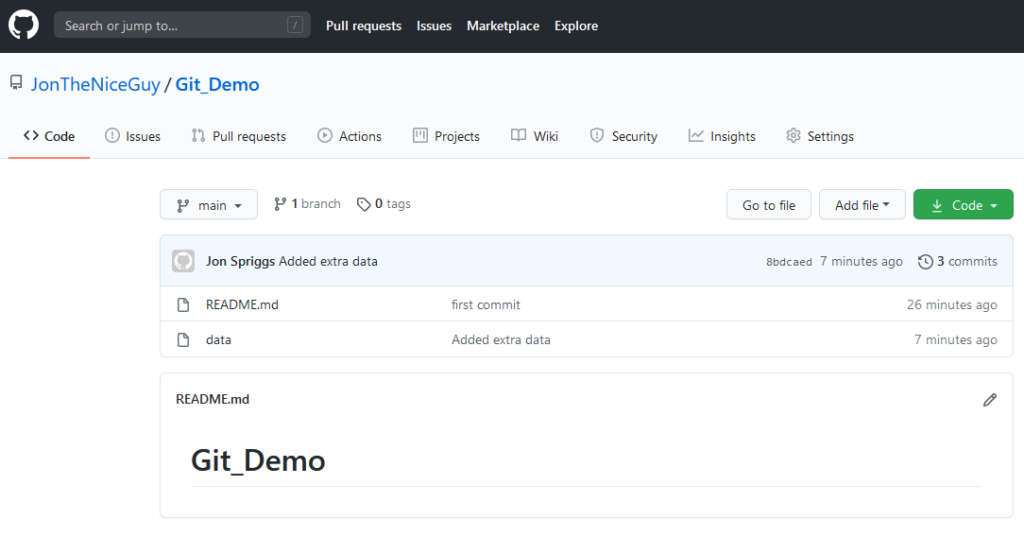
In this case, I’ve created two repositories, both on GitHub (which will both be removed by the time this post is published) called JonTheNiceGuy/Git_Demo (the “upstream”, open source project) and JonTheNiceGuy-Inc/Git_Demo (the private project, referred to as “mine”).

Getting the “Open Source” project started

Here we have a simple repository, showing the README file for the project (which is likely, in the real world, to show what license that code has been released under, some explaination on what it’s for, etc.) and the actual data source. In this demo, the data source is a series of numbers, showing the decimal number in the first column, the binary representation of that number in the second column, and the hexedecimal representation in the third column.

Our “upstream” repository, showing the README.md file and the data source we want to use.
The data source itself. Note, I forgot to take a screen shot of this file, so I’ve had to “go back to a previous commit” to collect this particular image.

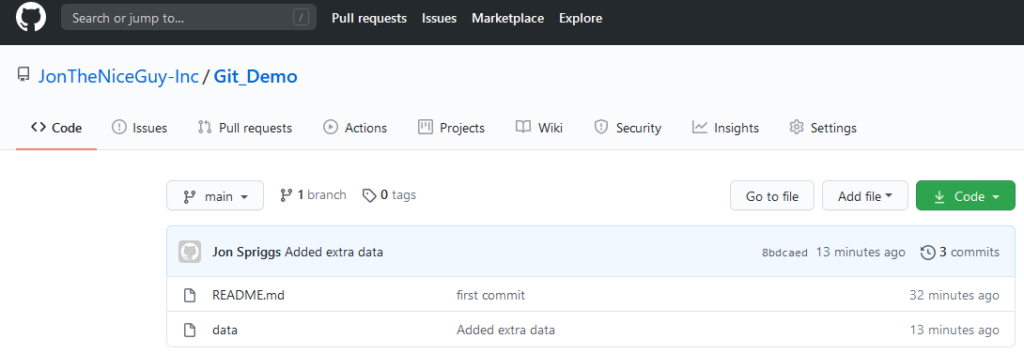
Elsewhere in the world, a private project has started! It’s going to use this data source as some element of this project, and to ensure that the code they’re relying on doesn’t go away, they create their own repository which this code will go into.

Preparing the private project

If both repositories are using GitHub, or if both repositories are using GitLab, then you should be able to “just” Fork the repository, using the “Fork” button in the top right corner:

The “Fork” button

And then select the organisation or account to place the forked repo into.

A list of potential targets to fork the repository into. Your view may differ if you are part of less organisations.

Gitlab has a similar workflow – they have a similar “fork” button, but the list of potential targets is different (but still works the same way).

Gitlab’s list of potential targets to fork the repository into.

Note that you can’t “easily” fork between different Version Control Services! To do something similar, you need to create a new repository in the target service, and then, run some commands to move the code over.

The screen you see immediately after you’ve created a new project – here I’ve created it in the “JonTheNiceGuy-Inc” Organisation. You can see the “quick setup” panel which has the URL to use for the repository.
Here we see the results of running five commands, which are: git clone <url> ; cd <target-dir> ; git remote rename origin upstream ; git remote add mine <url> ; git push –set-upstream mine main

If you’re using the command line method, here’s the commands you issue:

  • git clone http://service/user/repo – This command clones the repository from your service of choice to your local file system. It usually places it into the name of the repository you specified. In this case, “repo”, but in the above context (cloning from Git_Demo.git) it goes into “Git_Demo”. Note, HTTP(S) isn’t the only git transport, another common one is SSH, so if you prefer using SSH instead of HTTP, the URL in this case will be something like git@service:user/repo or service:user/repo. If you’re using submodules, however, I’d strongly recommend using HTTP(S) over SSH for at least the initial pull, as this is much easier for clients to navigate.
  • cd repo – Move into the directory where the cloned repository has been placed.
  • OPTIONAL: git remote rename origin upstream – Rename the remote source of the repository. By default, when you git clone or use git submodule add, the name of the remote resource is called “origin”. I prefer to give a descriptive name for my remote sources, so using “upstream” makes more sense to me. In later commands, I’ll use the remote name “upstream” again. If you don’t want to run this command, and leave the remote name as “origin”, you’ll just have to remember to change it back to “origin”.
  • git remote add mine http://new-service/user/repo – this adds a new remote source, to which you can push new commits, or pull code from your peers. Again, like in the git clone command above, you may use another URL format instead of HTTP(S). You may want to use a different name for the new remote, but again, I tend to prefer “mine” for anything I’m personally working on.
  • git push --set-upstream mine main – This sends the entire commit tree for the branch you’re currently on to your remote source.
Once we’ve run the git push, you can now see that the code has all been pushed to your private project.
Issuing a git log command, shows the current tip on the branch “main” in the “upstream” repository is equal to the current tip on the branch “main” in the “mine” repository, as well as the tip of the “main” repository locally.

Making your local changes

So, while you could just keep using just the upstream project’s code (and doing the above groundwork is good practice to keep you from putting yourself into the situation that the NPM world got into with “left-pad”). What’s more likely is that you want to make your own, local changes to this repository. I’ve done this in the past where I wanted to demonstrate a software build using a public machine image, but internally at work we used our own images. Using this method, I can consume the code I’ve created in public, and just update the assets we use at work.

In this example, let’s update that data file. I’ve added two new lines, “115” (and it’s binary/hex representations) and “132”. I can use the git diff command to confirm the changes I want to make – it’s all good!

Next, I stage the changes with git add, use git commit to write it to the branch, and git push to push it up to my repository. This is all fairly standard stuff in the Git world.

Here we make a change to the data source, confirm there is a difference, add and commit it, and then push it to our default branch (mine/main).

When I then check the git log, we see that there’s a divergence, between my local main branch and the upstream main branch. You could also use git log -p to see the exact code changes, if you wanted… but we know what’s changed already.

The git log, showing that we have a “local” change from the “upstream” source, and that we’ve pushed that local change to the “mine” source.

Bringing data from the upstream source

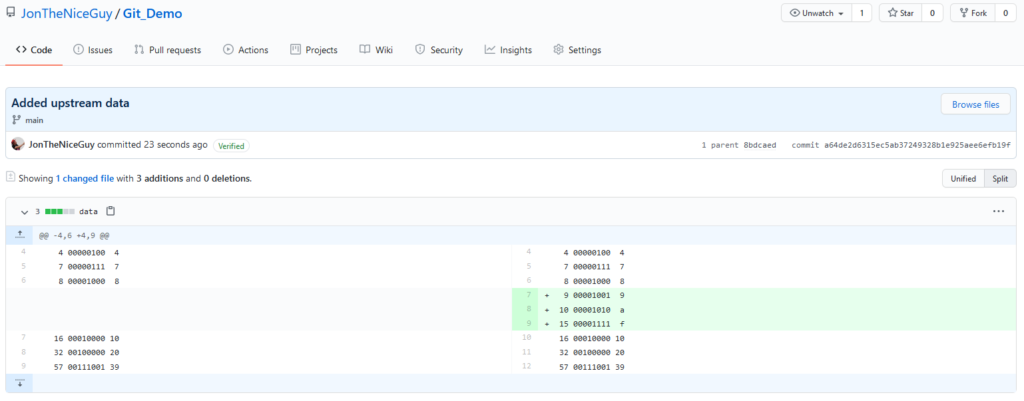
Oh joy! The upstream project (“JonTheNiceGuy” not “JonTheNiceGuy-Inc”) have updated their Git_Demo repository – they’ve had the audacity to add three new numbers – 9, 10 and 15 – to the data source.

The patch that was applied to this branch. We can check the difference here before we try to do anything with it! It’s something we want!

Well, actually we want to use that data, so let’s start bringing it in. We use the git pull command.

The git pull command, with the remote source (“upstream”) and the branch (“main”) to use.

Because this makes a change to a file that you’ve amended as part of your work, it can’t perform a “Fast forward” of these changes, so Git has to perform a merge commit. This means there’s a new commit in the log, so it’s clear that we’ve updated files because of this merge.

If there were a conflict in this file (which, fortunately, there isn’t!) you’d also be prompted to fix the merge conflicts too. This is a bit bigger than what I’m trying to explain, so instead, I’ll link to a tutorial by Atlassian on merge conflicts. You may also want to take a quick look at the rebasing page on the Git Project’s documentation site, and see whether this might have made your life easier in the case of a conflict!

Anyway, let’s use the default merge message.

The default message when performing a git pull where the change can’t be fast-forwarded.

Once the merge message is done, the merge completes. Yey!

We successfully merged our change, and it’s now part of our local tree

And to prove it, we can now see that we have all the changes from the upstream (commits starting 3b75eb, 8ad9ae, 8bdcae and the new one at a64de2) and our local changes (starting 02e40e).

Because we performed a merge, not a fast forward, our local branch is at a different commit than either of our remote sources – the commit starting 6f4db6 is on our local version, “upstream” is at a64de2 and “mine” is at 02e40e. So we need to fix at least our “mine/main” branch. We do this with a git push.

We do our git push here to get the code into our “mine/main” branch.

And now we can see the git log on our service.

The list of commits on Github for our “mine/main” branch.

And locally, we can see that the remote state has changed too. Let’s look at that git log again.

The result of the git log command on our local machine, showing the new position of the pointers for “upstream/main”, “mine/main” and the local “main” branches.

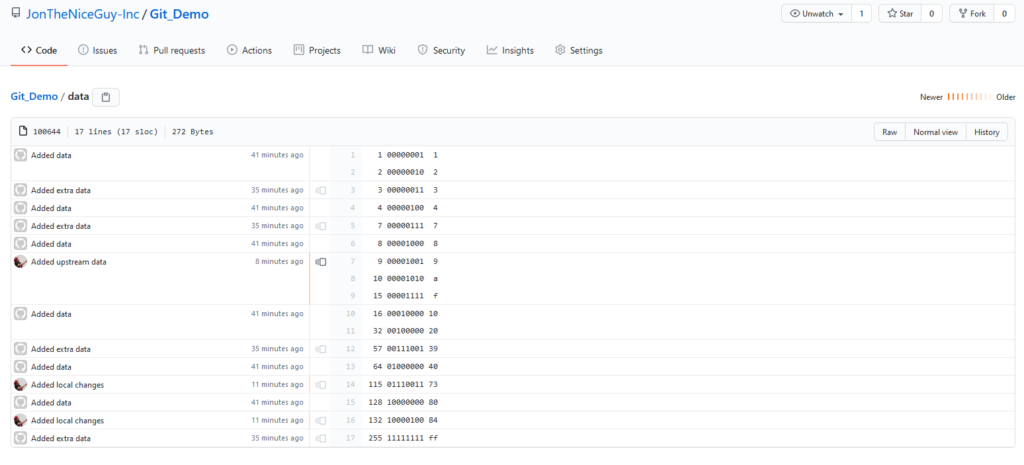
We can also look at the git blame on the service.

The git blame screen on GitHub, showing who made the various commits.

Or on our local machine.

git blame run locally, showing the commit reference, the author, the date and time of the commit, and the line number, followed by the line in question.

Featured image is “Salmon leaping” by “openpad” on Flickr and is released under a CC-BY license.

"Submarine" by "NH53" on Flickr

Recursive Git Submodules

One of my colleagues asked today about using recursive git submodules. First, let’s quickly drill into what a Submodule is.

Git Submodules

A submodule is a separate git repository, attached to the git repository you’re working on via two “touch points” – a file in the root directory called .gitmodules, and, when checked out, the HEAD file in the .git directory.

When you clone a repository with a submodule attached, it creates the directory the submodule will be cloned into, but leave it empty, unless you either do git submodule update --init --recursive or, when you clone the repository initially, you can ask it to pull any recursive submodules, like this git clone https://your.vcs.example.org/someorg/somerepo.git --recursive.

Git stores the commit reference of the submodule (via a file in .git/modules/$SUBMODULE_NAME/HEAD which contains the commit reference). If you change a file in that submodule, it marks the path of the submodule as “dirty” (because you have an uncommitted change), and if you either commit that change, or pull an updated commit from the source repository, then it will mark the path of the submodule as having changed.

In other words, you can track two separate but linked parts of your code in the same tree, working on each in turn, and without impacting each other code base.

I’ve used this, mostly with Ansible playbooks, where I’ve consumed someone else’s role, like this:

My_Project
|
+- Roles
|  |
|  +- <SUBMODULE> someorg.some_role
|  +- <SUBMODULE> anotherorg.another_role
+- inventory
+- playbook.yml
+- .git
|  |
|  +- HEAD
|  +- modules
|  +- etc
+- .gitmodules

In .gitmodules the file looks like this:

[submodule "module1"]
 path = module1
 url = https://your.vcs.example.org/someorg/module1.git

Once you’ve checked out this submodule, you can do any normal operations in this submodule, like pulls, pushes, commits, tags, etc.

So, what happens when you want to nest this stuff?

Nesting Submodule Recursion

So, my colleague wanted to have files in three layers of directories. In this instance, I’ve simulated this by creating three directories, root, module1 and module2. Typically these would be pulled from their respective Git Service paths, like GitHub or GitLab, but here I’m just using everything on my local file system. Where, in the following screen shot, you see /tmp/ you could easily replace that with https://your.vcs.example.org/someorg/.

The output of running mkdir {root,module1,module2} ; cd root ; git init ; cd ../module1 ; git init ; cd ../module2 ; git init ; touch README.md ; git add README.md ; git commit -m 'Added README.md' ; cd ../module1 ; git submodule add /tmp/module2 module2 ; git commit -m 'Added module2' ; cd ../root ; git submodule add /tmp/module1 module1 ; git submodule update --init --recursive ; tree showing the resulting tree of submodules under the root directory.
The output of running mkdir {root,module1,module2} ; cd root ; git init ; cd ../module1 ; git init ; cd ../module2 ; git init ; touch README.md ; git add README.md ; git commit -m ‘Added README.md’ ; cd ../module1 ; git submodule add /tmp/module2 module2 ; git commit -m ‘Added module2’ ; cd ../root ; git submodule add /tmp/module1 module1 ; git submodule update –init –recursive ; tree showing the resulting tree of submodules under the root directory.

So, here, we’ve created these three paths (basically to initiate the repositories), added a basic commit to the furthest submodule (module2), then done a submodule add into the next furthest submodule (module1) and finally added that into the root tree.

Note, however, when you perform the submodule add it doesn’t automatically clone any submodules, and if you were to, from another machine, perform git clone https://your.vcs.example.org/someorg/root.git you wouldn’t get any of the submodules (neither module1 nor module2) without adding either --recursive to the clone command (like this: git clone --recursive https://your.vcs.example.org/someorg/root.git), or by running the follow-up command git submodule update --init --recursive.

Oh, and if any of these submodules are updated? You need to go in and pull those updates, and then commit that change, like this!

The workflow of pulling updates for each of the submodules, with git add, git commit, and git pull, also noting that when a module has been changed, it shows as having “new commits”.
And here we have the finish of the workflow, updating the other submodules. Note that some of these steps (probably the ones in the earlier image) are likely to have been performed by some other developer on another system, so having all the updates on one machine is pretty rare!

The only thing which isn’t in these submodules is if you’ve done a git clone of the root repo (using the terms from the above screen images), the submodules won’t be using the “master” branch (or a particular “tag” or “branch hame”, for that matter), but will instead be using the commit reference. If you wanted to switch to a specific branch or tag, then you’d need to issue the command git checkout some_remote/some_branch or git checkout master instead of (in the above screen captures) git pull.

If you have any questions or issues with this post, please either add a comment, or contact me via one of the methods at the top or side of this page!

Featured image is “Submarine” by “NH53” on Flickr and is released under a CC-BY license.