"Observatories Combine to Crack Open the Crab Nebula" by "NASA Goddard Space Flight Center" on Flickr

Nebula Offline Certificate Management with a Raspberry Pi using Bash

I have been playing again, recently, with Nebula, an Open Source Peer-to-Peer VPN product which boasts speed, simplicity and in-built firewalling. Although I only have a few nodes to play with (my VPS, my NAS, my home server and my laptop), I still wanted to simplify, for me, the process of onboarding devices. So, naturally, I spent a few evenings writing a bash script that helps me to automate the creation of my Nebula nodes.

Nebula Certificates

Nebula have implemented their own certificate structure. It’s similar to an x509 “TLS Certificate” (like you’d use to access an HTTPS website, or to establish an OpenVPN connection), but has a few custom fields.

The result of typing “
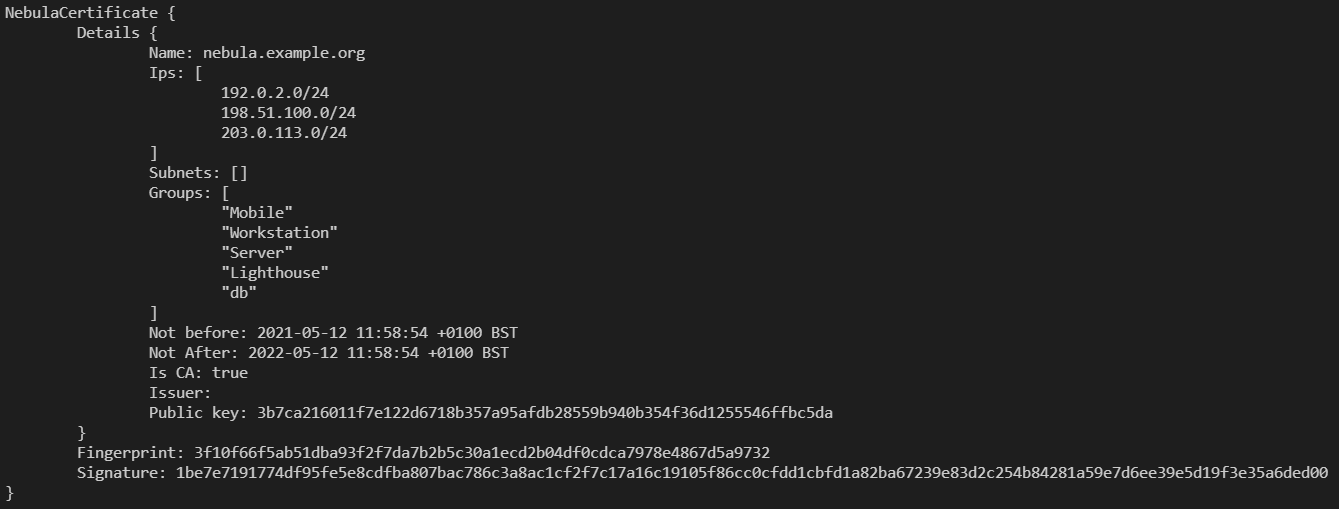
nebula-cert print -path ca.crt” to print the custom fields

In this context, I’ve created a nebula Certificate Authority (CA), using this command:

nebula-cert ca -name nebula.example.org -ips 192.0.2.0/24,198.51.100.0/24,203.0.113.0/24 -groups Mobile,Workstation,Server,Lighthouse,db

So, what does this do?

Well, it creates the certificate and private key files, storing the name for the CA as “nebula.example.org” (there’s a reason for this!) and limiting the subnets and groups (like AWS or Azure Tags) the CA can issue certificates with.

Here, I’ve limited the CA to only issue IP addresses in the RFC5737 “Documentation” ranges, which are 192.0.2.0/24, 198.51.100.0/24 and 203.0.113.0/24, but this can easily be expanded to 10.0.0.0/8 or lots of individual subnets (I tested, and proved 1026 separate subnets which worked fine).

Groups, in Nebula parlance, are building blocks of the Security product, and can act like source or destination filters. In this case, I limited the CA to only being allowed to issue certificates with the groups of “Mobile”, “Workstation”, “Server”, “Lighthouse” and “db”.

As this certificate authority requires no internet access, and only enough access to read and write files, I have created my Nebula CA server on a separate Micro SD card to use with a Raspberry Pi device, and this is used only to generate a new CA certificate each 6 months (in theory, I’ve not done this part yet!), and to sign keys for all the client devices as they come on board.

I copy the ca.crt file to my target machines, and then move on to creating my client certificates

Client Certificates

When you generate key materials for Public Key Cryptographic activities (like this one), you’re supposed to generate the private key on the source device, and the private key should never leave the device on which it’s generated. Nebula allows you to do this, using the nebula-cert command again. That command looks like this:

nebula-cert keygen -out-key host.key -out-pub host.pub

If you notice, there’s a key difference at this point between Nebula’s key signing routine, and an x509 TLS style certificate, you see, this stage would be called a “Certificate Signing Request” or CSR in TLS parlance, and it usually would specify the record details for the certificate (normally things like “region”, “organisational unit”, “subject name” and so on) before sending it to the CA for signing (marking it as trusted).

In the Nebula world, you create a key, and send the public part of that (in this case, “host.pub” but it can have any name you like) to the CA, at which point the CA defines what IP addresses it will have, what groups it is in, and so on, so let’s do that.

nebula-cert sign -ca-crt ca.crt -ca-key ca.key -in-pub host.pub -out-crt host.crt -groups Workstation -ip 192.0.2.5/24 -name host.nebula.example.org

Let’s pick apart these options, shall we? The first four flags “-ca-crt“, “-ca-key“, “-in-pub” and “-out-crt” all refer to the CSR process – it’s reading the CA certificate and key, as well as the public part of the keypair created for the process, and then defines what the output certificate will be called. The next switch, -groups, identifies the tags we’re assigning to this node, then (the mandatory flag) -ip sets the IP address allocated to the node. Note that the certificate is using one of the valid group names, and has been allocated a valid IP address address in the ranges defined above. If you provide a value for the certificate which isn’t valid, you’ll get a warning message.

nebula-cert issues a warning when signing a certificate that tries to specify a value outside the constraints of the CA

In the above screenshot, I’ve bypassed the key generation and asked for the CA to sign with values which don’t match the constraints.

The last part is the name of the certificate. This is relevant because Nebula has a DNS service which can resolve the Nebula IPs to the hostnames assigned on the Certificates.

Anyway… Now that we know how to generate certificates the “hard” way, let’s make life a bit easier for you. I wrote a little script – Nebula Cert Maker, also known as certmaker.sh.

certmaker.sh

So, what does certmaker.sh do that is special?

  1. It auto-assigns an IP address, based on the MD5SUM of the FQDN of the node. It uses (by default) the first CIDR mask (the IP range, written as something like 192.0.2.0/24) specified in the CA certificate. If multiple CIDR masks are specified in the certificate, there’s a flag you can use to select which one to use. You can override this to get a specific increment from the network address.
  2. It takes the provided name (perhaps webserver) and adds, as a suffix, the name of the CA Certificate (like nebula.example.org) to the short name, to make the FQDN. This means that you don’t need to run a DNS service for support staff to access machines (perhaps you’ll have webserver1.nebula.example.org and webserver2.nebula.example.org as well as database.nebula.example.org).
  3. Three “standard” roles have been defined for groups, these are “Server”, “Workstation” and “Lighthouse” [1] (the latter because you can configure Lighthouses to be the DNS servers mentioned in step 2.) Additional groups can also be specified on the command line.

[1] A lighthouse, in Nebula terms, is a publically accessible node, either with a static IP, or a DNS name which resolves to a known host, that can help other nodes find each other. Because all the nodes connect to it (or a couple of “it”s) this is a prime place to run the DNS server, as, well, it knows where all the nodes are!

So, given these three benefits, let’s see these in a script. This script is (at least currently) at the end of the README file in that repo.

# Create the CA
mkdir -p /tmp/nebula_ca
nebula-cert ca -out-crt /tmp/nebula_ca/ca.crt -out-key /tmp/nebula_ca/ca.key -ips 192.0.2.0/24,198.51.100.0/24 -name nebula.example.org

# First lighthouse, lighthouse1.nebula.example.org - 192.0.2.1, group "Lighthouse"
./certmaker.sh --cert_path /tmp/nebula_ca --name lighthouse1 --ip 1 --lighthouse

# Second lighthouse, lighthouse2.nebula.example.org - 192.0.2.2, group "Lighthouse"
./certmaker.sh -c /tmp/nebula_ca -n lighthouse2 -i 2 -l

# First webserver, webserver1.nebula.example.org - 192.0.2.168, groups "Server" and "web"
./certmaker.sh --cert_path /tmp/nebula_ca --name webserver1 --server --group web

# Second webserver, webserver2.nebula.example.org - 192.0.2.191, groups "Server" and "web"
./certmaker.sh -c /tmp/nebula_ca -n webserver2 -s -g web

# Database Server, db.nebula.example.org - 192.0.2.182, groups "Server" and "db"
./certmaker.sh --cert_path /tmp/nebula_ca --name db --server --group db

# First workstation, admin1.nebula.example.org - 198.51.100.205, group "Workstation"
./certmaker.sh --cert_path /tmp/nebula_ca --index 1 --name admin1 --workstation

# Second workstation, admin2.nebula.example.org - 198.51.100.77, group "Workstation"
./certmaker.sh -c /tmp/nebula_ca -d 1 -n admin2 -w

# First Mobile device - Create the private/public key pairing first
nebula-cert keygen -out-key mobile1.key -out-pub mobile1.pub
# Then sign it, mobile1.nebula.example.org - 198.51.100.217, group "mobile"
./certmaker.sh --cert_path /tmp/nebula_ca --index 1 --name mobile1 --group mobile --public mobile1.pub

# Second Mobile device - Create the private/public key pairing first
nebula-cert keygen -out-key mobile2.key -out-pub mobile2.pub
# Then sign it, mobile2.nebula.example.org - 198.51.100.22, group "mobile"
./certmaker.sh -c /tmp/nebula_ca -d 1 -n mobile2 -g mobile -p mobile2.pub

Technically, the mobile devices are simulating the local creation of the private key, and the sharing of the public part of that key. It also simulates what might happen in a more controlled environment – not where everything is run locally.

So, let’s pick out some spots where this content might be confusing. I’ve run each type of invocation twice, once with the short version of all the flags (e.g. -c instead of --cert_path, -n instead of --name) and so on, and one with the longer versions. Before each ./certmaker.sh command, I’ve added a comment, showing what the hostname would be, the IP address, and the Nebula Groups assigned to that node.

It is also possible to override the FQDN with your own FQDN, but this command option isn’t in here. Also, if the CA doesn’t provide a CIDR mask, one will be selected for you (10.44.88.0/24), or you can provide one with the -b/--subnet flag.

If the CA has multiple names (e.g. nebula.example.org and nebula.example.com), then the name for the host certificates will be host.nebula.example.org and also host.nebula.example.com.

Using Bash

So, if you’ve looked at, well, almost anything on my site, you’ll see that I like to use tools like Ansible and Terraform to deploy things, but for something which is going to be run on this machine, I’d like to keep things as simple as possible… and there’s not much in this script that needed more than what Bash offers us.

For those who don’t know, bash is the default shell for most modern Linux distributions and Docker containers. It can perform regular expression parsing (checking that strings, or specific collections of characters appear in a variable), mathematics, and perform extensive loop and checks on values.

I used a bash template found on a post at BetterDev.blog to give me a basic structure – usage, logging and parameter parsing. I needed two functions to parse and check whether IP addresses were valid, and what ranges of those IP addresses might be available. These were both found online. To get just enough of the MD5SUM to generate a random IPv4 address, I used a function to convert the hexedecimal number that the MDSUM produces, and then turned that into a decimal number, which I loop around the address space in the subnets. Lastly, I made extensive use of Bash Arrays in this. This was largely thanks to an article on OpenSource.com about bash arrays. It’s well worth a read!

So, take a look at the internals of the script, if you want to know some options on writing bash scripts that manipulate IP addresses and read the output of files!

If you’re looking for some simple tasks to start your portfolio of work, there are some “good first issue” tasks in the “issues” of the repo, and I’d be glad to help you work through them.

Wrap up

I hope you enjoy using this script, and I hope, if you’re planning on writing some bash scripts any time soon, that you take a look over the code and consider using some of the templates I reference.

Featured image is β€œObservatories Combine to Crack Open the Crab Nebula” by β€œNASA Goddard Space Flight Center” on Flickr and is released under a CC-BY license.

"Family" by "Ivan" on Flickr

Debian on Docker using Vagrant

I want to use Vagrant-Docker to try standing up some environments. There’s no reasonable justification, it’s just a thing I wanted to do. Normally, I’d go into this long and rambling story about why… but on this occasion, the reason was “Because it’s possible”…

TL;DR?: Get the code from the repo and enjoy 😁

Installing Docker

On Ubuntu you can install Docker following the instructions on the Docker Install Page, which includes a convenience script (that runs all the commands you need), if you want to use it. Similar instructions for Debian, CentOS and Fedora exist.

On Windows or Mac there are downloads you can get from the Docker Hub. The Windows Version requires WSL2. I don’t have a Mac, so I don’t know what the requirements are there! Installing WSL2 has a whole host of extra steps that I can’t really do justice to. See this Microsoft article for details.

Installing Vagrant

On Debian and Ubuntu you can add the HashiCorp Apt Repo and then install Vagrant, using these commands:

curl -fsSL https://apt.releases.hashicorp.com/gpg | sudo apt-key add -
sudo apt-add-repository "deb [arch=amd64] https://apt.releases.hashicorp.com $(lsb_release -cs) main"
sudo apt install vagrant

There are similar instructions for RHEL, CentOS and Fedora users there too.

Windows and Mac users will have to get the application from the download page.

Creating your Dockerfile

A Dockerfile is a simple text file which has a series of line prefixes which instruct the Docker image processor to add certain instructions to the Docker Image. I found two pages which helped me with what to add for this; “Ansible. Docker. Vagrant. Bringing together” and the git repo “AkihiroSuda/containerized-systemd“.

You see, while a Dockerfile is great at starting single binary files or scripts, it’s not very good at running SystemD… and I needed SystemD to be able to run the SSH service that Vagrant requires, and to also run the scripts and commands I needed for the image I wanted to build…

Sooooo…. here’s the Dockerfile I created:

# Based on https://vtorosyan.github.io/ansible-docker-vagrant/
# and https://github.com/AkihiroSuda/containerized-systemd/

FROM debian:buster AS debian_with_systemd

# This stuff enables SystemD on Debian based systems
STOPSIGNAL SIGRTMIN+3
RUN DEBIAN_FRONTEND=noninteractive apt update && DEBIAN_FRONTEND=noninteractive apt install -y --no-install-recommends systemd systemd-sysv dbus dbus-user-session
COPY docker-entrypoint.sh /
RUN chmod 755 /docker-entrypoint.sh
ENTRYPOINT [ "/docker-entrypoint.sh" ]
CMD [ "/bin/bash" ]

# This part installs an SSH Server (required for Vagrant)
RUN DEBIAN_FRONTEND=noninteractive apt install -y sudo openssh-server
RUN mkdir /var/run/sshd
#    We enable SSH here, but don't start it with "now" as the build stage doesn't run anything long-lived.
RUN systemctl enable ssh
EXPOSE 22

# This part creates the vagrant user, sets the password to "vagrant", adds the insecure key and sets up password-less sudo.
RUN useradd -G sudo -m -U -s /bin/bash vagrant
#    chpasswd takes a colon delimited list of username/password pairs.
RUN echo 'vagrant:vagrant' | chpasswd
RUN mkdir -m 700 /home/vagrant/.ssh
# This key from https://github.com/hashicorp/vagrant/tree/main/keys. It will be replaced on first run.
RUN echo 'ssh-rsa AAAAB3NzaC1yc2EAAAABIwAAAQEA6NF8iallvQVp22WDkTkyrtvp9eWW6A8YVr+kz4TjGYe7gHzIw+niNltGEFHzD8+v1I2YJ6oXevct1YeS0o9HZyN1Q9qgCgzUFtdOKLv6IedplqoPkcmF0aYet2PkEDo3MlTBckFXPITAMzF8dJSIFo9D8HfdOV0IAdx4O7PtixWKn5y2hMNG0zQPyUecp4pzC6kivAIhyfHilFR61RGL+GPXQ2MWZWFYbAGjyiYJnAmCP3NOTd0jMZEnDkbUvxhMmBYSdETk1rRgm+R4LOzFUGaHqHDLKLX+FIPKcF96hrucXzcWyLbIbEgE98OHlnVYCzRdK8jlqm8tehUc9c9WhQ== vagrant insecure public key' > /home/vagrant/.ssh/authorized_keys
RUN chmod 600 /home/vagrant/.ssh/authorized_keys
RUN chown -R vagrant:vagrant /home/vagrant
RUN echo 'vagrant ALL=(ALL:ALL) NOPASSWD:ALL' >> /etc/sudoers

This Dockerfile calls out to a separate script, called docker-entrypoint.sh, taken verbatim from AkihiroSuda’s repo, so here’s that file:

#!/bin/bash
set -ex
container=docker
export container

if [ $# -eq 0 ]; then
	echo >&2 'ERROR: No command specified. You probably want to run `journalctl -f`, or maybe `bash`?'
	exit 1
fi

if [ ! -t 0 ]; then
	echo >&2 'ERROR: TTY needs to be enabled (`docker run -t ...`).'
	exit 1
fi

env >/etc/docker-entrypoint-env

cat >/etc/systemd/system/docker-entrypoint.target <<EOF
[Unit]
Description=the target for docker-entrypoint.service
Requires=docker-entrypoint.service systemd-logind.service systemd-user-sessions.service
EOF
cat /etc/systemd/system/docker-entrypoint.target

quoted_args="$(printf " %q" "${@}")"
echo "${quoted_args}" >/etc/docker-entrypoint-cmd
cat /etc/docker-entrypoint-cmd

cat >/etc/systemd/system/docker-entrypoint.service <<EOF
[Unit]
Description=docker-entrypoint.service

[Service]
ExecStart=/bin/bash -exc "source /etc/docker-entrypoint-cmd"
# EXIT_STATUS is either an exit code integer or a signal name string, see systemd.exec(5)
ExecStopPost=/bin/bash -ec "if echo \${EXIT_STATUS} | grep [A-Z] > /dev/null; then echo >&2 \"got signal \${EXIT_STATUS}\"; systemctl exit \$(( 128 + \$( kill -l \${EXIT_STATUS} ) )); else systemctl exit \${EXIT_STATUS}; fi"
StandardInput=tty-force
StandardOutput=inherit
StandardError=inherit
WorkingDirectory=$(pwd)
EnvironmentFile=/etc/docker-entrypoint-env

[Install]
WantedBy=multi-user.target
EOF
cat /etc/systemd/system/docker-entrypoint.service

systemctl mask systemd-firstboot.service systemd-udevd.service
systemctl unmask systemd-logind
systemctl enable docker-entrypoint.service

systemd=
if [ -x /lib/systemd/systemd ]; then
	systemd=/lib/systemd/systemd
elif [ -x /usr/lib/systemd/systemd ]; then
	systemd=/usr/lib/systemd/systemd
elif [ -x /sbin/init ]; then
	systemd=/sbin/init
else
	echo >&2 'ERROR: systemd is not installed'
	exit 1
fi
systemd_args="--show-status=false --unit=multi-user.target"
echo "$0: starting $systemd $systemd_args"
exec $systemd $systemd_args

Now, if you were to run this straight in Docker, it will fail, because you must pass certain flags to Docker to get this to run. These flags are:

  • -t : pass a “TTY” to the shell
  • --tmpfs /tmp : Create a temporary filesystem in /tmp
  • --tmpfs /run : Create another temporary filesystem in /run
  • --tmpfs /run/lock : Apparently having a tmpfs in /run isn’t enough – you ALSO need one in /run/lock
  • -v /sys/fs/cgroup:/sys/fs/cgroup:ro : Mount the CGroup kernel configuration values into the container

(I found these flags via a RedHat blog post, and a Podman issue on Github.)

So, how would this look, if you were to try and run it?

docker exec -t --tmpfs /tmp --tmpfs /run --tmpfs /run/lock -v /sys/fs/cgroup:/sys/fs/cgroup:ro YourImage

Blimey, what a long set of text! Perhaps we could hide that behind something a bit more legible? Enter Vagrant.

Creating your Vagrantfile

Vagrant is an abstraction tool, designed to hide complicated virtualisation scripts into a simple command. In this case, we’re hiding a containerisation script into a simple command.

Like with the Dockerfile, I made extensive use of the two pages I mentioned before, as well as the two pages to get the flags to run this.

# Based on https://vtorosyan.github.io/ansible-docker-vagrant/
# and https://github.com/AkihiroSuda/containerized-systemd/
# and https://developers.redhat.com/blog/2016/09/13/running-systemd-in-a-non-privileged-container/
# with tweaks indicated by https://github.com/containers/podman/issues/3295
ENV['VAGRANT_DEFAULT_PROVIDER'] = 'docker'
Vagrant.configure("2") do |config|
  config.vm.provider "docker" do |d|
    d.build_dir       = "."
    d.has_ssh         = true
    d.remains_running = false
    d.create_args     = ['--tmpfs', '/tmp', '--tmpfs', '/run', '--tmpfs', '/run/lock', '-v', '/sys/fs/cgroup:/sys/fs/cgroup:ro', '-t']
  end
end

If you create that file, and run vagrant up you’ll get a working Vagrant boot… But if you try and execute any shell scripts, they’ll fail to run, as the they aren’t passed in with execute permissions… so I want to use Ansible to execute things, as these don’t require execute permissions on the /vagrant directory (also, as the thing I’m building in there requires Ansible… so it’s helpful either way 😁)

Executing Ansible scripts

Ansible still expects to find python in /usr/bin/python but current systems don’t make the symlink to /usr/bin/python3, as python was typically a symlink to /usr/bin/python2… and also I wanted to put the PPA for Ansible in the sources, which is what the Ansible team recommend in their documentation. I’ve done this as part of the Dockerfile, as again, I can’t run scripts from Vagrant. So, here’s the addition I made to the Dockerfile.

FROM debian_with_systemd AS debian_with_systemd_and_ansible
RUN apt install -y gnupg2 lsb-release software-properties-common
RUN apt-key adv --keyserver keyserver.ubuntu.com --recv-keys 93C4A3FD7BB9C367
RUN add-apt-repository "deb http://ppa.launchpad.net/ansible/ansible/ubuntu trusty main"
RUN apt install -y ansible
# Yes, I know. Trusty? On Debian Buster?? But, that's what the Ansible Docs say!

In the Vagrantfile, I’ve added this block:

config.vm.provision "ansible_local" do |ansible|
  ansible.playbook = "test.yml"
end

And I created a test.yml, which looks like this:

---
- hosts: all
  tasks:
  - debug:
      msg: "Hello from Docker"

Running it

So how does this look on Windows when I run it?

PS C:\Dev\VagrantDockerBuster> vagrant up
==> default: Creating and configuring docker networks...
==> default: Building the container from a Dockerfile...
<SNIP A LOAD OF DOCKER STUFF>
    default: #20 DONE 0.1s
    default:
    default: Image: 190ffdeaeed0b7ed206097e6c1d4b5cc796a428700c9bd3e27eedacce47fb63b
==> default: Creating the container...
    default:   Name: 2021-02-13DockerBusterWithSSH_default_1613469604
    default:  Image: 190ffdeaeed0b7ed206097e6c1d4b5cc796a428700c9bd3e27eedacce47fb63b
    default: Volume: C:/Users/SPRIGGSJ/OneDrive - FUJITSU/Documents/95 My Projects/2021-02-13 Docker Buster With SSH:/vagrant
    default:   Port: 127.0.0.1:2222:22
    default:
    default: Container created: b64ed264d8949b12
==> default: Enabling network interfaces...
==> default: Starting container...
==> default: Waiting for machine to boot. This may take a few minutes...
    default: SSH address: 127.0.0.1:2222
    default: SSH username: vagrant
    default: SSH auth method: private key
    default:
    default: Vagrant insecure key detected. Vagrant will automatically replace
    default: this with a newly generated keypair for better security.
    default:
    default: Inserting generated public key within guest...
==> default: Machine booted and ready!
==> default: Running provisioner: ansible_local...
    default: Running ansible-playbook...

PLAY [all] *********************************************************************

TASK [Gathering Facts] *********************************************************
[WARNING]: Platform linux on host default is using the discovered Python
interpreter at /usr/bin/python, but future installation of another Python
interpreter could change this. See https://docs.ansible.com/ansible/2.9/referen
ce_appendices/interpreter_discovery.html for more information.
ok: [default]

TASK [debug] *******************************************************************
ok: [default] => {
    "msg": "Hello from Docker"
}

PLAY RECAP *********************************************************************
default                    : ok=2    changed=0    unreachable=0    failed=0    skipped=0    rescued=0    ignored=0   

PS C:\Dev\VagrantDockerBuster>

And on Linux?

Bringing machine 'default' up with 'docker' provider...
==> default: Creating and configuring docker networks...
==> default: Building the container from a Dockerfile...
<SNIP A LOAD OF DOCKER STUFF>
    default: Removing intermediate container e56bed4f7be9
    default:  ---> cef749c205bf
    default: Successfully built cef749c205bf
    default:
    default: Image: cef749c205bf
==> default: Creating the container...
    default:   Name: 2021-02-13DockerBusterWithSSH_default_1613470091
    default:  Image: cef749c205bf
    default: Volume: /home/spriggsj/Projects/2021-02-13 Docker Buster With SSH:/vagrant
    default:   Port: 127.0.0.1:2222:22
    default:
    default: Container created: 3fe46b02d7ad10ab
==> default: Enabling network interfaces...
==> default: Starting container...
==> default: Waiting for machine to boot. This may take a few minutes...
    default: SSH address: 127.0.0.1:2222
    default: SSH username: vagrant
    default: SSH auth method: private key
    default:
    default: Vagrant insecure key detected. Vagrant will automatically replace
    default: this with a newly generated keypair for better security.
    default:
    default: Inserting generated public key within guest...
    default: Removing insecure key from the guest if it's present...
    default: Key inserted! Disconnecting and reconnecting using new SSH key...
==> default: Machine booted and ready!
==> default: Running provisioner: ansible_local...
    default: Running ansible-playbook...

PLAY [all] *********************************************************************

TASK [Gathering Facts] *********************************************************
[WARNING]: Platform linux on host default is using the discovered Python
interpreter at /usr/bin/python, but future installation of another Python
interpreter could change this. See https://docs.ansible.com/ansible/2.9/referen
ce_appendices/interpreter_discovery.html for more information.
ok: [default]

TASK [debug] *******************************************************************
ok: [default] => {
    "msg": "Hello from Docker"
}

PLAY RECAP *********************************************************************
default                    : ok=2    changed=0    unreachable=0    failed=0    skipped=0    rescued=0    ignored=0

So, if you’re crazy and want to do Vagrant using Docker with Debian Buster and Ansible, this is how to do it. I don’t know how much I’m likely to be using this in the future, but if you use it, let me know what you’re doing with it! πŸ˜€

Featured image is β€œFamily” by β€œIvan” on Flickr and is released under a CC-BY license.

"Raven" by "Jim Bahn" on Flickr

Sending SSH login notifications to Matrix via Huginn using Webhooks

On the Self Hosted Podcast’s Discord Server, someone posted a link to the following blog post, which I read and found really interesting…: https://blog.hay-kot.dev/ssh-notifications-in-home-assistant/

You see, the key part of that post wasn’t that they were posting to Home Assistant when they were logging in, but instead that they were triggering a webhook on login. And I can do stuff with Webhooks.

What’s a webhook?

A webhook is a callable URL, either with a “secret” embedded in the URL or some authentication header that lets you trigger an action of some sort. I first came across these with Github, but they’re pretty common now. Services will offer these as a way to get an action in one service to do something in another. A fairly common webhook for those getting started with these sorts of things is where creating a pull request (PR) on a Github repository will trigger a message on something like Slack to say the PR is there.

Well, that’s all well and good, but what does Matrix or Huginn have to do with things?

Matrix is a decentralized, end to end encrypted, eventually consistent database system, that just happens to be used extensively as a chat network. In particular, it’s used by Open Source projects, like KDE and Mozilla, and by Government bodies, like the whole French goverment (lead by DINSIC) the German Bundeswehr (Unified Armed Forces) department.

Matrix has a reference client, Element, that was previously called “Riot”, and in 2018 I produced a YouTube video showing how to bridge various alternative messaging systems into Matrix.

Huginn describes itself as:

Huginn is a system for building agents that perform automated tasks for you online. They can read the web, watch for events, and take actions on your behalf. Huginn’s Agents create and consume events, propagating them along a directed graph. Think of it as a hackable version of IFTTT or Zapier on your own server. You always know who has your data. You do.

Huginn Readme

With Huginn, I can create “agents”, including a “receive webhook agent” that will take the content I send, and tweak it to do something else. In the past I used IFTTT to do some fun things, like making this blog work, but now I use Huginn to post Tweets when I post to this blog.

So that I knew that Huginn was posting my twitter posts, I created a Matrix room called “Huginn Alerts” and used the Matrix account I created for the video I mentioned before to send me messages that it had made the posts I wanted. I followed the guidance from this page to do it: https://drwho.virtadpt.net/archive/2020-02-12/integrating-huginn-with-a-matrix-server/

Enough already. Just show me what you did.

In Element.io

  1. Get an access token for the Matrix account you want to post with.

Log into the web interface at https://app.element.io and go to your settings

Click where it says your handle, then click on where it says “All Settings”.

Then click on “Help & About” and scroll to the bottom of that page, where it says “Advanced”

Get to the “Advanced” part of the settings, under “Help & About” to get your access token.

Click where it says “Access Token: <click to reveal>” (strangely, I’m not posting that πŸ˜‰)

  1. Click on the room, then click on it’s name at the top to open the settings, then click on “Advanced” to get the “Internal room ID”
Gettng the Room ID. Note, it starts with an exclamation mark (!) and ends :<servername>.

In Huginn

  1. Go to the “Credentials” tab, and click on “New Credential”. Give the credential a name (perhaps “Matrix Bot Access Token”), leave it as text and put your access token in here.
  1. Create a Credential for the Room ID. Like before, name it something sensible and put the ID you found earlier.
  1. Create a “Post Agent” by going to Agents and selecting “New agent”. This will show just the “Type” box. You can type in this box to put “Post Agent” and then find it. That will then provide you with the rest of these boxes. Provide a name, and tick the box marked “Propagate immediately”. I’ll cover the content of the “Options” box after this screenshot.

In the “Options” block is a button marked “Toggle View”. Select this which turns it from the above JSON pretty editor, into this text field (note your text is likely to be different):

My content of that box is as follows:

{
  "post_url": "https://matrix.org/_matrix/client/r0/rooms/{% credential Personal_Matrix_Notification_Channel %}/send/m.room.message?access_token={% credential Matrix_Bot_Access_Credential %}",
  "expected_receive_period_in_days": "365",
  "content_type": "json",
  "method": "post",
  "payload": {
    "msgtype": "m.text",
    "body": "{{ text }}"
  },
  "emit_events": "true",
  "no_merge": "false",
  "output_mode": "clean"
}

Note that the “post_url” value contains two “credential” values, like this:

{% credential Personal_Matrix_Notification_Channel %} (this is the Room ID we found earlier) and {% credential Matrix_Bot_Access_Credential %} (this is the Access Token we found earlier).

If you’ve used different names for these values (which are perfectly valid!) then just change these two. The part where it says “{{ text }}” leave there, because we’ll be using that in a later section. Click “Save” (the blue button at the bottom).

  1. Create a Webhook Agent. Go to Agents and then “New Agent”. Select “Webhook Agent” from the “Type” field. Give it a name, like “SSH Logged In Notification Agent”. Set “Keep Events” to a reasonable number of days, like 5. In “Receivers” find the Notification agent you created (“Send Matrix Message to Notification Room” was the name I used). Then, in the screenshot, I’ve pressed the “Toggle View” button on the “Options” section, as this is, to me a little clearer.

The content of the “options” box is:

{
  "secret": "supersecretstring",
  "expected_receive_period_in_days": 365,
  "payload_path": ".",
  "response": ""
}

Change the “secret” from “supersecretstring” to something a bit more useful and secure.

The “Expected Receive Period in Days” basically means, if you’ve not had an event cross this item in X number of days, does Huginn think this agent is broken? And the payload path of “.” basically means “pass everything to the next agent”.

Once you’ve completed this step, press “Save” which will take you back to your agents, and then go into the agent again. This will show you a page like this:

Copy that URL, because you’ll need it later…

On the server you are logging the SSH to

As root, create a file called /etc/ssh/sshrc. This file will be your script that will run every time someone logs in. It must have the file permissions 0644 (u+rw,g+r,o+r), which means that there is a slight risk that the Webhook secret is exposed.

The content of that file is as follows:

#!/bin/sh
ip="$(echo "$SSH_CONNECTION" | cut -d " " -f 1)"
curl --silent\
     --header "Content-Type: application/json"\
     --request POST\
     --data '{
       "At": "'"$(date -Is)"'",
       "Connection": "'"$SSH_CONNECTION"'",
       "User": "'"$USER"'",
       "Host": "'"$(hostname)"'",
       "Src": "'"$ip"'",
       "text": "'"$USER@$(hostname) logged in from $ip at $(date +%H:%M:%S)"'"
     }'\
     https://my.huginn.website/some/path/web_requests/taskid/secret

The heading line (#!/bin/sh) is more there for shellcheck, as, according to the SSH man page this is executed by /bin/sh either way.

The bulk of these values (At, Connection, User, Host or Src) are not actually used by Huginn, but might be useful for later… the key one is text, which if you recall from the “Send Matrix Message to Notification Room” Huginn agent, we put {{ text }} into the “options” block – that’s this block here!

So what happens when we log in over SSH?

SSH asks the shell in the user’s context to execute /etc/ssh/sshrc before it hands over to the user’s login session. This script calls curl and hands some POST data to the url.

Huginn receives this POST via the “SSH Logged In Notification Agent”, and files it.

Huginn then hands that off to the “Send Matrix Message to Notification Room”:

Huginn makes a POST to the Matrix.org server, and Matrix sends the finished message to all the attached clients.

Featured image is β€œRaven” by β€œJim Bahn” on Flickr and is released under a CC-BY license.

"The Guitar Template" by "Neil Williamson" on Flickr

Testing (and failing inline) for data types in Ansible

I tend to write long and overly complicated set_fact statements in Ansible, ALL THE DAMN TIME. I write stuff like this:

rulebase: |
  {
    {% for var in vars | dict2items %}
      {% if var.key | regex_search(regex_rulebase_match) | type_debug != "NoneType"
        and (
          var.value | type_debug == "dict" 
          or var.value | type_debug == "AnsibleMapping"
        ) %}
        {% for item in var.value | dict2items %}
          {% if item.key | regex_search(regex_rulebase_match) | type_debug != "NoneType"
            and (
              item.value | type_debug == "dict" 
              or item.value | type_debug == "AnsibleMapping"
            ) %}
            "{{ var.key | regex_replace(regex_rulebase_match, '\2') }}{{ item.key | regex_replace(regex_rulebase_match, '\2') }}": {
              {# This block is used for rulegroup level options #}
              {% for key in ['log_from_start', 'log', 'status', 'nat', 'natpool', 'schedule', 'ips_enable', 'ssl_ssh_profile', 'ips_sensor'] %}
                {% if var.value[key] is defined and rule.value[key] is not defined %}
                  {% if var.value[key] | type_debug in ['string', 'AnsibleUnicode'] %}
                    "{{ key }}": "{{ var.value[key] }}",
                  {% else %}
                    "{{ key }}": {{ var.value[key] }},
                  {% endif %}
                {% endif %}
              {% endfor %}
              {% for rule in item.value | dict2items %}
                {% if rule.key in ['sources', 'destinations', 'services', 'src_internet_service', 'dst_internet_service'] and rule.value | type_debug not in ['list', 'AnsibleSequence'] %}
                  "{{ rule.key }}": ["{{ rule.value }}"],
                {% elif rule.value | type_debug in ['string', 'AnsibleUnicode'] %}
                  "{{ rule.key }}": "{{ rule.value }}",
                {% else %}
                  "{{ rule.key }}": {{ rule.value }},
                {% endif %}
              {% endfor %}
            },
          {% endif %}
        {% endfor %}
      {% endif %}
    {% endfor %}
  }

Now, if you’re writing set_fact or vars like this a lot, what you tend to end up with is the dreaded dict2items requires a dictionary, got instead. which basically means “Hah! You wrote a giant blob of what you thought was JSON, but didn’t render right, so we cast it to a string for you!”

The way I usually write my playbooks, I’ll do something with this set_fact at line, let’s say, 10, and then use it at line, let’s say, 500… So, I don’t know what the bloomin’ thing looks like then!

So, how to get around that? Well, you could do a type check. In fact, I wrote a bloomin’ big blog post explaining just how to do that!

However, that gets unwieldy really quickly, and what I actually wanted to do was to throw the breaks on as soon as I’d created an invalid data type. So, to do that, I created a collection of functions which helped me with my current project, and they look a bit like this one, called “is_a_string.yml“:

- name: Type Check - is_a_string
  assert:
    quiet: yes
    that:
    - vars[this_key] is not boolean
    - vars[this_key] is not number
    - vars[this_key] | int | string != vars[this_key] | string
    - vars[this_key] | float | string != vars[this_key] | string
    - vars[this_key] is string
    - vars[this_key] is not mapping
    - vars[this_key] is iterable
    success_msg: "{{ this_key }} is a string"
    fail_msg: |-
      {{ this_key }} should be a string, and is instead
      {%- if vars[this_key] is not defined %} undefined
      {%- else %} {{ vars[this_key] is boolean | ternary(
        'a boolean',
        (vars[this_key] | int | string == vars[this_key] | string) | ternary(
          'an integer',
          (vars[this_key] | float | string == vars[this_key] | string) | ternary(
            'a float',
            vars[this_key] is string | ternary(
              'a string',
              vars[this_key] is mapping | ternary(
                'a dict',
                vars[this_key] is iterable | ternary(
                  'a list',
                  'unknown (' ~ vars[this_key] | type_debug ~ ')'
                )
              )
            )
          )
        )
      )}}{% endif %} - {{ vars[this_key] | default('unset') }}

To trigger this, I do the following:

- hosts: localhost
  gather_facts: false
  vars:
    SomeString: abc123
    SomeDict: {'somekey': 'somevalue'}
    SomeList: ['somevalue']
    SomeInteger: 12
    SomeFloat: 12.0
    SomeBoolean: false
  tasks:
  - name: Type Check - SomeString
    vars:
      this_key: SomeString
    include_tasks: tasks/type_check/is_a_string.yml
  - name: Type Check - SomeDict
    vars:
      this_key: SomeDict
    include_tasks: tasks/type_check/is_a_dict.yml
  - name: Type Check - SomeList
    vars:
      this_key: SomeList
    include_tasks: tasks/type_check/is_a_list.yml
  - name: Type Check - SomeInteger
    vars:
      this_key: SomeInteger
    include_tasks: tasks/type_check/is_an_integer.yml
  - name: Type Check - SomeFloat
    vars:
      this_key: SomeFloat
    include_tasks: tasks/type_check/is_a_float.yml
  - name: Type Check - SomeBoolean
    vars:
      this_key: SomeBoolean
    include_tasks: tasks/type_check/is_a_boolean.yml

I hope this helps you, bold traveller with complex jinja2 templating requirements!

(Oh, and if you get “template error while templating string: no test named 'boolean'“, you’re probably running Ansible which you installed using apt from Ubuntu Universe, version 2.9.6+dfsg-1 [or, at least I was!] – to fix this, use pip to install a more recent version – preferably using virtualenv first!)

Featured image is β€œThe Guitar Template” by β€œNeil Williamson” on Flickr and is released under a CC-BY-SA license.

'Geocache "Goodies"' by 'sk' on Flickr

Caching online data sources in Ansible for later development or testing

My current Ansible project relies on me collecting a lot of data from AWS and then checking it again later, to see if something has changed.

This is great for one-off tests (e.g. terraform destroy ; terraform apply ; ansible-playbook run.yml) but isn’t great for repetitive tests, especially if you have to collect data that may take many minutes to run all the actions, or if you have slow or unreliable internet in your development environment.

To get around this, I wrote a wrapper for caching this data.

At the top of my playbook, run.yml, I have these tasks:

- name: Set Online Status.
  # This stores the value of run_online, unless run_online
  # is not set, in which case, it defines it as "true".
  ansible.builtin.set_fact:
    run_online: |-
      {{- run_online | default(true) | bool -}}

- name: Create cache_data path.
  # This creates a "cached_data" directory in the same
  # path as the playbook.
  when: run_online | bool and cache_data | default(false) | bool
  delegate_to: localhost
  run_once: true
  file:
    path: "cached_data"
    state: directory
    mode: 0755

- name: Create cache_data for host.
  # This creates a directory under "cached_data" in the same
  # path as the playbook, with the name of each of the inventory
  # items.
  when: run_online | bool and cache_data | default(false) | bool
  delegate_to: localhost
  file:
    path: "cached_data/{{ inventory_hostname }}"
    state: directory
    mode: 0755

Running this sets up an expectation for the normal operation of the playbook, that it will be “online”, by default.

Then, every time I need to call something “online”, for example, collect EC2 Instance Data (using the community.aws.ec2_instance_info module), I call out to (something like) this set of tasks, instead of just calling the task by itself.

- name: List all EC2 instances in the regions of interest.
  when: run_online | bool
  community.aws.ec2_instance_info:
    region: "{{ item.region_name }}"
  loop: "{{ regions }}"
  loop_control:
    label: "{{ item.region_name }}"
  register: regional_ec2

- name: "NOTE: Set regional_ec2 data path"
  when: not run_online | bool or cache_data | default(false) | bool
  set_fact:
    regional_ec2_cached_data_file_loop: "{{ regional_ec2_cached_data_file_loop | default(0) | int + 1 }}"
    cached_data_filename: "cached_data/{{ inventory_hostname }}/{{ cached_data_file | default('regional_ec2') }}.{{ regional_ec2_cached_data_file_loop | default(0) | int + 1 }}.json"

- name: "NOTE: Cache/Get regional_ec2 data path"
  when: not run_online | bool or cache_data | default(false) | bool
  debug:
    msg: "File: {{ cached_data_filename }}"

- name: Cache all EC2 instances in the regions of interest.
  when: run_online | bool and cache_data | default(false) | bool
  delegate_to: localhost
  copy:
    dest: "{{ cached_data_filename }}"
    mode: "0644"
    content: "{{ regional_ec2 }}"

- name: "OFFLINE: Load all EC2 instances in the regions of interest."
  when: not run_online | bool
  set_fact:
    regional_ec2: "{% include( cached_data_filename ) %}"

The first task, if it’s still set to being “online” will execute the task, and registers the result for later. If cache_data is configured, we generate a filename for the caching, record the filename to the log (via the debug task) and then store it (using the copy task). So far, so online… but what happens when we don’t need the instance to be up and running?

In that case, we use the set_fact module, triggered by running the playbook like this: ansible-playbook run.yml -e run_online=false. This reads the cached data out of that locally stored pool of data for later use.

Featured image is ‘Geocache “Goodies”‘ by ‘sk‘ on Flickr and is released under a CC-BY-ND license.

"2009.01.17 - UNKNOWN, Unknown" by "Adrian Clark" on Flickr

Creating tagged AWS EC2 resources (like Elastic IPs) with Ansible

This is a quick note, having stumbled over this one today.

Mostly these days, I’m used to using Terraform to create Elastic IP (EIP) items in AWS, and I can assign tags to them during creation. For various reasons in $Project I’m having to create my EIPs in Ansible.

To make this work, you can’t just create an EIP with tags (like you would in Terraform), instead what you need to do is to create the EIP and then tag it, like this:

  - name: Allocate a new elastic IP
    community.aws.ec2_eip:
      state: present
      in_vpc: true
      region: eu-west-1
    register: eip

  - name: Tag that resource
    amazon.aws.ec2_tag:
      region: eu-west-1
      resource: "{{ eip.allocation_id }}"
      state: present
      tags:
        Name: MyTag
    register: tag

Notice that we create a VPC associated EIP, and assign the allocation_id from the result of that module to the resource we want to tag.

How about if you’re trying to be a bit more complex?

Here I have a list of EIPs I want to create, and then I pass this into the ec2_eip module, like this:

- name: Create list of EIPs
  set_fact:
    region: eu-west-1
    eip_list:
    - demo-eip-1
    - demo-eip-2
    - demo-eip-3

  - name: Allocate new elastic IPs
    community.aws.ec2_eip:
      state: present
      in_vpc: true
      region: "{{ region }}"
    register: eip
    loop: "{{ eip_list | dict2items }}"
    loop_control:
      label: "{{ item.key }}"

  - name: Tag the EIPs
    amazon.aws.ec2_tag:
      region: "{{ item.invocation.module_args.region }}"
      resource: "{{ item.allocation_id }}"
      state: present
      tags:
        Name: "{{ item.item.key }}"
    register: tag
    loop: "{{ eip.results }}"
    loop_control:
      label: "{{ item.item.key }}"

So, in this instance we pass the list of EIP names we want to create as a list with the loop instruction. Now, at the point we create them, we don’t actually know what they’ll be called, but we’re naming them there because when we tag them, we get the “item” (from the loop) that was used to create the EIP. When we then tag the EIP, we can use some of the data that was returned from the ec2_eip module (region, EIP allocation ID and the name we used as the loop key). I’ve trimmed out the debug statements I created while writing this, but here’s what you get back from ec2_eip:

"eip": {
        "changed": true,
        "msg": "All items completed",
        "results": [
            {
                "allocation_id": "eipalloc-decafbaddeadbeef1",
                "ansible_loop_var": "item",
                "changed": true,
                "failed": false,
                "invocation": {
                    "module_args": {
                        "allow_reassociation": false,
                        "aws_access_key": null,
                        "aws_ca_bundle": null,
                        "aws_config": null,
                        "aws_secret_key": null,
                        "debug_botocore_endpoint_logs": false,
                        "device_id": null,
                        "ec2_url": null,
                        "in_vpc": true,
                        "private_ip_address": null,
                        "profile": null,
                        "public_ip": null,
                        "public_ipv4_pool": null,
                        "region": "eu-west-1",
                        "release_on_disassociation": false,
                        "reuse_existing_ip_allowed": false,
                        "security_token": null,
                        "state": "present",
                        "tag_name": null,
                        "tag_value": null,
                        "validate_certs": true,
                        "wait_timeout": null
                    }
                },
                "item": {
                    "key": "demo-eip-1",
                    "value": {}
                },
                "public_ip": "192.0.2.1"
            }
     ]
}

So, that’s what I’m doing next!

Featured image is β€œ2009.01.17 – UNKNOWN, Unknown” by β€œAdrian Clark” on Flickr and is released under a CC-BY-ND license.

"pharmacy" by "Tim Evanson" on Flickr

AWX – The Gateway Drug to Ansible Tower

A love letter to Ansible Tower

I love Ansible… I mean, I really love Ansible. You can ask anyone, and they’ll tell you my first love is my wife, then my children… and then it’s Ansible.

OK, maybe it’s Open Source and then Ansible, but either way, Ansible is REALLY high up there.

But, while I love Ansible, I love what Ansible Tower brings to an environment. See, while you get to easily and quickly manage a fleet of machines with Ansible, Ansible Tower gives you the fine grained control over what you need to expose to your developers, your ops team, or even, in a fit of “what-did-you-just-do”-ness, your manager. (I should probably mention that Ansible Tower is actually part of a much larger portfolio of products, called Ansible Automation Platform, and there’s some hosted SaaS stuff that goes with it… but the bit I really want to talk about is Tower, so I’ll be talking about Tower and not Ansible Automation Platform. Sorry!)

Ansible Tower has a scheduling engine, so you can have a “Go” button, for deploying the latest software to your fleet, or just for the 11PM patching cycle. It has a credential store, so your teams can’t just quickly go and perform an undocumented quick fix on that “flaky” box – they need to do their changes via Ansible. And lastly, it has an inventory, so you can see that the last 5 jobs failed to deploy on that host, so maybe you’ve got a problem with it.

One thing that people don’t so much love to do, is to get a license to deploy Tower, particularly if they just want to quickly spin up a demonstration for some colleagues to show how much THEY love Ansible. And for those people, I present AWX.

The first hit is free

One of the glorious and beautiful things that RedHat did, when they bought Ansible, was to make the same assertion about the Ansible products that they make to the rest of their product line, which is… while they may sell a commercial product, underneath it will be an Open Source version of that product, and you can be part of developing and improving that version, to help improve the commercial product. Thus was released AWX.

Now, I hear the nay-sayers commenting, “but what if you have an issue with AWX at 2AM, how do you get support on that”… and to those people, I reply: “If you need support at 2AM for your box, AWX is not the tool for you – what you need is Tower.”… Um, I mean Ansible Automation Platform. However, Tower takes a bit more setting up than what I’d want to do for a quick demo, and it has a few more pre-requisites. ANYWAY, enough about dealing with the nay-sayers.

AWX is an application inside Docker containers. It’s split into three parts, the AWX Web container, which has the REST API. There’s also a PostgreSQL database inside there too, and one “Engine”, which is the separate container which gets playbooks from your version control system, asks for any dynamic inventories, and then runs those playbooks on your inventories.

I like running demos of Tower, using AWX, because it’s reasonably easy to get stood up, and it’s reasonably close to what Tower looks and behaves like (except for the logos)… and, well, it’s a good gateway to getting people interested in what Tower can do for them, without them having to pay (or spend time signing up for evaluation licenses) for the environment in the first place.

And what’s more, it can all be automated

Yes, folks, because AWX is just a set of docker containers (and an install script), and Ansible knows how to start Docker containers (and run an install script), I can add an Ansible playbook to my cloud-init script, Vagrantfile or, let’s face it, when things go really wrong, put it in a bash script for some poor keyboard jockey to install for you.

If you’re running a demo, and you don’t want to get a POC (proof of concept) or evaluation license for Ansible Tower, then the chances are you’re probably not running this on RedHat Enterprise Linux (RHEL) either. That’s OK, once you’ve sold the room on using Tower (by using AWX), you can sell them on using RHEL too. So, I’ll be focusing on using CentOS 8 instead. Partially because there’s a Vagrant box for CentOS 8, but also because I can also use CentOS 8 on AWS, where I can prove that the Ansible Script I’m putting into my Vagrantfile will also deploy nicely via Cloud-Init too. With a very small number of changes, this is likely to work on anything that runs Docker, so everything from Arch to Ubuntu… probably 😁

“OK then. How can you work this magic, eh?” I hear from the back of the room. OK, pipe down, nay-sayers.

First, install Ansible on your host. You just need to run dnf install -y ansible.

Next, you need to install Docker. This is a marked difference between AWX and Ansible Tower, as AWX is based on Docker, but Ansible Tower uses other magic to make it work. When you’re selling the benefits of Tower, note that it’s not a 1-for-1 match at this point, but it’s not a big issue. Fortunately, CentOS can install Docker Community edition quite easily. At this point, I’m swapping to using Ansible playbooks. At the end, I’ll drop a link to where you can get all this in one big blob… In fact, we’re likely to use it with our Cloud-Init deployment.

Aw yehr, here’s the good stuff

tasks:
- name: Update all packages
  dnf:
    name: "*"
    state: latest

- name: Add dependency for "yum config-manager"
  dnf:
    name: yum-utils
    state: present

- name: Add the Docker Repo
  shell: yum config-manager --add-repo https://download.docker.com/linux/centos/docker-ce.repo
  args:
    creates: /etc/yum.repos.d/docker-ce.repo
    warn: false

- name: Install Docker
  dnf:
    name:
    - docker-ce
    - docker-ce-cli
    - containerd.io
    state: present
  notify: Start Docker

That first stanza – update all packages? Well, that’s because containerd.io relies on a newer version of libseccomp, which hasn’t been built in the CentOS 8 Vagrantbox I’m using.

The next one? That ensures I can run yum config-manager to add a repo. I could use the copy module in Ansible to create the repo files so yum and/or dnf could use that instead, but… meh, this is a single line shell command.

And then we install the repo, and the docker-ce packages we require. We use the “notify” statement to trigger a handler call to start Docker, like this:

handlers:
- name: Start Docker
  systemd:
    name: docker
    state: started

Fab. We’ve got Docker. Now, let’s clone the AWX repo to our machine. Again, we’re doing this with Ansible, naturally :)

tasks:
- name: Clone AWX repo to local path
  git:
    repo: https://github.com/ansible/awx.git
    dest: /opt/awx

- name: Get latest AWX tag
  shell: |
    if [ $(git status -s | wc -l) -gt 0 ]
    then
      git stash >/dev/null 2>&1
    fi
    git fetch --tags && git describe --tags $(git rev-list --tags --max-count=1)
    if [ $(git stash list | wc -l) -gt 0 ]
    then
      git stash pop >/dev/null 2>&1
    fi
  args:
    chdir: /opt/awx
  register: latest_tag
  changed_when: false

- name: Use latest released version of AWX
  git:
    repo: https://github.com/ansible/awx.git
    dest: /opt/awx
    version: "{{ latest_tag.stdout }}"

OK, there’s a fair bit to get from this, but essentially, we clone the repo from Github, then ask (using a collection of git commands) for the latest released version (yes, I’ve been bitten by just using the head of “devel” before), and then we check out that released version.

Fab, now we can configure it.

tasks:
- name: Set or Read admin password
  set_fact:
    admin_password_was_generated: "{{ (admin_password is defined or lookup('env', 'admin_password') != '') | ternary(false, true) }}"
    admin_password: "{{ admin_password | default (lookup('env', 'admin_password') | default(lookup('password', 'pw.admin_password chars=ascii_letters,digits length=20'), true) ) }}"

- name: Configure AWX installer
  lineinfile:
    path: /opt/awx/installer/inventory
    regexp: "^#?{{ item.key }}="
    line: "{{ item.key }}={{ item.value }}"
  loop:
  - key: "awx_web_hostname"
    value: "{{ ansible_fqdn }}"
  - key: "pg_password"
    value: "{{ lookup('password', 'pw.pg_password chars=ascii_letters,digits length=20') }}"
  - key: "rabbitmq_password"
    value: "{{ lookup('password', 'pw.rabbitmq_password chars=ascii_letters,digits length=20') }}"
  - key: "rabbitmq_erlang_cookie"
    value: "{{ lookup('password', 'pw.rabbitmq_erlang_cookie chars=ascii_letters,digits length=20') }}"
  - key: "admin_password"
    value: "{{ admin_password }}"
  - key: "secret_key"
    value: "{{ lookup('password', 'pw.secret_key chars=ascii_letters,digits length=64') }}"
  - key: "create_preload_data"
    value: "False"
  loop_control:
    label: "{{ item.key }}"

If we don’t already have a password defined, then create one. We register the fact we’ve had to create one, as we’ll need to tell ourselves it once the build is finished.

After that, we set a collection of values into the installer – the hostname, passwords, secret keys and so on. It loops over a key/value pair, and passes these to a regular expression rewrite command, so at the end, we have the settings we want, without having to change this script between releases.

When this is all done, we execute the installer. I’ve seen this done two ways. In an ideal world, you’d throw this into an Ansible shell module, and get it to execute the install, but the problem with that is that the AWX install takes quite a while, so I’d much rather actually be able to see what’s going on… and so, instead, we exit our prepare script at this point, and drop back to the shell to run the installer. Let’s look at both options, and you can decide which one you want to do. In my script, I’m doing the first, but just because it’s a bit neater to have everything in one place.

- name: Run the AWX install.
  shell: ansible-playbook -i inventory install.yml
  args:
    chdir: /opt/awx/installer
cd /opt/awx/installer
ansible-playbook -i inventory install.yml

When this is done, you get a prepared environment, ready to access using the username admin and the password of … well, whatever you set admin_password to.

AWX takes a little while to stand up, so you might want to run this next Ansible stanza to see when it’s ready to go.

- name: Test access to AWX
  tower_user:
    tower_host: "http://{{ ansible_fqdn }}"
    tower_username: admin
    tower_password: "{{ admin_password }}"
    email: "admin@{{ ansible_fqdn }}"
    first_name: "admin"
    last_name: ""
    password: "{{ admin_password }}"
    username: admin
    superuser: yes
    auditor: no
  register: _result
  until: _result.failed == false
  retries: 240 # retry 240 times
  delay: 5 # pause for 5 sec between each try

The upshot to using that command there is that it sets the email address of the admin account to “admin@your.awx.example.org“, if the fully qualified domain name (FQDN) of your machine is your.awx.example.org.

Moving from the Theoretical to the Practical

Now we’ve got our playbook, let’s wrap this up in both a Vagrant Vagrantfile and a Terraform script, this means you can deploy it locally, to test something internally, and in “the cloud”.

To simplify things, and because the version of Ansible deployed on the Vagrant box isn’t the one I want to use, I am using a single “user-data.sh” script for both Vagrant and Terraform. Here that is:

#!/bin/bash
if [ -e "$(which yum)" ]
then
  yum install git python3-pip -y
  pip3 install ansible docker docker-compose
else
  echo "This script only supports CentOS right now."
  exit 1
fi

git clone https://gist.github.com/JonTheNiceGuy/024d72f970d6a1c6160a6e9c3e642e07 /tmp/Install_AWX
cd /tmp/Install_AWX
/usr/local/bin/ansible-playbook Install_AWX.yml

While they both have their differences, they both can execute a script once the machine has finished booting. Let’s start with Vagrant.

Vagrant.configure("2") do |config|
  config.vm.box = "centos/8"

  config.vm.provider :virtualbox do |v|
    v.memory = 4096
  end

  config.vm.provision "shell", path: "user-data.sh"

  config.vm.network "forwarded_port", guest: 80, host: 8080, auto_correct: true
end

To boot this up, once you’ve got Vagrant and Virtualbox installed, run vagrant up and it’ll tell you that it’s set up a port forward from the HTTP port (TCP/80) to a “high” port – TCP/8080. If there’s a collision (because you’re running something else on TCP/8080), it’ll tell you what port it’s forwarded the HTTP port to instead. Once you’ve finished, run vagrant destroy to shut it down. There are lots more tricks you can play with Vagrant, but this is a relatively quick and easy one. Be aware that you’re not using HTTPS, so traffic to the AWX instance can be inspected, but if you’re running this on your local machine, it’s probably not a big issue.

How about running this on a cloud provider, like AWS? We can use the exact same scripts – both the Ansible script, and the user-data.sh script, using Terraform, however, this is a little more complex, as we need to create a VPC, Internet Gateway, Subnet, Security Group and Elastic IP before we can create the virtual machine. What’s more, the Free Tier (that “first hit is free” thing that Amazon Web Services provide to you) does not have enough horsepower to run AWX, so, if you want to look at how to run up AWX in EC2 (or to tweak it to run on Azure, GCP, Digital Ocean or one of the fine offerings from IBM or RedHat), then click through to the gist I’ve put all my code from this post into. The critical lines in there are to select a “CentOS 8” image, open HTTP and SSH into the machine, and to specify the user-data.sh file to provision the machine. Everything else is cruft to make the virtual machine talk to, and be seen by, hosts on the Internet.

To run this one, you need to run terraform init to load the AWS plugin, then terraform apply. Note that this relies on having an AWS access token defined, so if you don’t have them set up, you’ll need to get that sorted out first. Once you’ve finished with your demo, you should run terraform destroy to remove all the assets created by this terraform script. Again, when you’re running that demo, note that you ONLY have HTTP access set up, not HTTPS, so don’t use important credentials on there!

Once you’ve got your AWX environment running, you’ve got just enough AWX there to demo what Ansible Tower looks like, what it can bring to your organisation… and maybe even convince them that it’s worth investing in a license, rather than running AWX in production. Just in case you have that 2AM call-out that we all dread.

Featured image is β€œpharmacy” by β€œTim Evanson” on Flickr and is released under a CC-BY-SA license.

"#security #lockpick" by "John Jones" on Flickr

Auto-starting an SSH Agent in Windows Subsystem for Linux

I tend to use Windows Subsystem for Linux (WSL) as a comprehensive SSH client, mostly for running things like Ansible scripts and Terraform. One of the issues I’ve had with it though is that, on a Linux GUI based system, I would start my SSH Agent on login, and then the first time I used an SSH key, I would unlock the key using the agent, and it would be cached for the duration of my logged in session.

While I was looking for something last night, I came across this solution on Stack Overflow (which in turn links to this blog post, which in turn links to this mailing list post) that suggests adding the following stanza to ~/.profile in WSL. I’m running the WSL version of Ubuntu 20.04, but the same principles apply on Cygwin, or, probably, any headless-server installation of a Linux distribution, if that’s your thing.

SSH_ENV="$HOME/.ssh/agent-environment"
function start_agent {
    echo "Initialising new SSH agent..."
    /usr/bin/ssh-agent | sed 's/^echo/#echo/' > "${SSH_ENV}"
    echo succeeded
    chmod 600 "${SSH_ENV}"
    . "${SSH_ENV}" > /dev/null
}
# Source SSH settings, if applicable
if [ -f "${SSH_ENV}" ]; then
    . "${SSH_ENV}" > /dev/null
    ps -ef | grep ${SSH_AGENT_PID} | grep ssh-agent$ > /dev/null || {
        start_agent;
    }
else
    start_agent;
fi

Now, this part is all well-and-good, but what about that part where you want to SSH using a key, and then that being unlocked for the duration of your SSH Agent being available?

To get around that, in the same solution page, there is a suggestion of adding this line to your .ssh/config: AddKeysToAgent yes. I’ve previously suggested using dynamically included SSH configuration files, so in this case, I’d look for your file which contains your “wildcard” stanza (if you have one), and add the line there. This is what mine looks like:

Host *
  AddKeysToAgent yes
  IdentityFile ~/.ssh/MyCurrentKey

How does this help you? Well, if you’re using jump hosts (using ProxyJump MyBastionHost, for example) you’ll only be prompted for your SSH Key once, or if you typically do a lot of SSH sessions, you’ll only need to unlock your session once.

BUT, and I can’t really stress this enough, don’t use this on a shared or suspected compromised system! If you’ve got a root account which can access the content of your Agent’s Socket and PID, then any protections that private key may have held for your system is compromised.

Featured image is β€œ#security #lockpick” by β€œJohn Jones” on Flickr and is released under a CC-BY-ND license.

"inventory" by "Lee" on Flickr

Using a AWS Dynamic Inventory with Ansible 2.10

In Ansible 2.10, Ansible started bundling modules and plugins as “Collections”, basically meaning that Ansible didn’t need to make a release every time a vendor wanted to update the libraries it required, or API changes required new fields to be supplied to modules. As part of this split between “Collections” and “Core”, the AWS modules and plugins got moved into a collection.

Now, if you’re using Ansible 2.9 or earlier, this probably doesn’t impact you, but there are some nice features in Ansible 2.10 that I wanted to use, so… buckle up :)

Getting started with Ansible 2.10, using a virtual environment

If you currently are using Ansible 2.9, it’s probably worth creating a “python virtual environment”, or “virtualenv” to try out Ansible 2.10. I did this on my Ubuntu 20.04 machine by typing:

sudo apt install -y virtualenv
mkdir -p ~/bin
cd ~/bin
virtualenv -p python3 ansible_2.10

The above ensures that you have virtualenv installed, creates a directory called “bin” in your home directory, if it doesn’t already exist, and then places the virtual environment, using Python3, into a directory there called “ansible_2.10“.

Whenever we want to use this new environment you must activate it, using this command:

source ~/bin/ansible_2.10/bin/activate

Once you’ve executed this, any binary packages created in that virtual environment will be executed from there, in preference to the file system packages.

You can tell that you’ve “activated” this virtual environment, because your prompt changes from user@HOST:~$ to (ansible_2.10) user@HOST:~$ which helps πŸ˜€

Next, let’s create a requirements.txt file. This will let us install the environment in a repeatable manner (which is useful with Ansible). Here’s the content of this file.

ansible>=2.10
boto3
botocore

So, this isn’t just Ansible, it’s also the supporting libraries we’ll need to talk to AWS from Ansible.

We execute the following command:

pip install -r requirements.txt

Note, on Windows Subsystem for Linux version 1 (which I’m using) this will take a reasonable while, particularly if it’s crossing from the WSL environment into the Windows environment, depending on where you have specified the virtual environment to be placed.

If you get an error message about something to do with being unable to install ffi, then you’ll need to install the package libffi-dev with sudo apt install -y libffi-dev and then re-run the pip install command above.

Once the installation has completed, you can run ansible --version to see something like the following:

ansible 2.10.2
  config file = None
  configured module search path = ['/home/user/.ansible/plugins/modules', '/usr/share/ansible/plugins/modules']
  ansible python module location = /home/user/ansible_2.10/lib/python3.8/site-packages/ansible
  executable location = /home/user/ansible_2.10/bin/ansible
  python version = 3.8.2 (default, Jul 16 2020, 14:00:26) [GCC 9.3.0]

Configuring Ansible for local collections

Ansible relies on certain paths in the filesystem to store things like collections, roles and modules, but I like to circumvent these things – particularly if I’m developing something, or moving from one release to the next. Fortunately, Ansible makes this very easy, using a single file, ansible.cfg to tell the code that’s running in this path where to find things.

A quick note on File permissions with ansible.cfg

Note that the POSIX file permissions for the directory you’re in really matter! It must be set to 775 (-rwxrwxr-x) as a maximum – if it’s “world writable” (the last number) it won’t use this file! Other options include 770, 755. If you accidentally set this as world writable, or are using a directory from the “Windows” side of WSL, then you’ll get an error message like this:

[WARNING]: Ansible is being run in a world writable directory (/home/user/ansible_2.10_aws), ignoring it as an ansible.cfg source. For more information see
https://docs.ansible.com/ansible/devel/reference_appendices/config.html#cfg-in-world-writable-dir

That link is this one: https://docs.ansible.com/ansible/devel/reference_appendices/config.html#cfg-in-world-writable-dir and has some useful advice.

Back to configuring Ansible

In ansible.cfg, I have the following configured:

[defaults]
collections_paths = ./collections:~/.ansible/collections:/usr/share/ansible/collections

This file didn’t previously exist in this directory, so I created that file.

This block asks Ansible to check the following paths in order:

  • collections in this path (e.g. /home/user/ansible_2.10_aws/collections)
  • collections in the .ansible directory under the user’s home directory (e.g. /home/user/.ansible/collections)
  • and finally /usr/share/ansible/collections for system-wide collections.

If you don’t configure Ansible with the ansible.cfg file, the default is to store the collections in ~/.ansible/collections, but you can “only have one version of the collection”, so this means that if you’re relying on things not to change when testing, or if you’re running multiple versions of Ansible on your system, then it’s safest to store the collections in the same file tree as you’re working in!

Installing Collections

Now we have Ansible 2.10 installed, and our Ansible configuration file set up, let’s get our collection ready to install. We do this with a requirements.yml file, like this:

---
collections:
- name: amazon.aws
  version: ">=1.2.1"

What does this tell us? Firstly, that we want to install the Amazon AWS collection from Ansible Galaxy. Secondly that we want at least the most current version (which is currently version 1.2.1). If you leave the version line out, it’ll get “the latest” version. If you replace ">=1.2.1" with 1.2.1 it’ll install exactly that version from Galaxy.

If you want any other collections, you add them as subsequent lines (more details here), like this:

collections:
- name: amazon.aws
  version: ">=1.2.1"
- name: some.other
- name: git+https://example.com/someorg/somerepo.git
  version: 1.0.0
- name: git@example.com:someorg/someotherrepo.git

Once we’ve got this file, we run this command to install the content of the requirements.yml: ansible-galaxy collection install -r requirements.yml

In our case, this installs just the amazon.aws collection, which is what we want. Fab!

Getting our dynamic inventory

Right, so we’ve got all the pieces now that we need! Let’s tell Ansible that we want it to ask AWS for an inventory. There are three sections to this.

Configuring Ansible, again!

We need to open up our ansible.cfg file. Because we’re using the collection to get our Dynamic Inventory plugin, we need to tell Ansible to use that plugin. Edit ./ansible.cfg in your favourite editor, and add this block to the end:

[inventory]
enable_plugins = aws_ec2

If you previously created the ansible.cfg file when you were setting up to get the collection installed alongside, then your ansible.cfg file will look (something) like this:

[defaults]
collections_paths     = ./collections:~/.ansible/collections:/usr/share/ansible/collections

[inventory]
enable_plugins = amazon.aws.aws_ec2

Configure AWS

Your machine needs to have access tokens to interact with the AWS API. These are stored in ~/.aws/credentials (e.g. /home/user/.aws/credentials) and look a bit like this:

[default]
aws_access_key_id = A1B2C3D4E5F6G7H8I9J0
aws_secret_access_key = A1B2C3D4E5F6G7H8I9J0a1b2c3d4e5f6g7h8i9j0

Set up your inventory

In a bit of a change to how Ansible usually does the inventory, to have a plugin based dynamic inventory, you can’t specify a file any more, you have to specify a directory. So, create the file ./inventory/aws_ec2.yaml (having created the directory inventory first). The file contains the following:

---
plugin: amazon.aws.aws_ec2

Late edit 2020-12-01: Further to the comment by Giovanni, I’ve amended this file snippet from plugin: aws_ec2 to plugin: amazon.aws.aws_ec2.

By default, this just retrieves the hostnames of any running EC2 instance, as you can see by running ansible-inventory -i inventory --graph

@all:
  |--@aws_ec2:
  |  |--ec2-176-34-76-187.eu-west-1.compute.amazonaws.com
  |  |--ec2-54-170-131-24.eu-west-1.compute.amazonaws.com
  |  |--ec2-54-216-87-131.eu-west-1.compute.amazonaws.com
  |--@ungrouped:

I need a bit more detail than this – I like to use the tags I assign to AWS assets to decide what I’m going to target the machines with. I also know exactly which regions I’ve got my assets in, and what I want to use to get the names of the devices, so this is what I’ve put in my aws_ec2.yaml file:

---
plugin: amazon.aws.aws_ec2
keyed_groups:
- key: tags
  prefix: tag
- key: 'security_groups|json_query("[].group_name")'
  prefix: security_group
- key: placement.region
  prefix: aws_region
- key: tags.Role
  prefix: role
regions:
- eu-west-1
hostnames:
- tag:Name
- dns-name
- public-ip-address
- private-ip-address

Late edit 2020-12-01: Again, I’ve amended this file snippet from plugin: aws_ec2 to plugin: amazon.aws.aws_ec2.

Now, when I run ansible-inventory -i inventory --graph, I get this output:

@all:
  |--@aws_ec2:
  |  |--euwest1-firewall
  |  |--euwest1-demo
  |  |--euwest1-manager
  |--@aws_region_eu_west_1:
  |  |--euwest1-firewall
  |  |--euwest1-demo
  |  |--euwest1-manager
  |--@role_Firewall:
  |  |--euwest1-firewall
  |--@role_Firewall_Manager:
  |  |--euwest1-manager
  |--@role_VM:
  |  |--euwest1-demo
  |--@security_group_euwest1_allow_all:
  |  |--euwest1-firewall
  |  |--euwest1-demo
  |  |--euwest1-manager
  |--@tag_Name_euwest1_firewall:
  |  |--euwest1-firewall
  |--@tag_Name_euwest1_demo:
  |  |--euwest1-demo
  |--@tag_Name_euwest1_manager:
  |  |--euwest1-manager
  |--@tag_Role_Firewall:
  |  |--euwest1-firewall
  |--@tag_Role_Firewall_Manager:
  |  |--euwest1-manager
  |--@tag_Role_VM:
  |  |--euwest1-demo
  |--@ungrouped:

To finish

Now you have your dynamic inventory, you can target your playbook at any of the groups listed above (like role_Firewall, aws_ec2, aws_region_eu_west_1 or some other tag) like you would any other inventory assignment, like this:

---
- hosts: role_Firewall
  gather_facts: false
  tasks:
  - name: Show the name of this device
    debug:
      msg: "{{ inventory_hostname }}"

And there you have it. Hope this is useful!

Late edit: 2020-11-23: Following a conversation with Andy from Work, we’ve noticed that if you’re trying to do SSM connections, rather than username/password based ones, you might want to put this in your aws_ec2.yml file:

---
plugin: amazon.aws.aws_ec2
hostnames:
  - tag:Name
compose:
  ansible_host: instance_id
  ansible_connection: 'community.aws.aws_ssm'

Late edit 2020-12-01: One final instance, I’ve changed plugin: aws_ec2 to plugin: amazon.aws.aws_ec2.

This will keep your hostnames “pretty” (with whatever you’ve tagged it as), but will let you connect over SSM to the Instance ID. Good fun :)

Featured image is β€œinventory” by β€œLee” on Flickr and is released under a CC-BY-SA license.

"centos login" by "fsse8info" on Flickr

Getting the default username and AMI for an OS with #Terraform

I have a collection of AWS AMIs I use for various builds at work. These come from two places – the AWS Marketplace and our internal Build process.

Essentially, our internal builds (for those who work for my employer – these are the OptiMISe builds) are taken from specific AWS Marketplace builds and hardened.

Because I don’t want to share the AMI details when I put stuff on GitHub, I have an override.tf file that handles the different AMI search strings. So, here’s the ami.tf file I have with the AWS Marketplace version:

data "aws_ami" "centos7" {
  most_recent = true

  filter {
    name   = "name"
    values = ["CentOS Linux 7 x86_64 HVM EBS ENA*"]
  }

  filter {
    name   = "architecture"
    values = ["x86_64"]
  }

  owners = ["679593333241"] # CentOS Project
}

And here’s an example of the override.tf file I have:

data "aws_ami" "centos7" {
  most_recent = true

  filter {
    name   = "name"
    values = ["SomeUniqueString Containing CentOS*"]
  }

  owners = ["123456789012"]
}

Next, I put these AMI images into a “null” data source, which is evaluated at runtime:

data "null_data_source" "os" {
  inputs = {
    centos7 = data.aws_ami.centos7.id
  }
}

I always forget which username goes with each image, so in the ami.tf file, I also have this:

variable "username" {
  type = map(string)
  default = {
    centos7 = "centos"
  }
}

And in the override.tf file, I have this:

variable "username" {
  type = map(string)
  default = {
    centos7 = "someuser"
  }
}

To get the right combination of username and AMI, I have this in the file where I create my “instance” (virtual machine):

variable "os" {
  default = "centos7"
}

resource "aws_instance" "vm01" {
  ami = data.null_data_source.os.outputs[var.os]
  # additional lines omitted for brevity
}

output "username" {
  value = var.username[var.os]
}

output "vm01" {
  value = aws_instance.vm01.public_ip
}

And that way, I get the VM’s default username and IP address on build. Nice.

Late edit – 2020-09-20: It’s worth noting that this is fine for short-lived builds, proof of concept, etc. But, for longer lived environments, you should be calling out exactly which AMI you’re using, right from the outset. That way, your builds will (or should) all start out from the same point, no ambiguity about exactly which point release they’re getting, etc.

Featured image is β€œcentos login” by β€œfsse8info” on Flickr and is released under a CC-BY-SA license.