I have a small server running Docker for services at home. There are several services which will want to use HTTP, but I can’t have them all sharing the same port without a reverse proxy to manage how to route the traffic to the containers!
This is my guide to how I got Traefik set up to serve HTTP and HTTPS traffic.
The existing setup for one service
Currently, I have phpIPAM which has the following docker-compose.yml file:
version: '3'

services:
  web:
    image: phpipam/phpipam-www:latest
    ports:
      - "80:80"
    cap_add:
      - NET_ADMIN
      - NET_RAW
    environment:
      - TZ=Europe/London
      - IPAM_DATABASE_HOST=db
      - IPAM_DATABASE_USER=someuser
      - IPAM_DATABASE_PASS=somepassword
      - IPAM_DATABASE_WEBHOST=%
    restart: unless-stopped
    volumes:
      - phpipam-logo:/phpipam/css/images/logo
      - phpipam-ca:/usr/local/share/ca-certificates:ro
    depends_on:
      - db

  cron:
    image: phpipam/phpipam-cron:latest
    cap_add:
      - NET_ADMIN
      - NET_RAW
    environment:
      - TZ=Europe/London
      - IPAM_DATABASE_HOST=db
      - IPAM_DATABASE_USER=someuser
      - IPAM_DATABASE_PASS=somepassword
      - SCAN_INTERVAL=1h
    restart: unless-stopped
    volumes:
      - phpipam-ca:/usr/local/share/ca-certificates:ro
    depends_on:
      - db

  db:
    image: mariadb:latest
    environment:
      - MYSQL_USER=someuser
      - MYSQL_PASSWORD=somepassword
      - MYSQL_RANDOM_ROOT_PASSWORD=yes
      - MYSQL_DATABASE=phpipam
    restart: unless-stopped
    volumes:
      - phpipam-db-data:/var/lib/mysql

volumes:
  phpipam-db-data:
  phpipam-logo:
  phpipam-ca:
The moment I want to bind another service to TCP/80, I get an error because we’ve already used TCP/80 for phpIPAM. Enter Traefik. Let’s stop the docker container with docker compose down and build our Traefik setup.
Traefik Setup
I always store my docker compose files in /opt/docker/<servicename>, so let’s create a directory for traefik; sudo mkdir -p /opt/docker/traefik
The (“dynamic”) configuration file
Next we need to create a configuration file called traefik.yaml
# Ensure all logs are sent to stdout for `docker compose logs`
accessLog: {}
log: {}

# Enable docker provider but don't switch it on by default
providers:
  docker:
    exposedByDefault: false
    # Select this as the docker network to connect from traefik to containers
    # This is defined in the docker-compose.yaml file
    network: web

# Enable the API and Dashboard on TCP/8080
api:
  dashboard: true
  insecure: true
  debug: true

# Listen on both HTTP and HTTPS
entryPoints:
  http:
    address: ":80"
    http: {}
  https:
    address: ":443"
    http:
      tls: {}
With the configuration file like this, we’ll serve HTTPS traffic with a self-signed TLS certificate on TCP/443 and plain HTTP on TCP/80. We have a dashboard on TCP/8080 served over HTTP, so make sure you don’t expose *that* to the public internet!
The Docker-Compose File
Next we need the docker-compose file for Traefik, so let’s create docker-compose.yaml
version: '3'

networks:
  web:
    name: web
    attachable: true

services:
  traefik:
    image: traefik:latest
    ports:
      - "8080:8080"
      - "443:443"
      - "80:80"
    networks:
      - web
    volumes:
      - /var/run/docker.sock:/var/run/docker.sock
      - ./traefik.yaml:/etc/traefik/traefik.yaml
    restart: always
There are a few parts here which aren’t spelled out on the Traefik quickstart! Firstly, if you don’t define a network, it’ll create one using the docker-compose file path, so probably traefik_traefik or traefik_default, which is not what we want! So, we’ll create one called “web” (but you can call it whatever you want. On other deployments, I’ve used the name “traefik” but I found it tedious to remember how to spell that each time). This network needs to be “attachable” so that other containers can use it later.
You then attach that network to the traefik service, and expose the ports we need (80, 443 and 8080).
And then start the container with docker compose up -d
alpine-docker:/opt/docker/traefik# docker compose up -d
[+] Running 2/2
 ✔ Network web                  Created   0.2s
 ✔ Container traefik-traefik-1  Started   1.7s
alpine-docker:/opt/docker/traefik#
Adding Traefik to phpIPAM
Going back to phpIPAM, So that Traefik can reach the containers, and so that the container can reach it’s database, we need two network statements now; the first is the “external” network for the traefik connection which we called “web“. The second is the inter-container network so that the “web” service can reach the “db” service, and so that the “cron” service can reach the “db” service. So we need to add that to the start of /opt/docker/phpipam/docker-compose.yaml, like this;
networks:
  web:
    name: web
    external: true
    attachable: true
  ipam:
    name: ipam
We then need to add both networks that to the “web” container, like this:
services:
  web:
    image: phpipam/phpipam-www:latest
    networks:
      - ipam
      - web
# ...... and the rest of the config
Remove the “ports” block and replace it with an expose block like this:
services:
  web:
# ...... The rest of the config for this service
    ## Don't bind to port 80 - we use traefik now
    # ports:
    #   - "80:80"
    ## Do expose port 80 for Traefik to use
    expose:
      - 80
# ...... and the rest of the config
And just the inter-container network to the “cron” and “db” containers, like this:
  cron:
    image: phpipam/phpipam-cron:latest
    networks:
      - ipam
# ...... and the rest of the config

  db:
    image: mariadb:latest
    networks:
      - ipam
# ...... and the rest of the config
There’s one other set of changes we need to make in the “web” service, which are to enable Traefik to know that this is a container to look at, and to work out what traffic to send to it, and that’s to add labels, like this:
services:
  web:
# ...... The rest of the config for this service
    labels:
      - traefik.enable=true
      - traefik.http.routers.phpipam.rule=Host(`phpipam.homenet`)
# ...... and the rest of the config
Right, now we run docker compose up -d
alpine-docker:/opt/docker/phpipam# docker compose up -d
[+] Running 4/4
 ✔ Network ipam              Created   0.4s
 ✔ Container phpipam-db-1    Started   1.4s
 ✔ Container phpipam-cron-1  Started   2.1s
 ✔ Container phpipam-web-1   Started   2.6s
alpine-docker:/opt/docker/phpipam#
If you notice, this doesn’t show to the web network being created (because it was already created by Traefik) but does bring up the container.
Checking to make sure it’s working
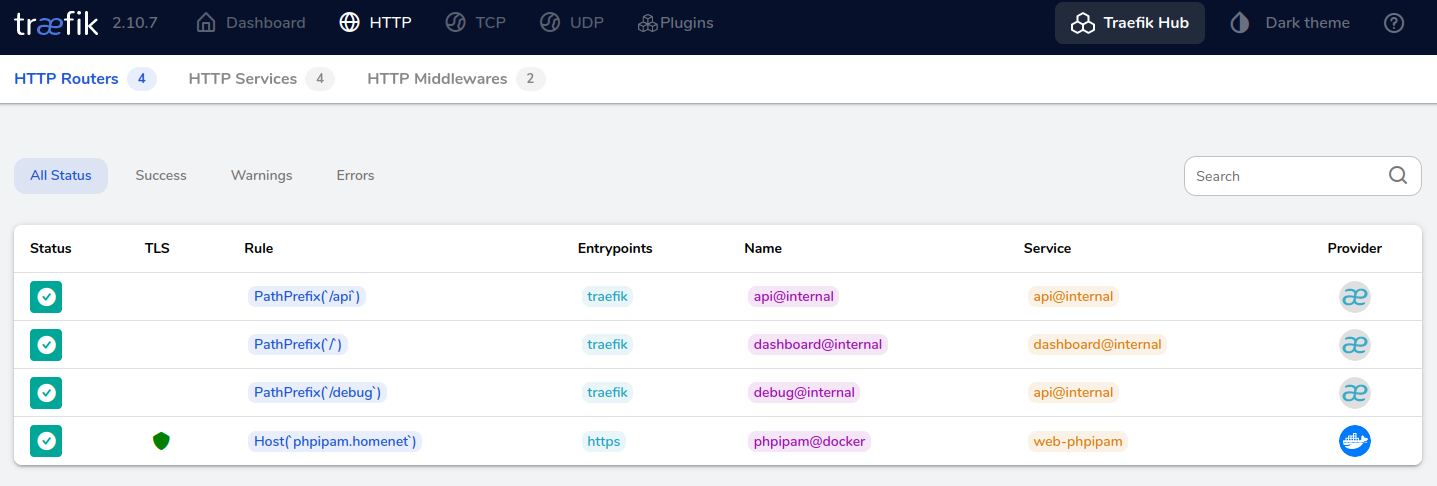
If we head to the Traefik dashboard (http://your-docker-server:8080) you’ll see the phpipam service identified there… yey!
Better TLS with Lets Encrypt
So, at home I actually have a DNS suffix that is a real DNS name. For the sake of the rest of this documentation, assume it’s homenet.sprig.gs (but it isn’t 😁).
This DNS space is hosted by Digital Ocean, so I can use a DNS Challenge with Lets Encrypt to provide hostnames which are not publically accessible. If you’re hosting with someone else, then that’s probably also available – check the Traefik documentation for your specific variables. The table on that page (as of 2023-12-30) shows the environment variables you need to pass to Traefik to get LetsEncrypt working.

As you can see here, I just need to add the value DO_AUTH_TOKEN, which is an API key. I went to the Digital Ocean console, and navigated to the API panel, and added a new “Personal Access Token”, like this:
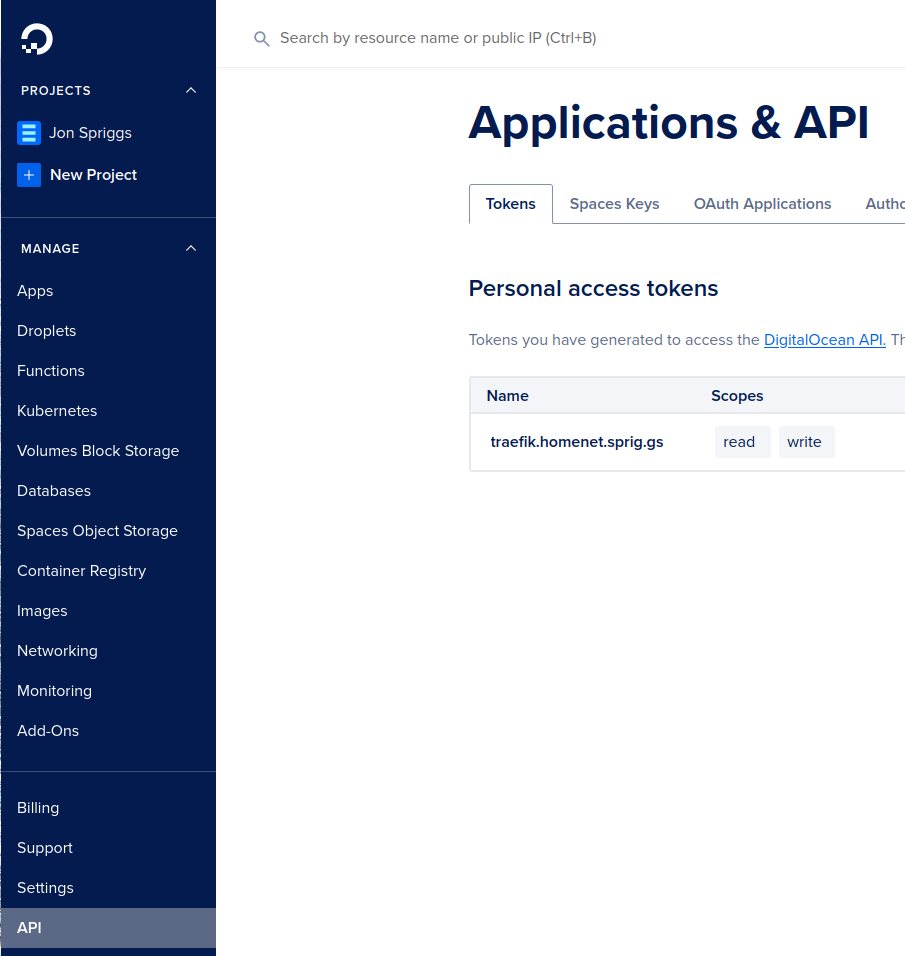
Notice that the API key needed to provide both “Read” and “Write” capabilities, and has been given a name so I can clearly see it’s purpose.
Changing the traefik docker-compose.yaml file
In /opt/docker/traefik/docker-compose.yaml we need to add that new environment variable; DO_AUTH_TOKEN, like this:
services:
  traefik:
# ...... The rest of the config for this service
    environment:
      DO_AUTH_TOKEN: dop_v1_decafbad1234567890abcdef....1234567890
# ...... and the rest of the config
Changing the traefik.yaml file
In /opt/docker/traefik/traefik.yaml we need to tell it to use Let’s Encrypt. Add this block to the end of the file:
certificatesResolvers:
  letsencrypt:
    acme:
      email: yourname@example.org
      storage: acme.json
      dnsChallenge:
        provider: digitalocean
        delayBeforeCheck: 1 # Minutes
        resolvers:
          - "1.1.1.1:53"
          - "8.8.8.8:53"
Obviously change the email address to a valid one for you! I hit a few issues with the value specified in the documentation for delayBeforeCheck, as their value of “0” wasn’t long enough for the DNS value to be propogated around the network – 1 minute is enough though!
I also had to add the resolvers, as my local network has a caching DNS server, so I’d never have seen the updates! You may be able to remove both those values from your files.
Now you’ve made all the changes to the Traefik service, restart it with docker compose down ; docker compose up -d
Changing the services to use Lets Encrypt
We need to add one final label to the /opt/docker/phpipam/docker-compose.yaml file, which is this one:
services:
  web:
# ...... The rest of the config for this service
    labels:
      - traefik.http.routers.phpipam.tls.certresolver=letsencrypt
# ...... and the rest of the config
Also, update your .rule=Host(`hostname`) to use the actual DNS name you want to be able to use, then restart the docker container.
phpIPAM doesn’t like trusting proxies, unless explicitly told to, so I also had add an environment variable IPAM_TRUST_X_FORWARDED=true to the /opt/docker/phpipam/docker-compose.yaml file too, because phpIPAM tried to write the HTTP scheme for any links which came up, based on what protocol it thought it was running – not what the proxy was telling it it was being accessed as!
Debugging any issues
If you have it all setup as per the above, and it isn’t working, go into /opt/docker/traefik/traefik.yaml and change the stanza which says log: {} to:
log:
  level: DEBUG
Be aware though, this adds a LOT to your logs! (But you won’t see why your ACME requests have failed without it). Change it back to log: {} once you have it working again.
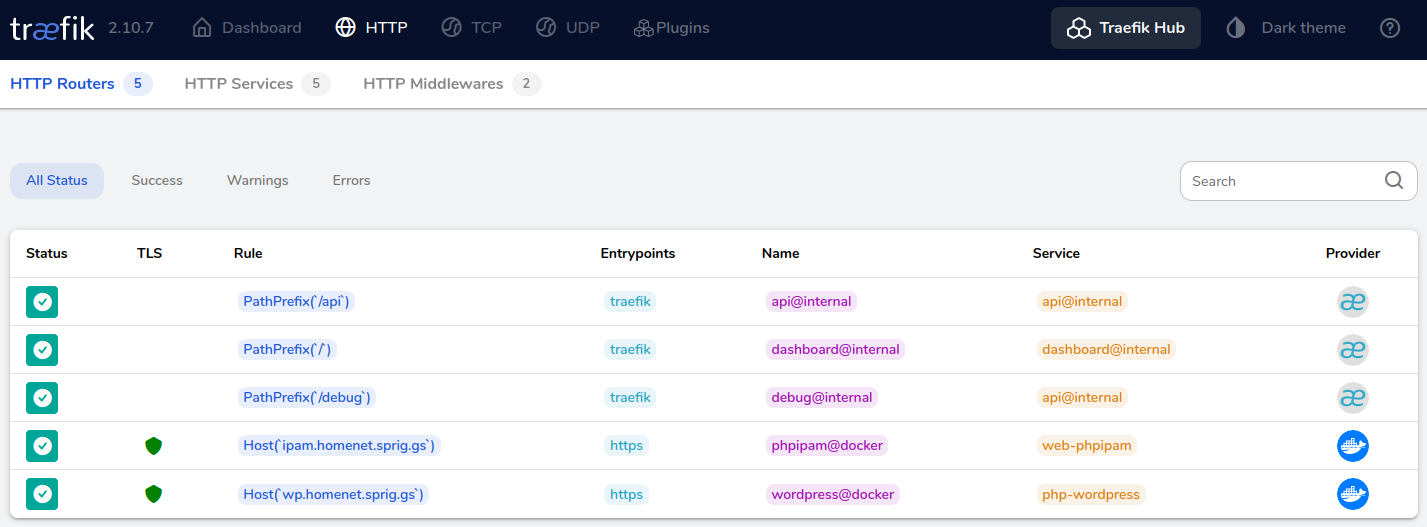
Adding your next service
I now want to add that second service to my home network – WordPress. Here’s /opt/docker/wordpress/docker-compose.yaml for that service;
version: '3.7'
networks:
web:
name: web
external: true
attachable: true
wordpress:
name: wordpress
services:
php:
image: wordpress:latest
expose:
- 80
environment:
- WORDPRESS_DB_HOST=mariadb
- WORDPRESS_DB_USER=db_user
- WORDPRESS_DB_PASSWORD=db_pass
- WORDPRESS_DB_NAME=wordpress
volumes:
- wordpress:/var/www/html
labels:
- traefik.enable=true
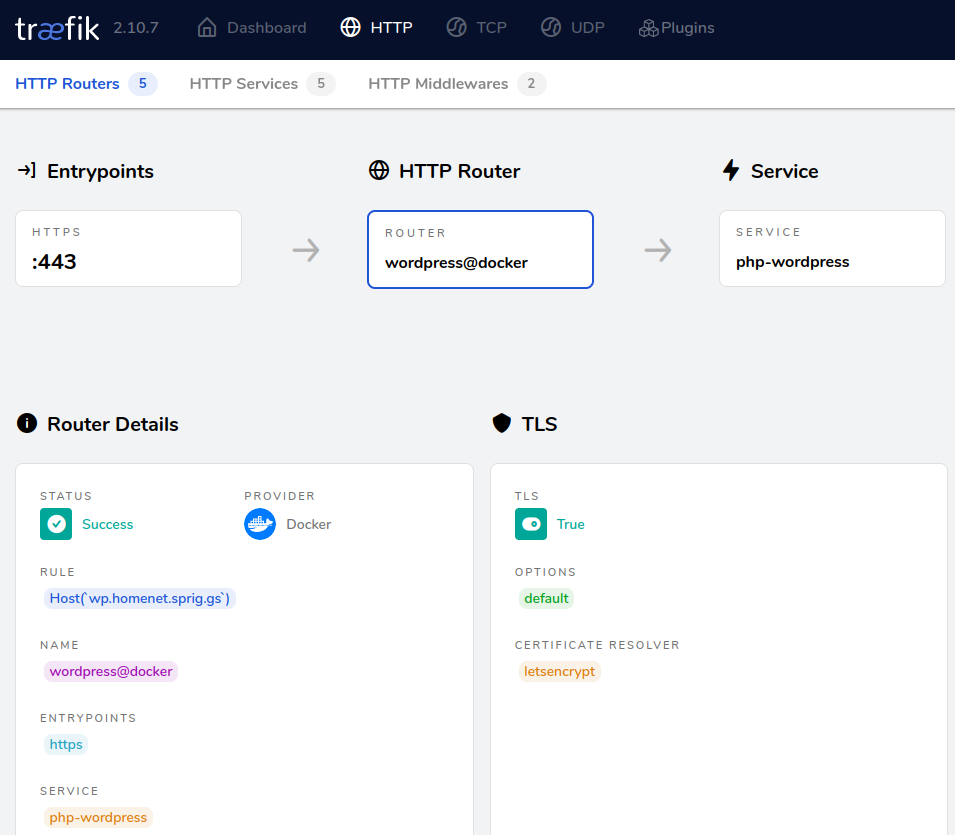
- traefik.http.routers.wordpress.rule=Host(`wp.homenet.sprig.gs`)
- traefik.http.routers.wordpress.tls.certresolver=letsencrypt
depends_on:
- mariadb
networks:
- wordpress
- web
mariadb:
image: mariadb:10.3
environment:
MYSQL_ROOT_PASSWORD: True
MYSQL_USER: db_user
MYSQL_PASSWORD: db_pass
MYSQL_DATABASE: wordpress
volumes:
- db:/var/lib/mysql
networks:
- wordpress
volumes:
wordpress:
db:And then we start it up;
alpine-docker:/opt/docker/wordpress# docker compose up -d
[+] Running 3/3
 ✔ Network wordpress              Created   0.2s
 ✔ Container wordpress-mariadb-1  Started   3.0s
 ✔ Container wordpress-php-1      Started   3.8s
alpine-docker:/opt/docker/wordpress#
Tada!
One final comment – I never did work out how to make connections forceably upgrade from HTTP to HTTPS, so instead, I shut down port 80 in Traefik, and instead run this container.
Featured image is “Traffic” by “Make Lemons” on Flickr and is released under a CC-BY-SA license.