This is a little different from my usual posts, but I heard about this from the User Error podcast this morning. In 2018 Melinda Seckington gave a talk at DevRelCon Tokyo which she then reposted in full detail on her blog. This set of posts is well worth a read, particularly if you’re someone who enjoys writing and delivering presentations, or if it’s part of your job.
While I don’t adhere to her advice exactly, I can see a lot of benefits to the way that she’s advising to create your decks.
It’s worth mentioning that if you follow the links on the blog posts, post 4 of 5 links to the wrong page for the last page (post 5/5), but there is a “next post” button at the bottom of the page… or just follow the links from this page :)
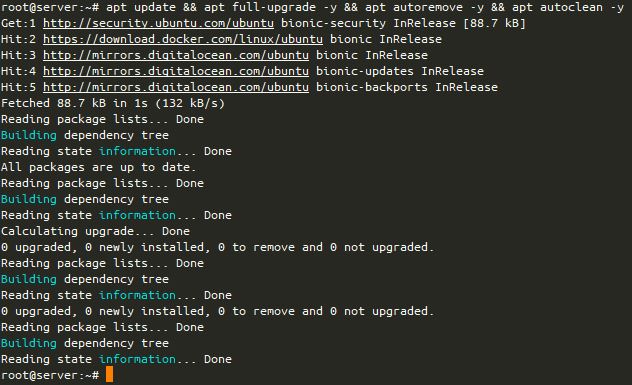
I’ve got a small Ansible script that I bundle up on Ubuntu boxes to do apt updates. This was originally a one-statement job, but I’ve added a few lines to it, so I thought I’d explain what I’m doing (more for myself, for later!)
Initally, I just had a task to do apt: upgrade=full update_cache=yes autoremove=yes autoclean-yes but if you’re running the script over and over again, well, this gets slow… So I added a tweak!
Here it is folks, in all it’s glory!
- hosts: all
  tasks:
  - name: Get stat of last run apt
    stat:
      path: /var/cache/apt/pkgcache.bin
    register: apt_run

  - name: "Apt update, Full-upgrade, autoremove, autoclean check"
    debug:
      msg: "Skipping apt-update, etc. actions as apt update was run today"
    when: "'%Y-%m-%d' | strftime(apt_run.stat.mtime) in ansible_date_time.date"

  - name: "Apt update, Full-upgrade, autoremove, autoclean"
    apt:
      upgrade: full
      update_cache: yes
      autoremove: yes
      autoclean: yes
    when: "'%Y-%m-%d' | strftime(apt_run.stat.mtime) not in ansible_date_time.date"
What does this do? Well, according to this AskUbuntu post, the best file to check if an update has been performed is /var/cache/apt/pkgcache.bin, so we check the status of that file. Most file systems available to Linux distributions provide the mtime – or “last modified time”. This is returned in the number of seconds since UTC 00:00:00 on the Unix Epoch (1970-01-01), so we need to convert that to a date., which we return as YYYY-MM-DD (e.g. today is 2020-01-06) and then compare that to what the system thinks today is. If the dates don’t equate (so one string doesn’t match the other – in other words, apt update wasn’t run today), it runs the update. If the dates do match up, we get a statement saying that apt update was already run.
Hello bold traveller! I recently got into a discussion with someone about how I put content into my blog and I realised that people don’t write this stuff down enough!
At the end of this post, I’d expect you to be able to use this information to be able to create your own, similar stack. If you don’t have the technical knowledge to be able to do so, you should at least have the pieces of information to ask someone else to help you build it. While I’d be flattered if you asked me for similar advice, I’m afraid I have limited time for new projects, even consultancy ones, and all I can do is point you back to this blog!
That said, consider this a bit of the “making the sausage” that most people don’t tend to share! 😀
I’m still digging into the details of it, but in essence, the “Armadillo” (Crunchy on the outside, soft on the inside) protection model is broken (sometimes known as the “Fortress Model”). You assume that your impenetrable network boundary will prevent attackers from getting to your sensitive data. While this may stop them for a while, what you’re actually seeing here is one part of a complex protection system, however many organisations miss the fact that this is just one part.
The examples used in the onlyonline content I’ve found about this refer to a burglary.
In this context, your “Protection” (P) is measured in time. Perhaps you have hardened glass that takes 20 seconds to break.
Next, we evaluate “Detection” (D) which is also, surprisingly enough, measured in time. As the glass is hit, it triggers an alarm to a security facility. That takes 20 seconds to respond and goes to a dispatch centre, another 20 seconds for that to be answered and a police officer dispatched.
The police officer being dispatched is the “Response” (R). The police take (optimistically) 2 minutes to arrive (it was written in the 90’s so the police forces weren’t decimated then).
So, in the TBS system, we say that Detection (D) of 40 seconds plus Response (R) of 120 seconds = 160 seconds. This is greater than Protection (P) of 20 seconds, so we have an Exposure (E) time of 140 seconds E = P – (D + R). The question that is posed is, how much damage can be done in E?
So, compare this to your average pre-automation SOC. Your firewall, SIEM (Security Incident Event Management system), IDS (Intrusion Detection System) or WAF (Web Application Firewall) triggers an alarm. Someone is trying to do something (e.g. Denial Of Service attack, password spraying or port scanning for vulnerable services) a system you’re responsible for. While D might be in the tiny fractions of a minute (perhaps let’s say 1 minute, for maths sake), R is likely to be minutes or even hours, depending on the refresh rate of the ticket management system or alarm system (again, for maths sake, let’s say 60 minutes). So, D+R is now 61 minutes. How long is P really going to hold? Could it be less than 30 minutes against a determined attacker? (Let’s assume P is 30 minutes for maths sake).
Let’s do the calculation for a pre-automation SOC (Security Operations Centre). P-(D+R)=E. E here is 31 minutes. How much damage can an attacker do in 31 minutes? Could they put a backdoor into your system? Can they download sensitive data to a remote system? Could they pivot to your monitoring system, and remove the logs that said they were in there?
If you consider how much smaller the D and R numbers become with an event driven SOAR (Security Orchestration and Automation Response) system – does that improve your P and E numbers? Consider that if you can get E to 0, this could be considered to be “A Secure Environment”.
Also, consider the fact that many of the tools we implement for security reduce D and R, but if you’re not monitoring the outputs of the Detection components, then your response time grows significantly. If your Detection component is misconfigured in that it’s producing too many False Positives (for example, “The Boy Who Cried Wolf“), so you don’t see the real incident, then your Response might only be when a security service notifies you that your data, your service or your money has been exposed and lost. And that wouldn’t be good now… Time to look into automation 😁
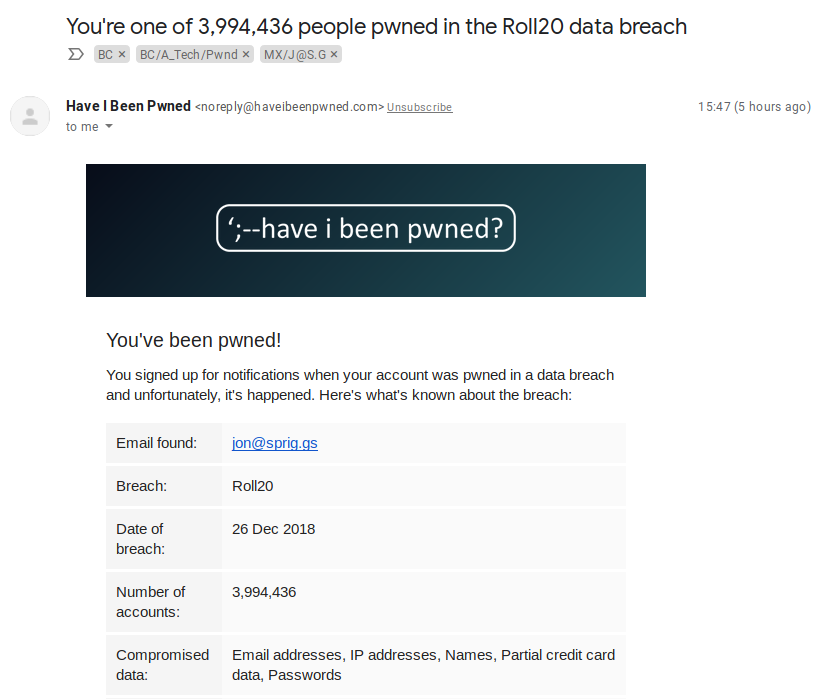
Hello! Maybe you just got a sneeking suspicion that a website you trusted isn’t behaving right, perhaps someone told you that “unusual content” is being posted in your name somewhere, or, if you’re really lucky, you might have just had an email from a website like “HaveIBeenPwned.com” or “Firefox Monitor“. It might look something like this:
An example of an email from the service “Have I Been Pwned”
Of course, it doesn’t feel like you’re lucky! It’s OK. These things happen quite a lot of the time, and you’re not the only one in this boat!
How bad is it, Doc?
First of all, don’t panic! Get some idea of the scale of problem this is by looking at a few key things.
How recent was the breach? Give this a score between 1 (right now) and 10 (more than 1 month ago).
How many websites and services do you use this account on? Give this a score between 1 (right now) and 10 (OMG, this is *my* password, and I use it everywhere).
How many other services would use this account to authenticate to, or get a password reset from? Give this a score between 1 (nope, it’s just this website. We’re good) and 10 (It’s my email account, and everything I’ve ever signed up to uses this account as the login address… or it’s Facebook/Google and I use their authentication to login to everything else).
How much does your reputation hang on this website or any other websites that someone reusing the credentials of this account would get access to? Give this a score between 1 (meh, I post cat pictures from an anonymous username) and 10 (I’m an INFLUENCER HERE dagnamit! I get money because I said stuff here and/or my job is on that website, or I am publicly connected to my employer by virtue of that profile).
(Optional) If this is from a breach notification, does it say that it’s just email addresses (score 1), or that it includes passwords (score 5), unencrypted or plaintext passwords (score 8) or full credit card details (score 10)?
Once you’ve got an idea of scale (4 to 40 or 5 to 50, depending on whether you used that last question), you’ve got an idea of how potentially bad it is.
Take action!
Make a list of the websites you think that you need to change this password on.
Start with email accounts (GMail, Hotmail, Outlook, Yahoo, AOL and so on) – each email account that uses the same password needs to be changed, and this is because almost every website uses your email address to make a “password” change on it! (e.g. “Forgot your password, just type in your email address here, and we’ll send you a reset link“).
Prominent social media profiles (e.g. Facebook, Twitter, Instagram) come next, even if they’re not linked to your persona. This is where your potential reputation damage comes from!
Next up is *this* website, the one you got the breach notification for. After all, you know this password is “wild” now!
Change some passwords
This is a bit of a bind, but I’d REALLY recommend making a fresh password for each of those sites. There are several options for doing this, but my preferred option is to use a password manager. If you’re not very tech savvy, consider using the service Lastpass. If you’re tech savvy, and understand how to keep files in sync across multiple devices, you might be interested in using KeePassXC (my personal preference) or BitWarden instead.
No really. A fresh password. Per site. Honest. And not just “MyComplexPassw0rd-Hotmail” because there are ways of spotting you’ve done something like that, and when they come to your facebook account, they’ll try “MyComplexPassw0rd-Facebook” just to see if it gets them in.
ℹ️ Using a password manager gives you a unique, per-account password. I just generated a fresh one (for a dummy website), and it was 2-K$F+j7#Zz8b$A^]qj. But, fortunately, I don’t have to remember it. I can just copy and paste it in to the form when I need to change it, or perhaps, if you have a browser add-on, that’ll fill it in for you.
Making a list, and checking it twice!
Fab, so you’ve now got a lovely list of unique passwords. A bit like Santa, it’s time to check your list again. Assume that your list of sites you just changed passwords for were all compromised, because someone knew that password… I know, it’s a scary thought! So, have a look at all those websites you just changed the password on and figure out what they have links to, then you’ll probably make your list of things you need to change a bit bigger.
Not sure what they have links to?
Well, perhaps you’re looking at an email account… have a look through the emails you’ve received in the last month, three months or year and see how many of those come from “something” unique. Perhaps you signed up to a shopping site with that email address? It’s probably worth getting a password reset for that site done.
Perhaps you’re looking at a social media site that lets you login to other services? Check through those other services and make sure that “someone” hasn’t allowed access to a website they control. After all, you did lose access to that website, and so you don’t know what it’s connected to.
Also, check all of these sites, and make sure there aren’t any unexpected “active sessions” (where someone else is logged into your account still). If you have got any, kick them out :)
OK, so the horse bolted, now close the gate!
Once you’ve sorted out all of these passwords, it’s probably worth looking at improving your security in general. To do this, we need to think about how people get access to your account. As I wrote in my “What to do when your Facebook account gets hacked?” post:
What if you accidentally gave your password to someone? Or if you went to a website that wasn’t actually the right page and put your password in there by mistake? Falling prey to this when it’s done on purpose is known as social engineering or phishing, and means that someone else has your password to get into your account.
The easiest way of locking this down is to use a “Second Factor” (sometimes abbreviated to 2FA). You need to give your password (“something you know”) to log into the website. Now you also need something separate, that isn’t in the same store. If this were a physical token (like a SoloKey, Yubikey, or a RSA SecurID token), it’d be “something you have” (after all, you need to carry around that “token” with you), but normally these days it’s something on your phone.
Some places will send you a text message, others will pop up an “approve login” screen (and, I should note, if you get one and YOU AREN’T LOGGING IN, don’t press “approve”!), or you might have a separate app (perhaps called “Google Authenticator”, “Authy” or something like “Duo Security”) that has a number that keeps changing.
You should then finish your login with a code from that app, SMS or token or reacting to that screen or perhaps even pressing a button on a thing you plug into your computer. If you want to know how to set this up, take a look at “TwoFactorAuth.org“, a website providing access to the documentation on setting up 2FA on many of the websites you currently use… but especially do this with your email accounts.
SemVer, short for Semantic Versioning is an easy way of numbering your software versions. They follow the model Major.Minor.Patch, like this 0.9.1 and has a very opinionated view on what is considered a Major “version bump” and what isn’t.
Sometimes, when writing a library, it’s easy to forget what version you’re on. Perhaps you have a feature change you’re working on, but also bug fixes to two or three previous versions you need to keep an eye on? How about an easy way of figuring out what that next bump should be?
In a recent conversation on the McrTech slack, Steven [0] mentioned he had a simple bash script for incrementing his SemVer numbers, and posted it over. Naturally, I tweaked it to work more easily for my usecases so, this is *mostly* Steven’s code, but with a bit of a wrapper before and after by me :)
Late Edit: 2022-11-19 ictus4u spotted that I wasn’t handling the reset of PATCH to 0 when MINOR gets a bump. I fixed this in the above gist.
So how do you use this? Dead simple, use nextver in a tree that has an existing git tag SemVer to get the next patch number. If you want to bump it to the next minor or major version, try nextver minor or nextver major. If you don’t have a git tag, and don’t specify a SemVer number, then it’ll just assume you’re starting from fresh, and return 0.0.1 :)
What we do here is to start an action with an “async” time (to give the Schedule an opportunity to register itself) and a “poll” time of 0 (to prevent the Schedule from waiting to be finished). We then tell it that it’s “never changed” (changed_when: False) because otherwise it always shows as changed, and to register the scheduled item itself as a “sleeper”.
After all the async jobs get queued, we then check the status of all the scheduled items with the async_status module, passing it the registered job ID. This lets me spin up a lot more items in parallel, and then “just” confirm afterwards that they’ve been run properly.
It’s not perfect, and it can make for rather messy code. But, it does work, and it’s well worth giving it the once over, particularly if you’ve got some slow-to-run tasks in your playbook!
An Ansible project I’ve been working on has tripped me up this week. I’m working with some HTTP APIs and I need to check early whether I can reach the host. To do this, I used a simple Ansible Core Module which lets you call an HTTP URI.
And this breaks the uri module, because it tries to punt everything through the proxy if the “no_proxy” contains CIDR values (like 192.0.2.0/24) (there’s a bug raised for this)… So here’s my fix!
The key part to this script is that we need to override the no_proxy environment variable with the IP address that we’re trying to address (so that we’re not putting 16M addresses for 10.0.0.0/8 into no_proxy, for example). To do that, we use the exact same URI block, except for the environment line at the end.
In turn, the set_fact block steps through the no_proxy values, looking for IP Addresses to check ({% if no_proxy | ipaddr ... %} says “if the no_proxy value is an IP Address, return it, but if it isn’t, return a ‘None’ value”) and if it’s an IP address or subnet mask, it checks to see whether the IP address of the host you’re trying to reach falls inside that IP Address or Subnet Mask ({% if ansible_host | ipaddr(no_proxy) ... %} says “if the ansible_host address falls inside the no_proxy range, then return it, otherwise return a ‘None’ value”). Both of these checks say “If this previous check returns anything other than a ‘None’ value, do the next thing”, and on the last check, the “next” thing is to set the flag ‘match’ to ‘true’. When we get to the environment variable, we say “if match is not true, it’s false, so don’t put a value in there”.
So that’s that! Yes, I could merge the set_fact block into the environment variable, but I do end up using that a fair amount. And really, if it was merged, that would be even MORE complicated to pick through.
Recently a friend of mine forwarded an email to me about a Wi-fi service he wanted to use from a firm, but he raised some technical questions with them which they seemed to completely misunderstand!
So, let’s talk about the misconceptions of Wi-fi passwords.
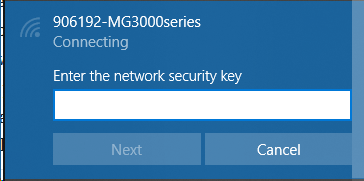
People also assume the same thing about Wi-fi. You reached a log in page, so it must be secure, right? It depends. If you didn’t put in a password to access the Wi-fi in the first place (like in the image of the Windows 10 screen, or on my KDE Desktop) then you’re probably using Unsecured Wi-fi.
An example of a secured Wi-fi sign-in box on Windows 10The same Wi-fi sign in box on KDE Neon
People like to compare network traffic to “sending things through the post”, notablycomparing E-Mail to “sending a postcard”, versus PGP encrypted E-Mail being compared to “sending a sealed letter”. Unencrypted Wi-fi is like using CB. Anyone who can hear your signal can understand what you are saying… but if you visit a website which uses HTTPS, then it’s like listening to someone saying random numbers over the radio.
So, many of these things can be protected against by using a simple method, that many people who provide Wi-fi don’t do.
Turn on WPA2 (the authentication bit). Even if *everyone* uses the same password (which they’d have to for WPA2), the fact you’re logging into the Access Point means it creates a unique shared secret for your session.
“But hang on”, I hear the guy at the back cry, “you used the same password – how does that work?”
OK, so this is where the fun stuff starts. The password is just part of how you negotiate to get on to the network. There’s a complex beast of a method that explains how get a shared unique secret when you’re passing stuff around “in the clear”, and so as a result, when you first connect to that Wi-fi access point, and you hand over your password, it “Authorises” you on to the network, but then hands you over to the encryption part, where you generate a key and then use that to talk to each other. The encryption is the bit like “HTTPS”, where you make it so that people can’t see what you’re looking at.
“I got told that if everyone used the same password” said a hipster in the front row, “I wouldn’t be able to tell them apart.” Aha, not true. You can have a separate passphrase to access the Wi-fi from the Login page, after all, you’ve got to make sure that people aren’t breaking the rules (which they *TOTALLY* read, before clicking “I agree, just get me on the damn Wi-fi already”) by using your network.
“OK”, says the lady over on the right, “but when I connected to the Wi-fi, they asked me to log in using Facebook – that’s secure, right?”
Um, no. Well, maybe. See, if they gave you a WPA2 password to log into the Wi-fi, and then the first thing you got to was that login screen, then yep, it’s all good! {*} You can browse with (relative) impunity. But if they didn’t… well, not only are they asking you to shout your secrets on the radio, but if you’re really unlucky, the page asking you to log into Facebook might *also* not actually be Facebook, but another website that just looks like Facebook… after all, I’m sure that page you went to complained that it wasn’t Google or Facebook when you tried to open it…
{*} Except for the fact they’re asking you to tell them not only who you are, but who you’re also friends with, where you went to school, what your hobbies are, what groups you’re in, your date of birth and so on.
But anyway. I understand why those login screens are there. They’re asserting that not only do you understand that you mustn’t use their network for bad things, but that if the police come and ask them who used their network to do something naughty, they can say “He said his name was ‘Bob Smith’ and his email address was ‘bob@example.com’, Officer”…
It also means that the “free” service they provide to you, usually at some great expense (*eye roll*) can get them some return on investment (like, they just got your totally-real-and-not-at-all-made-up-email-address… honest, and they also know what websites you visited while you were there, which they can sell on).
So… What to do the next time you “need” Wi-fi, and there’s a free service there? Always use a VPN when you’re not using a network you trust. If the Wi-fi isn’t using WPA2 encryption (even something as simple as “Buy a drink first” is a great passphrase to use!) point them to this page, and tell them it’s virtually pain free (as long as the passphrase is easy to remember, easy to type and doesn’t have too many weird symbols in) and makes their service more safe and secure for their customers…
Recently, I’ve been migrating my POV (proof of value) and POC (proof of concept) environment from K5 to Azure to be able to test vendor products inside Azure. I ran a few tests to build the environment using the native tools (the powershell scripts) and found that the Powershell way of delivering Azure environments seems overly complicated… particularly as I’m comfortable with how Ansible works.
To be fair, I also need to look at Terraform, but that isn’t what I’m looking at today :)
So, let’s start with the scaffolding. Any Ansible Playbook which deals with creating virtual machines needs to have some extra modules installed. Make sure you’ve got ansible 2.7 or later and the python azure library 2.0.0 or later (you can get both with pip for python).
Next, let’s look at the group_vars for this playbook.
This file has several pieces. We define the project settings (anything prefixed project_ is a project setting), including the prefix used for all resources we create (in this case “env01“), and a standard password used for all VMs we create (in this case “My$uper$ecret$Passw0rd“).
Next we define the standard images to load from the Marketplace. You can extend this with other images, these are just the “easiest” ones that I’m most familiar with (your mileage may vary). Next up is the networks to build inside the VNet, and lastly we define the actual machines we want to build. If you’ve got questions about any of the values we define here, just let me know in the comments below :)
Here we start by pulling in the variables we might want to override, and we do this by reading system environment variables (ANSIBLE_PREFIX and BREAKGLASS) and using them if they’re set. If they’re not, use the project defaults, and if that hasn’t been set, use some pre-defined values… and then tell us what they are when we’re running the tasks (those are the debug: lines).
This block is where we create our “Static Assets” – individual items that we will be consuming later. This shows a clear win here over the Powershell methods endorsed by Microsoft – here you can create a Resource Group (RG) as part of the playbook! We also create a single Storage Account for this RG and a single VNET too.
These creation rules are not suitable for production use, as this defines an “Any-Any” Security group! You should tailor your security groups for your need, not for blanket access in!
This is where things start to get a bit more interesting – We’re using the “async/async_status” pattern here (and the rest of these sections) to start creating the resources in parallel. As far as I can tell, sometimes you’ll get a case where the async doesn’t quite get set up fast enough, then the async_status can’t track the resources properly, but re-running the playbook should be enough to sort that out, without slowing things down too much.
But what are we actually doing with this block of code? A UDR is a “User Defined Route” or routing table for Azure. Effectively, you treat each network interface as being plumbed directly to the router (none of this “same subnet broadcast” stuff works here!) so you can do routing at the router for all the networks.
By default there are some existing network routes (stuff to the internet flows to the internet, RFC1918 addresses are dropped with the exception of any RFC1918 addresses you have covered in your VNETs, and each of your subnets can reach each other “directly”). Adding a UDR overrides this routing table. The UDRs we’re creating here are applied at a subnet level, but currently don’t override any of the existing routes (they’re blank). We’ll start putting routes in after we’ve added the UDRs to the subnets. Talking of which….
Again, this block is not really suitable for production use, and assumes the VNET supernet of /8 will be broken down into several /24’s. In the “real world” you might deliver a handful of /26’s in a /24 VNET… or you might even have lots of disparate /24’s in the VNET which are then allocated exactly as individual /24 subnets… this is not what this model delivers but you might wish to investigate further!
Now that we’ve created our subnets, we can start adding the routing table to the UDR. This is a basic one – add a 0.0.0.0/0 route (internet access) from the “protected” network via the firewall. You can get a lot more specific than this – most people are likely to want to add the VNET range (in this case 10.0.0.0/8) via the firewall as well, except for this subnet (because otherwise, for example, 10.0.0.100 trying to reach 10.0.0.101 will go via the firewall too).
Without going too much into the intricacies of network architecture, if you are routing your traffic between subnets to the firewall, it’s probably better to get an appliance with more interfaces, so you can route traffic across the appliance, rather than going across a single interface as this will halve your traffic bandwidth (it’s currently capped 1Gb/s – so 500Mb/s).
Having mentioned “The Internet” – let’s give our firewall a public IP address, and create the rest of the interfaces as well.
This script creates a public IP address by default for each interface unless you explicitly tell it not to (see lines 40, 53 and 62 in the group_vars file I rendered above). You could easily turn this around by changing the lines which contain this:
item.1.public is not defined or (item.1.public is defined and item.1.public == 'true')
into lines which contain this:
item.1.public is defined and item.1.public == 'true'
OK, having done all that, we’re now ready to build our virtual machines. I’ve introduced a “Priority system” here – VMs with priority 0 go first, then 1, and 2 go last. The code snippet below is just for priority 0, but you can easily see how you’d extrapolate that out (and in fact, the full code sample does just that).
There are a few blocks here to draw attention to :) I’ve re-jigged them a bit here so it’s clearer to understand, but when you see them in the main playbook they’re a bit more compact. Let’s start with looking at the Network Interfaces section!
network_interfaces: |
  [
    {%- for nw in item.value.ports -%}
      '{{ prefix }}{{ item.value.name }}port{{ nw.subnet.name }}'
      {%- if not loop.last -%}, {%- endif -%}
    {%- endfor -%}
  ]
In this part, we loop over the ports defined for the virtual machine. This is because one device may have 1 interface, or four interfaces. YAML is parsed to make a JSON variable, so here we can create a JSON variable, that when the YAML is parsed it will just drop in. We’ve previously created all the interfaces to have names like this PREFIXhostnamePORTsubnetname (or aFW01portWAN in more conventional terms), so here we construct a JSON array, like this: ['aFW01portWAN'] but that could just as easily have been ['aFW01portWAN', 'aFW01portProtect', 'aFW01portMGMT', 'aFW01portSync']. This will then attach those interfaces to the virtual machine.
Next up, custom_data. This section is sometimes known externally as userdata or config_disk. My code has always referred to it as a “Provision Script” – hence the variable name in the code below!
custom_data: |
  {%- if item.value.provision_script is defined and item.value.provision_script != '' -%}
    {%- include(item.value.provision_script) -%}
  {%- elif item.value.image.provision_script is defined and item.value.image.provision_script != '' -%}
    {%- include(item.value.image.provision_script) -%}
  {%- else -%}
    {{ omit }}
  {%- endif -%}
Let’s pick this one apart too. If we’ve defined a provisioning script file for the VM, include it, if we’ve defined a provisioning script file for the image (or marketplace entry), then include that instead… otherwise, pretend that there’s no “custom_data” field before you submit this to Azure.
One last quirk to Azure, is that some images require a “plan” to go with it, and others don’t.
plan: |
  {%- if item.value.image.plan is not defined -%}{{ omit }}{%- else -%}
    {'name': '{{ item.value.image.sku }}',
     'publisher': '{{ item.value.image.publisher }}',
     'product': '{{ item.value.image.offer }}'
    }
  {%- endif -%}
So, here we say “if we’ve not got a plan, omit the value being passed to Azure, otherwise use these fields we previously specified. Weird huh?
The very last thing we do in the script is to re-render the standard password we’ve used for all these builds, so that we can check them out!