I’ve just finished what felt like the worlds longest work instruction, and it made me think… I’ve got these great tools at my disposal for when I’m writing documentation – perhaps not everyone knows about them!?
So here are the main ones!
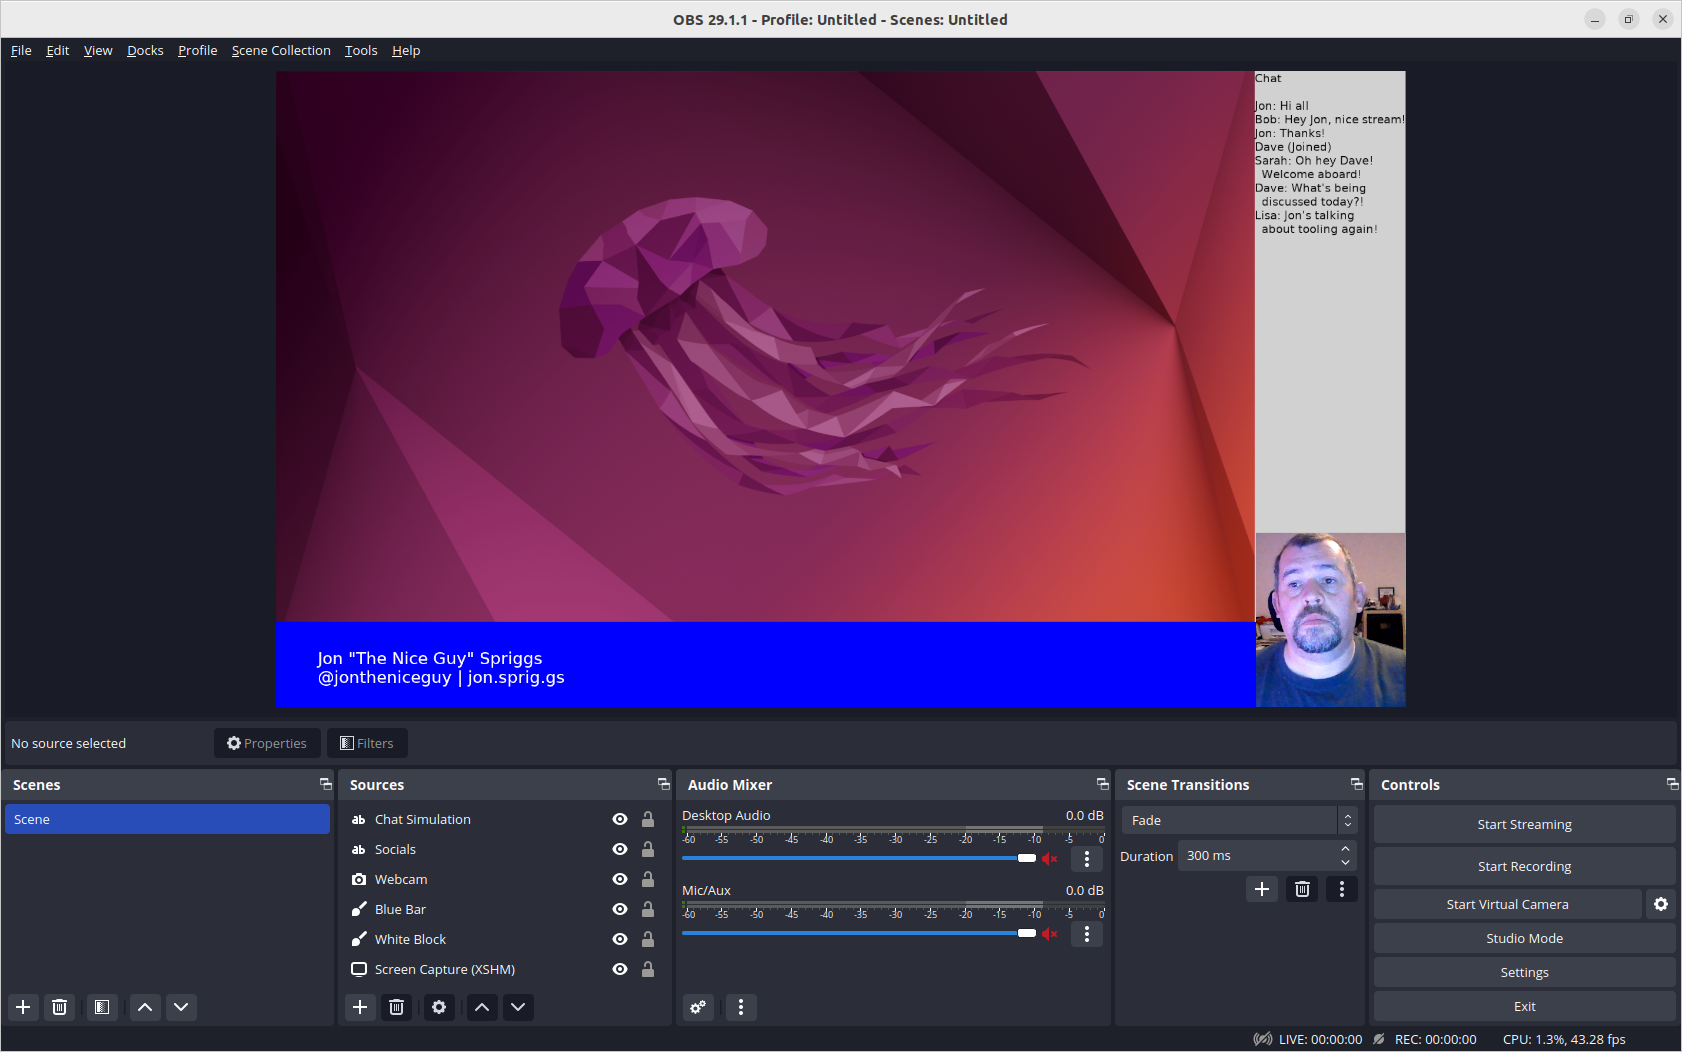
Open Broadcaster Software (OBS) Studio
OBS Studio is a screen recording application, most commonly used by eSports players and gamers to stream content to streaming platforms like Twitch. While it’s really easy to do stuff like “lower third” bars (like this)
It’s also really *really* easy to just record a screen, which makes it easy to just “set and forget” and then run through the tasks. In the past, I’ve been on highly-technical in-person training courses and run OBS while I’ve been in a room, just to make sure I didn’t miss any details when I went back over my notes later!
Clicking “Start Recording” in the bottom third of that screen starts writing the content of that screen into (by default) a MKV file in your home directory (on Linux), or into your Videos directory on Windows. I don’t recall where it went on OS X!
This means after the task is done, I can play it back with…
VideoLan Client (VLC)
VLC is (or, at least, was) the defacto video player for anyone who consumes media on their computer. In my case, I only really use it now for playing back files I’ve recorded with OBS, but it’s a great player.
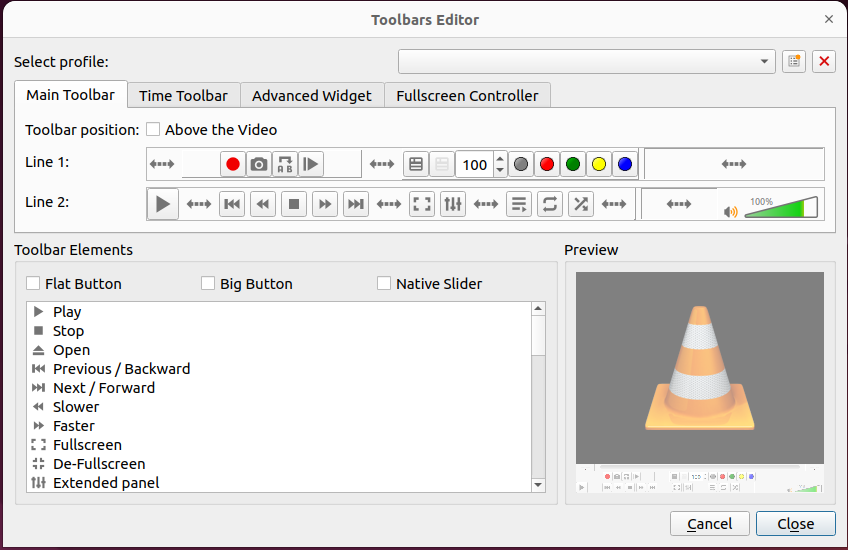
I only really make one key change to VLC, which is; adding the playback speed buttons. Different platforms do it differently, but on Linux and Windows at least, go to Tools -> Customise Interface and you’re presented with a screen like this:
I drag the “Slower” and “Faster” buttons to either side of the stop button, and will typically play videos back at 3x or even 8x speed to get to the areas I want, and then slow it down, sometimes, to 0.5x speed to get specific frames I’m looking for.
Once I get that frame, I’ll use a…
Screen Snipping Tool
On Windows this is the built-in snipping tool, found by pressing Windows+Shift+S. On Ubuntu, I’ve installed the package gnome-screenshot and the Gnome Extension Screenshot Tool.
With Snipping Tool you can draw circles around things and make annotations with a pen, but in extreme cases, I rely on the …
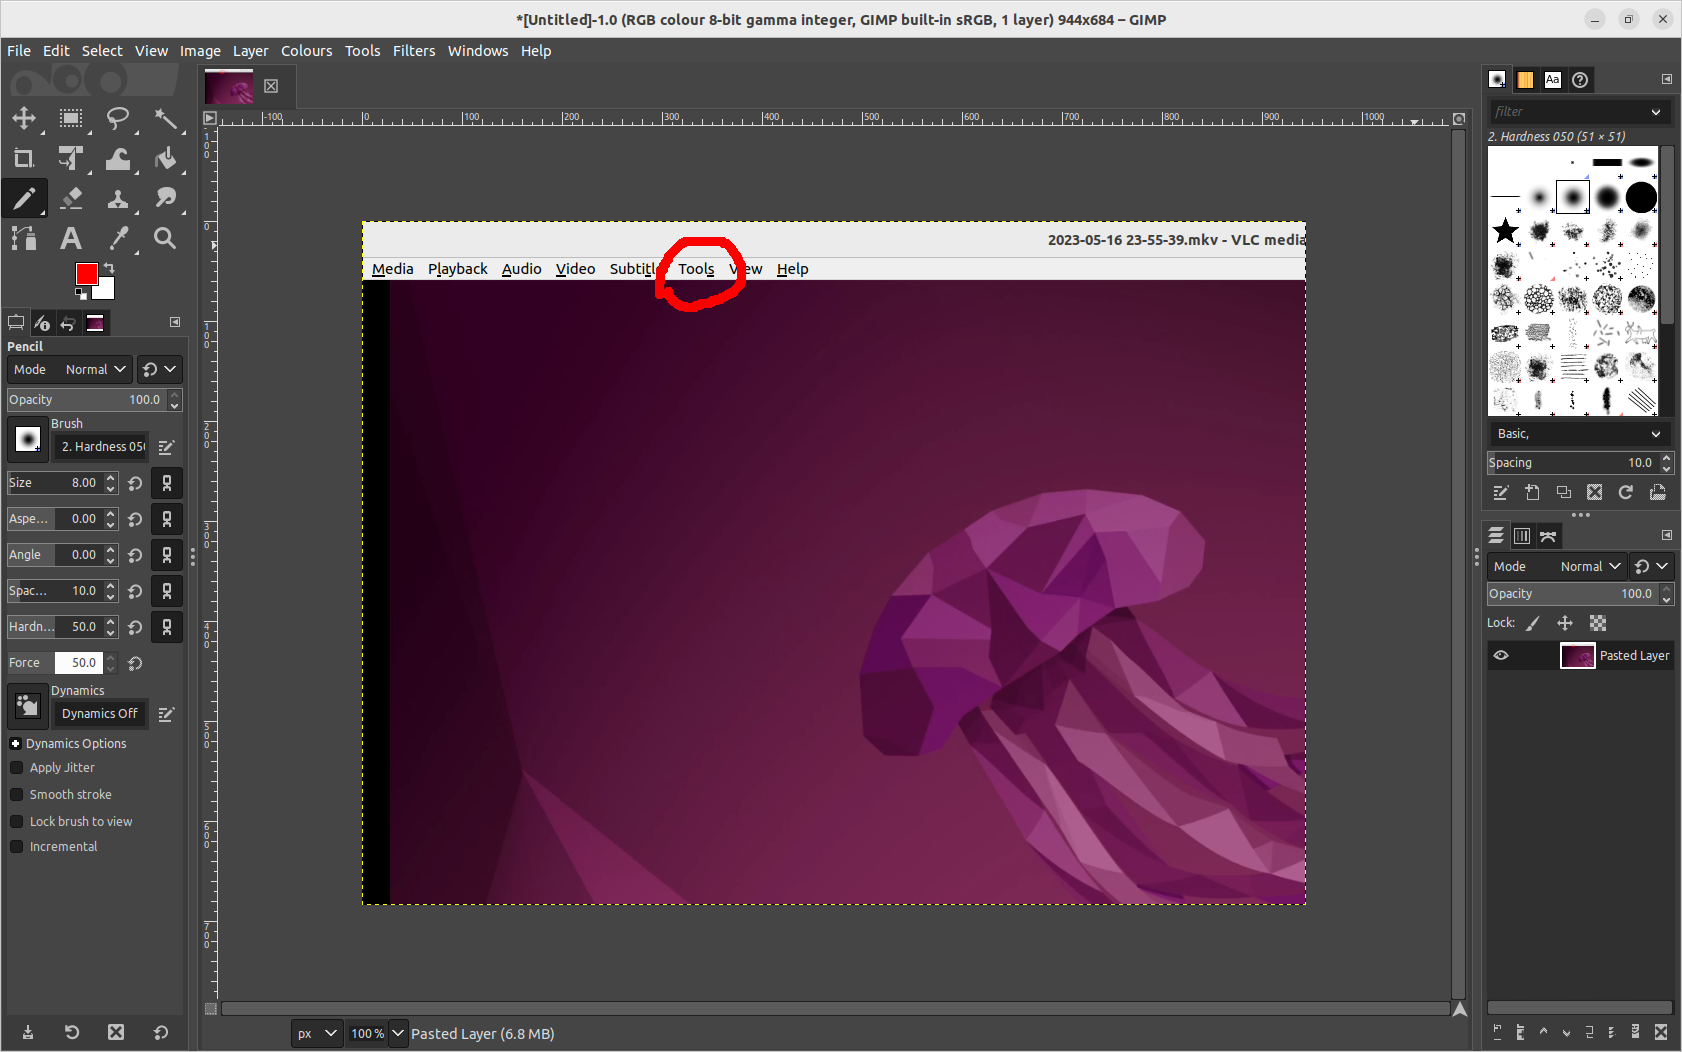
GNU Image Manipulation Program (GIMP).
GIMP, aside from being a badly named project (notably because most people over a certain age know about that scene from Pulp Fiction) is a FANTASTIC image editor. I use it for all sorts of editing, cropping and resizing, but I particularly love the layers menu on the side.
A couple of years ago my son wanted to give all his friends “membership cards” for a club he’d made. These were created in GIMP and just required him to clone a layer from the block on the right, hide the previous layer, and change the text in the clone.
This also means that if you want to easily highlight specific areas of the screen it’s only a few clicks to do it. Now, that said, it’s not as straightforward as Paint, and for anything beyond easy tweaks it will take a bit of experience, but it works.
This is all well and good, but sometimes you just need details from a terminal, where I’d use…
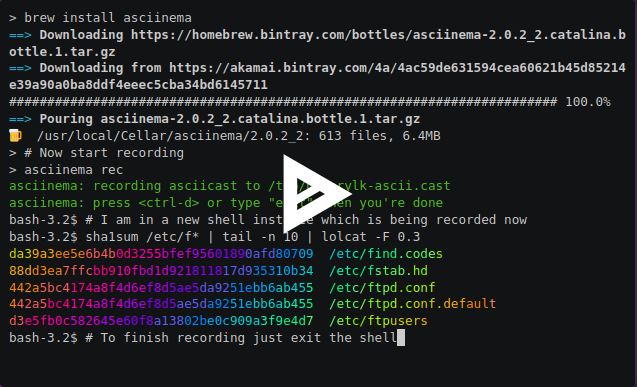
Asciinema
I use Asciinema (just a pip, apt or rpm away) when I’m working on something on a command line that I want to play back as a video, and the main reason is that I can adjust my output really quickly and easily!
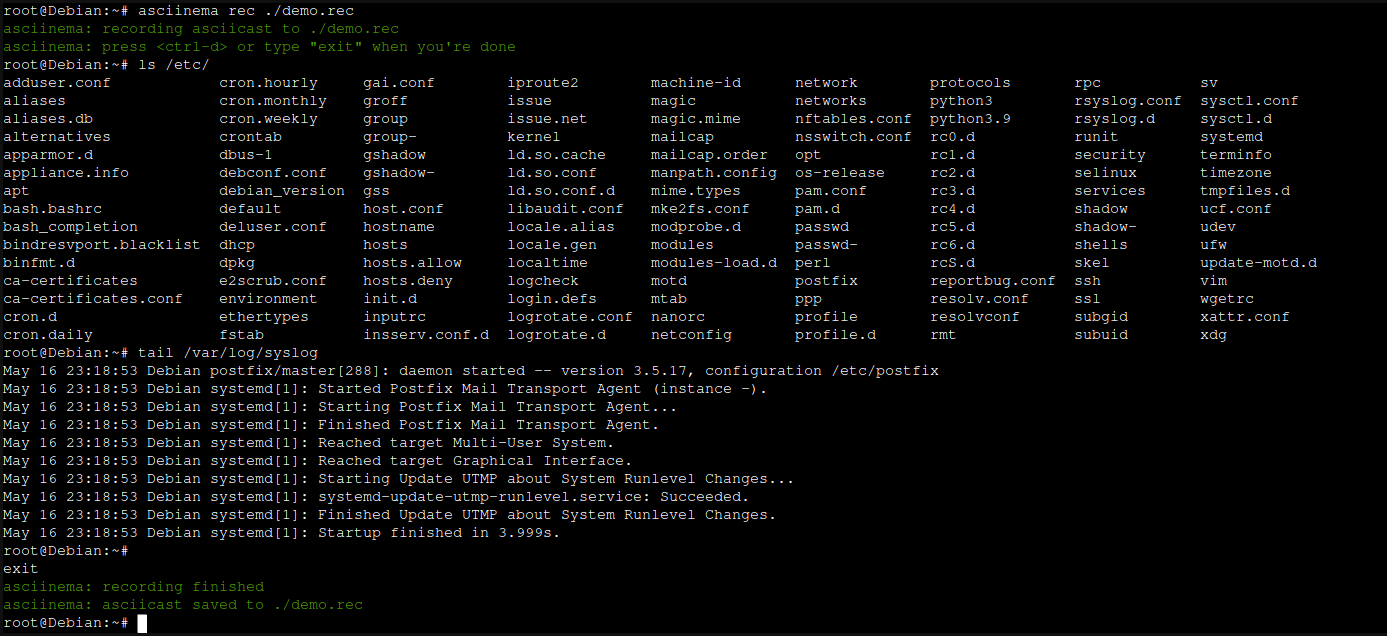
Consider this screen of data:
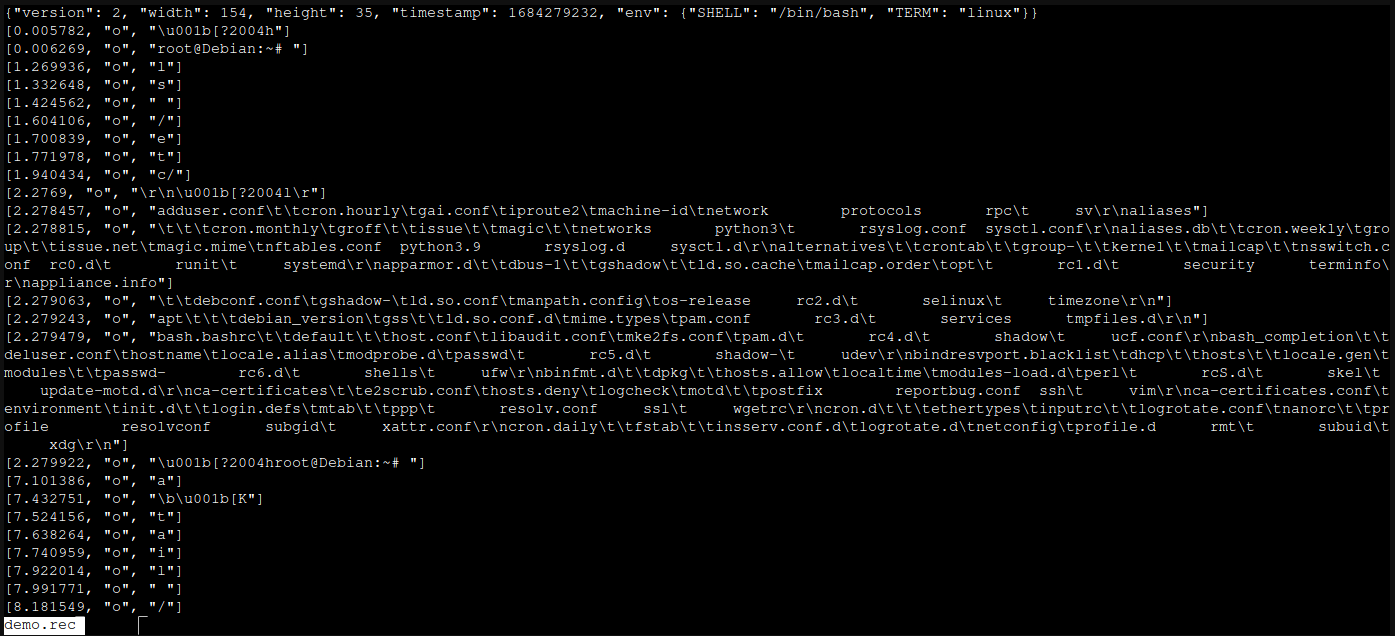
I “recorded” that using asciinema rec ./demo.rec and ended it with ctrl+d. That created a file called demo.rec, which looks like this:
Each line is prefixed with a timestamp, it then has a stream action (mostly o for “output”, but you can add m for “marker” or i for “input” in there if you wanted to be clever ;) ) and then the text which will be rendered when it’s played back (more about that in a tic). This means that if you make a drastic typo, you can fix it in this file, or if you want to redact a password that you never meant to type, you can do!
But, and here’s the next awesome thing, you can also ask it to play back ignoring any gaps longer than X amount of fractions of a second, so if you went off to make a coffee in the middle of doing a recording, playback won’t show it.
And then, playing it back… well, you can just run asciinema play demo.rec but that’s a bit boring… but you can link to it, like this demo I created a while ago or even embed it in your own site
Rendering it all
And the last thing I use? Whatever writing tool I have to hand! I typically write on my blog if it’s for public consumption (like this), but I’ve used private Github and gitlab repos, Visual Studio Code to create markdown files, Google Docs, Microsoft Word, LibreOffice Writer and even slide decks if it’s the right tool for the job.
But the most important thing is that you get your documentation OUT THERE! It’s so frustrating only having half a story… like this one:
Featured image is “Tools” by “Paul Downey” on Flickr and is released under a CC-BY license.
That said, If you’re thinking of getting started with Proxmox though it’s well worth a read. If you’ve *used* Proxmox, and think I’m doing something wrong here, let me know in the comments!
Context
In the various podcasts I listen to, I’ve been hearing over and over again about Proxmox, and how it’s a great system for building and running virtual machines. In a former life, I’d use a combination of VMWare ESXi servers or desktop machines running Vagrant and Virtualbox to build out small labs and build environments, and at home I’d previously used a i3 ex-demo machine that was resold to staff at a reduced price. Unfortunately, the power supply went pop one evening on that, and all my home-lab experiments died.
When I changed to my most recent job, I had a small cash windfall at the same time, and decided to rebuild my home lab. I bought two Dell Optiplex 3040M i5 with 16GB RAM and two 3TB external USB3 hard drives to provide storage. These were selected because of the small size which meant they would fit in the small comms rack I had fitted when I got my house wired with CAT6 networking cables last year. These were patched into the UniFi USW-Pro-24 which was fitted as part of the networking build.
(Yes, it’s a bit of a mess, but it’s also not been in there very long, so needs a bit of a clean-up!)
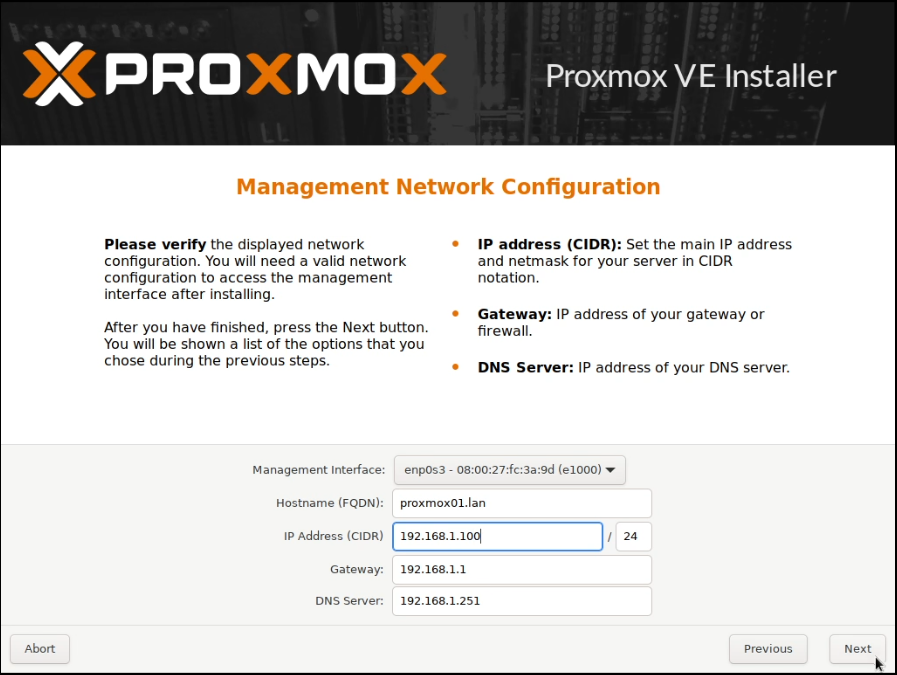
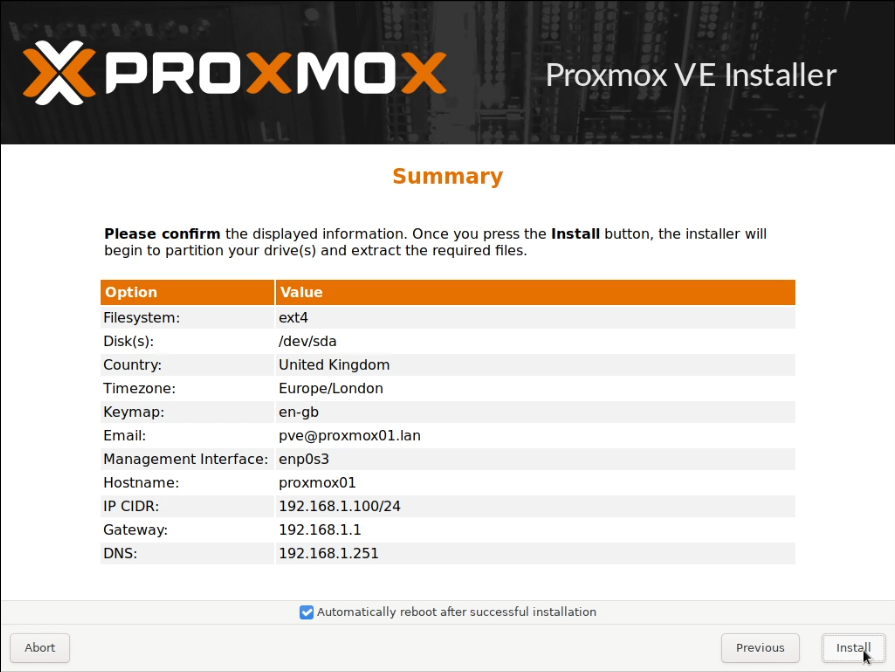
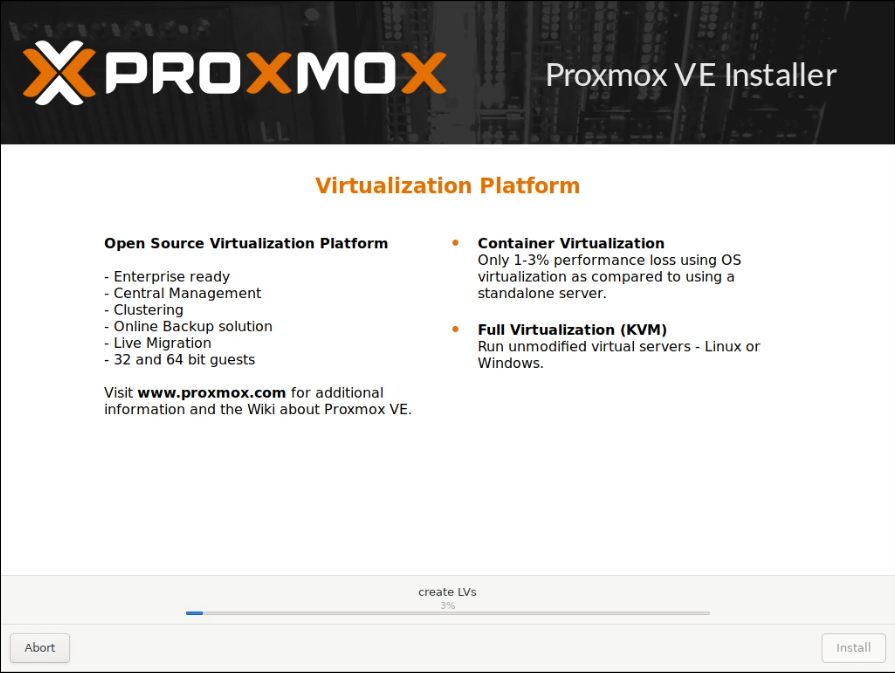
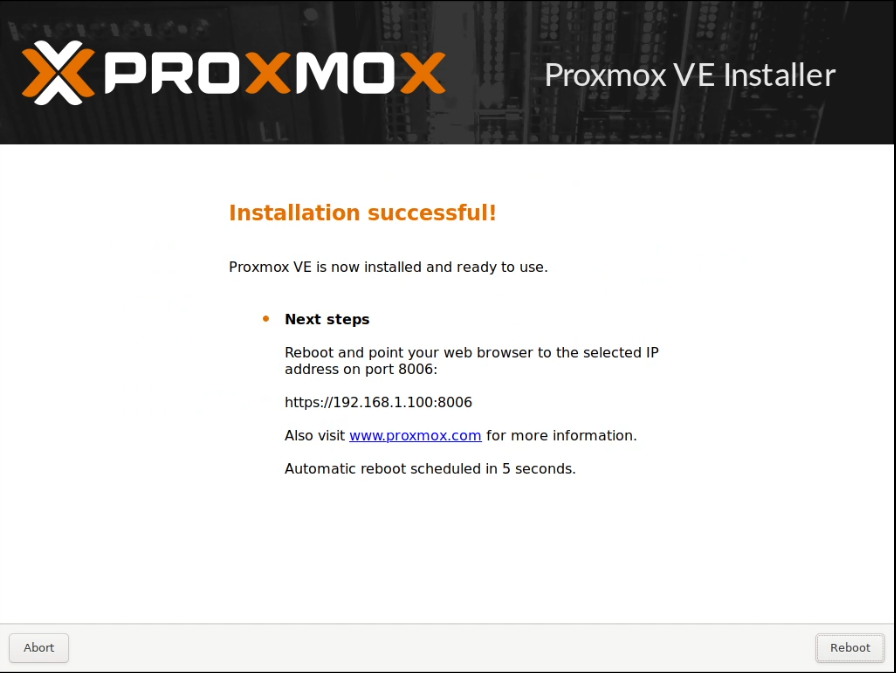
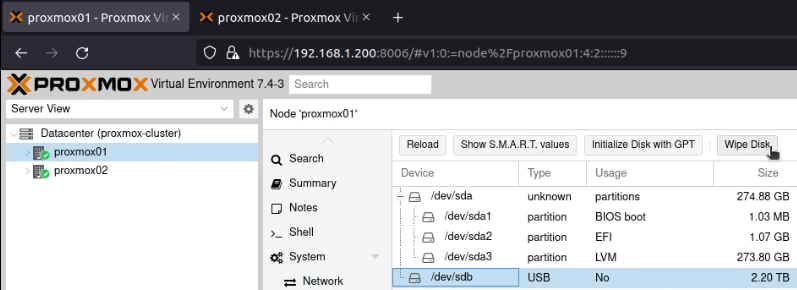
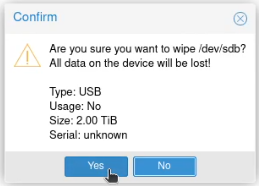
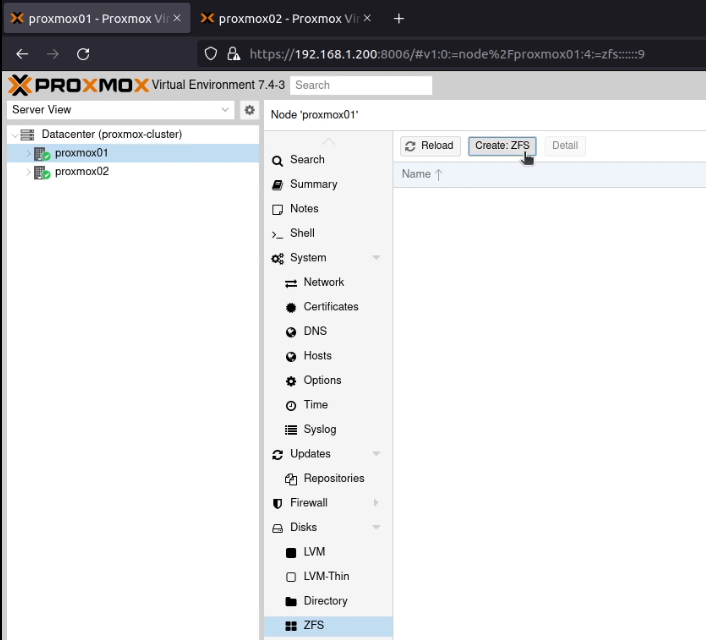
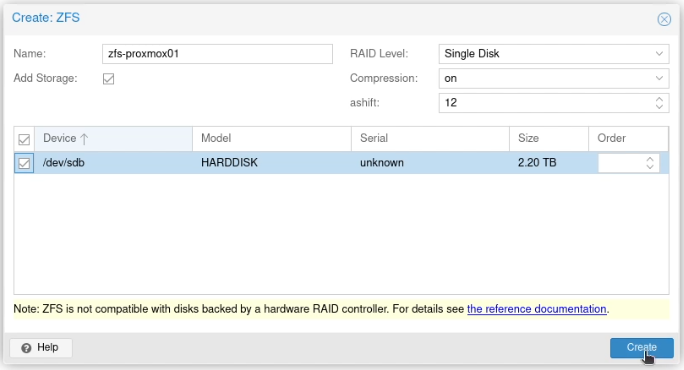
The Install
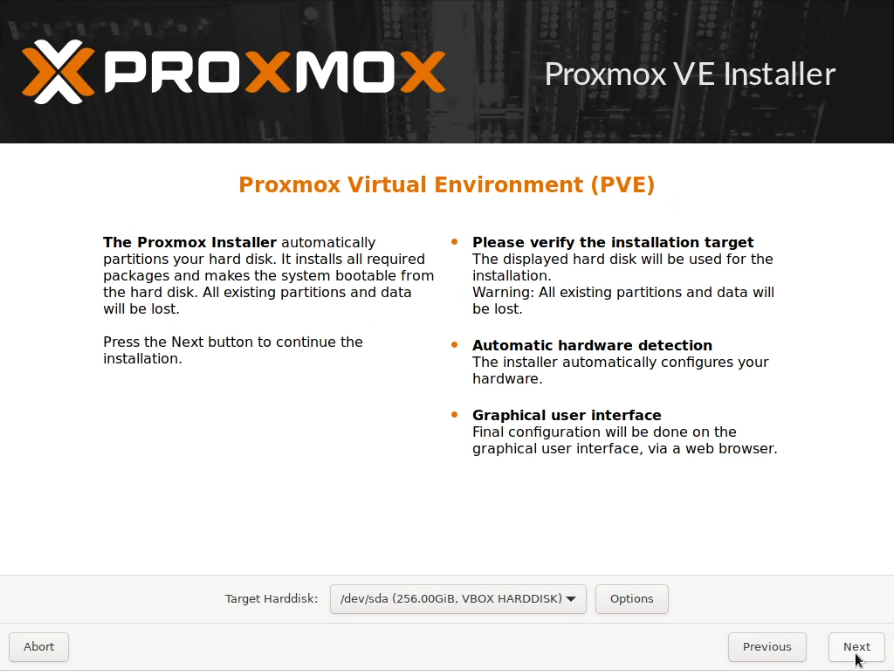
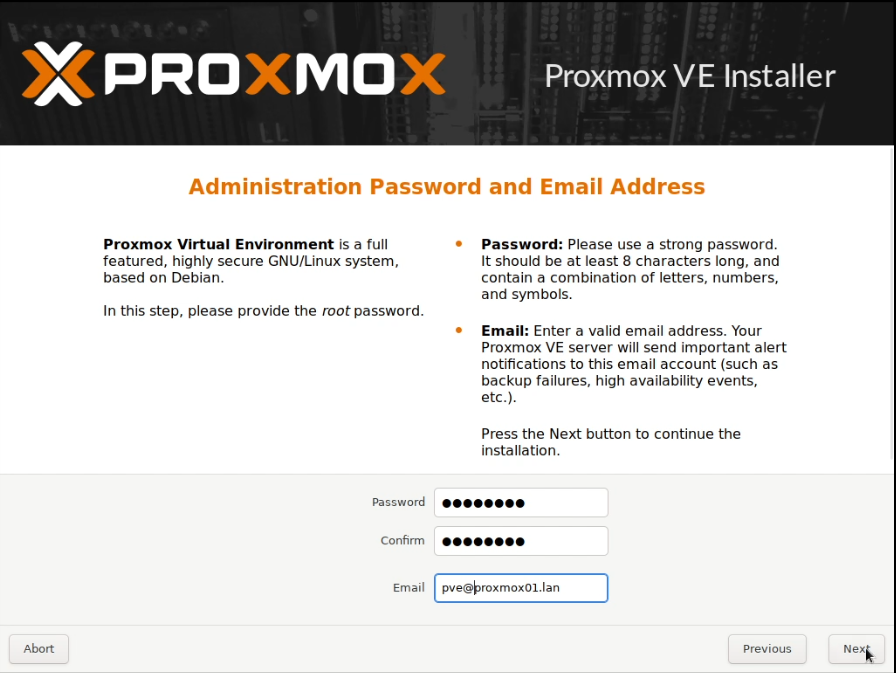
I allocated two static IP addresses for these hosts, and performed a standard installation of Proxmox using a USB stick with the multi-image-installer Ventoy on it.
Some screenshots follow:
Note that these screenshots were built on one pass, and have been rebuilt with new IPs that are used later.
As I don’t have an enterprise subscription, I ran these commands to use tteck’sPost PVE Install script to change the repositories.
wget https://raw.githubusercontent.com/tteck/Proxmox/main/misc/post-pve-install.sh
# Run the following to confirm the download looks OK and non-corrupted
less post-pve-install.sh
bash post-pve-install.sh
This results in the following (time-lapse) output, which is a series of options asking you to approve making changes to the system.
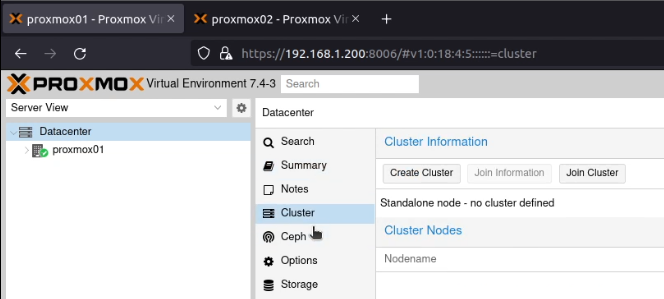
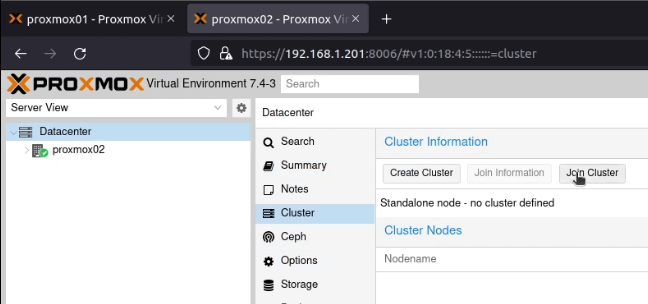
After signing into both Proxmox nodes, I went to my first node (proxmox01), selected “Datacenter” and then “Cluster”.
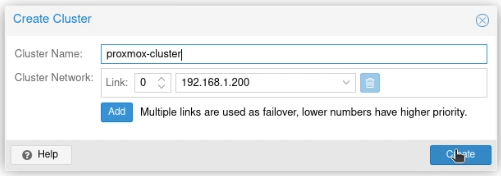
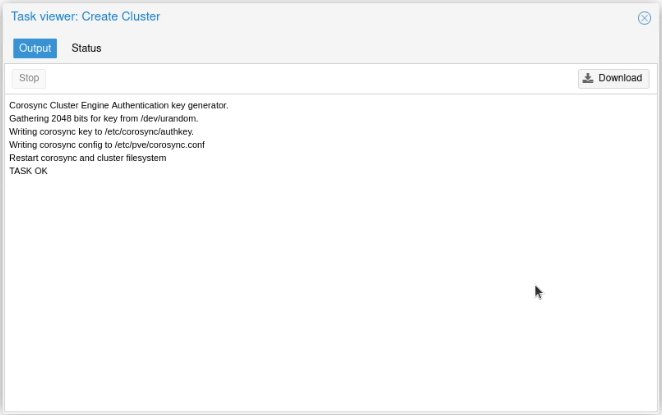
I clicked on “Create Cluster”, and created a cluster, called (unimaginatively) proxmox-cluster.
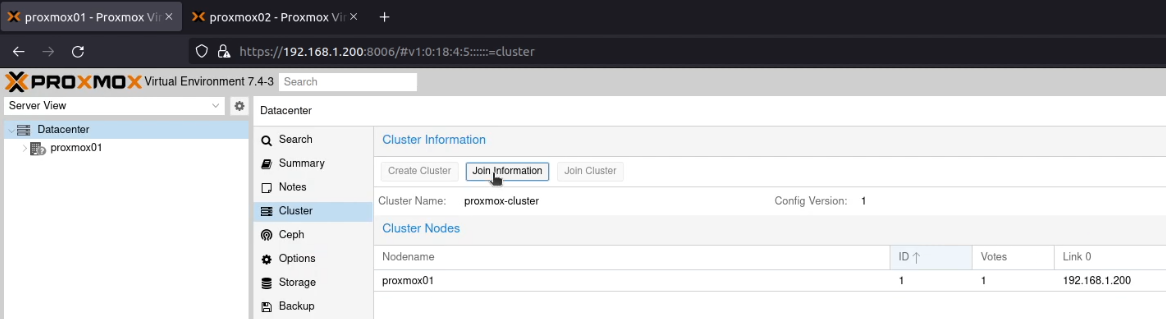
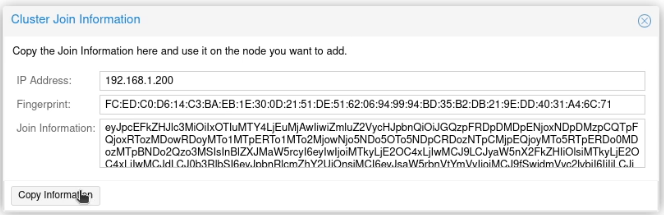
I clicked “Join Information”.
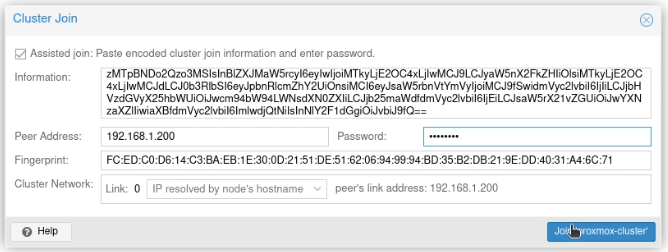
Next, on proxmox02 on the same screen, I clicked on “Join Cluster” and then pasted that information into the dialogue box. I entered the root password, and clicked “Join ‘proxmox-cluster'”.
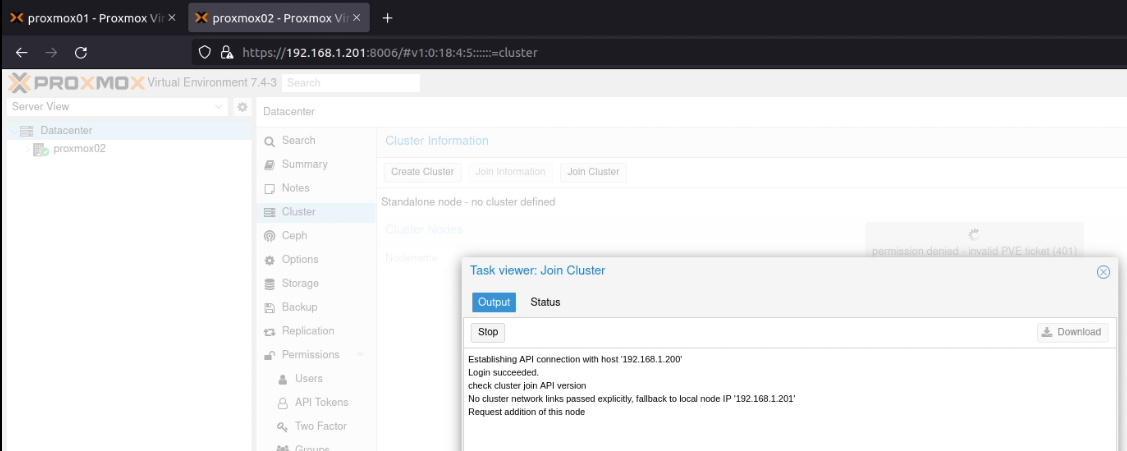
When this finished running, if either screen has hung, check whether one of the screens is showing an error like permission denied - invalid PVE ticket (401), like this (hidden just behind the “Task Viewer: Join Cluster” dialogue box):
Or /etc/pve/nodes/NODENAME/pve-ssl.pem' does not exist! (500):
Refresh your browsers, and you’ll probably find that the joining node will present a new TLS certificate:
Accept the certificate to resume the process.
To ensure I had HA quorum, which requires three nodes, I added an unused Raspberry Pi 3 running Raspberry Pi OS.
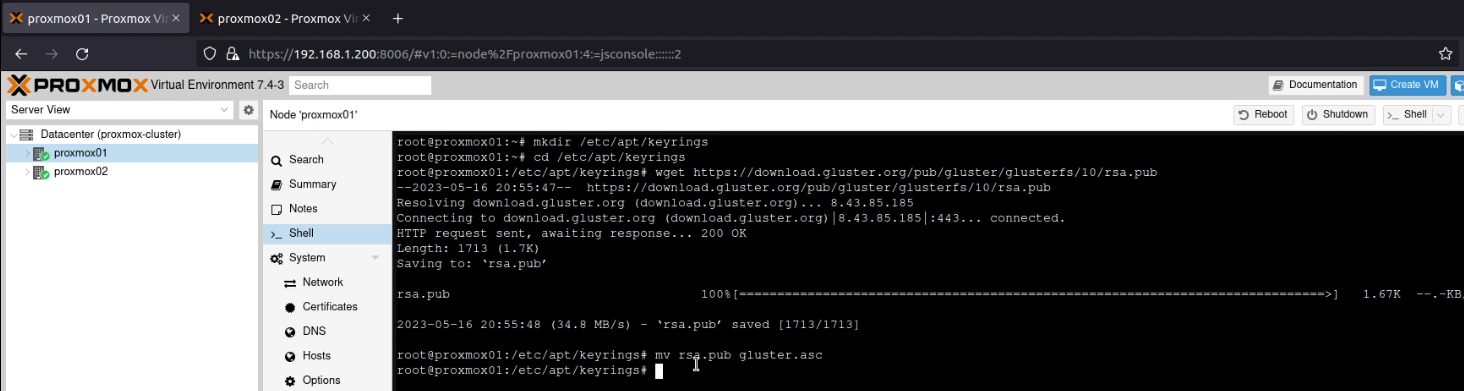
mkdir /etc/apt/keyrings
cd /etc/apt/keyrings
wget https://download.gluster.org/pub/gluster/glusterfs/10/rsa.pub
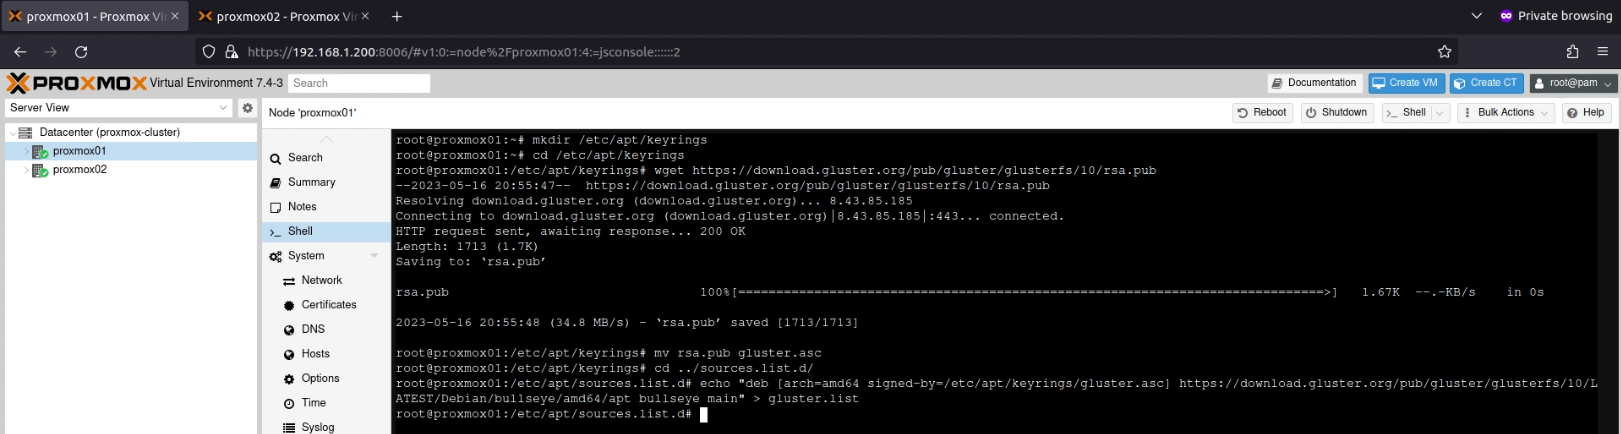
mv rsa.pub gluster.asc
Next I created a new repository entry in /etc/apt/sources.list.d/gluster.listwhich contained the line:
deb [arch=amd64 signed-by=/etc/apt/keyrings/gluster.asc] https://download.gluster.org/pub/gluster/glusterfs/10/LATEST/Debian/bullseye/amd64/apt bullseye main
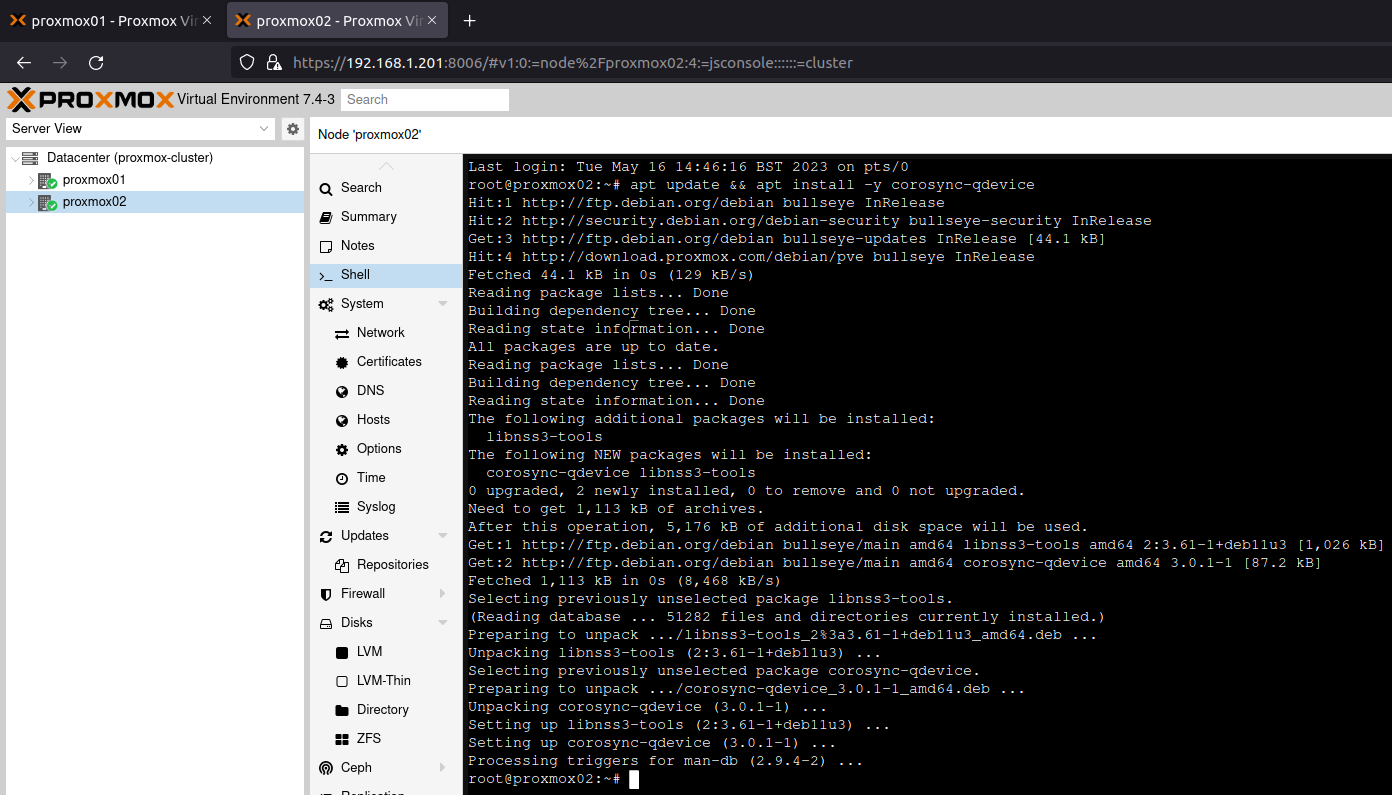
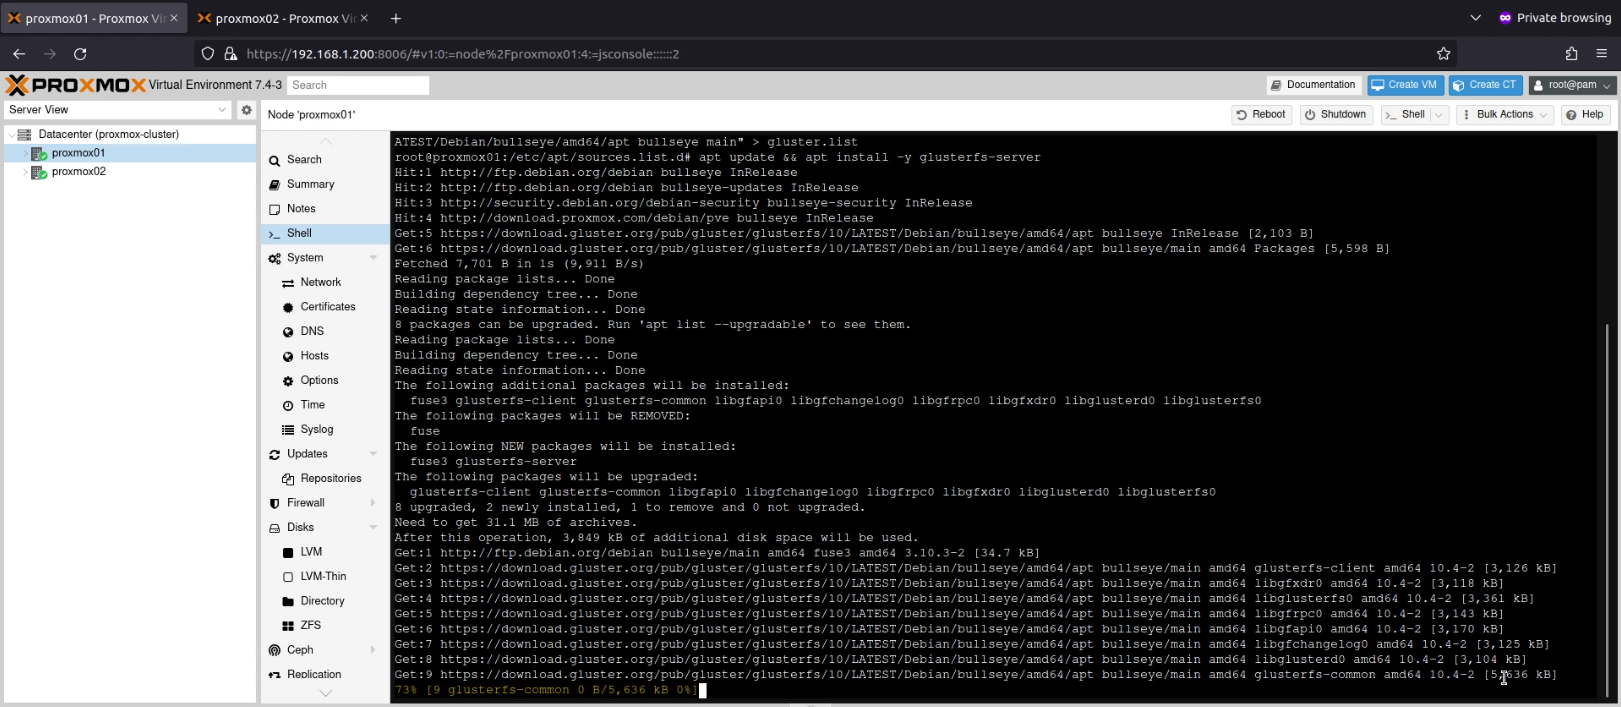
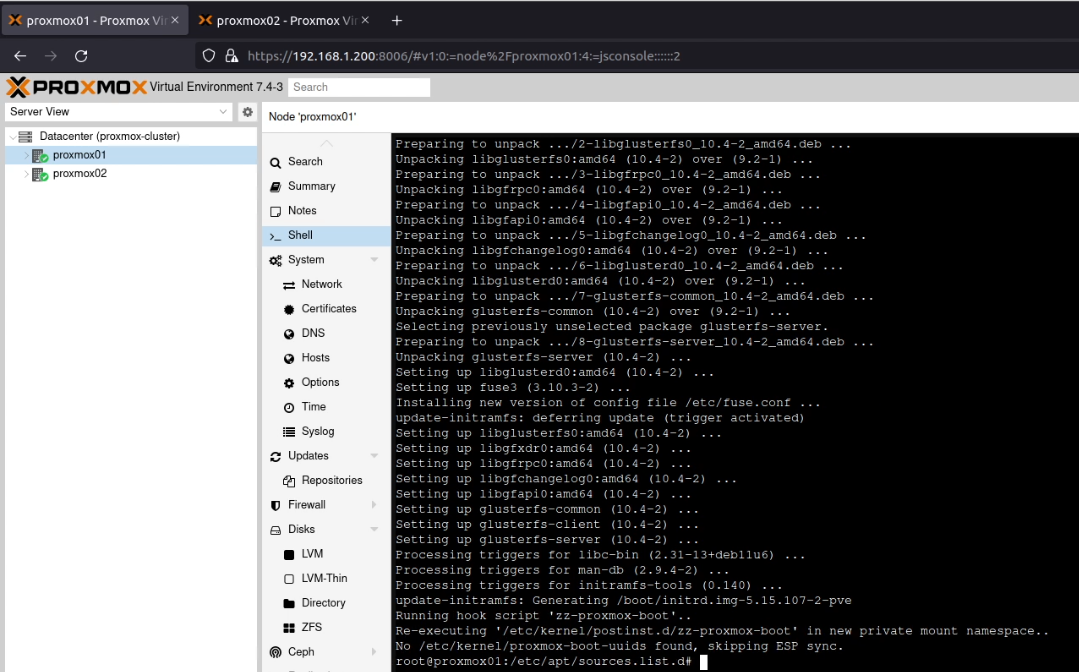
I next ran apt update && apt install -y glusterfs-serverwhich installed the Gluster service.
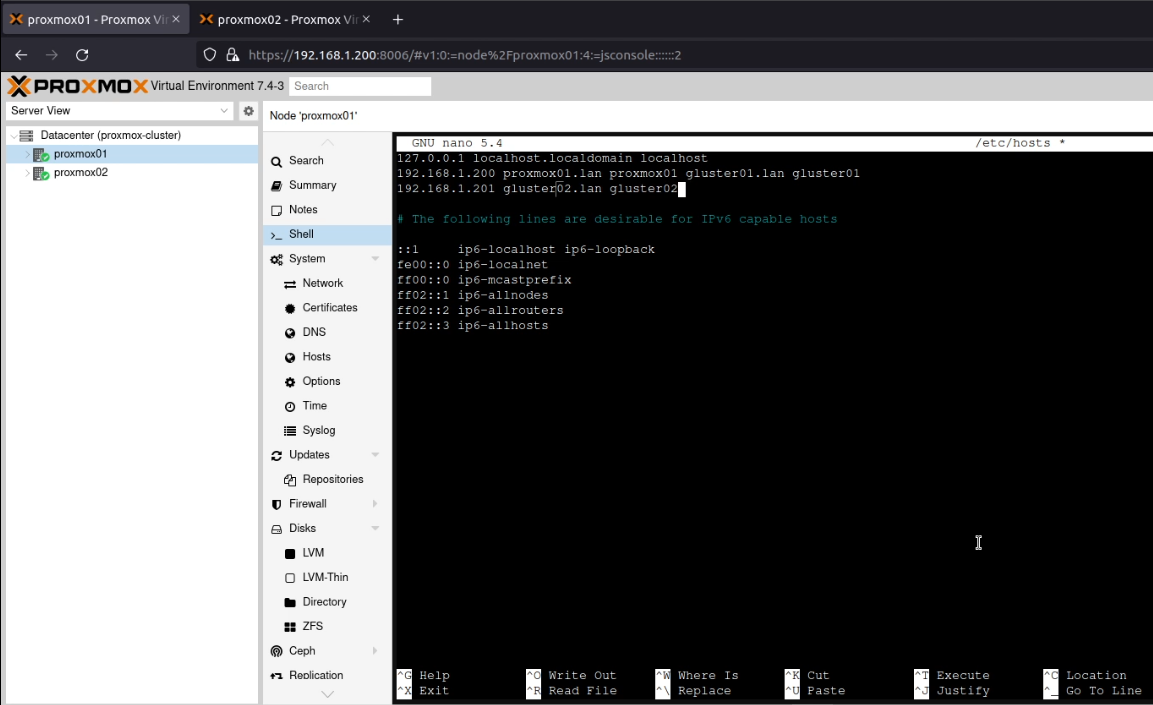
Following the YouTube link above, I created an entry for gluster01 and gluster02 in /etc/hosts which pointed to the IP address of proxmox01 and proxmox02 respectively.
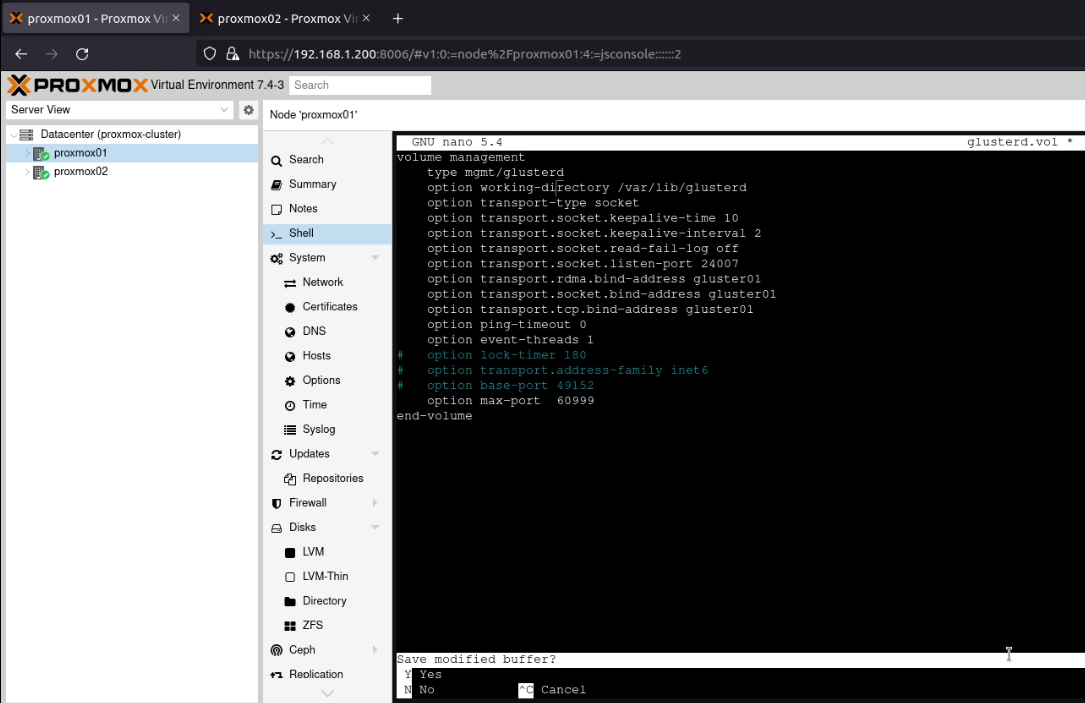
Next, I edited /etc/glusterfs/glusterd.volso it contained this content:
Note that this content above is for proxmox01. For proxmox02 I replaced “gluster01” with “gluster02”. I then ran systemctl enable --now glusterdwhich started the Gluster service.
Once this is done, you must run gluster probe gluster02from proxmox01 (or vice versa), otherwise, when you run the next command, you get this message:
volume create: gluster-volume: failed: Host gluster02 is not in 'Peer in Cluster' state
(This takes some backing out… ugh)
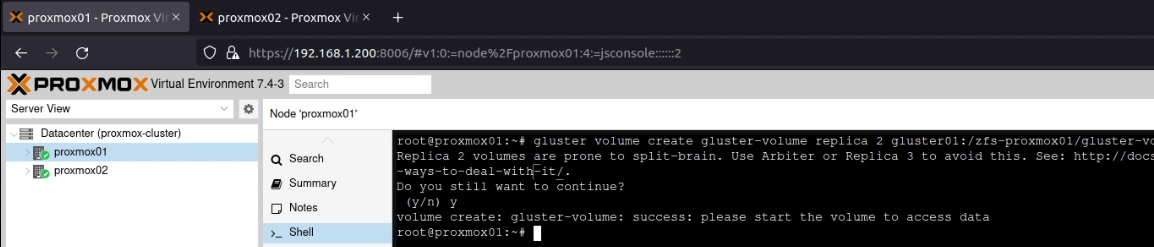
On proxmox01, I created the volume using this command:
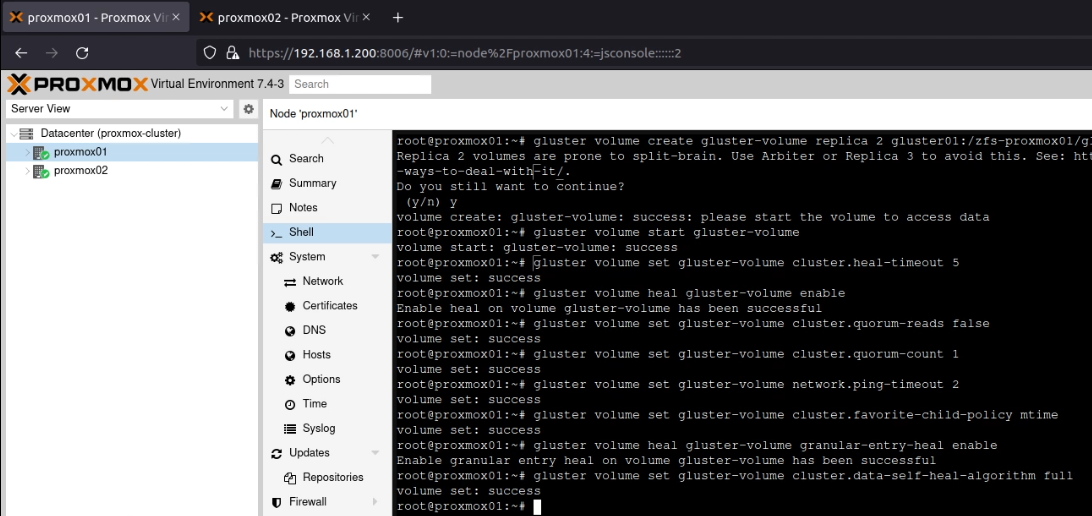
As you can see in the above screenshot, this warned about split brain situations. However, as this is for my home lab, I accepted the risk here. Following the YouTube video again, I ran these commands to “avoid [a] split-brain situation”:
gluster volume start gluster-volume
gluster volume set gluster-volume cluster.heal-timeout 5
gluster volume heal gluster-volume enable
gluster volume set gluster-volume cluster.quorum-reads false
gluster volume set gluster-volume cluster.quorum-count 1
gluster volume set gluster-volume network.ping-timeout 2
gluster volume set gluster-volume cluster.favorite-child-policy mtime
gluster volume heal gluster-volume granular-entry-heal enable
gluster volume set gluster-volume cluster.data-self-heal-algorithm full
I created /gluster-volume on both proxmox01 and proxmox02, and then added this line to /etc/fstab(yes, I know it should really have been a systemd mount unit) on proxmox01:
On both systems, I ensured that /gluster-volume was created, and then ran mount -a.
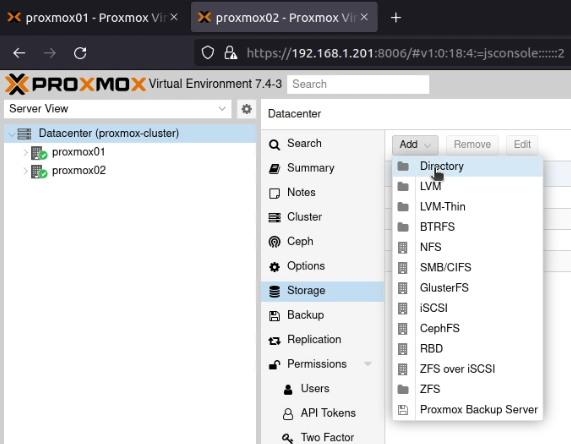
In the Proxmox UI, I went to the “Datacenter” and selected “Storage”, then “Add” and selected “Directory”.
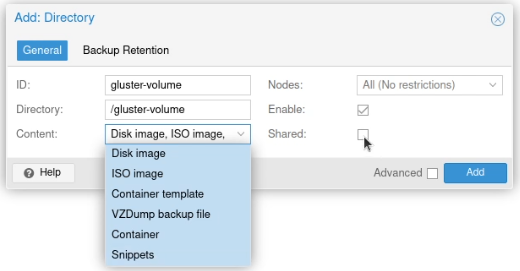
I set the ID to “gluster-volume”, the directory to “/gluster-volume”, ticked the “Shared” box and selected all the content types (it looks like a list box, but it’s actually a multi-select box).
(I forgot to click “Shared” before I selected all the items under “Content” here.)
I clicked Add and it was available on both systems then.
Backups
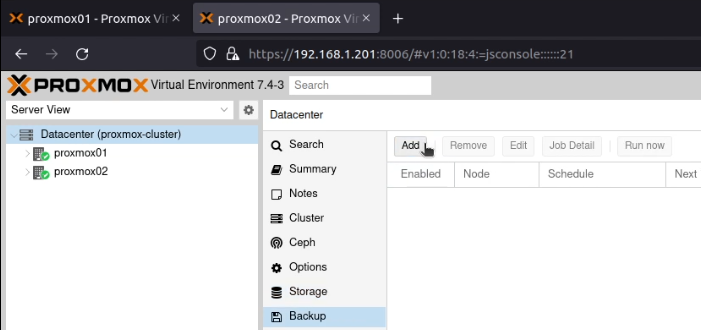
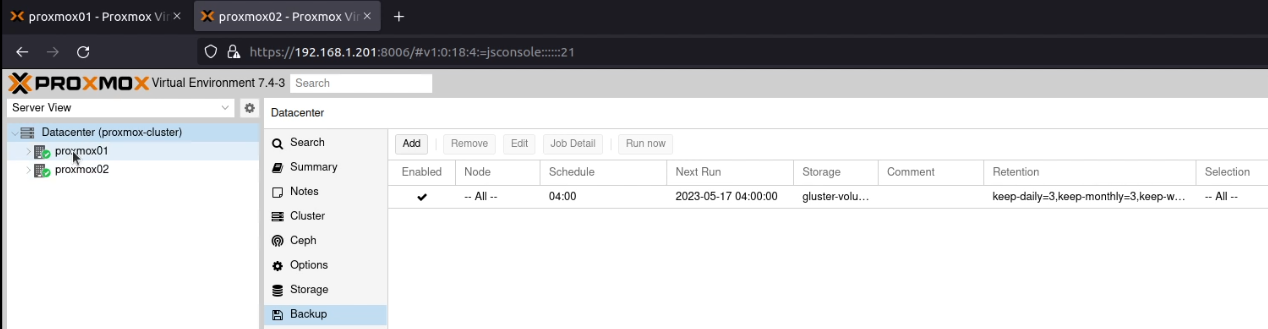
This one saved me from having to rebuild my Home Assistant system last week! Go into “Datacenter” and select the “Backup” option.
Click the “Add” button, select the storage you’ve just configured (gluster-volume) and a schedule (I picked daily at 04:00) and choose “Selection Mode” of “All”.
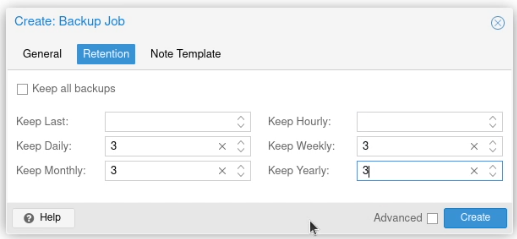
On the retention tab, I entered the number 3 for “Keep Daily”, “Keep Weekly”, “Keep Monthly” and “Keep Yearly”. Your retention needs are likely to be different to mine!
If you end up needing to restore one of these backups, you need a different tool depending on whether it’s a LXC container or a QEMU virtual machine. For a container, you’d run:
vmid=199
pct restore $vmid /path/to/backup-file
For a virtual machine, you’d run:
vmid=199
qmrestore /path/to/backup-file $vmid
…and yes, you can replace the vmid=199 \n $vmidwith just the number for the VMID like this:
If you need to point the storage at a different device (perhaps Gluster broke, or your external drive) you’d add --storage storage-label(e.g. --storage local-lvm)
Networking
The biggest benefit for me of a home lab is being able to build things on their own VLAN. A VLAN allows a single network interface to carry traffic for multiple logical networks, in such a way that other ports on the switch which aren’t configured to carry that logical network can’t access that traffic.
For example, I’ve configured my switch to have a new VLAN on it, VLAN 30. This VLAN is exposed to the two Proxmox servers (which can access all the VLANs) and also the port to my laptop. This means that I can run virtual machines on VLAN 30 which can’t be accessed by any other machine on my network.
There are two ways to do this, the “easy way” and the “explicit way”. Both ways produce the same end state, it’s just down to which makes more logical sense in your head.
In both routes, you must create the VLANs on your switch first – I’m just addressing the way of configuring Proxmox to pass this traffic to your network switch.
Note that these VLAN tagged interfaces also don’t have a DHCP server or Internet gateway (unless you create one), so any addresses will need to be manually configured in any installation screens.
The easy way
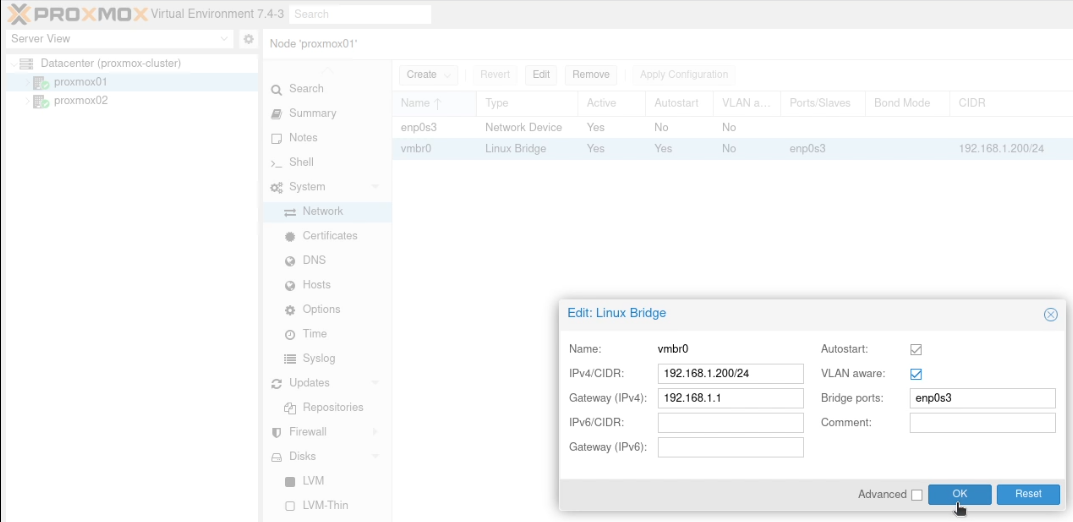
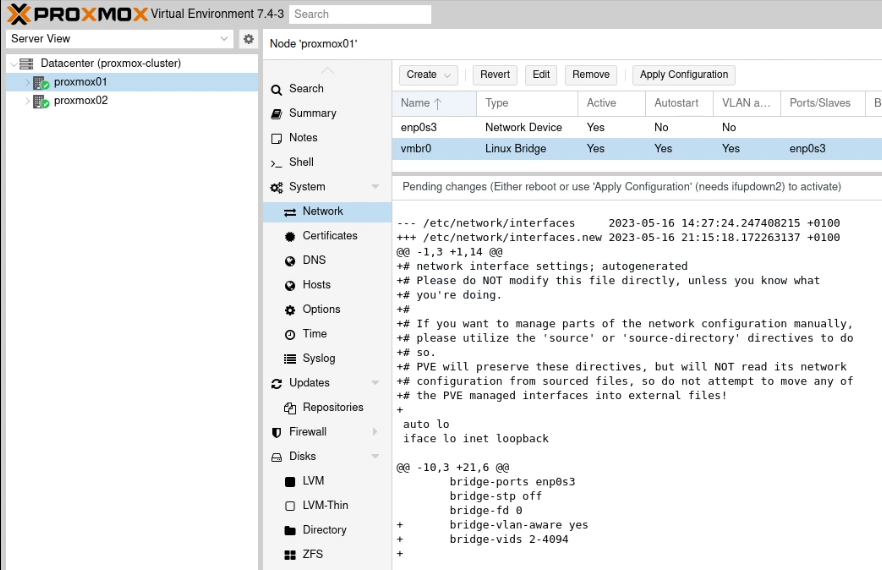
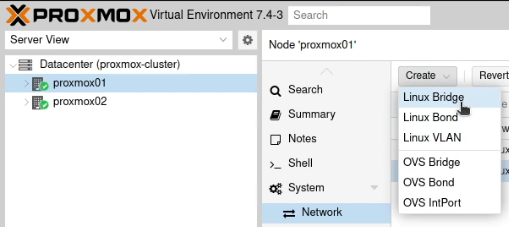
Go into the individual nodes and select the Network option in the sidebar (nested under “System”). You’ll need to perform these actions on both nodes.
Click on the “Linux Bridge” line which is aligned to your “trunked” network interface. For me, as I have a single network interface (enp2s0) I have a single Linux Bridge (vmbr0). Click “Edit” and tick the “VLAN aware” box and click “OK”.
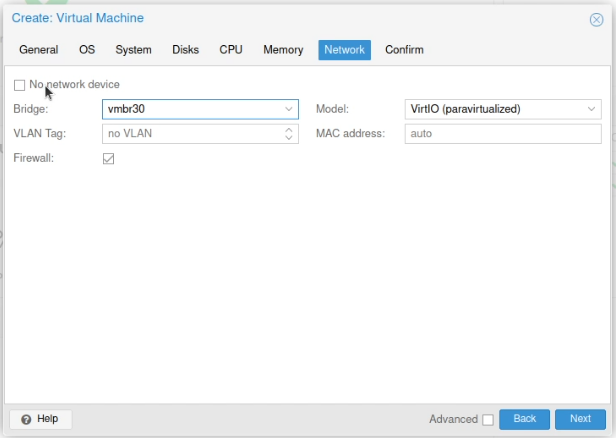
When you now create your virtual machines, on the hardware option in the sidebar, find the network interface and enter the VLAN tag you want to assign.
(This screenshot shows no VLAN tag added, but it’s fairly clear where you’d put that tag in there)
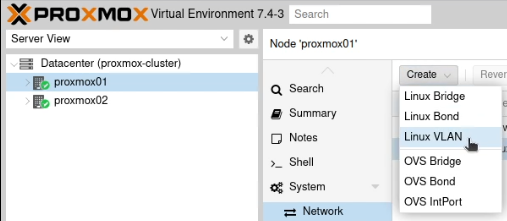
The explicit way
Go into the individual nodes and select the Network option in the sidebar. You’ll need to perform all the steps in the section on both nodes!
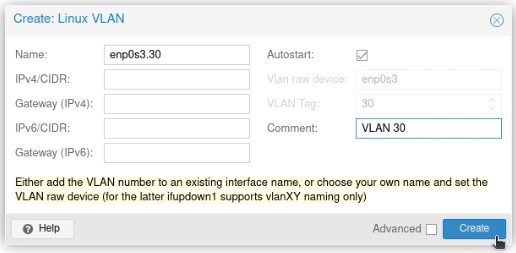
Create a new “Linux VLAN” object.
Call it by the name of the interface (e.g. enp2s0) followed by a dot and then the VLAN tag, like this enp2s0.30. Click Create.
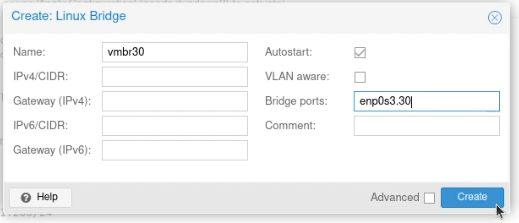
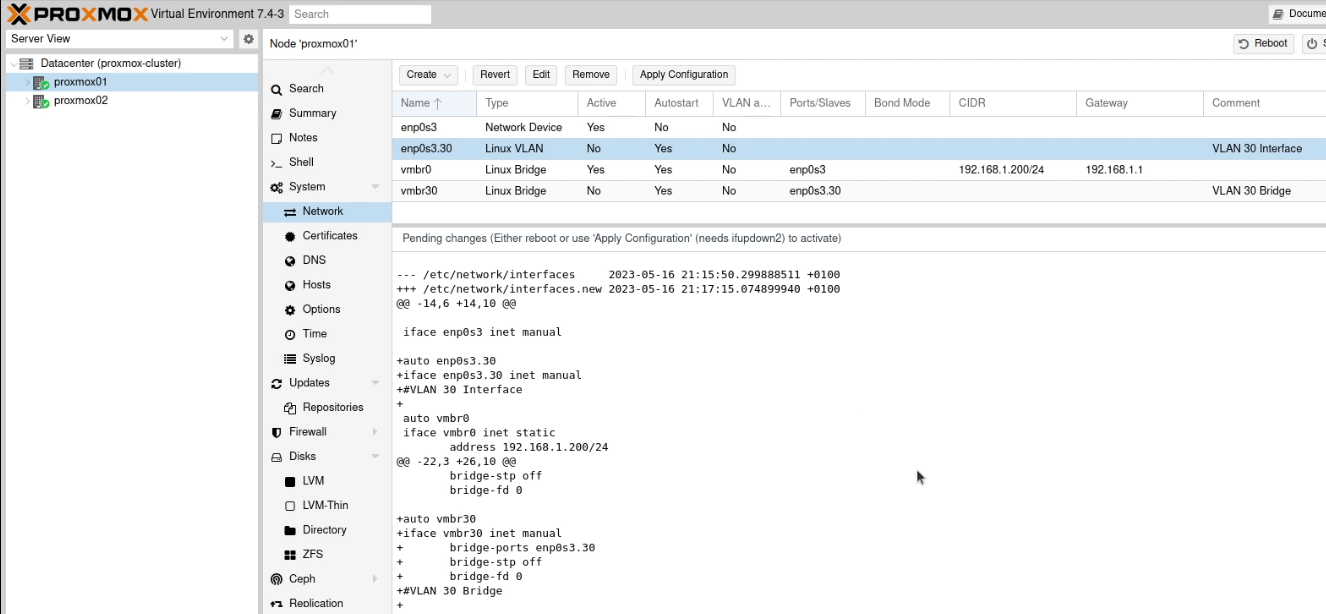
Next create a new “Linux Bridge”.
Call it vmbr and then the VLAN tag, like this vmbr30. Set the ports to the VLAN you just created (enp2s0.30)
(I should note that I added the comment between writing this guide and taking these screen shots)
When you create your virtual machines select this bridge for accessing that VLAN.
Making machines run in “HA”
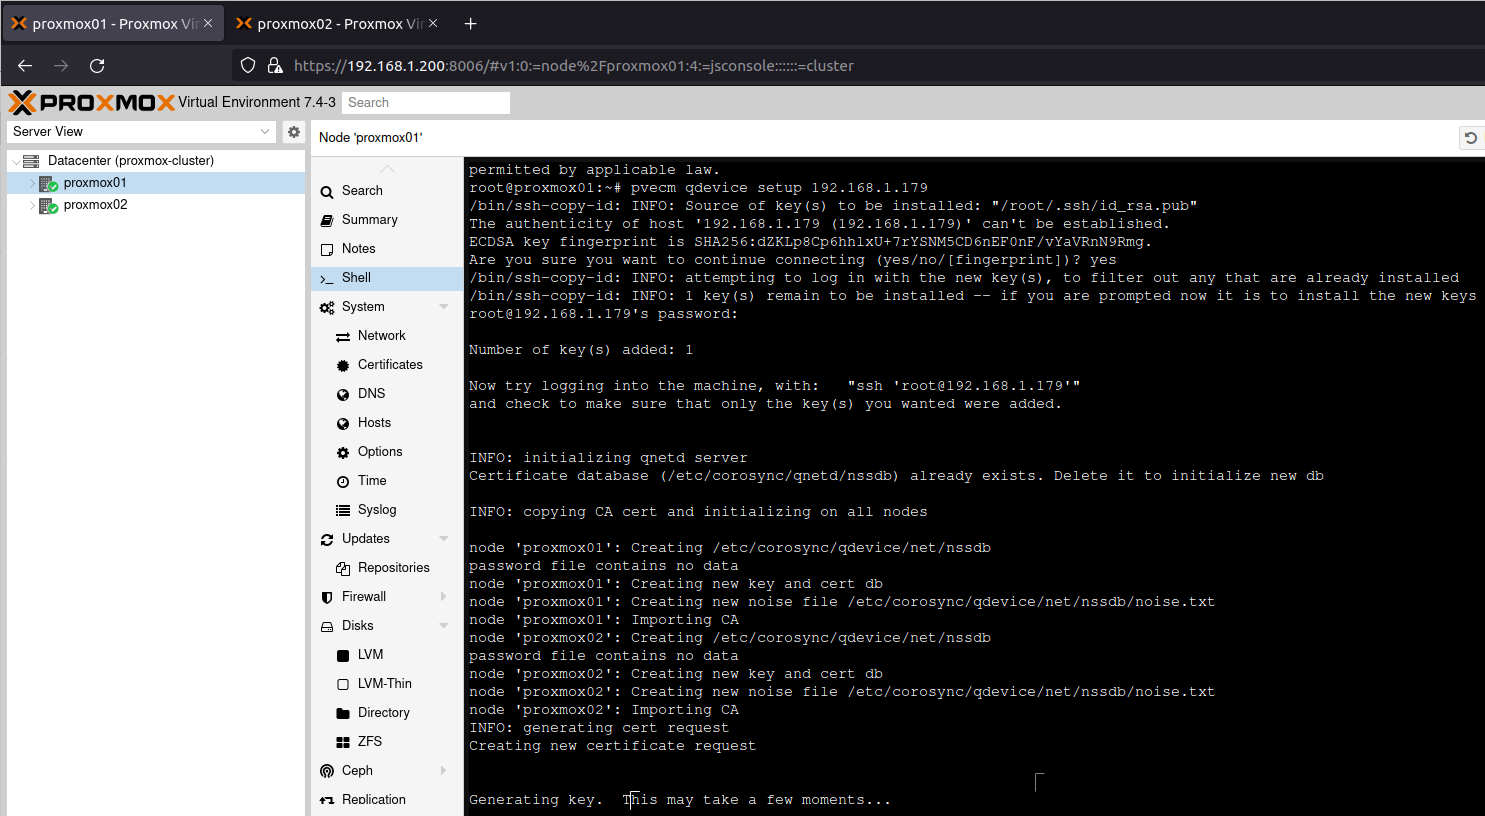
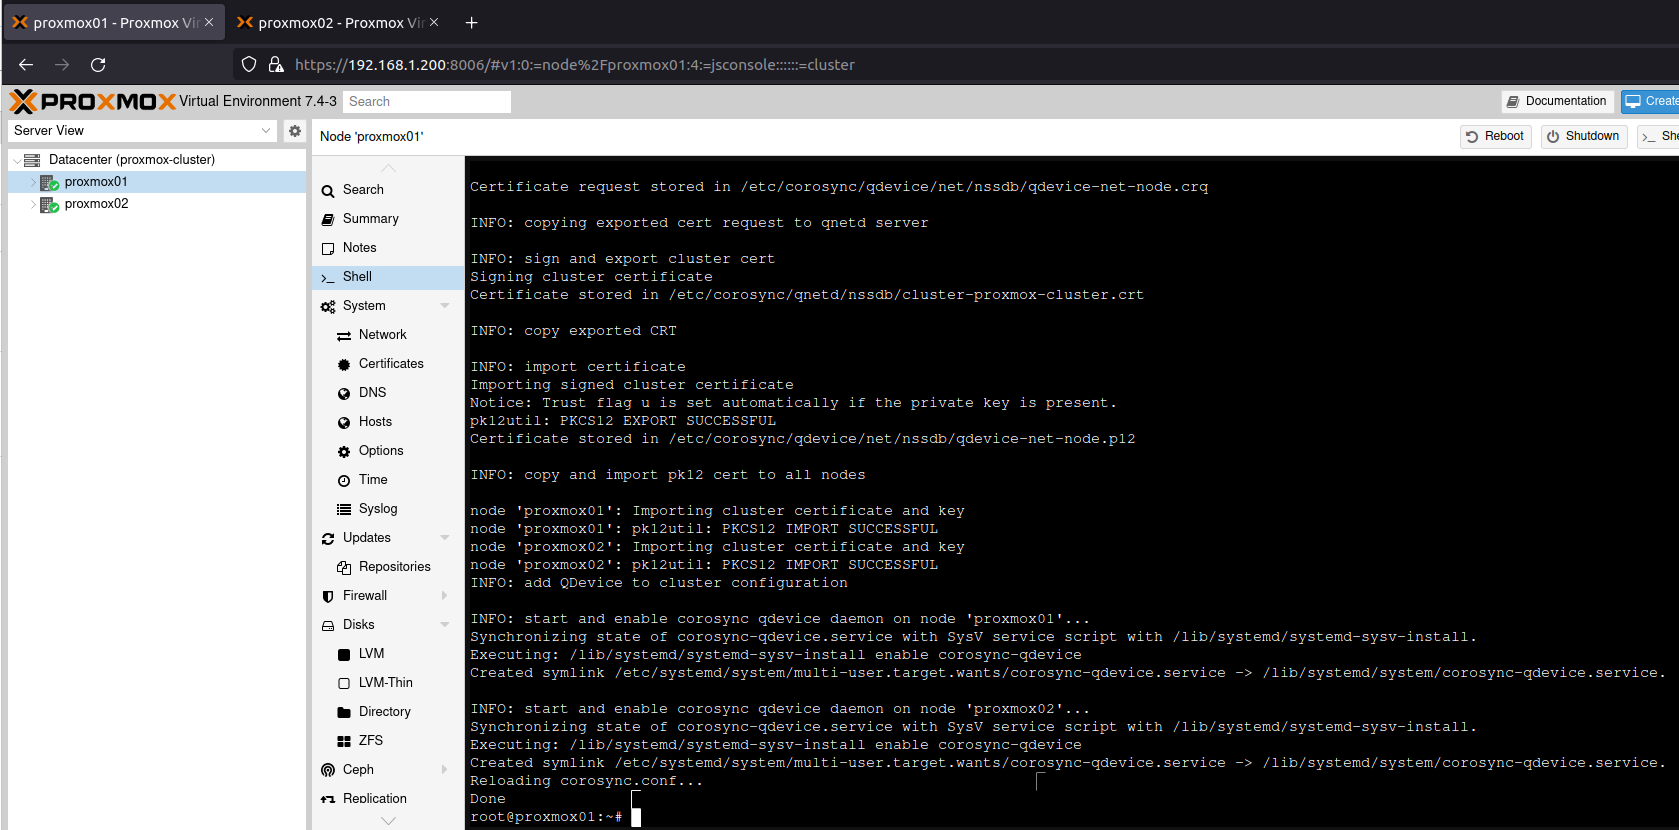
If you haven’t already done the part with the QDevice under clustering, go back there and run those steps! You need quorum to do this right!
YOU MUST HAVE THE SAME NETWORK AND STORAGE CONFIGURATION FOR HIGH AVAILABILITY AND MIGRATIONS. This means every VM which you want to migrate from proxmox01 to proxmox02 must use the same network interface and storage device, no matter which host it’s connected to.
If you’re connecting enp2s0 to VLAN 55 by using a VLAN Bridge called vmbr55, then both nodes need this VLAN Bridge available. Alternatively, if you’re using a VLAN tag on vmbr0, that’s fine, but both nodes need to have vmbr0 set to be “VLAN aware”.
If you’re using a disk on gluster-volume, this must be shared across the cluster
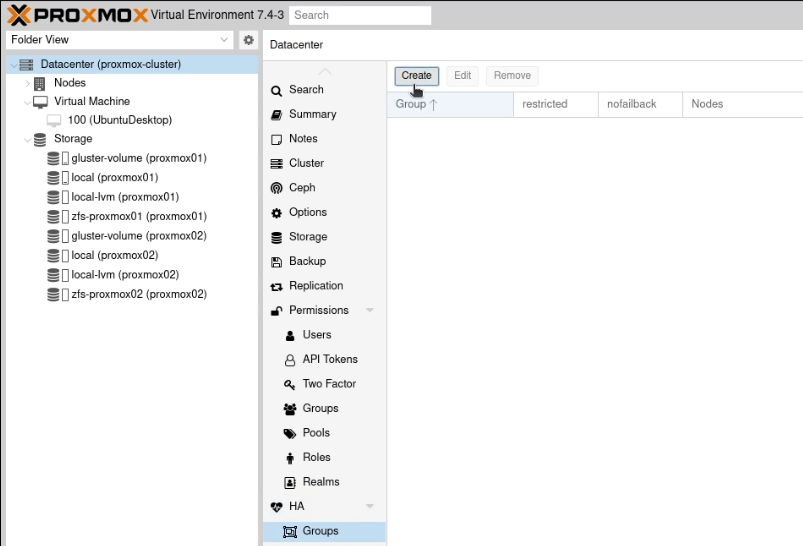
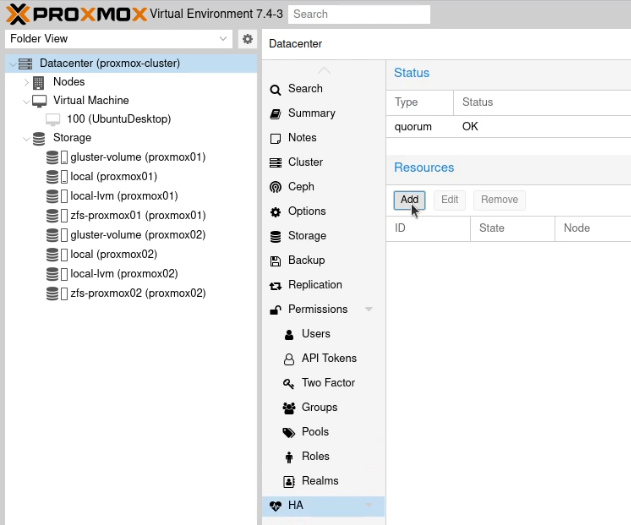
Go to “Datacenter” and select “Groups” which is nested under “HA” in the sidebar.
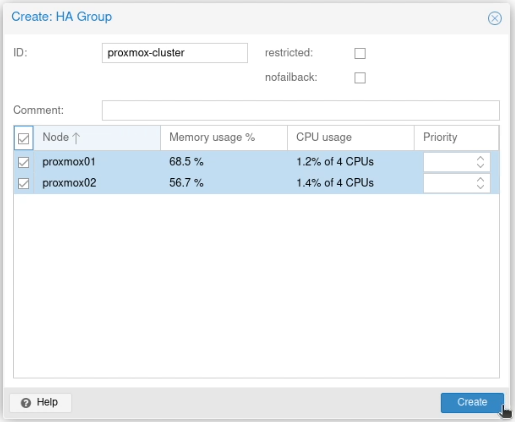
Create a new group (again, unimaginatively, I went with “proxmox”). Select both nodes and press Create.
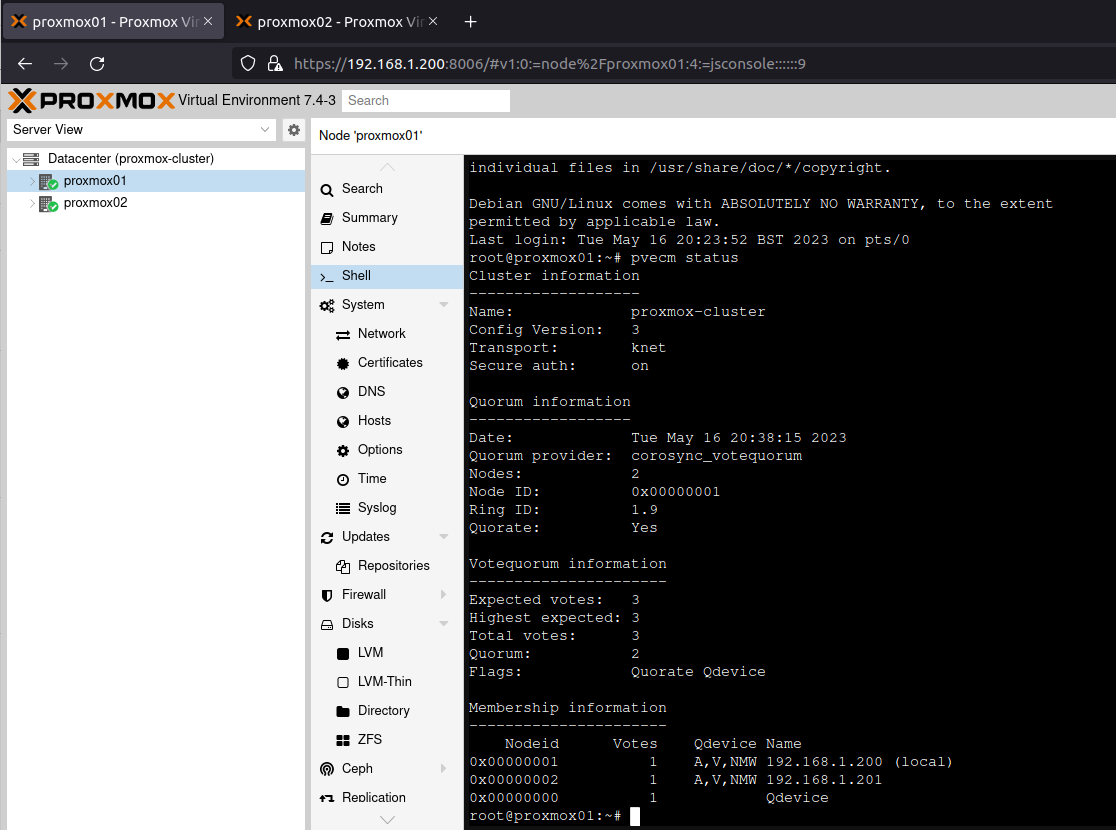
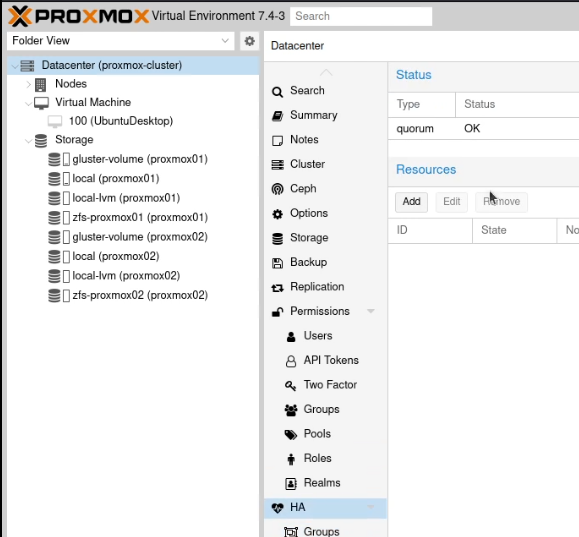
Now go to the “HA” option in the sidebar and verify you have quorum, although it doesn’t matter which is the master.
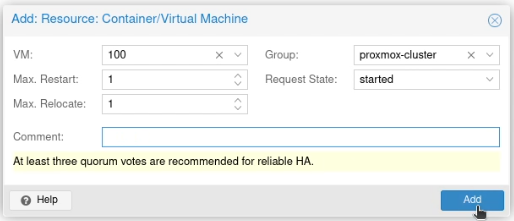
Under resources on that page, click “Add”.
In the VM box, select the ID for the container or virtual machine you want to be highly available and click Add.
This will restart that machine or container in HA mode.
The wrap up!
So, after all of this, there’s still no virtual machines running (well, that Ubuntu Desktop is created but not running yet!) and I’ve not even started playing around with Terraform yet… but I’m feeling really positive about Proxmox. It’s close enough to the proprietary solutions I’ve used at work in the past that I’m reasonably comfortable with it, but it’s open enough to mess around under the surface. I’m looking forward to doing more experiments!
The featured image is of the comms rack in my garage showing how bad my wiring is when I can’t get to the back of a rack!! It’s released under a CC-0 license.
Following a quick conversation with a neighbour today, I thought I’d do a run-down of (and links to) the technology I’m using in my house :)
Late Edit 2024-06-08: This is now listed on my What do I use? page. As an Amazon Associate I earn from qualifying purchases. This means, if you follow a link from this page to an Amazon item, I may earn referral fees.
The devices
Amazon Alexa and Fire Devices
I’ve been a fan of these for some time! I have Echo Dots, an Echo Show and a few Echo Flex devices. I also have an Echo Auto, which was rubbish.
My TV, although it’s nominally “smart”, I prefer to be able to swap out the “smart” part, and so I also have a Fire TV stick for actually consuming content. I previously tested a FireTV Cube, and would have loved to have kept that, but I had to return it.
Ring Stick-up Camera
In a previous role, I was asked to test a Ring Stick-up Camera. When I left, they said I was allowed to keep it. The device is OK, but I probably wouldn’t have bought it if it wasn’t sent to me.
Tuya Wifi Enabled Light and Mains Switches
I have a few different models of these things. Most of them are used just as wi-fi power switches, but a handful of them also do power monitoring too. In my last set of works, I also got a couple of the light switches too.
Previously, I was using a handful of Raspberry Pi devices to run all of this lot. I had a Raspberry Pi 4 Model B, 4GB and a couple of the Raspberry Pi 3 Model B+ devices too. Recently, I’ve moved all my main computing workloads off these, and on to a pair of these Dell Optiplex 3040M i5 with 16GB RAM. That’s not to say they’ve gone unused now (no, I’m running Octopi amongst other things) but my main lab stuff isn’t on those any more.
The software
Hypervisor: Proxmox
Previously (pre-Pi), my computers would be running an Ubuntu variant, and everything would be running Docker containers or virtual machines with Vagrant, but after the last few months of wall-to-wall Proxmox recommendations, when I got those two PCs, they were immediately setup as a Proxmox Cluster. I did a few of the tweaks from tteck’s Proxmox VE Helper Scripts page.
Storage: gluster
I have a cluster of two machines, and I want to be able to migrate between the pair of them. To get this working, I setup Gluster following this YouTube tutorial. This gives me storage across the pair of servers, and lets me live migrate any virtual machines and containers between the pair of them. At some point in the future, I’ll be setting up nfs-ganesha-gluster on there too, to allow virtual machines to have object storage rather than block storage as needed.
Home Automation: Home Assistant OS
This was what I was running on my Raspberry Pi, and so it was a no-brainer to port the configuration over. While I could have set a virtual machine up by hand, instead I used tteck’s helper script, which asked me to run this command:
It’s always slightly suspicious when someone asks you to run a shell script without checking it, so I downloaded the script first, checked it over (as much as one can), and then ran it from the system. It’s not the most secure way to do it, but I was satisfied with what I was seeing that let me trust it.
Remote access: Tailscale
Tailscale is a mesh VPN product, using the great Wireguard VPN product. I previously experimented with Nebula, and while I’d still endorse it to anyone who is keen to run their own infrastructure, sadly I failed on certificate basics with Nebula on my home network, and Tailscale moves all that away from my headspace. I can see more scope for automation with Nebula, but the extra controls needed were too much for me.
Plugins, Extensions and Add-Ons
Android App: Home Assistant
OK, so this is more of a “nice to have” than a “needed” thing, but with this I can determine who’s in the house, and can track battery usage for the devices. It also means I can see and manipulate the Home Assistant dashboard.
Android App: Smart Home (Tuya)
Only really needed for the initial set-up of the Smart Devices, sometimes it’s useful to see power used over time, or to find out what the MAC address of the device is (for making sure it’s on your network), and whether it’s actually getting a reasonable signal from your WiFi router.
Home Assistant Add-ons: HACS and Alexa Media Player
HACS is a meta-add-on; it helps you to add more integrations to Home Assistant. With this, I can integrate my Amazon Echo devices.
Home Assistant Blueprint: “Notify or do something when an appliance like a dishwasher or washing machine finishes”
I … um … use this exactly as defined; it’s hooked up to the switch on the washing machine and dishwasher, and notifies me via Pushbullet when they’re both done, giving me a fighting chance of emptying them before my wife has to.
I recently obtained a new laptop, so installed Ubuntu with the encrypted ZFS root filesystem. This all works great! I then installed the DisplayLink drivers using the system recommended by Synaptics;
At which point I’m prompted to reboot my system. All good, so far.
Except, what I’m presented with is a recovery console, asking me to enter my root password!
Fortunately, I’d had the common sense to set the password for my root account (sudo passwdwill do it), so I could sign in and start to figure out what was going on.
In my logs, I looked for anything to do with “displaylink”, and found this line:
Apr 28 11:13:05 jonspriggs-Kratos-EL04R6 systemd-udevd[1912]: 4-3.1.3:1.0: Spawned process '/opt/displaylink/udev.sh /dev /devices/pci0000:00/0000:00:14.0/usb4/4-3/4-3.1/4-3.1.3/4-3.1.3:1.0 usb-004-004-DisplayLink_PR09_DisplayPort_Dock_YVFJ093338 /dev/bus/usb/004/004' [2280] is taking longer than 59s to complete
Just after, it showed this log:
Apr 28 11:14:05 jonspriggs-Kratos-EL04R6 systemd[1]: systemd-udev-settle.service: Main process exited, code=exited, status=1/FAILURE
░░ Subject: Unit process exited
░░ Defined-By: systemd
░░ Support: http://www.ubuntu.com/support
░░
░░ An ExecStart= process belonging to unit systemd-udev-settle.service has exited.
░░
░░ The process' exit code is 'exited' and its exit status is 1.
So, my initial response was to purge the displaylink-driver (which I did, and it worked), but I actually quite like this dock, so I re-installed the driver and took a look at what else was in there.
Between the systemd-udev-settle.service starting and finishing with an error was this log entry:
Apr 28 11:12:05 jonspriggs-Kratos-EL04R6 udevadm[1890]: systemd-udev-settle.service is deprecated. Please fix zfs-load-module.service, zfs-import-cache.service not to pull it in.
Hmm, I wonder if that’s what the issue is?! So, I edited zfs-load-module.service (/lib/systemd/system/zfs-load-module.service) and zfs-import-cache.service (/lib/systemd/system/zfs-import-cache.service) files commenting out the line: Requires=systemd-udev-settle.serviceand restarted.
The system booted straight up! Huzzah!
I’ve had a look in the logs, and prior to installing the DisplayLink driver, I was getting this error above, but as systemd-udev-settle wasn’t failing to start, it wasn’t preventing zfs from loading, which in turn was preventing the boot, so the issue is definitely somewhere between DisplayLink and systemd-udev-settle, but we’ll see what happens as a result of this issue.
Due to … issues with my home Internet service at the moment, I’m currently tethered to an EE mobile phone for my outbound Internet access. For 99.9% of access, this is fine, however… not when you create dynamic security groups based on your own IP address. For whatever reason (I’m guessing they’re doing HTTP(S) proxying to perform some traffic analysis) when you make HTTP requests, you appear as one IP address, but when you make any other type of request, you get another.
In order to test this, I ran some checks (I’ve changed the first three octets for privacy);
# DNS Check
$ dig +short txt ch whoami.cloudflare @1.0.0.1
"192.0.2.232"
# HTTP Check
curl http://ipv4.icanhazip.com
192.0.2.235
# HTTPS Check
curl https://ipv4.icanhazip.com
192.0.2.235
# SSH Check
$ ssh ipv4.sshmyip.com
The authenticity of host 'ipv4.sshmyip.com (64:ff9b::313:6f08)' can't be established.
RSA key fingerprint is SHA256:OhNL391d/beeFnxxg18AwWVYTAHww+D4djEE7Co0Yng.
This key is not known by any other names
Are you sure you want to continue connecting (yes/no/[fingerprint])? yes
Warning: Permanently added 'ipv4.sshmyip.com' (RSA) to the list of known hosts.
{


"comment": "##     Your IP Address is 192.0.2.235 (54140)     ##",


"family": "ipv4",
"ip": "192.0.2.235",
"port": "54140",
"protocol": "ssh",
"version": "v1.3.0",
"website": "https://github.com/packetsar/checkmyip",
"sponsor": "Sponsored by ConvergeOne, https://www.convergeone.com/"
}
 Connection to ipv4.sshmyip.com closed by remote host.
Connection to ipv4.sshmyip.com closed.
So, I guess, what this tells us is that I can’t guarantee what IP address I’ll be using, but at least I know it’s one of those two!
I recently was in the situation where I had two github profiles (one work, one personal) that I needed to incorporate in projects.
My work account on this device is my “default”, I use it to push, pull and so on, but the occasional personal activities (like terminate-notice) all should be attributed to my personal account.
To make this happen, I used direnv which reads a .envrcfile in the parents of the directory you’re currently in. I created a directory for my personal projects – ~/Code/Personaland placed a .envrc file which contains:
This means that I have a specific SSH key just for my personal activities (~/.ssh/personal.id_ed25519) and I’ve got my email address defined as two environment variables – AUTHOR (who wrote the code) and COMMITTER (who added it to the tree) – both are required when you’re changing them like this!
Because I don’t ever want it to try to use my SSH Agent, I’ve added the fact that SSH_AUTH_SOCK should be empty.
As an aside, work also require Commit Signing, but I don’t want to use that for my personal projects right now, so I also discovered a new feature as-of 2020 – the environment variables GIT_CONFIG_KEY_x, GIT_CONFIG_VALUE_x and GIT_CONFIG_COUNT=x
By using these, you can override any system, global and repo-level configuration values, like this:
This ensures that I *will not* GPG Sign commits, tags or pushes.
If I accidentally cloned a repo into an unusual location, or on purpose need to make a directory or submodule a personal repo, I just copy the .envrc file into that part of the tree, run direnv allowand hey-presto! I’ve turned that area into a personal repo, without having to remember the .gitconfigstring to mark a new part of my tree as a personal one.
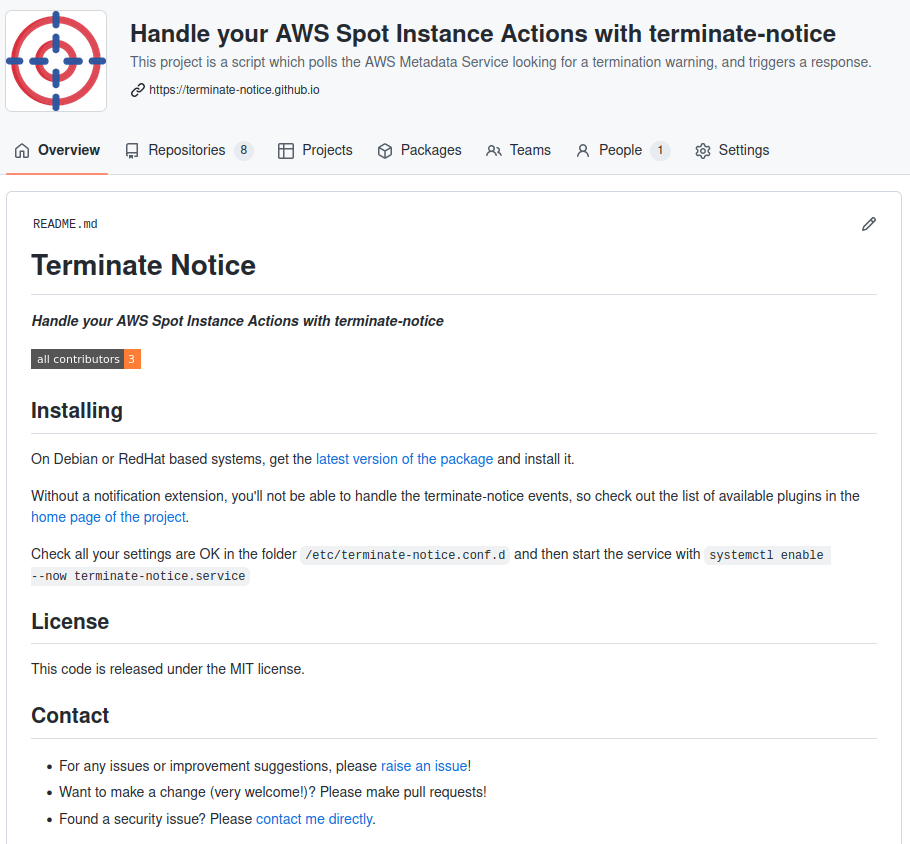
Last week I created a post talking about the new project I’ve started on Github called “Terminate-Notice” (which in hindsight isn’t very accurate – at best it’s ‘spot-instance-responses’ and at worst it’s ‘instance-rebalance-and-actions-responder’ but neither work well)… Anyway, I mentioned how I was creating RPM and DEB packages for my bash scripts and that I hadn’t put it into a repo yet.
Well, now I have, so let’s wander through how I made this work.
I have a the following files in my shell script, which are:
/usr/sbin/terminate-notice (the actual script which will run)
/usr/lib/systemd/system/terminate-notice.service (the SystemD Unit file to start and stop the script)
/usr/share/doc/terminate-notice/LICENSE (the license under which the code is released)
/etc/terminate-notice.conf.d/service.conf (the file which tells the script how to run)
These live in the root directory of my repository.
I also have the .github directory (where the things that make this script work will live), a LICENSE file (so Github knows what license it’s released under) and a README.md file (so people visiting the repo can find out about it).
A bit about Github Actions
Github Actions is a CI/CD pipeline built into Github. It responds to triggers – in our case, pushes (or uploads, in old fashioned terms) to the repository, and then runs commands or actions. The actions which will run are stored in a simple YAML formatted file, referred to as a workflow which contains some setup fields and then the “jobs” (collections of actions) themselves. The structure is as follows:
# The pretty name rendered by Actions to refer to this workflow
name: Workflow Name

# Only run this workflow when the push is an annotated tag starting v
on:
  push:
    tags:
      - 'v*'

# The workflow contains a collection of jobs, each of which has
# some actions (or "steps") to run
jobs:
  # This is used to identify the output in other jobs
  Unique_Name_For_This_Job:
    # This is the pretty name rendered in the Github UI for this job
    name: Job Name
    # This is the OS that the job will run on - typically
    # one of: ubuntu-latest, windows-latest, macos-latest
    runs-on: runner-os
    # The actual actions to perform
    steps:
      # This is a YAML list, so note where the hyphens (-) are
        # The pretty name of this step
      - name: Checkout Code
        # The name of the public collection of actions to perform
        uses: actions/checkout@v3
        # Any variables to pass into this action module
        with:
          path: "REPO"

      # This action will run a shell command
      - name: Run a command
        run: echo "Hello World"
Build a DEB package
At the simplest point, creating a DEB package is;
Create the directory structure (as above) that will unpack from your package file and put the files in the right places.
Create a DEBIAN/control file which provides enough details for your package manager to handle it.
Run dpkg-deb --build ${PATH_TO_SOURCE} ${OUTPUT_FILENAME}
Assuming the DEBIAN/control file was static and also lived in the repo, and I were just releasing the DEB file, then I could make the above work with the following steps:
name: Create the DEB

permissions:
  contents: write

on:
  push:
    tags:
      - 'v*'

jobs:
  Create_Packages:
    name: Create Package
    runs-on: ubuntu-latest
    steps:
      - name: Checkout code
        uses: actions/checkout@v3
        with:
          path: "REPO"

      - name: Copy script files around to stop .github from being added to the package then build the package
        run: |
          mkdir PKG_SOURCE
          cp -Rf REPO/usr REPO/etc REPO/DEBIAN PKG_SOURCE
          dpkg-deb --build PKG_SOURCE package.deb

      - name: Release the Package
        uses: softprops/action-gh-release@v1
        with:
          files: package.deb
But no, I had to get complicated and ALSO build an RPM file… and put some dynamic stuff in there.
Build an RPM file
RPMs are a little more complex, but not by much. RPM takes a spec file, which starts off looking like the DEBIAN/control file, and adds some “install” instructions. Let’s take a look at that spec file:
The “Name”, “Version”, “Release” and “BuildArch” values in the top of that file define what the resulting filename is (NAME_VERSION-RELEASE.BUILDARCH.rpm).
Notice that there are some “macros” which replace /etc with %{_sysconfdir}, /usr/sbin with %{_sbindir} and so on, which means that, theoretically, this RPM could be installed in an esoteric tree… but most people won’t bother.
The one quirk with this is that %{name} bit there – RPM files need to have all these sources in a directory named after the package name, which in turn is stored in a directory called SOURCES (so SOURCES/my-package for example), and then it copies the files to wherever they need to go. I’ve listed etc/config/file and usr/sbin/script but these could just have easily been file and script for all that the spec file cares.
Once you have the spec file, you run sudo rpmbuild --define "_topdir $(pwd)" -bb file.spec to build the RPM.
So, again, how would that work from a workflow YAML file perspective, assuming a static spec and source tree as described above?
name: Create the DEB

permissions:
  contents: write

on:
  push:
    tags:
      - 'v*'

jobs:
  Create_Packages:
    name: Create Package
    runs-on: ubuntu-latest
    steps:
      - name: Checkout code
        uses: actions/checkout@v3
        with:
          path: "REPO"

      - name: Copy script files around to stop .github from being added to the package then build the package
        run: |
          mkdir -p SOURCES/my-package-name
          cp -Rf REPO/usr REPO/etc SOURCES/my-package-name
          sudo rpmbuild --define "_topdir $(pwd)" -bb my-package-name.spec

      - name: Release the Package
        uses: softprops/action-gh-release@v1
        with:
          files: RPMS/my-package-name_0.0.1-1.noarch.rpm
But again, I want to be fancy (and I want to make resulting packages as simple to repeat as possible)!
So, this is my release.yml as of today:
name: Run the Release

permissions:
  contents: write

on:
  push:
    tags:
      - 'v*'

jobs:
  Create_Packages:
    name: Create Packages
    runs-on: ubuntu-latest
    steps:
      - name: Checkout code
        uses: actions/checkout@v3
        with:
          path: "REPO"

      - name: Calculate some variables
        run: |
          (
            echo "GITHUB_REPO_NAME=$(echo "${GITHUB_REPOSITORY}" | cut -d/ -f2)"
            echo "VERSION=$(echo "${GITHUB_REF_NAME}" | sed -e 's/^v//')"
            echo "DESCRIPTION=A script which polls the AWS Metadata Service looking for an 'instance action', and triggers scripts in response to the termination notice."
            echo "DEB_ARCHITECTURE=${ARCHITECTURE:-all}"
            echo "RPM_ARCHITECTURE=${ARCHITECTURE:-noarch}"
            echo "RELEASE=1"
            cd REPO
            echo "FIRST_YEAR=$(git log $(git rev-list --max-parents=0 HEAD) --date="format:%Y" --format="format:%ad")"
            echo "THIS_COMMIT_YEAR=$(git log HEAD -n1 --date="format:%Y" --format="format:%ad")"
            echo "THIS_COMMIT_DATE=$(git log HEAD -n1 --format="format:%as")"
            if [ "$FIRST_YEAR" = "$THIS_COMMIT_YEAR" ]
            then
              echo "YEAR_RANGE=$FIRST_YEAR"
            else
              echo "YEAR_RANGE=${FIRST_YEAR}-${THIS_COMMIT_YEAR}"
            fi
            cd ..
          ) >> $GITHUB_ENV

      - name: Make Directory Structure
        run: mkdir -p "SOURCES/${GITHUB_REPO_NAME}" SPECS release

      - name: Copy script files into SOURCES
        run: |
          cp -Rf REPO/[a-z]* "SOURCES/${GITHUB_REPO_NAME}"
          cp REPO/LICENSE REPO/README.md "SOURCES/${GITHUB_REPO_NAME}/usr/share/doc/${GITHUB_REPO_NAME}/"
          if grep -lr '#TAG#' SOURCES
          then
            sed -i -e "s/#TAG#/${VERSION}/" $(grep -lr '#TAG#' SOURCES)
          fi
          if grep -lr '#TAG_DATE#' SOURCES
          then
            sed -i -e "s/#TAG_DATE#/${THIS_COMMIT_YEAR}/" $(grep -lr '#TAG_DATE#' SOURCES)
          fi
          if grep -lr '#DATE_RANGE#' SOURCES
          then
            sed -i -e "s/#DATE_RANGE#/${YEAR_RANGE}/" $(grep -lr '#DATE_RANGE#' SOURCES)
          fi
          if grep -lr '#MAINTAINER#' SOURCES
          then
            sed -i -e "s/#MAINTAINER#/${MAINTAINER:-Jon Spriggs <jon@sprig.gs>}/" $(grep -lr '#MAINTAINER#' SOURCES)
          fi

      - name: Create Control File
        # Fields from https://www.debian.org/doc/debian-policy/ch-controlfields.html#binary-package-control-files-debian-control
        run: |
          mkdir -p SOURCES/${GITHUB_REPO_NAME}/DEBIAN
          (
            echo "Package:      ${GITHUB_REPO_NAME}"
            echo "Version:      ${VERSION}"
            echo "Section:      ${SECTION:-misc}"
            echo "Priority:     ${PRIORITY:-optional}"
            echo "Architecture: ${DEB_ARCHITECTURE}"
            if [ -n "${DEPENDS}" ]
            then
              echo "Depends: ${DEPENDS}"
            fi
            echo "Maintainer: ${MAINTAINER:-Jon Spriggs <jon@sprig.gs>}"
            echo "Description: ${DESCRIPTION}"
            if [ -n "${HOMEPAGE}" ]
            then
              echo "Homepage: ${HOMEPAGE}"
            fi
          ) | tee SOURCES/${GITHUB_REPO_NAME}/DEBIAN/control
          (
            echo "Files:"
            echo " *"
            echo "Copyright: ${YEAR_RANGE} ${MAINTAINER:-Jon Spriggs <jon@sprig.gs>}"
            echo "License: MIT"
            echo ""
            echo "License: MIT"
            sed 's/^/ /' "SOURCES/${GITHUB_REPO_NAME}/usr/share/doc/${GITHUB_REPO_NAME}/LICENSE"
          ) | tee SOURCES/${GITHUB_REPO_NAME}/DEBIAN/copyright

      - name: Create Spec File
        run: PATH="REPO/.github/scripts:${PATH}" create_spec_file.sh

      - name: Build DEB Package
        run: dpkg-deb --build SOURCES/${GITHUB_REPO_NAME} "${{ env.GITHUB_REPO_NAME }}_${{ env.VERSION }}_${{ env.DEB_ARCHITECTURE }}.deb"

      - name: Build RPM Package
        run: sudo rpmbuild --define "_topdir $(pwd)" -bb SPECS/${GITHUB_REPO_NAME}.spec

      - name: Confirm builds complete
        run: sudo install -m 644 -o runner -g runner $(find . -type f -name *.deb && find . -type f -name *.rpm) release/

      - name: Release
        uses: softprops/action-gh-release@v1
        with:
          files: release/*
So this means I can, within reason, drop this workflow (plus a couple of other scripts to generate the slightly more complex RPM file – see the other files in that directory structure) into another package to release it.
OH WAIT, I DID! (for the terminate-notice-slack repo, for example!) All I actually needed to do there was to change the description line, and off it went!
So, this is all well and good, but how can I distribute these? Enter Repositories.
Making a Repository
Honestly, I took most of the work here from two fantastic blog posts for creating an RPM repo and a DEB repo.
First you need to create a GPG key.
To do this, I created the following pgp-key.batch file outside my repositories tree
%echo Generating an example PGP key
Key-Type: RSA
Key-Length: 4096
Name-Real: YOUR_ORG_NAME
Name-Email: your_org_name@users.noreply.github.com
Expire-Date: 0
%no-ask-passphrase
%no-protection
%commit
Store the public.asc file to one side (you’ll need it later) and keep the private.asc safe because we need to put that into Github.
Creating Github Pages
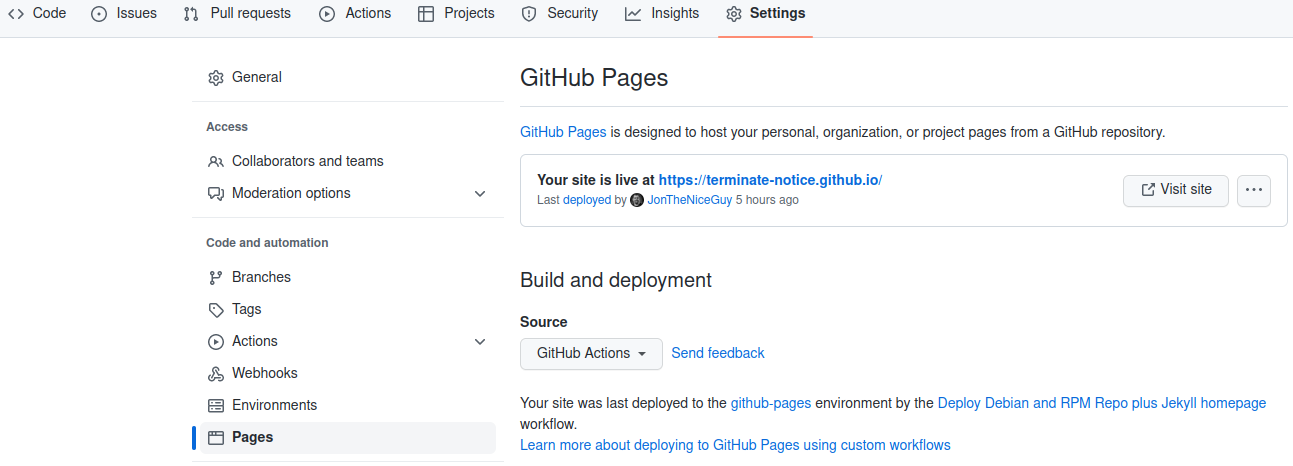
Create a new Git repository in your organisation called your-org.github.io. This marks the repository as being a Github Pages repository. Just to make that more explicit, in the settings for the repository, go to the pages section. (Note that yes, the text around this may differ, but are accurate as of 2023-03-28 in EN-GB localisation.)
Under “Source” select “GitHub Actions”.
Clone this repository to your local machine, and copy public.asc into the root of the tree with a sensible name, ending .asc.
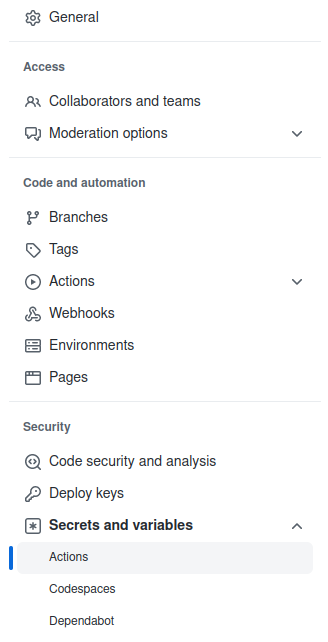
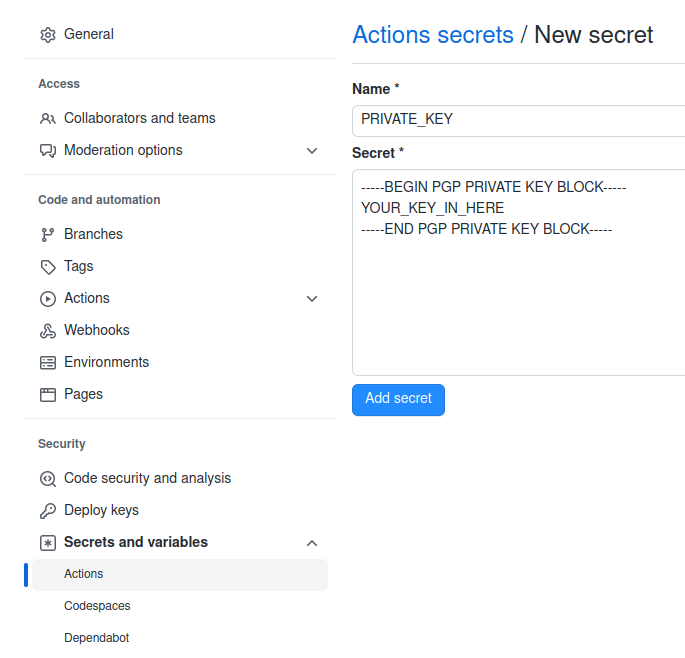
In the Github settings, find “Secrets and variables” under “Security” and pick “Actions”.
Select “New repository secret” and call it “PRIVATE_KEY”.
Now you can use this to sign things (and you will sign *SO MUCH* stuff)
Building the HTML front to your repo (I’m using Jekyll)
I’ve elected to use Jekyll because I know it, and it’s quite easy, but you should pick what works for you. My workflow for deploying these repos into the website rely on Jekyll because Github built that integration, but you’ll likely find other tools for things like Eleventy or Hugo.
Put a file called _config.yml into the root directory, and fill it with relevant content:
title: your-org
email: email_address@example.org
description: >-
  This project does stuff.
baseurl: ""
url: "https://your-org.github.io"
github_username: your-org

# Build settings
theme: minima
plugins:
  - jekyll-feed
exclude:
  - tools/
  - doc/
Naturally, make “your-org” “email_address@example.org” and the descriptions more relevant to your environment.
Next, create an index.md file with whatever is relevant for your org, but it must start with something like:
---
layout: home
title: YOUR-ORG Website
---
Here is the content for the front page.
Building the repo behind your static content
We’re back to working with Github Actions workflow files, so let’s pop that open.
I’ve basically changed the “stock” Jekyll static site Github Actions file and added every step that starts [REPO] to make the repository stuff fit in around the steps that start [JEKYLL] which build and deploy the Jekyll based site.
The key part to all this though is the step Build DEB and RPM repos which calls a script that downloads all the RPM and DEB files from the various other repository build stages and does some actions to them. Now yes, I could have put all of this into the workflow.yml file, but I think it would have made it all a bit more confusing! So, let’s work through those steps!
Making an RPM Repo
To build a RPM repo you get and sign each of the RPM packages you want to offer. You do this with this command:
Then, once you have all your RPM files signed, you then run a command called createrepo_c (available in Debian archives – Github Actions doesn’t have a RedHat based distro available at this time, so I didn’t look for the RPM equivalent). This creates the repository metadata, and finally you sign that file, like this:
gpg --detach-sign --armor repodata/repomd.xml
Making a DEB Repo
To build a DEB repo you get each of the DEB packages you want to offer in a directory called pool/main (you can also call “main” something else – for example “contrib”, “extras” and so on).
Once you have all your files, you create another directory called dists/stable/main/binary-all into which we’ll run a command dpkg-scanpackages to create the list of the available packages. Yes, “main” could also be called “contrib”, “extras” and “stable” could be called “testing” or “preprod” or the name of your software release (like “jaunty”, “focal” or “warty”). The “all” after the word “binary” is the architecture in question.
dpkg-scanpackages creates an index of the packages in that directory including the version number, maintainer and the cryptographic hashes of the DEB files.
We zip (using gzip and bzip2) the Packages file it creates to improve the download speeds of these files, and then make a Release file. This in turn has the cryptographic hashes of each of the Packages and zipped Packages files, which in turn is then signed with GPG.
Ugh, that was MESSY
Making the repository available to your distributions
RPM repos have it quite easy here – there’s a simple file, that looks like this:
The distribution user simply downloads this file, puts it into /etc/yum.sources.d/org-name.repo and now all the packages are available for download. Woohoo!
DEB repos are a little harder.
First, download the public key – https://org-name.github.io/public.asc and put it in /etc/apt/keyrings/org-name.asc. Next, create file in /etc/apt/sources.list.d/org-name.list with this line in:
deb [arch=all signed-by=/etc/apt/keyrings/org-name.asc] https://org-name.github.io/deb stable main
And now they can install whatever packages they want too!
Doing this the simple way
Of course, this is all well-and-good, but if you’ve got a simple script you want to package, please don’t hesitate to use the .github directory I’m using for terminate-notice, which is available in the -skeleton repo and then to make it into a repo, you can reuse the .github directory in the terminate-notice.github.io repo to start your adventure.
I’m using Vagrant to test out some scripts, and I really need to stop myself from destroying my caching proxy that I’m running in the test.
To do that, I’ve got this Vagrantfile:
Vagrant.configure("2") do |config|
  config.vm.define "caching-proxy" do |this|
    this.trigger.before :destroy do |trigger|
      trigger.info = "This machine is currently prevented from being destroyed. Please remove the trigger to be able to destroy it.
      trigger.abort = 1
    end
    this.vm.box = "ubuntu/jammy64"
    # etc
  end
  config.vm.define "normalnode" do |this|
    this.vm.box = "ubuntu/jammy64"
  end
end
Now when I try to run vagrant destroy caching-proxy I get:
==> caching-proxy: Running action triggers before destroy ...
==> caching-proxy: Running trigger...
==> caching-proxy: This machine is currently prevented from being destroyed. Please remove the trigger to destroy it.
==> caching-proxy: Vagrant has been configured to abort. Terminating now...
Running vagrant destroy normalnode I get:
    normalnode: Are you sure you want to destroy the 'normalnode' VM? [y/N] y
==> normalnode: Forcing shutdown of VM...
==> normalnode: Destroying VM and associated drives...
During some debugging of an issue with our AWS Spot Instances at work, a colleague noticed that we weren’t responding to the Instance Actions that AWS sends when it’s due to shut down a spot instance.
I’m working on a new project, and I am using Multipass on an Ubuntu machine to provision some virtual machines on my local machine using cloudinit files. All good so far!
I wanted to expose one of the services I’ve created to the bridged network (so I can run avahi-daemon), and did this by running multipass launch -n vm01 --network enp3s0 when, what should I see but: launch failed: The bridging feature is not implemented on this backend. OH NO!