"Mesh Facade" by "Pedro Ângelo" on Flickr

Looking at the Nebula Overlay Meshed VPN Network from Slack

Around 2-3 years ago, Slack– the company who produces Slack the IM client, started working on a meshed overlay network product, called Nebula, to manage their environment. After two years of running their production network on the back of it, they decided to open source it. I found out about Nebula via a Medium Post that was mentioned in the HangOps Slack Group. I got interested in it, asked a few questions about Nebula in the Slack, and then in the Github Issues for it, and then recently raised a Pull Request to add more complete documentation than their single (heavily) commented config file.

So, let’s go into some details on why this is interesting to me.

1. Nebula uses a flat IPv4 network to identify all hosts in the network, no matter where in the network those hosts reside.

This means that I can address any host in my (self allocated) 198.18.0.0/16 network, and I don’t need to worry about routing tables, production/DR sites, network tromboneing and so on… it’s just… Flat.

[Note: Yes, that IP address “looks” like a public subnet – but it’s actually a testing network, allocated by IANA for network testing!]

2. Nebula has host-based firewalling built into the configuration file.

This means that once I know how my network should operate (yes, I know that’s a big ask), I can restrict my servers from being able to reach my laptops, or I can stop my web server from being able to talk to my database server, except for on the database ports. Lateral movement becomes a LOT harder.

This firewalling also looks a lot like (Network) Security Groups (for the AWS and Azure familiar), so you have a default “Deny” rule, and then layer “Allow” rules on top. You also have Inbound and Outbound rules, so if you want to stop your laptops from talking anything but DNS, SSH, HTTPS and ICMP over Nebula…. well, yep, you can do that :)

3. Nebula uses a PKI environment. Where you can have multiple Certificate Authorities.

This means that I have a central server running my certificate authority (CA), with a “backup” CA, stored offline – in case of dire disaster with my primary CA, and push both CA’s to all my nodes. If I suddenly need to replace all the certificates that my current CA signed, I can do that with minimal interruption to my nodes. Good stuff.

Nebula also created their own PKI attributes to identify the roles of each device in the Nebula environment. By signing that as part of the certificate on each node too, means your CA asserts that the role that certificate holds is valid for that node in the network.

Creating a node’s certificate is a simple command:

nebula-cert sign -name jon-laptop -ip 198.18.0.1/16 -groups admin,laptop,support

This certificate has the IP address of the node baked in (it’s 198.18.0.1) and the groups it’s part of (admin, laptop and support), as well as the host name (jon-laptop). I can use any of these three items in my firewall rules I mentioned above.

4. It creates a peer-to-peer, meshed VPN.

While it’s possible to create a peer-to-peer meshed VPN with commercial products, I’ve not seen any which are as light-weight to deploy as this. Each node finds all the other nodes in the network by using a collection of “Lighthouses” (similar to Torrent Seeds or Skype Super Nodes) which tells all the connecting nodes where all the other machines in the network are located. These then initiate UDP connections to the other nodes they want to talk to. If they are struggling (because of NAT or Double NAT), then there’s a NAT Punching process (called, humourously, “punchy”) which lets you signal via the Lighthouse that you’re trying to reach another node that can’t see your connection, and asks it to also connect out to you over UDP… thereby fixing the connection issue. All good.

5. Nebula has clients for Windows, Mac and Linux. Apparently there are clients for iOS in the works (meh, I’m not on Apple… but I know some are) and I’ve heard nothing about Android as yet, but as it’s on Linux, I’m sure some enterprising soul can take a look at it (the client is written in Go).

If you want to have a look at Nebula for your own testing, I’ve created a Terraform based environment on AWS and Azure to show how you’d manage it all using Ansible Tower, which builds:

2 VPCs (AWS) and 1 VNet (Azure)
6 subnets (3 public, 3 private)
1 public AWX (the upstream project from Ansible Tower) Server
1 private Nebula Certificate Authority
2 public Web Servers (one in AWS, one in Azure)
2 private Database Servers (one in AWS, one in Azure)
2 public Bastion Servers (one in AWS, one in Azure) – that lets AWX reach into the Private sections of the network, without exposing SSH from all the hosts.

If you don’t want to provision the Azure side, just remove load_web2_module.tf from the Terraform directory in that repo… Job’s a good’n!

I have plans to look at a couple of variables, like Nebula’s closest rival, ZeroTier, and to look at using SaltStack instead of Ansible, to reduce the need for the extra Bastion servers.

Featured image is “Mesh Facade” by “Pedro Ângelo” on Flickr and is released under a CC-BY-SA license.

“Swatch Water Store, Grand Central Station, NYC, 9/2016, pics by Mike Mozart of TheToyChannel and JeepersMedia on YouTube #Swatch #Watch” by “Mike Mozart” on Flickr

Time Based Security

I came across the concept of “Time Based Security” (TBS) in the Sysadministrivia podcast, S4E13.

I’m still digging into the details of it, but in essence, the “Armadillo” (Crunchy on the outside, soft on the inside) protection model is broken (sometimes known as the “Fortress Model”). You assume that your impenetrable network boundary will prevent attackers from getting to your sensitive data. While this may stop them for a while, what you’re actually seeing here is one part of a complex protection system, however many organisations miss the fact that this is just one part.

The examples used in the only online content I’ve found about this refer to a burglary.

In this context, your “Protection” (P) is measured in time. Perhaps you have hardened glass that takes 20 seconds to break.

Next, we evaluate “Detection” (D) which is also, surprisingly enough, measured in time. As the glass is hit, it triggers an alarm to a security facility. That takes 20 seconds to respond and goes to a dispatch centre, another 20 seconds for that to be answered and a police officer dispatched.

The police officer being dispatched is the “Response” (R). The police take (optimistically) 2 minutes to arrive (it was written in the 90’s so the police forces weren’t decimated then).

So, in the TBS system, we say that Detection (D) of 40 seconds plus Response (R) of 120 seconds = 160 seconds. This is greater than Protection (P) of 20 seconds, so we have an Exposure (E) time of 140 seconds E = P – (D + R). The question that is posed is, how much damage can be done in E?

So, compare this to your average pre-automation SOC. Your firewall, SIEM (Security Incident Event Management system), IDS (Intrusion Detection System) or WAF (Web Application Firewall) triggers an alarm. Someone is trying to do something (e.g. Denial Of Service attack, password spraying or port scanning for vulnerable services) a system you’re responsible for. While D might be in the tiny fractions of a minute (perhaps let’s say 1 minute, for maths sake), R is likely to be minutes or even hours, depending on the refresh rate of the ticket management system or alarm system (again, for maths sake, let’s say 60 minutes). So, D+R is now 61 minutes. How long is P really going to hold? Could it be less than 30 minutes against a determined attacker? (Let’s assume P is 30 minutes for maths sake).

Let’s do the calculation for a pre-automation SOC (Security Operations Centre). P-(D+R)=E. E here is 31 minutes. How much damage can an attacker do in 31 minutes? Could they put a backdoor into your system? Can they download sensitive data to a remote system? Could they pivot to your monitoring system, and remove the logs that said they were in there?

If you consider how much smaller the D and R numbers become with an event driven SOAR (Security Orchestration and Automation Response) system – does that improve your P and E numbers? Consider that if you can get E to 0, this could be considered to be “A Secure Environment”.

Also, consider the fact that many of the tools we implement for security reduce D and R, but if you’re not monitoring the outputs of the Detection components, then your response time grows significantly. If your Detection component is misconfigured in that it’s producing too many False Positives (for example, “The Boy Who Cried Wolf“), so you don’t see the real incident, then your Response might only be when a security service notifies you that your data, your service or your money has been exposed and lost. And that wouldn’t be good now… Time to look into automation 😁

Featured image is “Swatch Water Store, Grand Central Station, NYC, 9/2016, pics by Mike Mozart of TheToyChannel and JeepersMedia on YouTube #Swatch #Watch” by “Mike Mozart” on Flickr and is released under a CC-BY license.
Building a simple CA for testing purposes

I recently needed to create a Certificate Authority with an Intermediate Certificate to test some TLS inspection stuff at work. This script (based on a document I found at jamielinux.com) builds a Certificate Authority and creates an Intermediate Certificate Authority using the root.

I’ve also done something similar with Ansible before, but I’ve not got that to hand :)

Late edit, 2019-08-21: Found it! Needs some tweaks to add the sub-CA or child certs, but so-far it would work :)

"Confused" by "CollegeDegrees360" on Flickr

Using AWSCLI on Ubuntu/Ubuntu-in-WSL

This is a brief note to myself (but might be useful to you)!

awscli (similar to the Azure az command) is packaged for Ubuntu, but the version which is in the Ubuntu 18.04 repositories is “out of date” and won’t work with AWS. You *actually* need to run the following:

sudo apt update && sudo apt install python3-pip -y && sudo -H pip3 install --upgrade awscli

If you’ve unfortunately already installed awscli from apt, do the following:

sudo apt remove awscli -y

Then, logout (for some reason, binary path caching is a thing now?) and log back in, and then run the above pip install line.

Solution found via this logged issue on the awscli git repo.

Featured image is “Confused” by “CollegeDegrees360” on Flickr and is released under a CC-BY-SA license.

"Feb 11" by "Gordon" on Flickr

How to quickly get the next SemVer for your app

SemVer, short for Semantic Versioning is an easy way of numbering your software versions. They follow the model Major.Minor.Patch, like this 0.9.1 and has a very opinionated view on what is considered a Major “version bump” and what isn’t.

Sometimes, when writing a library, it’s easy to forget what version you’re on. Perhaps you have a feature change you’re working on, but also bug fixes to two or three previous versions you need to keep an eye on? How about an easy way of figuring out what that next bump should be?

In a recent conversation on the McrTech slack, Steven [0] mentioned he had a simple bash script for incrementing his SemVer numbers, and posted it over. Naturally, I tweaked it to work more easily for my usecases so, this is *mostly* Steven’s code, but with a bit of a wrapper before and after by me :)

Late Edit: 2022-11-19 ictus4u spotted that I wasn’t handling the reset of PATCH to 0 when MINOR gets a bump. I fixed this in the above gist.

So how do you use this? Dead simple, use nextver in a tree that has an existing git tag SemVer to get the next patch number. If you want to bump it to the next minor or major version, try nextver minor or nextver major. If you don’t have a git tag, and don’t specify a SemVer number, then it’ll just assume you’re starting from fresh, and return 0.0.1 :)

Want to find more cool stuff from the original author of this work? Here is a video by the author :)

Featured image is “Feb 11” by “Gordon” on Flickr and is released under a CC-BY-SA license.

Expanding XFS drives with LVM

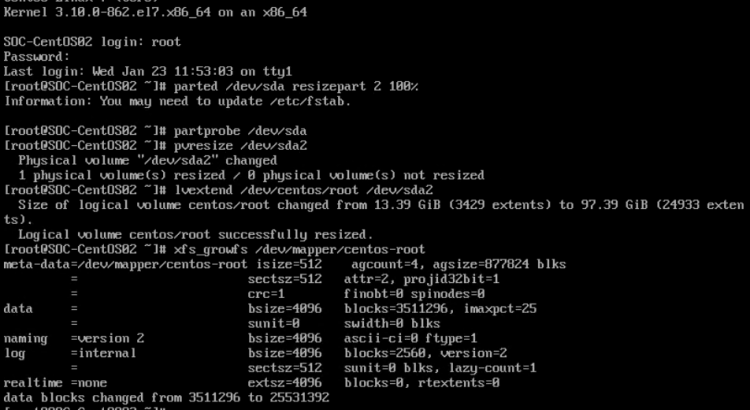
Say, for example, you’ve got a lovely CentOS VM (using XFS by default) which has a disk that isn’t quite big enough. Fair enough, your VM Hypervisor is sensible enough to resize that disk without question… How do you resize the XFS partition? Assuming you’ve got your disk mounted as /dev/sda, and you’ve got a boot volume as partition 1 and a root volume as partition 2 (the standard install model)

  1. parted /dev/sda resizepart 2 100%
  2. partprobe /dev/sda
  3. pvresize /dev/sda2
  4. lvextend /dev/centos/root /dev/sda2
  5. xfs_growfs /dev/mapper/centos-root
The graphical version of the steps above

Research via:

"www.GetIPv6.info decal" from Phil Wolff on Flickr

Hurricane Electric IPv6 Gateway on Raspbian for Raspberry Pi

NOTE: This article was replaced on 2019-03-12 by a github repository where I now use Vagrant instead of a Raspberry Pi, because I was having some power issues with my Raspberry Pi. Also, using this method means I can easily use an Ansible Playbook. The following config will still work(!) however I prefer this Vagrant/Ansible workflow for this, so won’t update this blog post any further.

Following an off-hand remark from a colleague at work, I decided I wanted to set up a Raspberry Pi as a Hurricane Electric IPv6 6in4 tunnel router. Most of the advice around (in particular, this post about setting up IPv6 on the Raspberry Pi Forums) related to earlier version of Raspbian, so I thought I’d bring it up-to-date.

I installed the latest available version of Raspbian Stretch Lite (2018-11-13) and transferred it to a MicroSD card. I added the file ssh to the boot volume and unmounted it. I then fitted it into my Raspberry Pi, and booted it. While it was booting, I set a static IPv4 address on my router (192.168.1.252) for the Raspberry Pi, so I knew what IP address it would be on my network.

I logged into my Hurricane Electric (HE) account at tunnelbroker.net and created a new tunnel, specifying my public IP address, and selecting my closest HE endpoint. When the new tunnel was created, I went to the “Example Configurations” tab, and selected “Debian/Ubuntu” from the list of available OS options. I copied this configuration into my clipboard.

I SSH’d into the Pi, and gave it a basic config (changed the password, expanded the disk, turned off “predictable network names”, etc) and then rebooted it.

After this was done, I created a file in /etc/network/interfaces.d/he-ipv6 and pasted in the config from the HE website. I had to change the “local” line from the public IP I’d provided HE with, to the real IP address of this box. Note that any public IPs (that is, not 192.168.x.x addresses) in the config files and settings I’ve noted refer to documentation addressing (TEST-NET-2 and the IPv6 documentation address ranges)

auto he-ipv6
iface he-ipv6 inet6 v4tunnel
        address 2001:db8:123c:abd::2
        netmask 64
        endpoint 198.51.100.100
        local 192.168.1.252
        ttl 255
        gateway 2001:db8:123c:abd::1

Next, I created a file in /etc/network/interfaces.d/eth0 and put the following configuration in, using the first IPv6 address in the “routed /64” range listed on the HE site:

auto eth0
iface eth0 inet static
    address 192.168.1.252
    gateway 192.168.1.254
    netmask 24
    dns-nameserver 8.8.8.8
    dns-nameserver 8.8.4.4

iface eth0 inet6 static
    address 2001:db8:123d:abc::1
    netmask 64

Next, I disabled the DHCPd service by issuing systemctl stop dhcpcd.service Late edit (2019-01-22): Note, a colleague mentioned that this should have actually been systemctl stop dhcpcd.service && systemctl disable dhcpcd.service – good spot! Thanks!! This ensures that if, for some crazy reason, the router stops offering the right DHCP address to me, I can still access this box on this IP. Huzzah!

I accessed another host which had IPv6 access, and performed both a ping and an SSH attempt. Both worked. Fab. However, this now needs to be blocked, as we shouldn’t permit anything to be visible downstream from this gateway.

I’m using the Uncomplicated Firewall (ufw) which is a simple wrapper around IPTables. Let’s create our policy.

# First install the software
sudo apt update && sudo apt install ufw -y

# Permits inbound IPv4 SSH to this host - which should be internal only. 
# These rules allow tailored access in to our managed services
ufw allow in on eth0 app DNS
ufw allow in on eth0 app OpenSSH

# These rules accept all broadcast and multicast traffic
ufw allow in on eth0 to 224.0.0.0/4 # Multicast addresses
ufw allow in on eth0 to 255.255.255.255 # Global broadcast
ufw allow in on eth0 to 192.168.1.255 # Local broadcast

# Alternatively, accept everything coming in on eth0
# If you do this one, you don't need the lines above
ufw allow in on eth0

# Setup the default rules - deny inbound and routed, permit outbound
ufw default deny incoming 
ufw default deny routed
ufw default allow outgoing

# Prevent inbound IPv6 to the network
# Also, log any drops so we can spot them if we have an issue
ufw route deny log from ::/0 to 2001:db8:123d:abc::/64

# Permit outbound IPv6 from the network
ufw route allow from 2001:db8:123d:abc::/64

# Start the firewall!
ufw enable

# Check the policy
ufw status verbose
ufw status numbered

Most of the documentation I found suggested running radvd for IPv6 address allocation. This basically just allocates on a random basis, and, as far as I can make out, each renewal gives the host a new IPv6 address. To make that work, I performed apt-get update && apt-get install radvd -y and then created this file as /etc/radvd.conf. If all you want is a floating IP address with no static assignment – this will do it…

interface eth0
{
    AdvSendAdvert on;
    MinRtrAdvInterval 3;
    MaxRtrAdvInterval 10;
    prefix 2001:db8:123d:abc::/64
    {
        AdvOnLink on;
        AdvAutonomous on;
    };
   route ::/0 {
   };
};

However, this doesn’t give me the ability to statically assign IPv6 addresses to hosts. I found that a different IPv6 allocation method will do static addressing, based on your MAC address called SLAAC (note there are some privacy issues with this, but I’m OK with them for now…) In this mode assuming the prefix as before – 2001:db8:123d:abc:: and a MAC address of de:ad:be:ef:01:23, your IPv6 address will be something like: 2001:db8:123d:abc:dead:beff:feef:0123and this will be repeatably so – because you’re unlikely to change your MAC address (hopefully!!).

This SLAAC allocation mode is available in DNSMasq, which I’ve consumed before (in a Pi-Hole). To use this, I installed DNSMasq with apt-get update && apt-get install dnsmasq -y and then configured it as follows:

interface=eth0
listen-address=127.0.0.1
# DHCPv6 - Hurricane Electric Resolver and Google's
dhcp-option=option6:dns-server,[2001:470:20::2],[2001:4860:4860::8888]
# IPv6 DHCP scope
dhcp-range=2001:db8:123d:abc::, slaac

I decided to move from using my router as a DHCP server, to using this same host, so expanded that config as follows, based on several posts, but mostly centred around the MAN page (I’m happy to have this DNSMasq config improved if you’ve got any suggestions ;) )

# Stuff for DNS resolution
domain-needed
bogus-priv
no-resolv
filterwin2k
expand-hosts
domain=localnet
local=/localnet/
log-queries

# Global options
interface=eth0
listen-address=127.0.0.1

# Set these hosts as the DNS server for your network
# Hurricane Electric and Google
dhcp-option=option6:dns-server,[2001:470:20::2],2001:4860:4860::8888]

# My DNS servers are:
server=1.1.1.1                # Cloudflare's DNS server
server=8.8.8.8                # Google's DNS server

# IPv4 DHCP scope
dhcp-range=192.168.1.10,192.168.1.210,12h
# IPv6 DHCP scope
dhcp-range=2001:db8:123d:abc::, slaac

# Record the DHCP leases here
dhcp-leasefile=/run/dnsmasq/dhcp-lease

# DHCPv4 Router
dhcp-option=3,192.168.1.254

So, that’s what I’m doing now! Hope it helps you!

Late edit (2019-01-22): In issue 129 of the “Awesome Self Hosted Newsletter“, I found a post called “My New Years Resolution: Learn IPv6“… which uses a pfSense box and a Hurricane Electric tunnel too. Fab!

Header image is “www.GetIPv6.info decal” by “Phil Wolff” on Flickr and is released under a CC-BY-SA license. Used with thanks!