I have a collection of AWS AMIs I use for various builds at work. These come from two places – the AWS Marketplace and our internal Build process.
Essentially, our internal builds (for those who work for my employer – these are the OptiMISe builds) are taken from specific AWS Marketplace builds and hardened.
Because I don’t want to share the AMI details when I put stuff on GitHub, I have an override.tf file that handles the different AMI search strings. So, here’s the ami.tf file I have with the AWS Marketplace version:
data "aws_ami" "centos7" {
  most_recent = true

  filter {
    name   = "name"
    values = ["CentOS Linux 7 x86_64 HVM EBS ENA*"]
  }

  filter {
    name   = "architecture"
    values = ["x86_64"]
  }

  owners = ["679593333241"] # CentOS Project
}
And here’s an example of the override.tf file I have:
To get the right combination of username and AMI, I have this in the file where I create my “instance” (virtual machine):
variable "os" {
  default = "centos7"
}

resource "aws_instance" "vm01" {
  ami = data.null_data_source.os.outputs[var.os]
  # additional lines omitted for brevity
}

output "username" {
  value = var.username[var.os]
}

output "vm01" {
  value = aws_instance.vm01.public_ip
}
And that way, I get the VM’s default username and IP address on build. Nice.
Late edit – 2020-09-20: It’s worth noting that this is fine for short-lived builds, proof of concept, etc. But, for longer lived environments, you should be calling out exactly which AMI you’re using, right from the outset. That way, your builds will (or should) all start out from the same point, no ambiguity about exactly which point release they’re getting, etc.
For a project I’m working on, I needed to define a list of ports, and set some properties on some of them. In the Ansible world, you’d use statements like:
{% if data.somekey is defined %}something {{ data.somekey }}{% endif %}
or
{{ data.somekey | default('') }}
In a pinch, you can also do this:
{{ (data | default({}) ).somekey | default('') }}
With Terraform, I was finding it much harder to work out how to find whether a value as part of a map (the Terraform term for a Dictionary in Ansible terms, or an Associative Array in PHP terms), until I stumbled over the Lookup function. Here’s how that looks for just a simple Terraform file:
In a project I’m working on in Terraform, I’ve got several feature flags in a module. These flags relate to whether this module should turn on a system in a cloud provider, or not, and looks like this:
variable "turn_on_feature_x" {
  description = "Setting this to 'yes' will enable Feature X. Any other value will disable it. (Default 'yes')"
  value = "yes"
}

variable "turn_on_feature_y" {
  description = "Setting this to 'yes' will enable Feature Y. Any other value will disable it. (Default 'no')"
  value = "no"
}
When I call the module, I then can either leave the feature with the default values, or selectively enable or disable them, like this:
When I then want to use the feature, I have to remember a couple of key parts.
Normally this feature check is done with a “count” statement, and the easiest way to use this is to use the ternary operator to check values and return a “1” or a “0” for if you want the value used.
Ternary operators look like this: var.turn_on_feature_x == "yes" ? 1 : 0 which basically means, if the value of the variable turn_on_feature_x is set to “yes”, then return 1 otherwise return 0.
This can get a bit complex, particularly if you want to check several flags a few times, like this: var.turn_on_feature_x == "yes" ? var.turn_on_feature_y == "yes" ? 1 : 0 : 0. I’ve found that wrapping them in brackets helps to understand what you’re getting, like this:
If you end up using a count statement, the resulting value must be treated as an 0-indexed array, like this: some_provider_service.my_name[0].result
This is because, using the count value says “I want X number of resources”, so Terraform has to treat it as an array, in case you actually wanted 10 instead of 1 or 0.
One of the things I’m currently playing with is a project to deploy some FortiGate Firewalls into cloud platforms. I have a couple of Evaluation Licenses I can use (as we’re a partner), but when it comes to automatically scaling, you need to use the PAYG license.
To try to keep my terraform files as reusable as possible, I came up with this work around. It’s likely to be useful in other places too. Enjoy!
This next block is stored in license.tf and basically says “by default, you have no license.”
variable "license_file" {
  default = ""
  description = "Path to the license file to load, or leave blank to use a PAYG license."
}
We can either override this with a command line switch terraform apply -var 'license_file=mylicense.lic', or (more likely) the above override file named license_override.tf (ignored in Git) which has this next block in it:
This next block is also stored in license.tf and says “If var.license is not empty, load that license file [var.license != "" ? var.license] but if it is empty, check whether /dev/null exists (*nix platforms) [fileexists("/dev/null")] in which case, use /dev/null, otherwise use the NUL: device (Windows platforms).”
👉 Just as an aside, I’ve seen this “ternary” construct in a few languages. It basically looks like this: boolean_operation ? true_value : false_value
That check, logically, could have been written like this instead: "%{if boolean_operation}${true_value}%{else}${false_value}%{endif}"
By combining two of these together, while initially it looks far more messy and hard to parse, I’ve found that, especially in single-line statements, it’s much more compact and eventually easier to read than the alternative if/else/endif structure.
So, this means that we can now refer to data.local_file.license as our data source.
Next, I want to select either the PAYG (Pay As You Go) or BYOL (Bring Your Own License) licensed AMI in AWS (the same principle applies in Azure, GCP, etc), so in this block we provide a different value to the filter in the AMI Data Source, suggesting the string “FortiGate-VM64-AWS *x.y.z*” if we have a value provided license, or “FortiGate-VM64-AWSONDEMAND *x.y.z*” if we don’t.
And so that is how I can elect to provide a license, or use a pre-licensed image from AWS, and these lessons can also be applied in an Azure or GCP environment too.
TL;DR?It’s possible to work out what type of variable you’re working with in Ansible. The in-built filters don’t always do quite what you’re expecting. Jump to the “In Summary” heading for my suggestions.
LATE EDIT: 2021-05-23 After raising a question in #ansible on Freenode, flowerysong noticed that my truth table around mappings, iterables and strings was wrong. I’ve amended the table accordingly, and have added a further note below the table.
One of the things I end up doing quite a bit with Ansible is value manipulation. I know it’s not really normal, but… well, I like rewriting values from one type of a thing to the next type of a thing.
For example, I like taking a value that I don’t know if it’s a list or a string, and passing that to an argument that expects a list.
Doing it wrong, getting it better
Until recently, I’d do that like this:
- debug:
    msg: |-
      {
        {%- if value | type_debug == "string" or value | type_debug == "AnsibleUnicode" -%}
           "string": "{{ value }}"
        {%- elif value | type_debug == "dict" or value | type_debug == "ansible_mapping" -%}
          "dict": {{ value }}
        {%- elif value | type_debug == "list" -%}
          "list": {{ value }}
        {%- else -%}
          "other": "{{ value }}"
        {%- endif -%}
      }
But, following finding this gist, I now know I can do this:
- debug:
    msg: |-
      {
        {%- if value is string -%}
           "string": "{{ value }}"
        {%- elif value is mapping -%}
          "dict": {{ value }}
        {%- elif value is iterable -%}
          "list": {{ value }}
        {%- else -%}
          "other": "{{ value }}"
        {%- endif -%}
      }
So, how would I use this, given the context of what I was saying before?
- assert:
    that:
    - value is string
    - value is not mapping
    - value is iterable
- some_module:
    some_arg: |-
      {%- if value is string -%}
        ["{{ value }}"]
      {%- else -%}
        {{ value }}
      {%- endif -%}
More details on finding a type
Why in this order? Well, because of how values are stored in Ansible, the following states are true:
⬇️Type \ ➡️Check
is iterable
is mapping
is sequence
is string
a_dict (e.g. {})
✔️
✔️
✔️
❌
a_list (e.g. [])
✔️
❌
✔️
❌
a_string (e.g. “”)
✔️
❌
✔️
✔️
A comparison between value types
So, if you were to check for is iterable first, you might match on a_list or a_dict instead of a_string, but string can only match on a_string. Once you know it can’t be a string, you can check whether something is mapping – again, because a mapping can only match a_dict, but it can’t match a_list or a_string. Once you know it’s not that, you can check for either is iterable or is sequence because both of these match a_string, a_dict and a_list.
LATE EDIT: 2021-05-23 Note that a prior revision of this table and it’s following paragraph showed “is_mapping” as true for a_string. This is not correct, and has been fixed, both in the table and the paragraph.
Likewise, if you wanted to check whether a_float and an_integeris number and not is string, you can check these:
⬇️Type \ ➡️Check
is float
is integer
is iterable
is mapping
is number
is sequence
is string
a_float
✔️
❌
❌
❌
✔️
❌
❌
an_integer
❌
✔️
❌
❌
✔️
❌
❌
A comparison between types of numbers
So again, a_float and an_integer don’t match is string, is mapping or is iterable, but they both match is number and they each match their respective is float and is integer checks.
How about each of those (a_float and an_integer) wrapped in quotes, making them a string? What happens then?
⬇️Type \ ➡️Check
is float
is integer
is iterable
is mapping
is number
is sequence
is string
a_float_as_string
❌
❌
✔️
❌
❌
✔️
✔️
an_integer_as_string
❌
❌
✔️
❌
❌
✔️
✔️
A comparison between types of numbers when held as a string
This is somewhat interesting, because they look like a number, but they’re actually “just” a string. So, now you need to do some comparisons to make them look like numbers again to check if they’re numbers.
Changing the type of a string
What happens if you cast the values? Casting means to convert from one type of value (e.g. string) into another (e.g. float) and to do that, Ansible has three filters we can use, float, int and string. You can’t cast to a dict or a list, but you can use dict2items and items2dict (more on those later). So let’s start with casting our group of a_ and an_ items from above. Here’s a list of values I want to use:
With each of these values, I returned the value as Ansible knows it, what happens when you do {{ value | float }} to cast it as a float, as an integer by doing {{ value | int }} and as a string {{ value | string }}. Some of these results are interesting. Note that where you see u'some value' means that Python converted that string to a Unicode string.
⬇️Value \ ➡️Cast
value
value when cast as float
value when cast as integer
value when cast as string
a_dict
{“key1”: “value1”}
0.0
0
“{u’key1′: u’value1′}”
a_float
1.1
1.1
1
“1.1”
a_float_as_string
“1.1”
1.1
1
“1.1”
a_list
[“item1”]
0.0
0
“[u’item1′]”
a_string
“string”
0.0
0
“string”
an_int
1
1
1
“1”
an_int_as_string
“1”
1
1
“1”
Casting between value types
So, what does this mean for us? Well, not a great deal, aside from to note that you can “force” a number to be a string, or a string which is “just” a number wrapped in quotes can be forced into being a number again.
Oh, and casting dicts to lists and back again? This one is actually pretty clearly documented in the current set of documentation (as at 2.9 at least!)
Checking for miscast values
How about if I want to know whether a value I think might be a float stored as a string, how can I check that?
What is this? If I cast a value that I think might be a float, to a float, and then turn both the cast value and the original into a string, do they match? If I’ve got a string or an integer, then I’ll get a false, but if I have actually got a float, then I’ll get true. Likewise for casting an integer. Let’s see what that table looks like:
⬇️Type \ ➡️Check
value when cast as float
value when cast as integer
value when cast as string
a_float
✔️
❌
✔️
a_float_as_string
✔️
❌
✔️
an_integer
❌
✔️
✔️
an_integer_as_string
❌
✔️
✔️
A comparison between types of numbers when cast to a string
So this shows us the values we were after – even if you’ve got a float (or an integer) stored as a string, by doing some careful casting, you can confirm they’re of the type you wanted… and then you can pass them through the right filter to use them in your playbooks!
Booleans
Last thing to check – boolean values – “True” or “False“. There’s a bit of confusion here, as a “boolean” can be: true or false, yes or no, 1 or 0, however, is true and True and TRUE the same? How about false, False and FALSE? Let’s take a look!
⬇️Value \ ➡️Check
type_debug
is boolean
is number
is iterable
is mapping
is string
value when cast as bool
value when cast as string
value when cast as integer
yes
bool
✔️
✔️
❌
❌
❌
True
True
1
Yes
AnsibleUnicode
❌
❌
✔️
❌
✔️
False
Yes
0
YES
AnsibleUnicode
❌
❌
✔️
❌
✔️
False
YES
0
“yes”
AnsibleUnicode
❌
❌
✔️
❌
✔️
True
yes
0
“Yes”
AnsibleUnicode
❌
❌
✔️
❌
✔️
True
Yes
0
“YES”
AnsibleUnicode
❌
❌
✔️
❌
✔️
True
YES
0
true
bool
✔️
✔️
❌
❌
❌
True
True
1
True
bool
✔️
✔️
❌
❌
❌
True
True
1
TRUE
bool
✔️
✔️
❌
❌
❌
True
True
1
“true”
AnsibleUnicode
❌
❌
✔️
❌
✔️
True
true
0
“True”
AnsibleUnicode
❌
❌
✔️
❌
✔️
True
True
0
“TRUE”
AnsibleUnicode
❌
❌
✔️
❌
✔️
True
TRUE
0
1
int
❌
✔️
❌
❌
❌
True
1
1
“1”
AnsibleUnicode
❌
❌
✔️
❌
✔️
True
1
1
no
bool
✔️
✔️
❌
❌
❌
False
False
0
No
bool
✔️
✔️
❌
❌
❌
False
False
0
NO
bool
✔️
✔️
❌
❌
❌
False
False
0
“no”
AnsibleUnicode
❌
❌
✔️
❌
✔️
False
no
0
“No”
AnsibleUnicode
❌
❌
✔️
❌
✔️
False
No
0
“NO”
AnsibleUnicode
❌
❌
✔️
❌
✔️
False
NO
0
false
bool
✔️
✔️
❌
❌
❌
False
False
0
False
bool
✔️
✔️
❌
❌
❌
False
False
0
FALSE
bool
✔️
✔️
❌
❌
❌
False
False
0
“false”
AnsibleUnicode
❌
❌
✔️
❌
✔️
False
false
0
“False”
AnsibleUnicode
❌
❌
✔️
❌
✔️
False
False
0
“FALSE”
AnsibleUnicode
❌
❌
✔️
❌
✔️
False
FALSE
0
0
int
❌
✔️
❌
❌
❌
False
0
0
“0”
AnsibleUnicode
❌
❌
✔️
❌
✔️
False
0
0
Comparisons between various stylings of boolean representations
So, the stand out thing for me here is that while all the permutations of string values of the boolean representations (those wrapped in quotes, like this: "yes") are treated as strings, and shouldn’t be considered as “boolean” (unless you cast for it explicitly!), and all non-string versions of true, false, and no are considered to be boolean, yes, Yes and YES are treated differently, depending on case. So, what would I do?
In summary
Consistently use no or yes, true or false in lower case to indicate a boolean value. Don’t use 1 or 0 unless you have to.
If you’re checking that you’re working with a string, a list or a dict, check in the order string (using is string), dict (using is mapping) and then list (using is sequence or is iterable)
Checking for numbers that are stored as strings? Cast your string through the type check for that number, like this: {% if value | float | string == value | string %}{{ value | float }}{% elif value | int | string == value | string %}{{ value | int }}{% else %}{{ value }}{% endif %}
Try not to use type_debug unless you really can’t find any other way. These values will change between versions, and this caused me a lot of issues with a large codebase I was working on a while ago!
Run these tests yourself!
Want to run these tests yourself? Here’s the code I ran (also available in a Gist on GitHub), using Ansible 2.9.10.
---
- hosts: localhost
  gather_facts: no
  vars:
    an_int: 1
    a_float: 1.1
    a_string: "string"
    an_int_as_string: "1"
    a_float_as_string: "1.1"
    a_list:
      - item1
    a_dict:
      key1: value1
tasks:
- debug:
msg: |
{
{% for var in ["an_int", "an_int_as_string","a_float", "a_float_as_string","a_string","a_list","a_dict"] %}
"{{ var }}": {
"type_debug": "{{ vars[var] | type_debug }}",
"value": "{{ vars[var] }}",
"is float": "{{ vars[var] is float }}",
"is integer": "{{ vars[var] is integer }}",
"is iterable": "{{ vars[var] is iterable }}",
"is mapping": "{{ vars[var] is mapping }}",
"is number": "{{ vars[var] is number }}",
"is sequence": "{{ vars[var] is sequence }}",
"is string": "{{ vars[var] is string }}",
"value cast as float": "{{ vars[var] | float }}",
"value cast as integer": "{{ vars[var] | int }}",
"value cast as string": "{{ vars[var] | string }}",
"is same when cast to float": "{{ vars[var] | float | string == vars[var] | string }}",
"is same when cast to integer": "{{ vars[var] | int | string == vars[var] | string }}",
"is same when cast to string": "{{ vars[var] | string == vars[var] | string }}",
},
{% endfor %}
}
---
- hosts: localhost
  gather_facts: false
  vars:
    # true, True, TRUE, "true", "True", "TRUE"
    a_true: true
    a_true_initial_caps: True
    a_true_caps: TRUE
    a_string_true: "true"
    a_string_true_initial_caps: "True"
    a_string_true_caps: "TRUE"
    # yes, Yes, YES, "yes", "Yes", "YES"
    a_yes: yes
    a_yes_initial_caps: Tes
    a_yes_caps: TES
    a_string_yes: "yes"
    a_string_yes_initial_caps: "Yes"
    a_string_yes_caps: "Yes"
    # 1, "1"
    a_1: 1
    a_string_1: "1"
    # false, False, FALSE, "false", "False", "FALSE"
    a_false: false
    a_false_initial_caps: False
    a_false_caps: FALSE
    a_string_false: "false"
    a_string_false_initial_caps: "False"
    a_string_false_caps: "FALSE"
    # no, No, NO, "no", "No", "NO"
    a_no: no
    a_no_initial_caps: No
    a_no_caps: NO
    a_string_no: "no"
    a_string_no_initial_caps: "No"
    a_string_no_caps: "NO"
    # 0, "0"
    a_0: 0
    a_string_0: "0"
  tasks:
    - debug:
        msg: |
          {
          {% for var in ["a_true","a_true_initial_caps","a_true_caps","a_string_true","a_string_true_initial_caps","a_string_true_caps","a_yes","a_yes_initial_caps","a_yes_caps","a_string_yes","a_string_yes_initial_caps","a_string_yes_caps","a_1","a_string_1","a_false","a_false_initial_caps","a_false_caps","a_string_false","a_string_false_initial_caps","a_string_false_caps","a_no","a_no_initial_caps","a_no_caps","a_string_no","a_string_no_initial_caps","a_string_no_caps","a_0","a_string_0"] %}
            "{{ var }}": {
              "type_debug": "{{ vars[var] | type_debug }}",
              "value": "{{ vars[var] }}",
              "is float": "{{ vars[var] is float }}",
              "is integer": "{{ vars[var] is integer }}",
              "is iterable": "{{ vars[var] is iterable }}",
              "is mapping": "{{ vars[var] is mapping }}",
              "is number": "{{ vars[var] is number }}",
              "is sequence": "{{ vars[var] is sequence }}",
              "is string": "{{ vars[var] is string }}",
              "is bool": "{{ vars[var] is boolean }}",
              "value cast as float": "{{ vars[var] | float }}",
              "value cast as integer": "{{ vars[var] | int }}",
              "value cast as string": "{{ vars[var] | string }}",
              "value cast as bool": "{{ vars[var] | bool }}",
              "is same when cast to float": "{{ vars[var] | float | string == vars[var] | string }}",
              "is same when cast to integer": "{{ vars[var] | int | string == vars[var] | string }}",
              "is same when cast to string": "{{ vars[var] | string == vars[var] | string }}",
              "is same when cast to bool": "{{ vars[var] | bool | string == vars[var] | string }}",
            },
          {% endfor %}
          }
Featured image is “Kelvin Test” by “Eelke” on Flickr and is released under a CC-BY license.
In it, Ricardo introduces me to two things which are interesting.
Using the wait command literally waits for all the backgrounded tasks to finish.
Running bash commands like this: function1 & function2 & function3 should run all three processes in parallel. To be honest, I’d always usually do it like this: function1 & function2 & function3 &
The other thing which Ricardo links to is a page suggesting that if you’re downloading a bash script and executing it (which, you know, probably isn’t a good idea at the best of times), then wrapping it in a function, like this:
#!/bin/bash

function main() {
  echo "Some function"
}

main
This means that the bash scripting engine needs to download and parse all the functions before it can run the script. As a result, you’re less likely to get a broken run of your script, because imagine it only got as far as:
#!/bin/bash
echo "Some fun
Then it wouldn’t have terminated the echo command (as an example)…
I’m starting to write some documentation, and I realised that I’ve not documented how I write with Markdown. So, let’s make some notes here :) This is largely drawn from the CommonMark Markdown Cheat Sheet, as well as my own experiences.
I’ll use the terms “Markdown” and “Commonmark” interchangeably, but really I’m talking about the “Commonmark” implementation of Markdown, as Markdown is just a “way of doing things”, whereas Commonmark is a specification to standardise how Markdown is done.
Late edit, 2020-06-24: My colleague, Simon Partridge, who writes the “Tech Snippets” round up of interesting content, pointed me to a Markdown Tutorial that he recommends. I’ve added two “Late Edit” comments below, in the Lists section and a new section called “Soft Breaks”, featuring stuff I’d not come across before that was on the Markdown Tutorial. It’s well worth a look! Dave Lee, the producer on the podcast I co-host, podcaster in his own right, and all-round-lovely-guy, also noted that the Walt Disney quote I included below wasn’t quite formatted right. I’ve fixed this, and added another example for clarity.
Normal text
This is normal text, you might know it in HTML as “paragraph” mode, or <p>some text</p>.
In your word processor, this is the default styled text that you start with.
In Markdown and Commonmark, line lengths don’t matter, you can just keep writing and writing and writing, or you can type 40 characters, and put a single new line in, and it’ll keep the text on the same line, like this:
In your word processor, this is the default styled
text that you start with.

In Markdown and Commonmark, line lengths don't matter, you can just keep writing and writing and writing or you can type 40 characters and put a single new line in, and it'll keep the text on the same line, like this:
Links
While a single page of text is often useful, some people find it easier to connect to other documents. In HTML, you would do this by writing something like this: <a hrеf="http://example.com">Link</a>. In Markdown, you use this format:
You might want to put your [link](http://example.com) in here for later.

This link is in-line for ease of understanding.
This makes it very easy to read in-line where a link is pointing to. It’s also possible to make those links listed elsewhere in the document, by writing something like this:
You might want to put your [link][1] in here for later.

Some documents include links elsewhere in their structure, which is easier
for moving links around your document, while keeping the formatting
structure.

[1]: (http://example.com)
Links can be to absolute URLs (http://example.com/some/page.html), or relative URLs (some/page.html) and can include anchor points (http://example.com/some/page.html#heading-1). They can also link to other protocols, like email (mailto:person@example.org) or ftp (ftp://user:password@192.0.2.1/some/directory/).
Images
Much like the link layout, in HTML an image is inserted with a special tag, in that case, <img src="http://example.com/some/image.png" alt="Some Image">. An image can have an “Alt Tag”, which is text that a screen reader (for people with partial or complete vision loss) can read out. To put an image into a Markdown document, you use the link-style formatting, but add an exclamation mark before it, like this:

![Some other image][1]
[1]: (relative/paths/work/too.png)
If you want to mix Images and Links, you do that like this:
[](my_link.html)
Note that here it looks a little complicated, as you’ve got the image identifier (![]()) inside the link identifier ([]()). Again, you could also use some non-inline URLs to clarify that a little, like this:
[![Click here to send an email][email]](mailto:someone@example.net?subject=Enquiry)

[email]: http://example.org/assets/email.png
Headings
You can prefix text with the # symbol and a space to make it a “top level heading”, like my heading for this blog post “Writing with Commonmark/Markdown formatting”, like this:
# Writing with Commonmark/Markdown formatting
Subsequent level headings, from 2 (e.g. “Headings” above) to 6 are written like this:
## Headings

### Now also at level 3

#### And level 4

##### And so on

###### Until level 6

### You can also jump back up levels, if you need to
Typically, you include a line space before and after the heading, just to make it clearer that this is a heading. It’s also possible to use the equals underlining and hyphen underlining to turn a single top level and second level heading, like this:
# Heading 1

is the same as

Heading 1
=========
## Heading 2

is the same as

Heading 2
---------
I’ve not really seen that structure before, but it seems less clear than the symbol-prefix method… I guess it’s just codifying some early practices.
Another benefit to the headings is that they automatically get turned into “anchor tags”, so you can refer to those points elsewhere in your document, like this:
Refer to [our sales literature for more details](#sales-literature).
## Sales Literature

Note that the anchor tag in this case is any heading tag (level 1 to 6), turned into lower case, and replacing any spaces with hyphens and removing any other characters.
Emphasis
Aside from the above, you can also use some punctuation to indicate emphasis, like this:
This is *bold* text. As is _this_.

This text is **italicised** instead. This is __too__.

This text is ***both*** bold and italicised. ___Also___ here.
So is __*this*__ and **_this_** and _**this**_ and *__this__*.
Lists (ordered and unordered)
An ordered list looks like this:
1. Go to the shops
  1. Open the door
  2. Walk in
  3. Select products
  4. Pay for products
    1. Use debit or credit card
    2. Enter PIN
  5. Open the door
  6. Exit
2. Go home
Both of these can be rendered in Markdown using this format:
1. Go to the shops
    1. Open the door
    2. Walk in
    3. Select products
        * Eggs
        * Dairy
            * Milk
2. Go home
Notice that you can nest ordered and unordered lists. You need to provide four spaces when indenting from one level to the next.
If you’re not sure what the numbering will be, you can replace each of the numbers (1., 2., 3. and so on) with a single number, 1. Also, * for the unordered list can be replaced with -. So, the above example could look like this:
1. Go to the shops
    1. Open the door
    1. Walk in
    1. Select products
        - Eggs
        - Dairy
            * Milk
1. Go home
This all depends on what writing style you prefer.
Late Edit: 2020-06-24 If you want to include a more content under the same list item, you can add a new line and indent it by at least one space (and usually to the same indenting level as the bullet point), like this:
1. Go to the shops

   I've found going to Smiths, on the high street best.

   1. Open the door

      Use the handle on the edge of the door.

   1. Walk in
   1. Select products

      Look for items with the best dates. The items you need are as follows:

      - Eggs
      - Dairy
          * Milk
Soft Breaks (Late edit, 2020-06-24)
A soft break, written in HTML as <br>, is signalled in Markdown with two spaces, like this (spaces replaced with . characters):
People sometimes like to quote other people. In Markdown, we do this by following a long email convention, proceeding the quote with a “chevron” symbol – >, like this:
> The way to get started is to quit talking and begin doing.
>
> [*Walt Disney*](https://blog.hubspot.com/sales/famous-quotes)
Note that this could also have been written like this:
The way to get started is to quit talking and begin doing.
As [Walt Disney](https://blog.hubspot.com/sales/famous-quotes) once said:

> The way to get started is to quit talking and begin doing.
Embedding code
This one I use all the time. Backticks (`) help you embed code, while three backticks (```) start a block of code, like this:
Also, `*` for the unordered list can be replaced with `-`.

```
> The way to get started is to quit talking and begin doing.

[Walt Disney](https://blog.hubspot.com/sales/famous-quotes)
```
Some interpretations of Markdown (notably “Github Flavoured Markdown”) let you signal what type of code you’ve written by adding the language after the first set of three backticks, like this:
```bash
#!/bin/bash
echo "$1"
exit
```
If three backticks don’t work for you, you can instead add four spaces before each line of your code, like this:
    #!/bin/bash
    echo "$1"
    exit
Raw HTML
Sometimes you just can’t do with Markdown what you want to achieve. I’ve notably found this with trying to incorporate several images and figure references in an ordered list, but in those cases, you can always use “raw HTML”. Here’s a list (from the Commonmark Spec as of version 0.29, dated 2019-04-06) of what tags are available to you:
1. Here's something to do with the following image<br>
<br>
*Figure 1 - Some image that is relevant*<br>
Since looking into this further, this is now what I intend to do:
1. Here's something to do with the following image
<figure>
<figcaption>*Figure 1 - Some image that is relevant*</figcaption>
</figure>
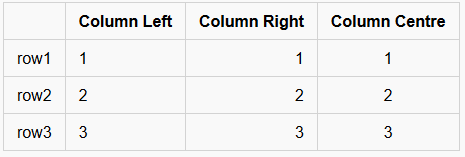
Tables
Not all Markdown flavours incorporate these, but some do. Trial-and-error is your friend here!
Github Flavoured Markdown supports tables, as do several other Markdown interpreters, but it’s explicitly not in Commonmark.
These are very basic tables, but will work for several cases. In this case, you MUST have a heading row (in my case, the first column has no name, but the second, third and fourth have the text “column” and then the alignment the subsequent rows follow), then a line which indicates the alignment of the row, either left (|---|), right (|--:|) or centre (|:-:|). All subsequent lines must contain all the columns specified. You can’t merge columns or rows, without resorting to HTML table definitions.
Note that different flavours disagree on whether the alignment of the text inside the rows matters, so while the above text works out OK, the following would also produce exactly the same result:
Personally, I’d probably use the longer format divider line to match up to the column heads, but use the shorter format for the rows.
Using Markdown
In projects on Github and Gitlab, any file suffixed .md will usually be rendered as a Markdown file. Editing a Markdown file in Github at least will allow you to use the “preview” tab to see the changes. You can also include some Markdown in issues and pull/merge requests. It is not recommended for git logs, and IIRC won’t render it there either.
Visual Studio Code will preview Markdown, and has a “linting” extension, called “markdownlint“, that will help identify common issues with Markdown.
WordPress’ “Gutenberg” block editor supports using markdown, both for importing content, and for using it to shortcut things like bold, italics, headings and links (in fact, I wrote rather a lot of this using it!).
Popular blogging platform Ghost and static site creation tool Jekyll both use Markdown extensively.
Alternatives
Naturally, Plain Text is an option :)
You might also consider “Restructured Text” (RST) which are popular with open source projects for their documentation.
Featured image is “html tattoo” by “webmove” on Flickr and is released under a CC-BY license.
I’ve recently been developing a few builds of things at home using throw-away sessions of virtual machines, and I found myself repeatedly having to accept and even having to remove SSH host keys for things I knew wouldn’t be around for long. It’s not a huge disaster, but it’s an annoyance.
This annoyance comes from the fact that SSH uses a thing called “Trust-On-First-Use” (Or TOFU) to protect yourself against a “Man-in-the-Middle” attack (or even where the host has been replaced with something malicious), which, for infrastructure that has a long lifetime (anything more than a couple of days) makes sense! You’re building something you want to trust hasn’t been compromised! That said, if you’re building new virtual machines, testing something and then rebuilding it to prove your script worked… well, that’s not so useful!
So, in this case, if you’ve got a designated build network, or if you trust, implicitly, your normal working network, this is a dead simple work-around.
In $HOME/.ssh/config or in $HOME/.ssh/config.d/local (if you’ve followed my previous advice to use separate ssh config files), add the following stanza:
These stanzas let you disable host key checking for any IP address in the RFC1918 ranges (10.0.0.0/8, 172.16.0.0/12 and 192.168.0.0/16), and for the RFC5373 ranges (192.0.2.0/24, 198.51.100.0/24 and 203.0.113.0/24) – which should be used for documentation, and for the RFC2544 range (198.18.0.0/15) which should be used for inter-network testing.
Alternatively, if you always use a DDNS provider for short-lived assignments (for example, I use davd/docker-ddns) then instead, you can use this stanza:
Host *.ddns.example.com
        StrictHostKeyChecking no
        UserKnownHostsFile /dev/null
(Assuming, of course, you use ddns.example.com as your DDNS address!)
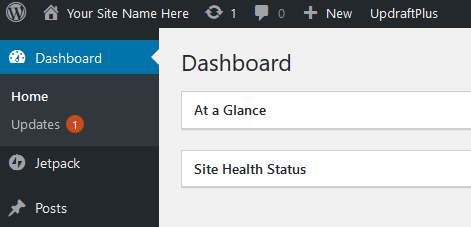
A simple tool to update and upgrade WordPress components
A few years ago, I hosted my blog on Dreamhost. They’ve customized something inside the blog which means it doesn’t automatically update itself. I’ve long since moved this blog off to my own hosting, but I can’t figure out which thing it was they changed, and I’ve got so much content and stuff in here, I don’t really want to mess with it.
Anyway, I like keeping my systems up to date, and I hate logging into a blog and finding updates are pending, so I wrote this script. It uses wp-cli which I have installed to /usr/local/bin/wp as per the install guide. This is also useful if you’re hosting your site in such a way that you can’t make changes to core or plugins from the web interface.
This script updates:
All core files (lines core update-db, core update and language core update)
All plugins (lines plugin update --all and language plugin update --all)
All themes (lines theme update --all and language theme update --all)
To remove any part of this script, just delete those lines, including the /usr/local/bin/wp and --quiet && \ fragments!
I then run sudo -u www-data crontab -e (replacing www-data with the real account name of the user who controls the blog, which can be found by doing an ls -l /var/www/html/ replacing the path to where your blog is located) and I add the bottom line to that crontab file (the rest is just comments to remind you what the fields are!)
#                                         day of month [1-31]
#                                             month [1-12]
#                                                 day of week [1-6 Mon-Sat, 0/7 Sun]
# minute   hour                                         command
1          1,3,5,7,9,11,13,15,17,19,21,23 *   *   *     /usr/local/bin/wp-upgrade.sh /var/www/jon.sprig.gs/blog
This means that every other hour, at 1 minute past the hour, every day, every month, I run the update :)
If you’ve got email setup for this host and user, you’ll get an email whenever it upgrades a component too.
As I only run a few machines with services that matter on them (notably, my home server and my web server), I don’t need a full-on monitoring service, so instead rely on a system called monit.
Monit is an open source piece of software, used to monitor (see, it’s easily named 😄) and, if possible remediate issues with things it sees wrong.
I use this for watching whether particular services are running (and if not, restart them), for whether the ink in my printer is empty, and to monitor the free space and SMART status on my disks.
Today I noticed that a Docker container had stopped, and I’d not noticed. It wasn’t a big thing, but it gnawed at me, so I had a bit of a look around to see what I can find about this.
So, here’s what I’m doing! Each container has it’s own file called/etc/monit/scripts/check_container_<container-name>.sh which has just this command in it:
#! /bin/bash
docker top "<container-name>"
exit $?
Note that you replace <container-name> in both the filename and the script itself with the name of the container – for example, the container hello-world would be monitored with the file check_container_hello-world.sh, and the line in that file would say docker top "hello-world".
I then have a file in /etc/monit/conf.d/ called check_container_<container-name> which has this content
CHECK PROGRAM <container-name> WITH PATH /etc/monit/scripts/check_container_<container-name>.sh
  START PROGRAM = "/usr/bin/docker start <container-name>"
  STOP PROGRAM = "/usr/bin/docker stop <container-name>"
  IF status != 0 FOR 3 CYCLES THEN RESTART
  IF 2 RESTARTS WITHIN 5 CYCLES THEN UNMONITOR
I then ensure that in /etc/monit/monitrc the line “include /etc/monit/conf.d/*” is included and not commented out, and then restart monit with systemctl restart monit.