"Bat Keychain" by "Nishant Khurana" on Flickr

Unit Testing Bash scripts with BATS-Core

I’m taking a renewed look into Unit Testing the scripts I’m writing, because (amongst other reasons) it’s important to know what expected behaviours you break when you make a change to a script!

A quick detour – what is Unit Testing?

A unit test is where you take one component of your script, and prove that, given specific valid or invalid tests, it works in an expected way.

For example, if you normally run sum_two_digits 1 1 and expect to see 2 as the result, with a unit test, you might write the following tests:

  • sum_two_digits should fail (no arguments)
  • sum_two_digits 1 should fail (no arguments)
  • sum_two_digits 1 1 should pass!
  • sum_two_digits 1 1 1 may fail (too many arguments), may pass (only sum the first two digits)
  • sum_two_digits a b should fail (not numbers)

and so on… you might have seen this tweet, for example

https://twitter.com/sempf/status/514473420277694465
Things you might unit test in a bar.

Preparing your environment

Everyone’s development methodology differs slightly, but I create my scripts in a git repository.

I start from a new repo, like this:

mkdir my_script
cd my_script
git init

echo '# `my_script`' > README.md
echo "" >> README.md
echo "This script does awesome things for awesome people. CC-0 licensed." >> README.md
git add README.md
git commit -m 'Added README'

echo '#!/bin/bash' > my_script.sh
chmod +x my_script.sh
git add my_script.sh
git commit -m 'Added initial commit of "my_script.sh"'

OK, so far, so awesome. Now let’s start adding BATS. (Yes, this is not necessarily the “best” way to create your “test_all.sh” script, but it works for my case!)

git submodule add https://github.com/bats-core/bats-core.git test/libs/bats
git commit -m 'Added BATS library'
echo '#!/bin/bash' > test/test_all.sh
echo 'cd "$(dirname "$0")" || true' >> test/test_all.sh
echo 'libs/bats/bin/bats $(find *.bats -maxdepth 0 | sort)' >> test/test_all.sh
chmod +x test/test_all.sh
git add test/test_all.sh
git commit -m 'Added test runner'

Now, let’s write two simple tests, one which fails and one which passes, so I can show you what this looks like. Create a file called test/prove_bats.bats

#!/usr/bin/env ./libs/bats/bin/bats

@test "This will fail" {
  run false
  [ "$status" -eq 0 ]
}

@test "This will pass" {
  run true
  [ "$status" -eq 0 ]
}

And now, when we run this with test/test_all.sh we get the following:

 ✗ This will fail
   (in test file prove_bats.bats, line 5)
     `[ "$status" -eq 0 ]' failed
 ✓ This will pass

2 tests, 1 failure

Excellent, now we know that our test library works, and we have a rough idea of what a test looks like. Let’s build something a bit more awesome. But first, let’s remove prove_bats.bats file, with rm test/prove_bats.bats.

Starting to develop “real” tests

Let’s create a new file, test/path_checking.bats. Our amazing script needs to have a configuration file, but we’re not really sure where in the path it is! Let’s get building!

#!/usr/bin/env ./libs/bats/bin/bats

# This runs before each of the following tests are executed.
setup() {
  source "../my_script.sh"
  cd "$BATS_TEST_TMPDIR"
}

@test "No configuration file is found" {
  run find_config_file
  echo "Status received: $status"
  echo "Actual output:"
  echo "$output"
  [ "$output" == "No configuration file found." ]
  [ "$status" -eq 1 ]
}

When we run this test (using test/test_all.sh), we get this response:

 ✗ No configuration file is found
   (in test file path_checking.bats, line 14)
     `[ "$output" == "No configuration file found." ]' failed with status 127
   Status received: 127
   Actual output:
   /tmp/my_script/test/libs/bats/lib/bats-core/test_functions.bash: line 39: find_config_file: command not found

1 test, 1 failure

Uh oh! Well, I guess that’s because we don’t have a function called find_config_file yet in that script. Ah, yes, let’s quickly divert into making your script more testable, by making use of functions!

Bash script testing with functions

When many people write a bash script, you’ll see something like this:

#!/bin/bash
echo "Validate 'uname -a' returns a string: "
read_some_value="$(uname -a)"
if [ -n "$read_some_value" ]
then
  echo "Yep"
fi

While this works, what it’s not good for is testing each of those bits (and also, as a sideline, if your script is edited while you’re running it, it’ll break, because Bash parses each line as it gets to it!)

A good way of making this “better” is to break this down into functions. At the very least, create a “main” function, and put everything into there, like this:

#!/bin/bash
function main() {
  echo "Validate 'uname -a' returns a string: "
  read_some_value="$(uname -a)"
  if [ -n "$read_some_value" ]
  then
    echo "Yep"
  fi
}

main

By splitting this into a “main” function, which is called when it runs, at the very least, a change to the script during operation won’t break it… but it’s still not very testable. Let’s break down some more of this functionality.

#!/bin/bash
function read_uname() {
  echo "$(uname -a)"
}
function test_response() {
  if [ -n "$1" ]
  then
    echo "Yep"
  fi
}
function main() {
  echo "Validate 'uname -a' returns a string: "
  read_some_value="$(read_uname)"
  test_response "$read_some_value"
}

main

So, what does this give us? Well, in theory we can test each part of this in isolation, but at the moment, bash will execute all those functions straight away, because they’re being called under “main”… so we need to abstract main out a bit further. Let’s replace that last line, main into a quick check.

if [[ "${BASH_SOURCE[0]}" == "${0}" ]]
then
  main
fi

Stopping your code from running by default with some helper variables

The special value $BASH_SOURCE[0] will return the name of the file that’s being read at this point, while $0 is the name of the script that was executed. As a little example, I’ve created two files, source_file.sh and test_sourcing.sh. Here’s source_file.sh:

#!/bin/bash

echo "Source: ${BASH_SOURCE[0]}"
echo "File: ${0}"

And here’s test_sourcing.sh:

#!/bin/bash
source ./source_file.sh

What happens when we run the two of them?

user@host:/tmp/my_script$ ./source_file.sh
Source: ./source_file.sh
File: ./source_file.sh
user@host:/tmp/my_script$ ./test_sourcing.sh
Source: ./source_file.sh
File: ./test_sourcing.sh

So, this means if we source our script (which we’ll do with our testing framework), $BASH_SOURCE[0] will return a different value from $0, so it knows not to invoke the “main” function, and we can abstract that all into more test code.

Now we’ve addressed all that lot, we need to start writing code… where did we get to? Oh yes, find_config_file: command not found

Walking up a filesystem tree

The function we want needs to look in this path, and all the parent paths for a file called “.myscript-config“. To do this, we need two functions – one to get the directory name of the “real” directory, and the other to do the walking up the path.

function _absolute_directory() {
  # Change to the directory provided, or if we can't, return with error 1
  cd "$1" || return 1
  # Return the full pathname, resolving symbolic links to "real" paths
  pwd -P
}

function find_config_file() {
  # Get the "real" directory name for this path
  absolute_directory="$(_absolute_directory ".")"
  # As long as the directory name isn't "/" (the root directory), and the
  #  return value (config_path) isn't empty, check for the config file.
  while [ "$absolute_directory" != "/" ] && 
        [ -n "$absolute_directory" ] && 
        [ -z "$config_path" ]
  do
    # Is the file we're looking for here?
    if [ -f "$absolute_directory/.myscript-config" ]
    then
      # Store the value
      config_path="$absolute_directory/.myscript-config"
    else
      # Get the directory name for the parent directory, ready to loop.
      absolute_directory="$(_absolute_directory "$absolute_directory/..")"
    fi
  done
  # If we've exited the loop, but have no return value, exit with an error
  if [ -z "$config_path" ]
  then
    echo "No config found. Please create .myscript-config in your project's root directory."
    # Failure states return an exit code of anything greater than 0. Success is 0.
    exit 1
  else
    # Output the result
    echo "$config_path"
  fi
}

Let’s re-run our test!

 ✗ No configuration file is found
   (in test file path_checking.bats, line 14)
     `[ "$output" == "No configuration file found." ]' failed
   Status received: 1
   Actual output:
   No config found. Please create .myscript-config in your project's root directory.

1 test, 1 failure

Uh oh! Our output isn’t what we told it to use. Fortunately, we’ve recorded the output it sent (“No config found. Please...“) so we can fix our test (or, find that output line and fix that).

Let’s fix the test! (The BATS test file just shows the test we’re amending)

@test "No configuration file is found" {
  run find_config_file
  echo "Status received: $status"
  echo "Actual output:"
  echo "$output"
  [ "$output" == "No config found. Please create .myscript-config in your project's root directory." ]
  [ "$status" -eq 1 ]
}

Fab, and now when we run it, it’s all good!

user@host:/tmp/my_script$ test/test_all.sh
 ✓ No configuration file is found

1 test, 0 failures

So, how do we test what happens when the file is there? We make a new test! Add this to your test file, or create a new one, ending .bats in the test directory.

@test "Configuration file is found and is OK" {
  touch .myscript-config
  run find_config_file
  echo "Status received: $status"
  echo "Actual output:"
  echo "$output"
  [ "$output" == "$BATS_TEST_TMPDIR/.myscript-config" ]
  [ "$status" -eq 0 ]
}

And now, when you run your test, you’ll see this:

user@host:/tmp/my_script$ test/test_all.sh
 ✓ No configuration file is found
 ✓ Configuration file is found and is OK

2 tests, 0 failures

Extending BATS

There are some extra BATS tests you can run – at the moment you’re doing manual checks of output and success or failure checks which aren’t very pretty. Let’s include the “assert” library for BATS.

Firstly, we need this library added as a submodule again.

# This module provides the formatting for the other non-core libraries
git submodule add https://github.com/bats-core/bats-support.git test/libs/bats-support
# This is the actual assertion tests library
git submodule add https://github.com/bats-core/bats-assert.git test/libs/bats-assert

And now we need to update our test. At the top of the file, under the #!/usr/bin/env line, add these:

load "libs/bats-support/load"
load "libs/bats-assert/load"

And then update your tests:

@test "No configuration file is found" {
  run find_config_file
  assert_output "No config found. Please create .myscript-config in your project's root directory."
  assert_failure
}

@test "Configuration file is found and is OK" {
  touch .myscript-config
  run find_config_file
  assert_output "$BATS_TEST_TMPDIR/.myscript-config"
  assert_success
}

Note that we removed the “echo” statements in this file. I’ve purposefully broken both types of tests (exit 1 became exit 0 and the file I’m looking for is $absolute_directory/.config instead of $absolute_directory/.myscript-config) in the source file, and now you can see what this looks like:

 ✗ No configuration file is found
   (from function `assert_failure' in file libs/bats-assert/src/assert_failure.bash, line 66,
    in test file path_checking.bats, line 15)
     `assert_failure' failed

   -- command succeeded, but it was expected to fail --
   output : No config found. Please create .myscript-config in your project's root directory.
   --

 ✗ Configuration file is found and is OK
   (from function `assert_output' in file libs/bats-assert/src/assert_output.bash, line 194,
    in test file path_checking.bats, line 21)
     `assert_output "$BATS_TEST_TMPDIR/.myscript-config"' failed

   -- output differs --
   expected : /tmp/bats-run-21332-1130Ph/suite-tmpdir-QMDmz6/file-tmpdir-path_checking.bats-nQf7jh/test-tmpdir--I3pJYk/.myscript-config
   actual   : No config found. Please create .myscript-config in your project's root directory.
   --

And so now you can see some of how to do unit testing with Bash and BATS. BATS also says you can unit test any command that can be run in a Bash environment, so have fun!

Featured image is “Bat Keychain” by “Nishant Khurana” on Flickr and is released under a CC-BY license.

"Picture in Picture" by "Mats" on Flickr

Hints and Tips when using Vagrant on Windows

I’ve been using HashiCorp’s Vagrant with Oracle’s VirtualBox for several years (probably since 2013, if my blog posts are anything to go by), and I’ve always been pretty comfortable with how it works.

This said, when using a Windows machine running Microsoft’s Hyper-V (built into Windows since Windows 7/2018) VirtualBox is unable (by default) to run 64 bit virtual machines (thanks to Hyper-V “stealing” the VT-x/AMD-V bit from the BIOS/EFI).

Around last year or maybe even the year before, Microsoft introduced a “Hypervisior Platform” add-on, which lets VirtualBox run 64 bit machines on a Hyper-V host (more on this later). HOWEVER, it is much slower than in native mode, and can often freeze on booting…

Meanwhile, Vagrant, (a configuration file that acts as a wrapper around various hypervisors, using VirtualBox by default) boots machines in a “headless” mode by default, so you can’t see the freezing.

I’m trying to use an Ubuntu 18.04 virtual machine for various builds I’m creating, and found that I’d get a few issues on boot, so let’s get these sorted out.

VirtualBox can’t start 64bit virtual machines when Hyper-V is installed.

You need to confirm that certain Windows features are enabled, including “Hyper-V” and “Windows Hypervisor Platform”. Confirm you’re running at least Windows 10 version 1803 which is the first release with the “Windows Hypervisor Platform”.

GUI mode

Run winver to bring up this box. Confirm the version number is greater than 1803. Mine is 1909.

A screenshot of the “winver” command, highlighting the version number, which in this case shows 1909, but needs to show at least 1803.

Right click on the start menu, and select “Apps and Features”. Click on “Programs and Features”.

The settings panel found by right clicking the “Start Menu” and selecting “Apps and Features”. Note the desired next step – “Programs and Features” is highlighted.

In the “Programs and Features” window, click on “Turn Windows Features on or off”. Note the shield icon here indicates that administrative access is required, and you may be required to authenticate to the machine to progress past this stage.

A fragment of the “Programs and Features” window, with the “Turn Windows features on or off” link highlighted.

Next, ensure that the following “Windows Features” are enabled; “Hyper-V”, “Virtual Machine Platform” and “Windows Hypervisor Platform”. Click on “OK” to install these features, if they’re not already installed.

A screen capture of the “Turn Windows features on or off” dialogue box, with certain features obscured and others highlighted.

Note that once you’ve pressed “OK”, you’ll likely need to reboot your machine, if any of these features were not already installed.

CLI mode

Right click on the start menu, and start an Administrative Powershell session.

Run the command Get-ComputerInfo | select WindowsVersion. You should get a response which looks like this:

WindowsVersion
--------------
1909

Note that the version number needs to be greater than 1803.

Next, find the names of the features you need to install. These features have region specific names, so outside EN-GB, these names may not match your requirements!

Run the command Get-WindowsOptionalFeature -online | select FeatureName,State and you’re looking for the following lines (this has been cropped to just what you need):

FeatureName                                     State
-----------                                     -----
HypervisorPlatform                            Enabled
VirtualMachinePlatform                        Enabled
Microsoft-Hyper-V-All                         Enabled

If any of these three features are not enabled, run Enable-WindowsOptionalFeature -online -FeatureName x where “x” is the name of the feature, listed in the above text block, you want to install. For example: Enable-WindowsOptionalFeature -online -FeatureName HypervisorPlatform,VirtualMachinePlatform,Microsoft-Hyper-V-All. If you run this when they’re already enabled, it should return RestartNeeded : False, but otherwise you’re likely to need to reboot.

After the reboot

After you’ve rebooted, and you start a 64 bit virtual machine in VirtualBox, you’ll see this icon in the bottom corner.

A screen grab of the VirtualBox Status Bar, highlighting the “Slow Mode” icon representing the CPU

Booting the Virtual Machine with Vagrant fails because it takes too long to boot

This was historically a big issue with Vagrant and VirtualBox, particularly with Windows Vagrant boxes, but prior to the Hyper-V/VirtualBox solution, it’d been largely fixed (or at least, I wasn’t seeing it!) There is a “standard” timeout for booting a Virtual Machine, I think at approximately 5 minutes, but I might be wrong. To make this “issue” stop occurring, add this config.vm.boot_timeout = 0 line to your Vagrantfile, like this:

Vagrant.configure("2") do |config|
  config.vm.boot_timeout = 0
end

This says to Vagrant, don’t worry how long it takes to boot, just keep waiting until it does. Yes, it will be slower, but it should get there in the end!

Booting the Virtual Maching with Vagrant does not fail, but it never authenticates with your Private Key.

Your VM may sit at this block for quite a while:

==> default: Waiting for machine to boot. This may take a few minutes...
    default: SSH address: 127.0.0.1:2222
    default: SSH username: vagrant
    default: SSH auth method: private key

If this occurs, you may find that your virtual machine has hung during the boot process… but weirdly, a simple work-around to this is to ensure that the VirtualBox GUI is open, and that you’ve got a block like this (config.vm.provider / vb.gui=true / end) in your Vagrantfile:

Vagrant.configure("2") do |config|
  config.vm.provider "virtualbox" do |vb|
    vb.gui = true
  end
end

This forces VirtualBox to open a window with your Virtual Machine’s console on it (much like having a monitor attached to real hardware). You don’t need to interact with it, but any random hangs or halts on your virtual machine may be solved just by bringing this window, or the VirtualBox Machines GUI, to the foreground.

Sometimes you may see, when this happens, a coredump or section of kernel debugging code on the console. Don’t worry about this!

Vagrant refuses to SSH to your virtual machine when using the vagrant ssh command.

Provisioning works like a treat, and you can SSH into the virtual machine from any other environment, but, when you run vagrant ssh, you get an error about keys not being permitted or usable. This is fixable by adding a single line, either to your system or user -wide environment variables, or by adding a line to your Vagrantfile.

The environment variable is VAGRANT_PREFER_SYSTEM_BIN, and by setting this to 0, it will use bundled versions of ssh or rsync instead of using any versions provided by Windows.

You can add a line like this ENV['VAGRANT_PREFER_SYSTEM_BIN']="0" to your Vagrantfile, outside of the block Vagrant.configureend, like this:

ENV['VAGRANT_PREFER_SYSTEM_BIN']="0"
Vagrant.configure("2") do |config|
end

Sources

Featured image is “Picture in Picture” by “Mats” on Flickr and is released under a CC-BY-SA license.

"Router" by "Ryan Hodnett" on Flickr

Post-Config of a RaspberryPi Zero W as an OTG-USB Gadget that routes

In my last post in this series I mentioned that I’d got my Raspberry Pi Zero W to act as a USB Ethernet adaptor via libComposite, and that I was using DNSMasq to provide a DHCP service to the host computer (the one you plug the Pi into). In this part, I’m going to extend what local services I could provide on this device, and start to use this as a router.

Here’s what you missed last time… When you plug the RPi in (to receive power on the data line), it powers up the RPi Zero, and uses a kernel module called “libComposite” to turn the USB interface into an Ethernet adaptor. Because of how Windows and non-Windows devices handle network interfaces, we use two features of libComposite to create an ECM/CDC interface and a RNDIS interface, called usb0 and usb1, and whichever one of these two is natively supported in the OS, that’s which interface comes up. As a result, we can then use DNSMasq to “advertise” a DHCP address for each interface, and use that to advertise services on, like an SSH server.

By making this device into a router, we can use it to access the network, without using the in-built network adaptor (which might be useful if your in-built WiFi adaptors isn’t detected under Linux or Windows without a driver), or to protect your computer from malware (by adding a second firewall that doesn’t share the same network stack as it’s host), or perhaps to ensure that your traffic is sent over a VPN tunnel.

Read More
"raspberry pie" by "stu_spivack" on Flickr

Post-Config of a RaspberryPi Zero W as an OTG-USB Gadget for off-device computing

History

A few months ago, I was working on a personal project that needed a separate, offline linux environment. I tried various different schemes to run what I was doing in the confines of my laptop and I couldn’t make what I was working on actually achieve my goals. So… I bought a Raspberry Pi Zero W and a “Solderless Zero Dongle“, with the intention of running Docker containers on it… unfortunately, while Docker runs on a Pi Zero, it’s really hard to find base images for the ARMv6/armhf platform that the Pi Zero W… so I put it back in the drawer, and left it there.

Roll forwards a month or so, and I was doing some experiments with Nebula, and only had an old Chromebook to test it on… except, I couldn’t install the Nebula client for Linux on there, and the Android client wouldn’t give me some features I wanted… so I broke out that old Pi Zero W again…

Now, while the tests with Nebula I was working towards will be documented later, I found that a lot of the documentation about using a Raspberry Pi Zero as a USB gadget were rough and unexplained. So, this post breaks down much of the content of what I found, what I tried, and what did and didn’t work.

Late Edit 2021-06-04: I spotted some typos around providing specific DHCP options for interfaces, based on work I’m doing elsewhere with this script. I’ve updated these values accordingly. I’ve also created a specific branch for this revision.

Late Edit 2021-06-06: I’ve noticed this document doesn’t cover IPv6 at all right now. I started to perform some tweaks to cover IPv6, but as my ISP has decided not to bother with IPv6, and won’t support Hurricane Electric‘s Tunnelbroker system, I can’t test any of it, without building out an IPv6 test environment… maybe soon, eh?

Read More
"Family" by "Ivan" on Flickr

Debian on Docker using Vagrant

I want to use Vagrant-Docker to try standing up some environments. There’s no reasonable justification, it’s just a thing I wanted to do. Normally, I’d go into this long and rambling story about why… but on this occasion, the reason was “Because it’s possible”…

TL;DR?: Get the code from the repo and enjoy 😁

Installing Docker

On Ubuntu you can install Docker following the instructions on the Docker Install Page, which includes a convenience script (that runs all the commands you need), if you want to use it. Similar instructions for Debian, CentOS and Fedora exist.

On Windows or Mac there are downloads you can get from the Docker Hub. The Windows Version requires WSL2. I don’t have a Mac, so I don’t know what the requirements are there! Installing WSL2 has a whole host of extra steps that I can’t really do justice to. See this Microsoft article for details.

Installing Vagrant

On Debian and Ubuntu you can add the HashiCorp Apt Repo and then install Vagrant, using these commands:

curl -fsSL https://apt.releases.hashicorp.com/gpg | sudo apt-key add -
sudo apt-add-repository "deb [arch=amd64] https://apt.releases.hashicorp.com $(lsb_release -cs) main"
sudo apt install vagrant

There are similar instructions for RHEL, CentOS and Fedora users there too.

Windows and Mac users will have to get the application from the download page.

Creating your Dockerfile

A Dockerfile is a simple text file which has a series of line prefixes which instruct the Docker image processor to add certain instructions to the Docker Image. I found two pages which helped me with what to add for this; “Ansible. Docker. Vagrant. Bringing together” and the git repo “AkihiroSuda/containerized-systemd“.

You see, while a Dockerfile is great at starting single binary files or scripts, it’s not very good at running SystemD… and I needed SystemD to be able to run the SSH service that Vagrant requires, and to also run the scripts and commands I needed for the image I wanted to build…

Sooooo…. here’s the Dockerfile I created:

# Based on https://vtorosyan.github.io/ansible-docker-vagrant/
# and https://github.com/AkihiroSuda/containerized-systemd/

FROM debian:buster AS debian_with_systemd

# This stuff enables SystemD on Debian based systems
STOPSIGNAL SIGRTMIN+3
RUN DEBIAN_FRONTEND=noninteractive apt update && DEBIAN_FRONTEND=noninteractive apt install -y --no-install-recommends systemd systemd-sysv dbus dbus-user-session
COPY docker-entrypoint.sh /
RUN chmod 755 /docker-entrypoint.sh
ENTRYPOINT [ "/docker-entrypoint.sh" ]
CMD [ "/bin/bash" ]

# This part installs an SSH Server (required for Vagrant)
RUN DEBIAN_FRONTEND=noninteractive apt install -y sudo openssh-server
RUN mkdir /var/run/sshd
#    We enable SSH here, but don't start it with "now" as the build stage doesn't run anything long-lived.
RUN systemctl enable ssh
EXPOSE 22

# This part creates the vagrant user, sets the password to "vagrant", adds the insecure key and sets up password-less sudo.
RUN useradd -G sudo -m -U -s /bin/bash vagrant
#    chpasswd takes a colon delimited list of username/password pairs.
RUN echo 'vagrant:vagrant' | chpasswd
RUN mkdir -m 700 /home/vagrant/.ssh
# This key from https://github.com/hashicorp/vagrant/tree/main/keys. It will be replaced on first run.
RUN echo 'ssh-rsa AAAAB3NzaC1yc2EAAAABIwAAAQEA6NF8iallvQVp22WDkTkyrtvp9eWW6A8YVr+kz4TjGYe7gHzIw+niNltGEFHzD8+v1I2YJ6oXevct1YeS0o9HZyN1Q9qgCgzUFtdOKLv6IedplqoPkcmF0aYet2PkEDo3MlTBckFXPITAMzF8dJSIFo9D8HfdOV0IAdx4O7PtixWKn5y2hMNG0zQPyUecp4pzC6kivAIhyfHilFR61RGL+GPXQ2MWZWFYbAGjyiYJnAmCP3NOTd0jMZEnDkbUvxhMmBYSdETk1rRgm+R4LOzFUGaHqHDLKLX+FIPKcF96hrucXzcWyLbIbEgE98OHlnVYCzRdK8jlqm8tehUc9c9WhQ== vagrant insecure public key' > /home/vagrant/.ssh/authorized_keys
RUN chmod 600 /home/vagrant/.ssh/authorized_keys
RUN chown -R vagrant:vagrant /home/vagrant
RUN echo 'vagrant ALL=(ALL:ALL) NOPASSWD:ALL' >> /etc/sudoers

This Dockerfile calls out to a separate script, called docker-entrypoint.sh, taken verbatim from AkihiroSuda’s repo, so here’s that file:

#!/bin/bash
set -ex
container=docker
export container

if [ $# -eq 0 ]; then
	echo >&2 'ERROR: No command specified. You probably want to run `journalctl -f`, or maybe `bash`?'
	exit 1
fi

if [ ! -t 0 ]; then
	echo >&2 'ERROR: TTY needs to be enabled (`docker run -t ...`).'
	exit 1
fi

env >/etc/docker-entrypoint-env

cat >/etc/systemd/system/docker-entrypoint.target <<EOF
[Unit]
Description=the target for docker-entrypoint.service
Requires=docker-entrypoint.service systemd-logind.service systemd-user-sessions.service
EOF
cat /etc/systemd/system/docker-entrypoint.target

quoted_args="$(printf " %q" "${@}")"
echo "${quoted_args}" >/etc/docker-entrypoint-cmd
cat /etc/docker-entrypoint-cmd

cat >/etc/systemd/system/docker-entrypoint.service <<EOF
[Unit]
Description=docker-entrypoint.service

[Service]
ExecStart=/bin/bash -exc "source /etc/docker-entrypoint-cmd"
# EXIT_STATUS is either an exit code integer or a signal name string, see systemd.exec(5)
ExecStopPost=/bin/bash -ec "if echo \${EXIT_STATUS} | grep [A-Z] > /dev/null; then echo >&2 \"got signal \${EXIT_STATUS}\"; systemctl exit \$(( 128 + \$( kill -l \${EXIT_STATUS} ) )); else systemctl exit \${EXIT_STATUS}; fi"
StandardInput=tty-force
StandardOutput=inherit
StandardError=inherit
WorkingDirectory=$(pwd)
EnvironmentFile=/etc/docker-entrypoint-env

[Install]
WantedBy=multi-user.target
EOF
cat /etc/systemd/system/docker-entrypoint.service

systemctl mask systemd-firstboot.service systemd-udevd.service
systemctl unmask systemd-logind
systemctl enable docker-entrypoint.service

systemd=
if [ -x /lib/systemd/systemd ]; then
	systemd=/lib/systemd/systemd
elif [ -x /usr/lib/systemd/systemd ]; then
	systemd=/usr/lib/systemd/systemd
elif [ -x /sbin/init ]; then
	systemd=/sbin/init
else
	echo >&2 'ERROR: systemd is not installed'
	exit 1
fi
systemd_args="--show-status=false --unit=multi-user.target"
echo "$0: starting $systemd $systemd_args"
exec $systemd $systemd_args

Now, if you were to run this straight in Docker, it will fail, because you must pass certain flags to Docker to get this to run. These flags are:

  • -t : pass a “TTY” to the shell
  • --tmpfs /tmp : Create a temporary filesystem in /tmp
  • --tmpfs /run : Create another temporary filesystem in /run
  • --tmpfs /run/lock : Apparently having a tmpfs in /run isn’t enough – you ALSO need one in /run/lock
  • -v /sys/fs/cgroup:/sys/fs/cgroup:ro : Mount the CGroup kernel configuration values into the container

(I found these flags via a RedHat blog post, and a Podman issue on Github.)

So, how would this look, if you were to try and run it?

docker exec -t --tmpfs /tmp --tmpfs /run --tmpfs /run/lock -v /sys/fs/cgroup:/sys/fs/cgroup:ro YourImage

Blimey, what a long set of text! Perhaps we could hide that behind something a bit more legible? Enter Vagrant.

Creating your Vagrantfile

Vagrant is an abstraction tool, designed to hide complicated virtualisation scripts into a simple command. In this case, we’re hiding a containerisation script into a simple command.

Like with the Dockerfile, I made extensive use of the two pages I mentioned before, as well as the two pages to get the flags to run this.

# Based on https://vtorosyan.github.io/ansible-docker-vagrant/
# and https://github.com/AkihiroSuda/containerized-systemd/
# and https://developers.redhat.com/blog/2016/09/13/running-systemd-in-a-non-privileged-container/
# with tweaks indicated by https://github.com/containers/podman/issues/3295
ENV['VAGRANT_DEFAULT_PROVIDER'] = 'docker'
Vagrant.configure("2") do |config|
  config.vm.provider "docker" do |d|
    d.build_dir       = "."
    d.has_ssh         = true
    d.remains_running = false
    d.create_args     = ['--tmpfs', '/tmp', '--tmpfs', '/run', '--tmpfs', '/run/lock', '-v', '/sys/fs/cgroup:/sys/fs/cgroup:ro', '-t']
  end
end

If you create that file, and run vagrant up you’ll get a working Vagrant boot… But if you try and execute any shell scripts, they’ll fail to run, as the they aren’t passed in with execute permissions… so I want to use Ansible to execute things, as these don’t require execute permissions on the /vagrant directory (also, as the thing I’m building in there requires Ansible… so it’s helpful either way 😁)

Executing Ansible scripts

Ansible still expects to find python in /usr/bin/python but current systems don’t make the symlink to /usr/bin/python3, as python was typically a symlink to /usr/bin/python2… and also I wanted to put the PPA for Ansible in the sources, which is what the Ansible team recommend in their documentation. I’ve done this as part of the Dockerfile, as again, I can’t run scripts from Vagrant. So, here’s the addition I made to the Dockerfile.

FROM debian_with_systemd AS debian_with_systemd_and_ansible
RUN apt install -y gnupg2 lsb-release software-properties-common
RUN apt-key adv --keyserver keyserver.ubuntu.com --recv-keys 93C4A3FD7BB9C367
RUN add-apt-repository "deb http://ppa.launchpad.net/ansible/ansible/ubuntu trusty main"
RUN apt install -y ansible
# Yes, I know. Trusty? On Debian Buster?? But, that's what the Ansible Docs say!

In the Vagrantfile, I’ve added this block:

config.vm.provision "ansible_local" do |ansible|
  ansible.playbook = "test.yml"
end

And I created a test.yml, which looks like this:

---
- hosts: all
  tasks:
  - debug:
      msg: "Hello from Docker"

Running it

So how does this look on Windows when I run it?

PS C:\Dev\VagrantDockerBuster> vagrant up
==> default: Creating and configuring docker networks...
==> default: Building the container from a Dockerfile...
<SNIP A LOAD OF DOCKER STUFF>
    default: #20 DONE 0.1s
    default:
    default: Image: 190ffdeaeed0b7ed206097e6c1d4b5cc796a428700c9bd3e27eedacce47fb63b
==> default: Creating the container...
    default:   Name: 2021-02-13DockerBusterWithSSH_default_1613469604
    default:  Image: 190ffdeaeed0b7ed206097e6c1d4b5cc796a428700c9bd3e27eedacce47fb63b
    default: Volume: C:/Users/SPRIGGSJ/OneDrive - FUJITSU/Documents/95 My Projects/2021-02-13 Docker Buster With SSH:/vagrant
    default:   Port: 127.0.0.1:2222:22
    default:
    default: Container created: b64ed264d8949b12
==> default: Enabling network interfaces...
==> default: Starting container...
==> default: Waiting for machine to boot. This may take a few minutes...
    default: SSH address: 127.0.0.1:2222
    default: SSH username: vagrant
    default: SSH auth method: private key
    default:
    default: Vagrant insecure key detected. Vagrant will automatically replace
    default: this with a newly generated keypair for better security.
    default:
    default: Inserting generated public key within guest...
==> default: Machine booted and ready!
==> default: Running provisioner: ansible_local...
    default: Running ansible-playbook...

PLAY [all] *********************************************************************

TASK [Gathering Facts] *********************************************************
[WARNING]: Platform linux on host default is using the discovered Python
interpreter at /usr/bin/python, but future installation of another Python
interpreter could change this. See https://docs.ansible.com/ansible/2.9/referen
ce_appendices/interpreter_discovery.html for more information.
ok: [default]

TASK [debug] *******************************************************************
ok: [default] => {
    "msg": "Hello from Docker"
}

PLAY RECAP *********************************************************************
default                    : ok=2    changed=0    unreachable=0    failed=0    skipped=0    rescued=0    ignored=0   

PS C:\Dev\VagrantDockerBuster>

And on Linux?

Bringing machine 'default' up with 'docker' provider...
==> default: Creating and configuring docker networks...
==> default: Building the container from a Dockerfile...
<SNIP A LOAD OF DOCKER STUFF>
    default: Removing intermediate container e56bed4f7be9
    default:  ---> cef749c205bf
    default: Successfully built cef749c205bf
    default:
    default: Image: cef749c205bf
==> default: Creating the container...
    default:   Name: 2021-02-13DockerBusterWithSSH_default_1613470091
    default:  Image: cef749c205bf
    default: Volume: /home/spriggsj/Projects/2021-02-13 Docker Buster With SSH:/vagrant
    default:   Port: 127.0.0.1:2222:22
    default:
    default: Container created: 3fe46b02d7ad10ab
==> default: Enabling network interfaces...
==> default: Starting container...
==> default: Waiting for machine to boot. This may take a few minutes...
    default: SSH address: 127.0.0.1:2222
    default: SSH username: vagrant
    default: SSH auth method: private key
    default:
    default: Vagrant insecure key detected. Vagrant will automatically replace
    default: this with a newly generated keypair for better security.
    default:
    default: Inserting generated public key within guest...
    default: Removing insecure key from the guest if it's present...
    default: Key inserted! Disconnecting and reconnecting using new SSH key...
==> default: Machine booted and ready!
==> default: Running provisioner: ansible_local...
    default: Running ansible-playbook...

PLAY [all] *********************************************************************

TASK [Gathering Facts] *********************************************************
[WARNING]: Platform linux on host default is using the discovered Python
interpreter at /usr/bin/python, but future installation of another Python
interpreter could change this. See https://docs.ansible.com/ansible/2.9/referen
ce_appendices/interpreter_discovery.html for more information.
ok: [default]

TASK [debug] *******************************************************************
ok: [default] => {
    "msg": "Hello from Docker"
}

PLAY RECAP *********************************************************************
default                    : ok=2    changed=0    unreachable=0    failed=0    skipped=0    rescued=0    ignored=0

So, if you’re crazy and want to do Vagrant using Docker with Debian Buster and Ansible, this is how to do it. I don’t know how much I’m likely to be using this in the future, but if you use it, let me know what you’re doing with it! 😀

Featured image is “Family” by “Ivan” on Flickr and is released under a CC-BY license.

"Prickily Hooks" by "Derek Gavey" on Flickr

When starting WSL2, you get “The attempted operation is not supported for the type of object referenced.”

Hello, welcome to my personal knowledgebase article 😁

I think you only get this if you have some tool or service which hooks WinSock to perform content inspection, but if you do, you need to tell WinSock to reject attempts to hook WSL2.

According to this post on the Github WSL Issues list, you need to add a key into your registry, in the path HKEY_LOCAL_MACHINE\SYSTEM\CurrentControlSet\Services\WinSock2\Parameters\AppId_Catalog and they mention that the vendor of “proxifier” have released a tool which creates this key. The screen shot in the very next post shows this registry key having been created.

A screenshot of a screenshot of the registry path needed to prevent WinSock from being hooked.

I don’t know if the hex ID of the “AppId_Catalog” path created is relevant, but it was what was in the screenshot, so I copied it, and created this registry export file. Feel free to create your own version of this file, and run it to fix your own issue.

Windows Registry Editor Version 5.00

[HKEY_LOCAL_MACHINE\SYSTEM\CurrentControlSet\Services\WinSock2\Parameters\AppId_Catalog\0408F7A3]
"AppFullPath"="C:\\Windows\\System32\\wsl.exe"
"PermittedLspCategories"=dword:80000000

As soon as I’d included this registry entry, I was able to access WSL OK again.

Featured image is “Prickily Hooks” by “Derek Gavey” on Flickr and is released under a CC-BY license.

"Salmon leaping" by "openpad" on Flickr

Using public #git sources in private projects

The last post I made was about using submodules to work with code that is being developed, either in isolation from other aspects of a project, or so components can be reused without requiring lots of copy-and-paste activities. It was inspired by a question from a colleague. After asking a few more questions, it turns out that may be what that colleague needed was to consume code from other repositories and store them in their own project.

In this case, I’ve created two repositories, both on GitHub (which will both be removed by the time this post is published) called JonTheNiceGuy/Git_Demo (the “upstream”, open source project) and JonTheNiceGuy-Inc/Git_Demo (the private project, referred to as “mine”).

Getting the “Open Source” project started

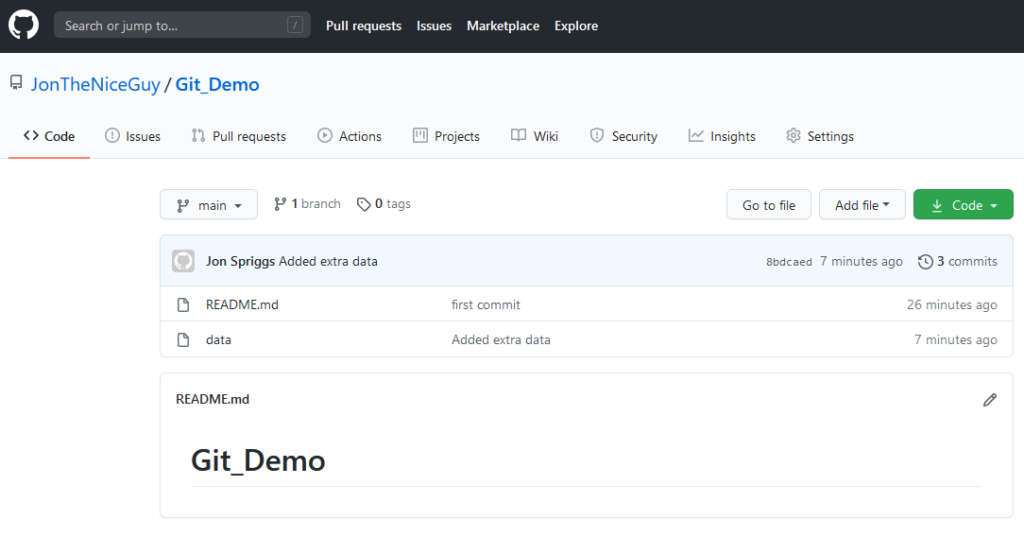
Here we have a simple repository, showing the README file for the project (which is likely, in the real world, to show what license that code has been released under, some explaination on what it’s for, etc.) and the actual data source. In this demo, the data source is a series of numbers, showing the decimal number in the first column, the binary representation of that number in the second column, and the hexedecimal representation in the third column.

Our “upstream” repository, showing the README.md file and the data source we want to use.
The data source itself. Note, I forgot to take a screen shot of this file, so I’ve had to “go back to a previous commit” to collect this particular image.

Elsewhere in the world, a private project has started! It’s going to use this data source as some element of this project, and to ensure that the code they’re relying on doesn’t go away, they create their own repository which this code will go into.

Preparing the private project

If both repositories are using GitHub, or if both repositories are using GitLab, then you should be able to “just” Fork the repository, using the “Fork” button in the top right corner:

The “Fork” button

And then select the organisation or account to place the forked repo into.

A list of potential targets to fork the repository into. Your view may differ if you are part of less organisations.

Gitlab has a similar workflow – they have a similar “fork” button, but the list of potential targets is different (but still works the same way).

Gitlab’s list of potential targets to fork the repository into.

Note that you can’t “easily” fork between different Version Control Services! To do something similar, you need to create a new repository in the target service, and then, run some commands to move the code over.

The screen you see immediately after you’ve created a new project – here I’ve created it in the “JonTheNiceGuy-Inc” Organisation. You can see the “quick setup” panel which has the URL to use for the repository.
Here we see the results of running five commands, which are: git clone <url> ; cd <target-dir> ; git remote rename origin upstream ; git remote add mine <url> ; git push –set-upstream mine main

If you’re using the command line method, here’s the commands you issue:

  • git clone http://service/user/repo – This command clones the repository from your service of choice to your local file system. It usually places it into the name of the repository you specified. In this case, “repo”, but in the above context (cloning from Git_Demo.git) it goes into “Git_Demo”. Note, HTTP(S) isn’t the only git transport, another common one is SSH, so if you prefer using SSH instead of HTTP, the URL in this case will be something like git@service:user/repo or service:user/repo. If you’re using submodules, however, I’d strongly recommend using HTTP(S) over SSH for at least the initial pull, as this is much easier for clients to navigate.
  • cd repo – Move into the directory where the cloned repository has been placed.
  • OPTIONAL: git remote rename origin upstream – Rename the remote source of the repository. By default, when you git clone or use git submodule add, the name of the remote resource is called “origin”. I prefer to give a descriptive name for my remote sources, so using “upstream” makes more sense to me. In later commands, I’ll use the remote name “upstream” again. If you don’t want to run this command, and leave the remote name as “origin”, you’ll just have to remember to change it back to “origin”.
  • git remote add mine http://new-service/user/repo – this adds a new remote source, to which you can push new commits, or pull code from your peers. Again, like in the git clone command above, you may use another URL format instead of HTTP(S). You may want to use a different name for the new remote, but again, I tend to prefer “mine” for anything I’m personally working on.
  • git push --set-upstream mine main – This sends the entire commit tree for the branch you’re currently on to your remote source.
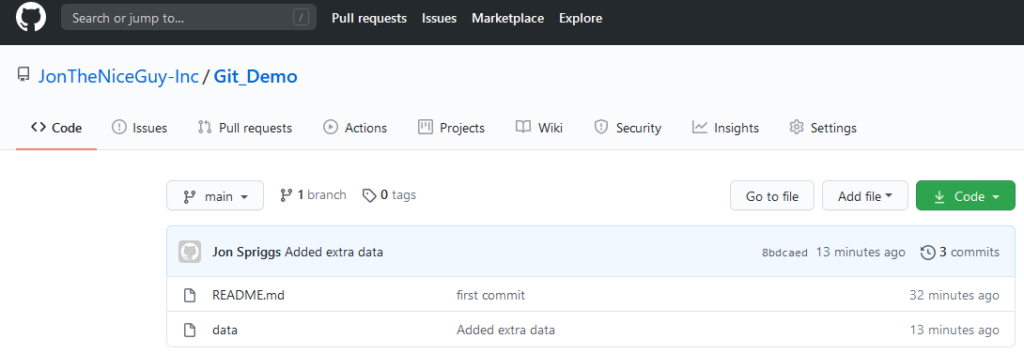
Once we’ve run the git push, you can now see that the code has all been pushed to your private project.
Issuing a git log command, shows the current tip on the branch “main” in the “upstream” repository is equal to the current tip on the branch “main” in the “mine” repository, as well as the tip of the “main” repository locally.

Making your local changes

So, while you could just keep using just the upstream project’s code (and doing the above groundwork is good practice to keep you from putting yourself into the situation that the NPM world got into with “left-pad”). What’s more likely is that you want to make your own, local changes to this repository. I’ve done this in the past where I wanted to demonstrate a software build using a public machine image, but internally at work we used our own images. Using this method, I can consume the code I’ve created in public, and just update the assets we use at work.

In this example, let’s update that data file. I’ve added two new lines, “115” (and it’s binary/hex representations) and “132”. I can use the git diff command to confirm the changes I want to make – it’s all good!

Next, I stage the changes with git add, use git commit to write it to the branch, and git push to push it up to my repository. This is all fairly standard stuff in the Git world.

Here we make a change to the data source, confirm there is a difference, add and commit it, and then push it to our default branch (mine/main).

When I then check the git log, we see that there’s a divergence, between my local main branch and the upstream main branch. You could also use git log -p to see the exact code changes, if you wanted… but we know what’s changed already.

The git log, showing that we have a “local” change from the “upstream” source, and that we’ve pushed that local change to the “mine” source.

Bringing data from the upstream source

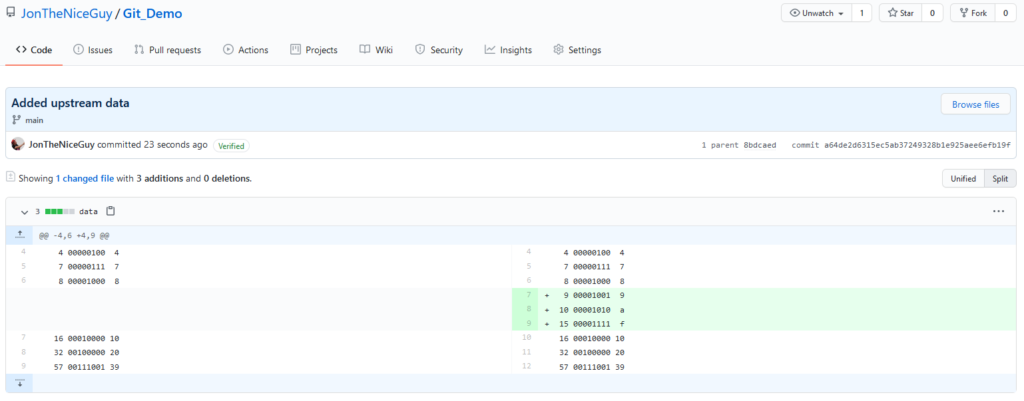
Oh joy! The upstream project (“JonTheNiceGuy” not “JonTheNiceGuy-Inc”) have updated their Git_Demo repository – they’ve had the audacity to add three new numbers – 9, 10 and 15 – to the data source.

The patch that was applied to this branch. We can check the difference here before we try to do anything with it! It’s something we want!

Well, actually we want to use that data, so let’s start bringing it in. We use the git pull command.

The git pull command, with the remote source (“upstream”) and the branch (“main”) to use.

Because this makes a change to a file that you’ve amended as part of your work, it can’t perform a “Fast forward” of these changes, so Git has to perform a merge commit. This means there’s a new commit in the log, so it’s clear that we’ve updated files because of this merge.

If there were a conflict in this file (which, fortunately, there isn’t!) you’d also be prompted to fix the merge conflicts too. This is a bit bigger than what I’m trying to explain, so instead, I’ll link to a tutorial by Atlassian on merge conflicts. You may also want to take a quick look at the rebasing page on the Git Project’s documentation site, and see whether this might have made your life easier in the case of a conflict!

Anyway, let’s use the default merge message.

The default message when performing a git pull where the change can’t be fast-forwarded.

Once the merge message is done, the merge completes. Yey!

We successfully merged our change, and it’s now part of our local tree

And to prove it, we can now see that we have all the changes from the upstream (commits starting 3b75eb, 8ad9ae, 8bdcae and the new one at a64de2) and our local changes (starting 02e40e).

Because we performed a merge, not a fast forward, our local branch is at a different commit than either of our remote sources – the commit starting 6f4db6 is on our local version, “upstream” is at a64de2 and “mine” is at 02e40e. So we need to fix at least our “mine/main” branch. We do this with a git push.

We do our git push here to get the code into our “mine/main” branch.

And now we can see the git log on our service.

The list of commits on Github for our “mine/main” branch.

And locally, we can see that the remote state has changed too. Let’s look at that git log again.

The result of the git log command on our local machine, showing the new position of the pointers for “upstream/main”, “mine/main” and the local “main” branches.

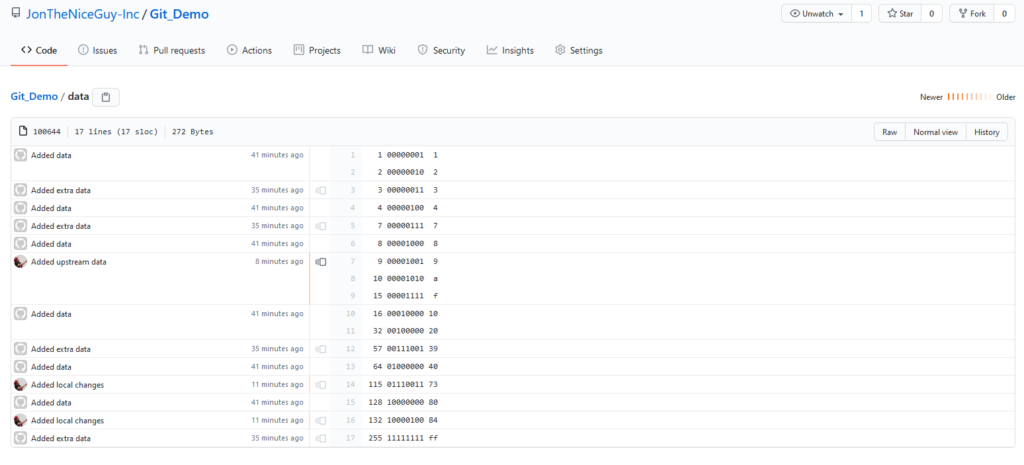
We can also look at the git blame on the service.

The git blame screen on GitHub, showing who made the various commits.

Or on our local machine.

git blame run locally, showing the commit reference, the author, the date and time of the commit, and the line number, followed by the line in question.

Featured image is “Salmon leaping” by “openpad” on Flickr and is released under a CC-BY license.

"Stockholms Stadsbibliotek" by "dilettantiquity" on Flickr

Terraform templates with Maps

For a project I’m working on, I needed to define a list of ports, and set some properties on some of them. In the Ansible world, you’d use statements like:

{% if data.somekey is defined %}something {{ data.somekey }}{% endif %}

or

{{ data.somekey | default('') }}

In a pinch, you can also do this:

{{ (data | default({}) ).somekey | default('') }}

With Terraform, I was finding it much harder to work out how to find whether a value as part of a map (the Terraform term for a Dictionary in Ansible terms, or an Associative Array in PHP terms), until I stumbled over the Lookup function. Here’s how that looks for just a simple Terraform file:

output "test" {
    value = templatefile(
        "template.tmpl",
        {
            ports = {
                "eth0": {"ip": "192.168.1.1/24", "name": "public"}, 
                "eth1": {"ip": "172.16.1.1/24", "name": "protected"}, 
                "eth2": {"ip": "10.1.1.1/24", "name": "management", "management": true}, 
                "eth3": {}
            },
            management = "1"
        }
    )
}

And the template that goes with that?

%{ for port, data in ports ~}
Interface: ${port}%{ if lookup(data, "name", "") != ""}
Alias: ${ lookup(data, "name", "") }%{ endif }
Services: ping%{ if lookup(data, "management", false) == true } ssh https%{ endif }
IP: ${ lookup(data, "ip", "Not Defined") }

%{ endfor }

This results in the following output:

C:\tf>terraform.exe apply -auto-approve

Apply complete! Resources: 0 added, 0 changed, 0 destroyed.

Outputs:

test = Interface: eth0
Alias: public
Services: ping
IP: 192.168.1.1/24

Interface: eth1
Alias: protected
Services: ping
IP: 172.16.1.1/24

Interface: eth2
Alias: management
Services: ping ssh https
IP: 10.1.1.1/24

Interface: eth3
Services: ping
IP: Not Defined

Naturally, using this in your own user-data or Custom Data field will probably make more sense than just writing it to “output” 😁

Featured image is “Stockholms Stadsbibliotek” by “dilettantiquity” on Flickr and is released under a CC-BY-SA license.

"Sydney Observatory I" by "Newtown grafitti" on Flickr

Using Feature Flags in Terraform with Count Statements

In a project I’m working on in Terraform, I’ve got several feature flags in a module. These flags relate to whether this module should turn on a system in a cloud provider, or not, and looks like this:

variable "turn_on_feature_x" {
  description = "Setting this to 'yes' will enable Feature X. Any other value will disable it. (Default 'yes')"
  value = "yes"
}

variable "turn_on_feature_y" {
  description = "Setting this to 'yes' will enable Feature Y. Any other value will disable it. (Default 'no')"
  value = "no"
}

When I call the module, I then can either leave the feature with the default values, or selectively enable or disable them, like this:

module "region1" {
  source = "./my_module"
}

module "region2" {
  source = "./my_module"
  turn_on_feature_x = "no"
  turn_on_feature_y = "yes"
}

module "region3" {
  source = "./my_module"
  turn_on_feature_y = "yes"
}

module "region4" {
  source = "./my_module"
  turn_on_feature_x = "no"
}

# Result:
# region1 has X=yes, Y=no
# region2 has X=no, Y=yes
# region3 has X=yes, Y=yes
# region4 has X=no, Y=no

When I then want to use the feature, I have to remember a couple of key parts.

  1. Normally this feature check is done with a “count” statement, and the easiest way to use this is to use the ternary operator to check values and return a “1” or a “0” for if you want the value used.

    Ternary operators look like this: var.turn_on_feature_x == "yes" ? 1 : 0 which basically means, if the value of the variable turn_on_feature_x is set to “yes”, then return 1 otherwise return 0.

    This can get a bit complex, particularly if you want to check several flags a few times, like this: var.turn_on_feature_x == "yes" ? var.turn_on_feature_y == "yes" ? 1 : 0 : 0. I’ve found that wrapping them in brackets helps to understand what you’re getting, like this:

    (
      var.turn_on_feature_x == "yes" ?
      (
        var.turn_on_feature_y == "yes" ?
        1 :
        0
      ) :
      0
    )
  2. If you end up using a count statement, the resulting value must be treated as an 0-indexed array, like this: some_provider_service.my_name[0].result

    This is because, using the count value says “I want X number of resources”, so Terraform has to treat it as an array, in case you actually wanted 10 instead of 1 or 0.

Here’s an example of that in use:

resource "aws_guardduty_detector" "Region" {
  count = var.enable_guardduty == "yes" ? 1 : 0
  enable = true
}

resource "aws_cloudwatch_event_rule" "guardduty_finding" {
  count = (var.enable_guardduty == "yes" ? (var.send_guardduty_findings_to_sns == "yes" ? 1 : (var.send_guardduty_findings_to_sqs == "yes" ? 1 : 0)) : 0)
  name = "${data.aws_caller_identity.current.account_id}-${data.aws_region.current.name}-${var.sns_guardduty_finding_suffix}"
  event_pattern = <<PATTERN
{
  "source": [
    "aws.guardduty"
  ],
  "detail-type": [
    "GuardDuty Finding"
  ]
}
PATTERN
}

resource "aws_cloudwatch_event_target" "sns_guardduty_finding" {
  count = (var.enable_guardduty == "yes" ? (var.send_guardduty_findings_to_sns == "yes" ? 1 : 0) : 0)
  rule = aws_cloudwatch_event_rule.guardduty_finding[0].name
  target_id = aws_sns_topic.guardduty_finding[0].name
  arn = aws_sns_topic.guardduty_finding[0].arn
}

resource "aws_cloudwatch_event_target" "sqs_guardduty_finding" {
  count = (var.enable_guardduty == "yes" ? (var.send_guardduty_findings_to_sqs == "yes" ? 1 : 0) : 0)
  rule = aws_cloudwatch_event_rule.guardduty_finding[0].name
  target_id = "SQS"
  arn = aws_sqs_queue.guardduty_finding[0].arn
}

One thing that bit me rather painfully around this was that if you change from an uncounted resource, like this:

resource "some_tool" "this" {
  some_setting = 1
}

To a counted resource, like this:

resource "some_tool" "this" {
  count = var.some_tool == "yes" ? 1 : 0
  some_setting = 1
}

Then, Terraform will promptly destroy some_tool.this to replace it with some_tool.this[0], because they’re not the same referenced thing!

Fun, huh? 😊

Featured image is “Sydney Observatory I” by “Newtown grafitti” on Flickr and is released under a CC-BY license.

"Kelvin Test" by "Eelke" on Flickr

In Ansible, determine the type of a value, and casting those values to other types

TL;DR? It’s possible to work out what type of variable you’re working with in Ansible. The in-built filters don’t always do quite what you’re expecting. Jump to the “In Summary” heading for my suggestions.

LATE EDIT: 2021-05-23 After raising a question in #ansible on Freenode, flowerysong noticed that my truth table around mappings, iterables and strings was wrong. I’ve amended the table accordingly, and have added a further note below the table.

One of the things I end up doing quite a bit with Ansible is value manipulation. I know it’s not really normal, but… well, I like rewriting values from one type of a thing to the next type of a thing.

For example, I like taking a value that I don’t know if it’s a list or a string, and passing that to an argument that expects a list.

Doing it wrong, getting it better

Until recently, I’d do that like this:

- debug:
    msg: |-
      {
        {%- if value | type_debug == "string" or value | type_debug == "AnsibleUnicode" -%}
           "string": "{{ value }}"
        {%- elif value | type_debug == "dict" or value | type_debug == "ansible_mapping" -%}
          "dict": {{ value }}
        {%- elif value | type_debug == "list" -%}
          "list": {{ value }}
        {%- else -%}
          "other": "{{ value }}"
        {%- endif -%}
      }

But, following finding this gist, I now know I can do this:

- debug:
    msg: |-
      {
        {%- if value is string -%}
           "string": "{{ value }}"
        {%- elif value is mapping -%}
          "dict": {{ value }}
        {%- elif value is iterable -%}
          "list": {{ value }}
        {%- else -%}
          "other": "{{ value }}"
        {%- endif -%}
      }

So, how would I use this, given the context of what I was saying before?

- assert:
    that:
    - value is string
    - value is not mapping
    - value is iterable
- some_module:
    some_arg: |-
      {%- if value is string -%}
        ["{{ value }}"]
      {%- else -%}
        {{ value }}
      {%- endif -%}

More details on finding a type

Why in this order? Well, because of how values are stored in Ansible, the following states are true:

⬇️Type \ ➡️Checkis iterableis mappingis sequenceis string
a_dict (e.g. {})✔️✔️✔️
a_list (e.g. [])✔️✔️
a_string (e.g. “”)✔️✔️✔️
A comparison between value types

So, if you were to check for is iterable first, you might match on a_list or a_dict instead of a_string, but string can only match on a_string. Once you know it can’t be a string, you can check whether something is mapping – again, because a mapping can only match a_dict, but it can’t match a_list or a_string. Once you know it’s not that, you can check for either is iterable or is sequence because both of these match a_string, a_dict and a_list.

LATE EDIT: 2021-05-23 Note that a prior revision of this table and it’s following paragraph showed “is_mapping” as true for a_string. This is not correct, and has been fixed, both in the table and the paragraph.

Likewise, if you wanted to check whether a_float and an_integer is number and not is string, you can check these:

⬇️Type \ ➡️Checkis floatis integeris iterableis mappingis numberis sequenceis string
a_float✔️✔️
an_integer✔️✔️
A comparison between types of numbers

So again, a_float and an_integer don’t match is string, is mapping or is iterable, but they both match is number and they each match their respective is float and is integer checks.

How about each of those (a_float and an_integer) wrapped in quotes, making them a string? What happens then?

⬇️Type \ ➡️Checkis floatis integeris iterableis mappingis numberis sequenceis string
a_float_as_string✔️✔️✔️
an_integer_as_string✔️✔️✔️
A comparison between types of numbers when held as a string

This is somewhat interesting, because they look like a number, but they’re actually “just” a string. So, now you need to do some comparisons to make them look like numbers again to check if they’re numbers.

Changing the type of a string

What happens if you cast the values? Casting means to convert from one type of value (e.g. string) into another (e.g. float) and to do that, Ansible has three filters we can use, float, int and string. You can’t cast to a dict or a list, but you can use dict2items and items2dict (more on those later). So let’s start with casting our group of a_ and an_ items from above. Here’s a list of values I want to use:

---
- hosts: localhost
  gather_facts: no
  vars:
    an_int: 1
    a_float: 1.1
    a_string: "string"
    an_int_as_string: "1"
    a_float_as_string: "1.1"
    a_list:
      - item1
    a_dict:
      key1: value1

With each of these values, I returned the value as Ansible knows it, what happens when you do {{ value | float }} to cast it as a float, as an integer by doing {{ value | int }} and as a string {{ value | string }}. Some of these results are interesting. Note that where you see u'some value' means that Python converted that string to a Unicode string.

⬇️Value \ ➡️Castvaluevalue when cast as floatvalue when cast as integervalue when cast as string
a_dict{“key1”: “value1”}0.00“{u’key1′: u’value1′}”
a_float1.11.11“1.1”
a_float_as_string“1.1”1.11“1.1”
a_list[“item1”]0.00“[u’item1′]”
a_string“string”0.00“string”
an_int111“1”
an_int_as_string“1”11“1”
Casting between value types

So, what does this mean for us? Well, not a great deal, aside from to note that you can “force” a number to be a string, or a string which is “just” a number wrapped in quotes can be forced into being a number again.

Oh, and casting dicts to lists and back again? This one is actually pretty clearly documented in the current set of documentation (as at 2.9 at least!)

Checking for miscast values

How about if I want to know whether a value I think might be a float stored as a string, how can I check that?

{{ vars[var] | float | string == vars[var] | string }}

What is this? If I cast a value that I think might be a float, to a float, and then turn both the cast value and the original into a string, do they match? If I’ve got a string or an integer, then I’ll get a false, but if I have actually got a float, then I’ll get true. Likewise for casting an integer. Let’s see what that table looks like:

⬇️Type \ ➡️Checkvalue when cast as floatvalue when cast as integervalue when cast as string
a_float✔️✔️
a_float_as_string✔️✔️
an_integer✔️✔️
an_integer_as_string✔️✔️
A comparison between types of numbers when cast to a string

So this shows us the values we were after – even if you’ve got a float (or an integer) stored as a string, by doing some careful casting, you can confirm they’re of the type you wanted… and then you can pass them through the right filter to use them in your playbooks!

Booleans

Last thing to check – boolean values – “True” or “False“. There’s a bit of confusion here, as a “boolean” can be: true or false, yes or no, 1 or 0, however, is true and True and TRUE the same? How about false, False and FALSE? Let’s take a look!

⬇️Value \ ➡️Checktype_debug is booleanis numberis iterableis mappingis stringvalue when cast as boolvalue when cast as stringvalue when cast as integer
yesbool✔️✔️TrueTrue1
YesAnsibleUnicode✔️✔️FalseYes0
YESAnsibleUnicode✔️✔️FalseYES0
“yes”AnsibleUnicode✔️✔️Trueyes0
“Yes”AnsibleUnicode✔️✔️TrueYes0
“YES”AnsibleUnicode✔️✔️TrueYES0
truebool✔️✔️TrueTrue1
Truebool✔️✔️TrueTrue1
TRUEbool✔️✔️TrueTrue1
“true”AnsibleUnicode✔️✔️Truetrue0
“True”AnsibleUnicode✔️✔️TrueTrue0
“TRUE”AnsibleUnicode✔️✔️TrueTRUE0
1int✔️True11
“1”AnsibleUnicode✔️✔️True11
nobool✔️✔️FalseFalse0
Nobool✔️✔️FalseFalse0
NObool✔️✔️FalseFalse0
“no”AnsibleUnicode✔️✔️Falseno0
“No”AnsibleUnicode✔️✔️FalseNo0
“NO”AnsibleUnicode✔️✔️FalseNO0
falsebool✔️✔️FalseFalse0
Falsebool✔️✔️FalseFalse0
FALSEbool✔️✔️FalseFalse0
“false”AnsibleUnicode✔️✔️Falsefalse0
“False”AnsibleUnicode✔️✔️FalseFalse0
“FALSE”AnsibleUnicode✔️✔️FalseFALSE0
0int✔️False00
“0”AnsibleUnicode✔️✔️False00
Comparisons between various stylings of boolean representations

So, the stand out thing for me here is that while all the permutations of string values of the boolean representations (those wrapped in quotes, like this: "yes") are treated as strings, and shouldn’t be considered as “boolean” (unless you cast for it explicitly!), and all non-string versions of true, false, and no are considered to be boolean, yes, Yes and YES are treated differently, depending on case. So, what would I do?

In summary

  • Consistently use no or yes, true or false in lower case to indicate a boolean value. Don’t use 1 or 0 unless you have to.
  • If you’re checking that you’re working with a string, a list or a dict, check in the order string (using is string), dict (using is mapping) and then list (using is sequence or is iterable)
  • Checking for numbers that are stored as strings? Cast your string through the type check for that number, like this: {% if value | float | string == value | string %}{{ value | float }}{% elif value | int | string == value | string %}{{ value | int }}{% else %}{{ value }}{% endif %}
  • Try not to use type_debug unless you really can’t find any other way. These values will change between versions, and this caused me a lot of issues with a large codebase I was working on a while ago!

Run these tests yourself!

Want to run these tests yourself? Here’s the code I ran (also available in a Gist on GitHub), using Ansible 2.9.10.

---
- hosts: localhost
  gather_facts: no
  vars:
    an_int: 1
    a_float: 1.1
    a_string: "string"
    an_int_as_string: "1"
    a_float_as_string: "1.1"
    a_list:
      - item1
    a_dict:
      key1: value1
  tasks:
    - debug:
        msg: |
          {
          {% for var in ["an_int", "an_int_as_string","a_float", "a_float_as_string","a_string","a_list","a_dict"] %}
            "{{ var }}": {
              "type_debug": "{{ vars[var] | type_debug }}",
              "value": "{{ vars[var] }}",
              "is float": "{{ vars[var] is float }}",
              "is integer": "{{ vars[var] is integer }}",
              "is iterable": "{{ vars[var] is iterable }}",
              "is mapping": "{{ vars[var] is mapping }}",
              "is number": "{{ vars[var] is number }}",
              "is sequence": "{{ vars[var] is sequence }}",
              "is string": "{{ vars[var] is string }}",
              "value cast as float": "{{ vars[var] | float }}",
              "value cast as integer": "{{ vars[var] | int }}",
              "value cast as string": "{{ vars[var] | string }}",
              "is same when cast to float": "{{ vars[var] | float | string == vars[var] | string }}",
              "is same when cast to integer": "{{ vars[var] | int | string == vars[var] | string }}",
              "is same when cast to string": "{{ vars[var] | string == vars[var] | string }}",
            },
          {% endfor %}
          }
---
- hosts: localhost
  gather_facts: false
  vars:
    # true, True, TRUE, "true", "True", "TRUE"
    a_true: true
    a_true_initial_caps: True
    a_true_caps: TRUE
    a_string_true: "true"
    a_string_true_initial_caps: "True"
    a_string_true_caps: "TRUE"
    # yes, Yes, YES, "yes", "Yes", "YES"
    a_yes: yes
    a_yes_initial_caps: Tes
    a_yes_caps: TES
    a_string_yes: "yes"
    a_string_yes_initial_caps: "Yes"
    a_string_yes_caps: "Yes"
    # 1, "1"
    a_1: 1
    a_string_1: "1"
    # false, False, FALSE, "false", "False", "FALSE"
    a_false: false
    a_false_initial_caps: False
    a_false_caps: FALSE
    a_string_false: "false"
    a_string_false_initial_caps: "False"
    a_string_false_caps: "FALSE"
    # no, No, NO, "no", "No", "NO"
    a_no: no
    a_no_initial_caps: No
    a_no_caps: NO
    a_string_no: "no"
    a_string_no_initial_caps: "No"
    a_string_no_caps: "NO"
    # 0, "0"
    a_0: 0
    a_string_0: "0"
  tasks:
    - debug:
        msg: |
          {
          {% for var in ["a_true","a_true_initial_caps","a_true_caps","a_string_true","a_string_true_initial_caps","a_string_true_caps","a_yes","a_yes_initial_caps","a_yes_caps","a_string_yes","a_string_yes_initial_caps","a_string_yes_caps","a_1","a_string_1","a_false","a_false_initial_caps","a_false_caps","a_string_false","a_string_false_initial_caps","a_string_false_caps","a_no","a_no_initial_caps","a_no_caps","a_string_no","a_string_no_initial_caps","a_string_no_caps","a_0","a_string_0"] %}
            "{{ var }}": {
              "type_debug": "{{ vars[var] | type_debug }}",
              "value": "{{ vars[var] }}",
              "is float": "{{ vars[var] is float }}",
              "is integer": "{{ vars[var] is integer }}",
              "is iterable": "{{ vars[var] is iterable }}",
              "is mapping": "{{ vars[var] is mapping }}",
              "is number": "{{ vars[var] is number }}",
              "is sequence": "{{ vars[var] is sequence }}",
              "is string": "{{ vars[var] is string }}",
              "is bool": "{{ vars[var] is boolean }}",
              "value cast as float": "{{ vars[var] | float }}",
              "value cast as integer": "{{ vars[var] | int }}",
              "value cast as string": "{{ vars[var] | string }}",
              "value cast as bool": "{{ vars[var] | bool }}",
              "is same when cast to float": "{{ vars[var] | float | string == vars[var] | string }}",
              "is same when cast to integer": "{{ vars[var] | int | string == vars[var] | string }}",
              "is same when cast to string": "{{ vars[var] | string == vars[var] | string }}",
              "is same when cast to bool": "{{ vars[var] | bool | string == vars[var] | string }}",
            },
          {% endfor %}
          }

Featured image is “Kelvin Test” by “Eelke” on Flickr and is released under a CC-BY license.