Expanding XFS drives with LVM

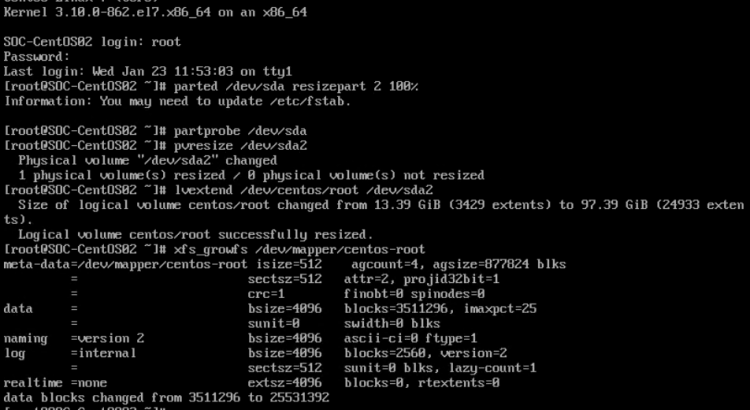
Say, for example, you’ve got a lovely CentOS VM (using XFS by default) which has a disk that isn’t quite big enough. Fair enough, your VM Hypervisor is sensible enough to resize that disk without question… How do you resize the XFS partition? Assuming you’ve got your disk mounted as /dev/sda, and you’ve got a boot volume as partition 1 and a root volume as partition 2 (the standard install model)

  1. parted /dev/sda resizepart 2 100%
  2. partprobe /dev/sda
  3. pvresize /dev/sda2
  4. lvextend /dev/centos/root /dev/sda2
  5. xfs_growfs /dev/mapper/centos-root
The graphical version of the steps above

Research via:

"www.GetIPv6.info decal" from Phil Wolff on Flickr

Hurricane Electric IPv6 Gateway on Raspbian for Raspberry Pi

NOTE: This article was replaced on 2019-03-12 by a github repository where I now use Vagrant instead of a Raspberry Pi, because I was having some power issues with my Raspberry Pi. Also, using this method means I can easily use an Ansible Playbook. The following config will still work(!) however I prefer this Vagrant/Ansible workflow for this, so won’t update this blog post any further.

Following an off-hand remark from a colleague at work, I decided I wanted to set up a Raspberry Pi as a Hurricane Electric IPv6 6in4 tunnel router. Most of the advice around (in particular, this post about setting up IPv6 on the Raspberry Pi Forums) related to earlier version of Raspbian, so I thought I’d bring it up-to-date.

I installed the latest available version of Raspbian Stretch Lite (2018-11-13) and transferred it to a MicroSD card. I added the file ssh to the boot volume and unmounted it. I then fitted it into my Raspberry Pi, and booted it. While it was booting, I set a static IPv4 address on my router (192.168.1.252) for the Raspberry Pi, so I knew what IP address it would be on my network.

I logged into my Hurricane Electric (HE) account at tunnelbroker.net and created a new tunnel, specifying my public IP address, and selecting my closest HE endpoint. When the new tunnel was created, I went to the “Example Configurations” tab, and selected “Debian/Ubuntu” from the list of available OS options. I copied this configuration into my clipboard.

I SSH’d into the Pi, and gave it a basic config (changed the password, expanded the disk, turned off “predictable network names”, etc) and then rebooted it.

After this was done, I created a file in /etc/network/interfaces.d/he-ipv6 and pasted in the config from the HE website. I had to change the “local” line from the public IP I’d provided HE with, to the real IP address of this box. Note that any public IPs (that is, not 192.168.x.x addresses) in the config files and settings I’ve noted refer to documentation addressing (TEST-NET-2 and the IPv6 documentation address ranges)

auto he-ipv6
iface he-ipv6 inet6 v4tunnel
        address 2001:db8:123c:abd::2
        netmask 64
        endpoint 198.51.100.100
        local 192.168.1.252
        ttl 255
        gateway 2001:db8:123c:abd::1

Next, I created a file in /etc/network/interfaces.d/eth0 and put the following configuration in, using the first IPv6 address in the “routed /64” range listed on the HE site:

auto eth0
iface eth0 inet static
    address 192.168.1.252
    gateway 192.168.1.254
    netmask 24
    dns-nameserver 8.8.8.8
    dns-nameserver 8.8.4.4

iface eth0 inet6 static
    address 2001:db8:123d:abc::1
    netmask 64

Next, I disabled the DHCPd service by issuing systemctl stop dhcpcd.service Late edit (2019-01-22): Note, a colleague mentioned that this should have actually been systemctl stop dhcpcd.service && systemctl disable dhcpcd.service – good spot! Thanks!! This ensures that if, for some crazy reason, the router stops offering the right DHCP address to me, I can still access this box on this IP. Huzzah!

I accessed another host which had IPv6 access, and performed both a ping and an SSH attempt. Both worked. Fab. However, this now needs to be blocked, as we shouldn’t permit anything to be visible downstream from this gateway.

I’m using the Uncomplicated Firewall (ufw) which is a simple wrapper around IPTables. Let’s create our policy.

# First install the software
sudo apt update && sudo apt install ufw -y

# Permits inbound IPv4 SSH to this host - which should be internal only. 
# These rules allow tailored access in to our managed services
ufw allow in on eth0 app DNS
ufw allow in on eth0 app OpenSSH

# These rules accept all broadcast and multicast traffic
ufw allow in on eth0 to 224.0.0.0/4 # Multicast addresses
ufw allow in on eth0 to 255.255.255.255 # Global broadcast
ufw allow in on eth0 to 192.168.1.255 # Local broadcast

# Alternatively, accept everything coming in on eth0
# If you do this one, you don't need the lines above
ufw allow in on eth0

# Setup the default rules - deny inbound and routed, permit outbound
ufw default deny incoming 
ufw default deny routed
ufw default allow outgoing

# Prevent inbound IPv6 to the network
# Also, log any drops so we can spot them if we have an issue
ufw route deny log from ::/0 to 2001:db8:123d:abc::/64

# Permit outbound IPv6 from the network
ufw route allow from 2001:db8:123d:abc::/64

# Start the firewall!
ufw enable

# Check the policy
ufw status verbose
ufw status numbered

Most of the documentation I found suggested running radvd for IPv6 address allocation. This basically just allocates on a random basis, and, as far as I can make out, each renewal gives the host a new IPv6 address. To make that work, I performed apt-get update && apt-get install radvd -y and then created this file as /etc/radvd.conf. If all you want is a floating IP address with no static assignment – this will do it…

interface eth0
{
    AdvSendAdvert on;
    MinRtrAdvInterval 3;
    MaxRtrAdvInterval 10;
    prefix 2001:db8:123d:abc::/64
    {
        AdvOnLink on;
        AdvAutonomous on;
    };
   route ::/0 {
   };
};

However, this doesn’t give me the ability to statically assign IPv6 addresses to hosts. I found that a different IPv6 allocation method will do static addressing, based on your MAC address called SLAAC (note there are some privacy issues with this, but I’m OK with them for now…) In this mode assuming the prefix as before – 2001:db8:123d:abc:: and a MAC address of de:ad:be:ef:01:23, your IPv6 address will be something like: 2001:db8:123d:abc:dead:beff:feef:0123and this will be repeatably so – because you’re unlikely to change your MAC address (hopefully!!).

This SLAAC allocation mode is available in DNSMasq, which I’ve consumed before (in a Pi-Hole). To use this, I installed DNSMasq with apt-get update && apt-get install dnsmasq -y and then configured it as follows:

interface=eth0
listen-address=127.0.0.1
# DHCPv6 - Hurricane Electric Resolver and Google's
dhcp-option=option6:dns-server,[2001:470:20::2],[2001:4860:4860::8888]
# IPv6 DHCP scope
dhcp-range=2001:db8:123d:abc::, slaac

I decided to move from using my router as a DHCP server, to using this same host, so expanded that config as follows, based on several posts, but mostly centred around the MAN page (I’m happy to have this DNSMasq config improved if you’ve got any suggestions ;) )

# Stuff for DNS resolution
domain-needed
bogus-priv
no-resolv
filterwin2k
expand-hosts
domain=localnet
local=/localnet/
log-queries

# Global options
interface=eth0
listen-address=127.0.0.1

# Set these hosts as the DNS server for your network
# Hurricane Electric and Google
dhcp-option=option6:dns-server,[2001:470:20::2],2001:4860:4860::8888]

# My DNS servers are:
server=1.1.1.1                # Cloudflare's DNS server
server=8.8.8.8                # Google's DNS server

# IPv4 DHCP scope
dhcp-range=192.168.1.10,192.168.1.210,12h
# IPv6 DHCP scope
dhcp-range=2001:db8:123d:abc::, slaac

# Record the DHCP leases here
dhcp-leasefile=/run/dnsmasq/dhcp-lease

# DHCPv4 Router
dhcp-option=3,192.168.1.254

So, that’s what I’m doing now! Hope it helps you!

Late edit (2019-01-22): In issue 129 of the “Awesome Self Hosted Newsletter“, I found a post called “My New Years Resolution: Learn IPv6“… which uses a pfSense box and a Hurricane Electric tunnel too. Fab!

Header image is “www.GetIPv6.info decal” by “Phil Wolff” on Flickr and is released under a CC-BY-SA license. Used with thanks!

"Zenith Z-19 Terminal" from ajmexico on Flickr

Some things I learned this week while coding extensions to Ansible!

If you follow any of the content I post around the internet, you might have seen me asking questions about trying to get data out of azure_rm_*_facts into something that’s usable. I can’t go into why I needed that data yet (it’s a little project I’m working on), but the upshot is that trying to manipulate data using “set_fact” with jinja is *doable* but *messy*. In the end, I decided to hand it all off to a new ansible module I’m writing. So, here are the things I learned about this.

  1. There’s lots more documentation about writing a module (a plugin that let’s you do stuff) than there is about writing filters (things that change text inline) or lookups (things that let you search other data stores). In the end, while I could have spent the time to figure out how better to write a filter or a lookup, it actually makes more sense in my context to hand a module all my data, and say “Parse this” and register the result than it would have done to have the playbook constantly check whether things were in other things. I still might have to do that, but… you know, for now, I’ve got the bits I want! :)
  2. I did start looking at writing a filter, and discovered that the “debugging advice” on the ansible site is all geared up to enable more modules than enabling filters… but I did discover that modules execute on their target (e.g. WebHost01) while filters and lookups execute on the local machine. Why does this matter? Well…..
  3. While I was looking for documentation about debugging Ansible code, I stumbled over this page on debugging modules that makes it all look easy. Except, it’s only for debugging *MODULES* (very frustrating. Well, what does it actually mean? The modules get zipped up and sent to the host that will be executing the code, which means that with an extra flag to your playbook (ANSIBLE_KEEP_REMOTE_FILES – even if it’s going to be run on “localhost”), you get the combined output of the script placed into a path on your machine, which means you can debug that specific play. That doesn’t work for filters…
  4. SOO, I jumped into #ansible on Freenode and asked for help. They in turn couldn’t help me (it’s more about writing playbooks than writing filters, modules, etc), so they directed me to #ansible-devel, where I was advised to use a python library called “q” (Edit, same day: my friend @mohclips pointed me to this youtube video from 2003 of the guy who wrote q explaining about it. Thanks Nick! I learned something *else* about this library).
  5. Oh man, this is the motherlode. So, q makes life *VERY* easy. Assuming this is valid code: All you’d need to do would be to add two lines, as you’ll see here: This then dumps the output from each of the q(something) lines into /tmp/q for you to read at your leisure! (To be fair, I’d probably remove it after you’ve finished, so you don’t fill a disk :) )
  6. And that’s when I discovered that it’s actually easier to use q() for all my python debugging purposes than it is to follow the advice above about debugging modules. Yehr, it’s basically a load of print statements, so you don’t get to see stack traces, or read all the variables, and you don’t get to step through code to see why decisions were taken… but for the rubbish code I produce, it’s easily enough for me!

Header image is “Zenith Z-19 Terminal” by “ajmexico” on Flickr and is released under a CC-BY license. Used with thanks!

Troubleshooting FortiGate API issues with the CLI?

One of my colleagues has asked me for some help with an Ansible script he’s writing to push some policy to a cloud hosted FortiGate appliance. Unfortunately, he kept getting some very weird error messages, like this one:

fatal: [localhost]: FAILED! => {"changed": false, "meta": {"build": 200, "error": -651, "http_method": "PUT", "http_status": 500, "mkey": "vip8080", "name": "vip", "path": "firewall", "revision": "36.0.0.10745196634707694665.1544442857", "serial": "CENSORED", "status": "error", "vdom": "root", "version": "v6.0.3"}, "msg": "Error in repo"}

This is using Fortinet’s own Ansible Modules, which, in turn use the fortiosapi python module.

This same colleague came across a post on the Fortinet Developer Network site (access to the site requires vendor approval), which said “this might be an internal bug, but to debug it, use the following”

fgt # diagnose debug enable

fgt # diagnose debug cli 8
Debug messages will be on for 30 minutes.

And then run your API commands. Your error message will be surfaced there… so here’s mine! (Mapped port doesn’t match extport in a vip).

0: config firewall vip
0: edit "vip8080"
0: unset src-filter
0: unset service
0: set extintf "port1"
0: set portforward enable
0: unset srcintf-filter
0: set mappedip "192.0.2.1-192.0.2.1"
0: unset extport
0: set extport 8080-8081
0: unset mappedport
0: set mappedport 8080
-651: end

Late edit 2020-03-27: I spotted a bug in the Ansible issues tracker today, and I added a note to the end of that bug mentioning that as well as diagnose debug cli 8, if that doesn’t give you enough logs to figure out what’s up, you can also try diagnose debug application httpsd -1 but this enables LOTS AND LOTS of logs, so really think twice before turning that one on!

Oh, and if 30 minutes isn’t enough, try diagnose debug duration 480 or however many minutes you think you need. Beware that it will write event logs out to the serial console even when you’ve logged out.

“You can’t run multiple commands in sudo” – and how to work around this

At work, we share tips and tricks, and one of my colleagues recently called me out on the following stanza I posted:

I like this [ansible] one for Debian based systems:
  - name: "Apt update, Full-upgrade, autoremove, autoclean"
    become: yes
    apt:
      upgrade: full
      update_cache: yes
      autoremove: yes
      autoclean: yes

And if you’re trying to figure out how to do that in Shell:
apt-get update && apt-get full-update -y && apt-get autoremove -y && apt-get autoclean -y

His response was “Surely you’re not logging into bash as root”. I said “I normally sudo -i as soon as I’ve logged in. I can’t recall offhand how one does a sudo for a string of command && command statements”

Well, as a result of this, I looked into it. Here’s one comment from the first Stack Overflow page I found:

You can’t run multiple commands from sudo – you always need to trick it into executing a shell which may accept multiple commands to run as parameters

So here are a few options on how to do that:

  1. sudo -s whoami \; whoami (link to answer)
  2. sudo sh -c "whoami ; whoami" (link to answer)
  3. But, my favourite is from this answer:

    An alternative using eval so avoiding use of a subshell: sudo -s eval 'whoami; whoami'

Why do I prefer the last one? Well, I already use eval for other purposes – mostly for starting my ssh-agent over SSH, like this: eval `ssh-agent` ; ssh-add

Ansible Behaviour Change

For those of you who are working with #Ansible… Ansible 2.5 is out, and has an unusual documentation change around a key Ansible concept – `with_` loops Where you previously had:

with_dict: "{{ your_fact }}"
or
with_subelements:
- "{{ your_fact }}"
- some_subkey

This now should be written like this:

loop: "{{ lookup('dict', your_fact) }}"
and
loop: "{{ lookup('subelements', your_fact, 'some_subkey') }}"

Fear not, I hear you say, It’s fine, of course the documentation suggests that this is “how it’s always been”…… HA HA HA Nope. This behaviour is new as of 2.5, and needs ansible to be updated to the latest version. As far as I can tell, there’s no way to indicate to Ansible “Oh, BTW, this needs to be running on 2.5 or later”… so I wrote a role that does that for you.

ansible-galaxy install JonTheNiceGuy.version-check

You’re welcome :)

More useful URLs:

"Copying and Pasting from Stack Overflow" Spoof O'Reilly Book Cover

Just a little reminder (to myself) about changing the path of a git submodule

Sometimes, it’s inevitable (maybe? :) ), you’ll add a git submodule from the wrong URL… I mean, EVERYONE’S done that, right? … right? you lot over there, am I right?… SIGH.

In my case, I’m trying to make sure I always use the https URLs with my github repo, but sometimes I add the git URL instead. When you run git remote -v in the path, you’ll get something like:

origin git@github.com:your-org/your-repo.git (fetch)

instead of

origin https://github.com/your-org/your-repo (fetch)

which means that when someone tries to clone your repo, they’ll be being asked for access to their public keys for all the submodules. Not great

Anyway, it should be easy enough – git creates a .gitmodules file in the repo root, so you should just be able to edit that file, and replace the git@ with https:// and the com: with com/… but what do you do next?

Thanks to this great Stack Overflow answer, I found you can just run these two commands after you’ve made that edit:

git submodule sync ; git submodule update --init --recursive --remote

Isn’t Stack Overflow great?

Experiments with USBIP on Raspberry Pi

At home, I have a server on which I run my VMs and store my content (MP3/OGG/FLAC files I have ripped from my CDs, Photos I’ve taken, etc.) and I want to record material from FreeSat to play back at home, except the server lives in my garage, and the satellite dish feeds into my Living Room. I bought a TeVii S660 USB FreeSat decoder, and tried to figure out what to do with it.

I previously stored the server near where the feed comes in, but the running fan was a bit annoying, so it got moved… but then I started thinking – what if I ran a Raspberry Pi to consume the media there.

I tried running OpenElec, and then LibreElec, and while both would see the device, and I could even occasionally get *content* out of it, I couldn’t write quick enough to the media devices attached to the RPi to actually record what I wanted to get from it. So, I resigned myself to the fact I wouldn’t be recording any of the Christmas Films… until I stumbled over usbip.

USBIP is a service which binds USB ports to a TCP port, and then lets you consume that USB port on another machine. I’ll discuss consuming the S660’s streams in another post, but the below DOES work :)

There are some caveats here. Because I’m using a Raspberry Pi, I can’t just bung on any old distribution, so I’m a bit limited here. I prefer Debian based images, so I’m going to artificially limit myself to these for now, but if I have any significant issues with these images, then I’ll have to bail on Debian based, and use something else.

  1. If I put on stock Raspbian Jessie, I can’t use usbip, because while ships its own kernel that has the right tools built-in (the usbip_host, usbip_core etc.), it doesn’t ship the right userland tools to manipulate it.
  2. If I’m using a Raspberry Pi 3, there’s no supported version of Ubuntu Server which ships for it. I can use a flavour (e.g. Ubuntu Mate), but that uses the Raspbian kernel, which, as I mentioned before, is not shipping the right userland tools.
  3. If I use a Raspberry Pi 2, then I can use Stock Ubuntu, which ships the right tooling. Now all I need to do is find a CAT5 cable, and some way to patch it through to my network…

Getting the Host stood up

I found most of my notes on this via a wiki entry at Github but essentially, it boils down to this:

On your host machine, (where the USB port is present), run

sudo apt-get install linux-tools-generic
sudo modprobe usbip_host
sudo usbipd -D

This confirms that your host can present the USB ports over the USBIP interface (there are caveats! I’ll cover them later!!). Late edit: 2020-05-21 I never did write up those caveats, and now, two years later, I don’t recall what they were. Apologies.

You now need to find which ports you want to serve. Run this command to list the ports on your system:

lsusb

You’ll get something like this back:

Bus 001 Device 004: ID 9022:d662 TeVii Technology Ltd.
Bus 001 Device 003: ID 0424:ec00 Standard Microsystems Corp. SMSC9512/9514 Fast Ethernet Adapter
Bus 001 Device 002: ID 0424:9514 Standard Microsystems Corp. SMC9514 Hub
Bus 001 Device 001: ID 1d6b:0002 Linux Foundation 2.0 root hub

And then you need to find which port the device thinks it’s attached to. Run this to see how usbip sees the world:

usbip list -l

This will return:

- busid 1-1.1 (0424:ec00)
unknown vendor : unknown product (0424:ec00)
- busid 1-1.3 (9022:d662)
unknown vendor : unknown product (9022:d662)

We want to share the TeVii device, which has the ID 9022:d662, and we can see that this is present as busid 1-1.3, so we now we need to bind it to the usbip system, with this command:

usbip bind -b 1-1.3

OK, so now we’re presenting this to the system. Perhaps you might want to make it available on a reboot?

echo "usbip_host" >> /etc/modules

I also added @reboot /usr/bin/usbipd -D ; sleep 5 ; /usr/bin/usbip bind -b 1-1.3 to root’s crontab, but it should probably go into a systemd unit.

Getting the Guest stood up

All these actions are being performed as root. As before, let’s get the modules loaded in the kernel:

apt-get install linux-tools-generic
modprobe vhci-hcd

Now, we can try to attach the module over the wire. Let’s check what’s offered to us (this code example uses 192.0.2.1 but this would be the static IP of your host):

usbip list -r 192.0.2.1

This hands up back the list of offered appliances:

Exportable USB devices
======================
- 192.0.2.1
1-1.3: TeVii Technology Ltd. : unknown product (9022:d662)
: /sys/devices/platform/soc/3f980000.usb/usb1/1-1/1-1.3
: (Defined at Interface level) (00/00/00)
: 0 - Vendor Specific Class / unknown subclass / unknown protocol (ff/01/01)

So, now all we need to do is attach it:

usbip attach -r 192.0.2.1 -b 1-1.3

Now I can consume the service from that device in tvheadend on my server. However, again, I need to make this persistent. So, let’s make sure the module is loaded on boot.

echo 'vhci-hcd' >> /etc/modules

And, finally, we need to attach the port on boot. Again, I’m using crontab, but should probably wrap this into a systemd service.

@reboot /usr/bin/usbip attach -r 192.0.2.1 -b 1-1.3

And then I had an attached USB device across my network!

Unfortuately, the throughput was a bit too low (due to silly ethernet-over-power adaptors) to make it work the way I wanted… but theoretically, if I had proper patching done in this house, it’d be perfect! :)

Interestingly, the day I finished this post off (after it’d sat in drafts since December), I spotted that one of the articles in Linux Magazine is “USB over the network with USB/IP”. Just typical! :D

Getting a PEM file from your OpenSSH Private Key

At work, the system used to get a Windows Administrator password in our OpenStack based system (K5) is derived from the SSH Public Key recorded in the system.

It’s really easy to use, and can be found here: https://decrypt-win-passwd.uk-1.cf-app.net

There is one downside to this though – the application needs the private key to be supplied to it (it’s OK, you regularly rotate your SSH private keys… right??) in PEM format… Now, if you’re any sort of sensible SSH user, you’ve used either OpenSSH’s ssh-keygen command, or PuTTY’s puttygen command… neither of which produce a PEM format key.

So, you need to convert it. After a bit of proding and poking, I found this command

openssl rsa -outform PEM -in ~/.ssh/id_rsa -out ~/.ssh/id_rsa.pem

Like the last post, this is more for me to find stuff in the future, but… if he helps someone else, so much the better!!