I recently was in the situation where I had two github profiles (one work, one personal) that I needed to incorporate in projects.
My work account on this device is my “default”, I use it to push, pull and so on, but the occasional personal activities (like terminate-notice) all should be attributed to my personal account.
To make this happen, I used direnv which reads a .envrcfile in the parents of the directory you’re currently in. I created a directory for my personal projects – ~/Code/Personaland placed a .envrc file which contains:
This means that I have a specific SSH key just for my personal activities (~/.ssh/personal.id_ed25519) and I’ve got my email address defined as two environment variables – AUTHOR (who wrote the code) and COMMITTER (who added it to the tree) – both are required when you’re changing them like this!
Because I don’t ever want it to try to use my SSH Agent, I’ve added the fact that SSH_AUTH_SOCK should be empty.
As an aside, work also require Commit Signing, but I don’t want to use that for my personal projects right now, so I also discovered a new feature as-of 2020 – the environment variables GIT_CONFIG_KEY_x, GIT_CONFIG_VALUE_x and GIT_CONFIG_COUNT=x
By using these, you can override any system, global and repo-level configuration values, like this:
This ensures that I *will not* GPG Sign commits, tags or pushes.
If I accidentally cloned a repo into an unusual location, or on purpose need to make a directory or submodule a personal repo, I just copy the .envrc file into that part of the tree, run direnv allowand hey-presto! I’ve turned that area into a personal repo, without having to remember the .gitconfigstring to mark a new part of my tree as a personal one.
Last week I created a post talking about the new project I’ve started on Github called “Terminate-Notice” (which in hindsight isn’t very accurate – at best it’s ‘spot-instance-responses’ and at worst it’s ‘instance-rebalance-and-actions-responder’ but neither work well)… Anyway, I mentioned how I was creating RPM and DEB packages for my bash scripts and that I hadn’t put it into a repo yet.
Well, now I have, so let’s wander through how I made this work.
I have a the following files in my shell script, which are:
/usr/sbin/terminate-notice (the actual script which will run)
/usr/lib/systemd/system/terminate-notice.service (the SystemD Unit file to start and stop the script)
/usr/share/doc/terminate-notice/LICENSE (the license under which the code is released)
/etc/terminate-notice.conf.d/service.conf (the file which tells the script how to run)
These live in the root directory of my repository.
I also have the .github directory (where the things that make this script work will live), a LICENSE file (so Github knows what license it’s released under) and a README.md file (so people visiting the repo can find out about it).
A bit about Github Actions
Github Actions is a CI/CD pipeline built into Github. It responds to triggers – in our case, pushes (or uploads, in old fashioned terms) to the repository, and then runs commands or actions. The actions which will run are stored in a simple YAML formatted file, referred to as a workflow which contains some setup fields and then the “jobs” (collections of actions) themselves. The structure is as follows:
# The pretty name rendered by Actions to refer to this workflow
name: Workflow Name

# Only run this workflow when the push is an annotated tag starting v
on:
  push:
    tags:
      - 'v*'

# The workflow contains a collection of jobs, each of which has
# some actions (or "steps") to run
jobs:
  # This is used to identify the output in other jobs
  Unique_Name_For_This_Job:
    # This is the pretty name rendered in the Github UI for this job
    name: Job Name
    # This is the OS that the job will run on - typically
    # one of: ubuntu-latest, windows-latest, macos-latest
    runs-on: runner-os
    # The actual actions to perform
    steps:
      # This is a YAML list, so note where the hyphens (-) are
        # The pretty name of this step
      - name: Checkout Code
        # The name of the public collection of actions to perform
        uses: actions/checkout@v3
        # Any variables to pass into this action module
        with:
          path: "REPO"

      # This action will run a shell command
      - name: Run a command
        run: echo "Hello World"
Build a DEB package
At the simplest point, creating a DEB package is;
Create the directory structure (as above) that will unpack from your package file and put the files in the right places.
Create a DEBIAN/control file which provides enough details for your package manager to handle it.
Run dpkg-deb --build ${PATH_TO_SOURCE} ${OUTPUT_FILENAME}
Assuming the DEBIAN/control file was static and also lived in the repo, and I were just releasing the DEB file, then I could make the above work with the following steps:
name: Create the DEB

permissions:
  contents: write

on:
  push:
    tags:
      - 'v*'

jobs:
  Create_Packages:
    name: Create Package
    runs-on: ubuntu-latest
    steps:
      - name: Checkout code
        uses: actions/checkout@v3
        with:
          path: "REPO"

      - name: Copy script files around to stop .github from being added to the package then build the package
        run: |
          mkdir PKG_SOURCE
          cp -Rf REPO/usr REPO/etc REPO/DEBIAN PKG_SOURCE
          dpkg-deb --build PKG_SOURCE package.deb

      - name: Release the Package
        uses: softprops/action-gh-release@v1
        with:
          files: package.deb
But no, I had to get complicated and ALSO build an RPM file… and put some dynamic stuff in there.
Build an RPM file
RPMs are a little more complex, but not by much. RPM takes a spec file, which starts off looking like the DEBIAN/control file, and adds some “install” instructions. Let’s take a look at that spec file:
The “Name”, “Version”, “Release” and “BuildArch” values in the top of that file define what the resulting filename is (NAME_VERSION-RELEASE.BUILDARCH.rpm).
Notice that there are some “macros” which replace /etc with %{_sysconfdir}, /usr/sbin with %{_sbindir} and so on, which means that, theoretically, this RPM could be installed in an esoteric tree… but most people won’t bother.
The one quirk with this is that %{name} bit there – RPM files need to have all these sources in a directory named after the package name, which in turn is stored in a directory called SOURCES (so SOURCES/my-package for example), and then it copies the files to wherever they need to go. I’ve listed etc/config/file and usr/sbin/script but these could just have easily been file and script for all that the spec file cares.
Once you have the spec file, you run sudo rpmbuild --define "_topdir $(pwd)" -bb file.spec to build the RPM.
So, again, how would that work from a workflow YAML file perspective, assuming a static spec and source tree as described above?
name: Create the DEB

permissions:
  contents: write

on:
  push:
    tags:
      - 'v*'

jobs:
  Create_Packages:
    name: Create Package
    runs-on: ubuntu-latest
    steps:
      - name: Checkout code
        uses: actions/checkout@v3
        with:
          path: "REPO"

      - name: Copy script files around to stop .github from being added to the package then build the package
        run: |
          mkdir -p SOURCES/my-package-name
          cp -Rf REPO/usr REPO/etc SOURCES/my-package-name
          sudo rpmbuild --define "_topdir $(pwd)" -bb my-package-name.spec

      - name: Release the Package
        uses: softprops/action-gh-release@v1
        with:
          files: RPMS/my-package-name_0.0.1-1.noarch.rpm
But again, I want to be fancy (and I want to make resulting packages as simple to repeat as possible)!
So, this is my release.yml as of today:
name: Run the Release

permissions:
  contents: write

on:
  push:
    tags:
      - 'v*'

jobs:
  Create_Packages:
    name: Create Packages
    runs-on: ubuntu-latest
    steps:
      - name: Checkout code
        uses: actions/checkout@v3
        with:
          path: "REPO"

      - name: Calculate some variables
        run: |
          (
            echo "GITHUB_REPO_NAME=$(echo "${GITHUB_REPOSITORY}" | cut -d/ -f2)"
            echo "VERSION=$(echo "${GITHUB_REF_NAME}" | sed -e 's/^v//')"
            echo "DESCRIPTION=A script which polls the AWS Metadata Service looking for an 'instance action', and triggers scripts in response to the termination notice."
            echo "DEB_ARCHITECTURE=${ARCHITECTURE:-all}"
            echo "RPM_ARCHITECTURE=${ARCHITECTURE:-noarch}"
            echo "RELEASE=1"
            cd REPO
            echo "FIRST_YEAR=$(git log $(git rev-list --max-parents=0 HEAD) --date="format:%Y" --format="format:%ad")"
            echo "THIS_COMMIT_YEAR=$(git log HEAD -n1 --date="format:%Y" --format="format:%ad")"
            echo "THIS_COMMIT_DATE=$(git log HEAD -n1 --format="format:%as")"
            if [ "$FIRST_YEAR" = "$THIS_COMMIT_YEAR" ]
            then
              echo "YEAR_RANGE=$FIRST_YEAR"
            else
              echo "YEAR_RANGE=${FIRST_YEAR}-${THIS_COMMIT_YEAR}"
            fi
            cd ..
          ) >> $GITHUB_ENV

      - name: Make Directory Structure
        run: mkdir -p "SOURCES/${GITHUB_REPO_NAME}" SPECS release

      - name: Copy script files into SOURCES
        run: |
          cp -Rf REPO/[a-z]* "SOURCES/${GITHUB_REPO_NAME}"
          cp REPO/LICENSE REPO/README.md "SOURCES/${GITHUB_REPO_NAME}/usr/share/doc/${GITHUB_REPO_NAME}/"
          if grep -lr '#TAG#' SOURCES
          then
            sed -i -e "s/#TAG#/${VERSION}/" $(grep -lr '#TAG#' SOURCES)
          fi
          if grep -lr '#TAG_DATE#' SOURCES
          then
            sed -i -e "s/#TAG_DATE#/${THIS_COMMIT_YEAR}/" $(grep -lr '#TAG_DATE#' SOURCES)
          fi
          if grep -lr '#DATE_RANGE#' SOURCES
          then
            sed -i -e "s/#DATE_RANGE#/${YEAR_RANGE}/" $(grep -lr '#DATE_RANGE#' SOURCES)
          fi
          if grep -lr '#MAINTAINER#' SOURCES
          then
            sed -i -e "s/#MAINTAINER#/${MAINTAINER:-Jon Spriggs <jon@sprig.gs>}/" $(grep -lr '#MAINTAINER#' SOURCES)
          fi

      - name: Create Control File
        # Fields from https://www.debian.org/doc/debian-policy/ch-controlfields.html#binary-package-control-files-debian-control
        run: |
          mkdir -p SOURCES/${GITHUB_REPO_NAME}/DEBIAN
          (
            echo "Package:      ${GITHUB_REPO_NAME}"
            echo "Version:      ${VERSION}"
            echo "Section:      ${SECTION:-misc}"
            echo "Priority:     ${PRIORITY:-optional}"
            echo "Architecture: ${DEB_ARCHITECTURE}"
            if [ -n "${DEPENDS}" ]
            then
              echo "Depends: ${DEPENDS}"
            fi
            echo "Maintainer: ${MAINTAINER:-Jon Spriggs <jon@sprig.gs>}"
            echo "Description: ${DESCRIPTION}"
            if [ -n "${HOMEPAGE}" ]
            then
              echo "Homepage: ${HOMEPAGE}"
            fi
          ) | tee SOURCES/${GITHUB_REPO_NAME}/DEBIAN/control
          (
            echo "Files:"
            echo " *"
            echo "Copyright: ${YEAR_RANGE} ${MAINTAINER:-Jon Spriggs <jon@sprig.gs>}"
            echo "License: MIT"
            echo ""
            echo "License: MIT"
            sed 's/^/ /' "SOURCES/${GITHUB_REPO_NAME}/usr/share/doc/${GITHUB_REPO_NAME}/LICENSE"
          ) | tee SOURCES/${GITHUB_REPO_NAME}/DEBIAN/copyright

      - name: Create Spec File
        run: PATH="REPO/.github/scripts:${PATH}" create_spec_file.sh

      - name: Build DEB Package
        run: dpkg-deb --build SOURCES/${GITHUB_REPO_NAME} "${{ env.GITHUB_REPO_NAME }}_${{ env.VERSION }}_${{ env.DEB_ARCHITECTURE }}.deb"

      - name: Build RPM Package
        run: sudo rpmbuild --define "_topdir $(pwd)" -bb SPECS/${GITHUB_REPO_NAME}.spec

      - name: Confirm builds complete
        run: sudo install -m 644 -o runner -g runner $(find . -type f -name *.deb && find . -type f -name *.rpm) release/

      - name: Release
        uses: softprops/action-gh-release@v1
        with:
          files: release/*
So this means I can, within reason, drop this workflow (plus a couple of other scripts to generate the slightly more complex RPM file – see the other files in that directory structure) into another package to release it.
OH WAIT, I DID! (for the terminate-notice-slack repo, for example!) All I actually needed to do there was to change the description line, and off it went!
So, this is all well and good, but how can I distribute these? Enter Repositories.
Making a Repository
Honestly, I took most of the work here from two fantastic blog posts for creating an RPM repo and a DEB repo.
First you need to create a GPG key.
To do this, I created the following pgp-key.batch file outside my repositories tree
%echo Generating an example PGP key
Key-Type: RSA
Key-Length: 4096
Name-Real: YOUR_ORG_NAME
Name-Email: your_org_name@users.noreply.github.com
Expire-Date: 0
%no-ask-passphrase
%no-protection
%commit
Store the public.asc file to one side (you’ll need it later) and keep the private.asc safe because we need to put that into Github.
Creating Github Pages
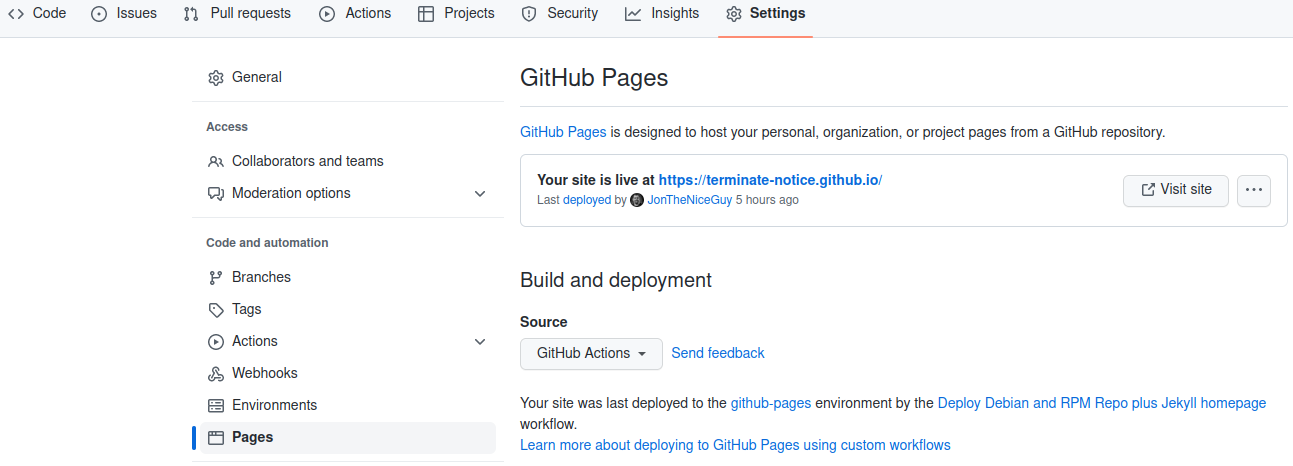
Create a new Git repository in your organisation called your-org.github.io. This marks the repository as being a Github Pages repository. Just to make that more explicit, in the settings for the repository, go to the pages section. (Note that yes, the text around this may differ, but are accurate as of 2023-03-28 in EN-GB localisation.)
Under “Source” select “GitHub Actions”.
Clone this repository to your local machine, and copy public.asc into the root of the tree with a sensible name, ending .asc.
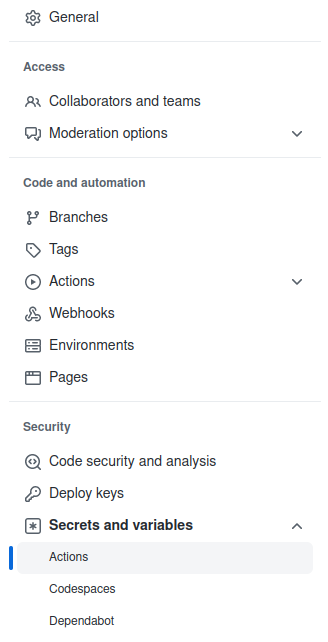
In the Github settings, find “Secrets and variables” under “Security” and pick “Actions”.
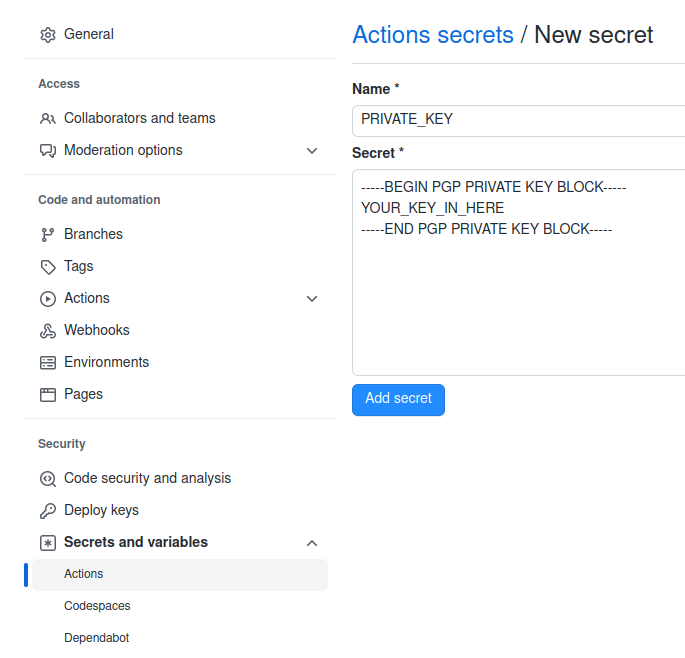
Select “New repository secret” and call it “PRIVATE_KEY”.
Now you can use this to sign things (and you will sign *SO MUCH* stuff)
Building the HTML front to your repo (I’m using Jekyll)
I’ve elected to use Jekyll because I know it, and it’s quite easy, but you should pick what works for you. My workflow for deploying these repos into the website rely on Jekyll because Github built that integration, but you’ll likely find other tools for things like Eleventy or Hugo.
Put a file called _config.yml into the root directory, and fill it with relevant content:
title: your-org
email: email_address@example.org
description: >-
  This project does stuff.
baseurl: ""
url: "https://your-org.github.io"
github_username: your-org

# Build settings
theme: minima
plugins:
  - jekyll-feed
exclude:
  - tools/
  - doc/
Naturally, make “your-org” “email_address@example.org” and the descriptions more relevant to your environment.
Next, create an index.md file with whatever is relevant for your org, but it must start with something like:
---
layout: home
title: YOUR-ORG Website
---
Here is the content for the front page.
Building the repo behind your static content
We’re back to working with Github Actions workflow files, so let’s pop that open.
I’ve basically changed the “stock” Jekyll static site Github Actions file and added every step that starts [REPO] to make the repository stuff fit in around the steps that start [JEKYLL] which build and deploy the Jekyll based site.
The key part to all this though is the step Build DEB and RPM repos which calls a script that downloads all the RPM and DEB files from the various other repository build stages and does some actions to them. Now yes, I could have put all of this into the workflow.yml file, but I think it would have made it all a bit more confusing! So, let’s work through those steps!
Making an RPM Repo
To build a RPM repo you get and sign each of the RPM packages you want to offer. You do this with this command:
Then, once you have all your RPM files signed, you then run a command called createrepo_c (available in Debian archives – Github Actions doesn’t have a RedHat based distro available at this time, so I didn’t look for the RPM equivalent). This creates the repository metadata, and finally you sign that file, like this:
gpg --detach-sign --armor repodata/repomd.xml
Making a DEB Repo
To build a DEB repo you get each of the DEB packages you want to offer in a directory called pool/main (you can also call “main” something else – for example “contrib”, “extras” and so on).
Once you have all your files, you create another directory called dists/stable/main/binary-all into which we’ll run a command dpkg-scanpackages to create the list of the available packages. Yes, “main” could also be called “contrib”, “extras” and “stable” could be called “testing” or “preprod” or the name of your software release (like “jaunty”, “focal” or “warty”). The “all” after the word “binary” is the architecture in question.
dpkg-scanpackages creates an index of the packages in that directory including the version number, maintainer and the cryptographic hashes of the DEB files.
We zip (using gzip and bzip2) the Packages file it creates to improve the download speeds of these files, and then make a Release file. This in turn has the cryptographic hashes of each of the Packages and zipped Packages files, which in turn is then signed with GPG.
Ugh, that was MESSY
Making the repository available to your distributions
RPM repos have it quite easy here – there’s a simple file, that looks like this:
The distribution user simply downloads this file, puts it into /etc/yum.sources.d/org-name.repo and now all the packages are available for download. Woohoo!
DEB repos are a little harder.
First, download the public key – https://org-name.github.io/public.asc and put it in /etc/apt/keyrings/org-name.asc. Next, create file in /etc/apt/sources.list.d/org-name.list with this line in:
deb [arch=all signed-by=/etc/apt/keyrings/org-name.asc] https://org-name.github.io/deb stable main
And now they can install whatever packages they want too!
Doing this the simple way
Of course, this is all well-and-good, but if you’ve got a simple script you want to package, please don’t hesitate to use the .github directory I’m using for terminate-notice, which is available in the -skeleton repo and then to make it into a repo, you can reuse the .github directory in the terminate-notice.github.io repo to start your adventure.
During some debugging of an issue with our AWS Spot Instances at work, a colleague noticed that we weren’t responding to the Instance Actions that AWS sends when it’s due to shut down a spot instance.
I’ve been working on my Decision Records open source project for a few months now, and I’ve finally settled on the cross-platform language Rust to create my script. As a result, I’ve got a build process which lets me build for Windows, Mac OS and Linux. I’m currently building a single, unsigned binary for each platform, and I wanted to make it so that Github Actions would build and release these three files for me. Most of the guidance which is currently out there points to some unmaintained actions, originally released by GitHub… but now they point to a 3rd party “release” action as their recommended alternative, so I thought I’d explain how I’m using it to release on several platforms at once.
Although I can go into detail about the release file I’m using for Rust-Decision-Records, I’m instead going to provide a much more simplistic view, based on my (finally working) initial test run.
GitHub Actions
GitHub have a built-in Continuous Integration, Continuous Deployment/Delivery (CI/CD) system, called GitHub Actions. You can have several activities it performs, and these are executed by way of instructions in .github/workflows/<somefile>.yml. I’ll be using .github/workflows/build.yml in this example. If you have multiple GitHub Action files you wanted to invoke (perhaps around issue management, unit testing and so on), these can be stored in separate .yml files.
The build.yml actions file will perform several tasks, separated out into two separate activities, a “Create Release” stage, and a “Build Release” stage. The Build stage will use a “Matrix” to execute builds on the three platforms at the same time – Linux AMD64, Windows and Mac OS.
The actual build steps? In this case, it’ll just be writing a single-line text file, stating the release it’s using.
So, let’s get started.
Create Release
A GitHub Release is typically linked to a specific “tagged” commit. To trigger the release feature, every time a commit is tagged with a string starting “v” (like v1.0.0), this will trigger the release process. So, let’s add those lines to the top of the file:
name: Create Release

on:
  push:
    tags:
      - 'v*'
You could just as easily use the filter pattern ‘v[0-9]+.[0-9]+.[0-9]+’ if you wanted to use proper Semantic Versioning, but this is a simple demo, right? 😉
Next we need the actual action we want to start with. This is at the same level as the “on” and “name” tags in that YML file, like this:
So, this is the actual “create release” job. I don’t think it matters what OS it runs on, but ubuntu-latest is the one I’ve seen used most often.
In this, you instruct it to create a simple release, using the text in the annotated tag you pushed as the release notes.
This is using a third-party release action, softprops/action-gh-release, which has not been vetted by me, but is explicitly linked from GitHub’s own action.
If you check the release at this point, (that is, without any other code working) you’d get just the source code as a zip and a .tgz file. BUT WE WANT MORE! So let’s build this mutha!
Build Release
Like with the create_release job, we have a few fields of instructions before we get to the actual actions it’ll take. Let’s have a look at them first. These instructions are at the same level as the jobs:\n create_release: line in the previous block, and I’ll have the entire file listed below.
So this section gives this job an ID (build_release) and a name (Build Release), so far, so exactly the same as the previous block. Next we say “You need to have finished the previous action (create_release) before proceeding” with the needs: create_release line.
But the real sting here is the strategy:\n matrix: block. This says “run these activities with several runners” (in this case, an unspecified Ubuntu, Mac OS and Windows release (each just “latest”). The include block asks the runners to add some template variables to the tasks we’re about to run – specifically release_suffix.
The last line in this snippet asks the runner to interpret the templated value matrix.os as the OS to use for this run.
Let’s move on to the build steps.
    steps:
      - name: Checkout code
        uses: actions/checkout@v2

      - name: Run Linux Build
        if: matrix.os == 'ubuntu-latest'
        run: echo "Ubuntu Latest" > release_ubuntu

      - name: Run Mac Build
        if: matrix.os == 'macos-latest'
        run: echo "MacOS Latest" > release_mac

      - name: Run Windows Build
        if: matrix.os == 'windows-latest'
        run: echo "Windows Latest" > release_windows
This checks out the source code on each runner, and then has a conditional build statement, based on the OS you’re using for each runner.
It should be fairly simple to see how you could build this out to be much more complex.
The final step in the matrix activity is to add the “built” file to the release. For this we use the softprops release action again.
As previously mentioned, I use Ansible a lot inside Virtual machines orchestrated with Vagrant. Today’s brief tip is how to make Vagrant install the absolutely latest version of Ansible on Ubuntu boxes with Pip.
Here’s your Vagrantfile
Vagrant.configure("2") do |config|
  config.vm.box = "ubuntu/focal64"
  config.vm.provision "ansible_local", run: "always" do |ansible|
    ansible.playbook         = "setup.yml"
    ansible.playbook_command = "sudo ansible-playbook"
    ansible.install_mode     = "pip"
    ansible.pip_install_cmd  = "(until sudo apt update ; do sleep 1 ; done && sudo apt install -y python3-pip && sudo rm -f /usr/bin/pip && sudo ln -s /usr/bin/pip3 /usr/bin/pip && sudo -H pip install --upgrade pip) 2>&1 | tee -a /var/log/vagrant-init"
  end
end
“But, that pip_install_cmd block is huge”, I hear you cry!
Well, yes, but let’s split that out into a slightly more readable code block! (Yes, I’ve removed the “&&” for clarity sake – it just means “only execute the next command if this one worked”)
(
  # Wait until we get the apt "package lock" released
  until sudo apt update
  do
    # By sleeping for 1 second increments until it works
    sleep 1
  done

  # Then install python3-pip
  sudo apt install -y python3-pip

  # Just in case python2-pip is installed, delete it
  sudo rm -f /usr/bin/pip

  # And symbolically link pip3 to pip
  sudo ln -s /usr/bin/pip3 /usr/bin/pip

  # And then do a pip self-upgrade
  sudo -H pip install --upgrade pip

# And output this to the end of the file /var/log/vagrant-init, including any error messages
) 2>&1 | tee -a /var/log/vagrant-init
What does this actually do? Well, pip is the python package manager, so we’re asking for the latest packaged version to be installed (it often isn’t particularly with older releases of, well, frankly any Linux distribution) – this is the “pip_install_cmd” block. Then, once pip is installed, it’ll run “pip install ansible” – which will give it the latest version available to Pip, and then when that’s all done, it’ll run “sudo ansible-playbook /vagrant/setup.yml”
In my last post in this series I mentioned that I’d got my Raspberry Pi Zero W to act as a USB Ethernet adaptor via libComposite, and that I was using DNSMasq to provide a DHCP service to the host computer (the one you plug the Pi into). In this part, I’m going to extend what local services I could provide on this device, and start to use this as a router.
Here’s what you missed last time… When you plug the RPi in (to receive power on the data line), it powers up the RPi Zero, and uses a kernel module called “libComposite” to turn the USB interface into an Ethernet adaptor. Because of how Windows and non-Windows devices handle network interfaces, we use two features of libComposite to create an ECM/CDC interface and a RNDIS interface, called usb0 and usb1, and whichever one of these two is natively supported in the OS, that’s which interface comes up. As a result, we can then use DNSMasq to “advertise” a DHCP address for each interface, and use that to advertise services on, like an SSH server.
By making this device into a router, we can use it to access the network, without using the in-built network adaptor (which might be useful if your in-built WiFi adaptors isn’t detected under Linux or Windows without a driver), or to protect your computer from malware (by adding a second firewall that doesn’t share the same network stack as it’s host), or perhaps to ensure that your traffic is sent over a VPN tunnel.
Yesterday I was struggling a bit with a bash script I was writing. I needed to stop it from running flat out through every loop, and I wanted to see what certain values were at key points in the script.
Yes, I know I could use “read” to pause the script and “echo” to print values, but that leaves a lot of mess that I need to clean up afterwards… so I went looking for something else I could try.
You can have extensive debug statements, which are enabled with a --debug flag or environment variable… but again, messy.
You can run bash -x ./myscript.sh – and, indeed, I do frequently do that… but that shows you the commands which were run at each point, not what the outcome is of each of those commands.
If my problem had been a syntax one, I could have installed shellcheck, which is basically a linter for Bash and other shell scripting languages, but no, I needed more detail about what was happening during the processing.
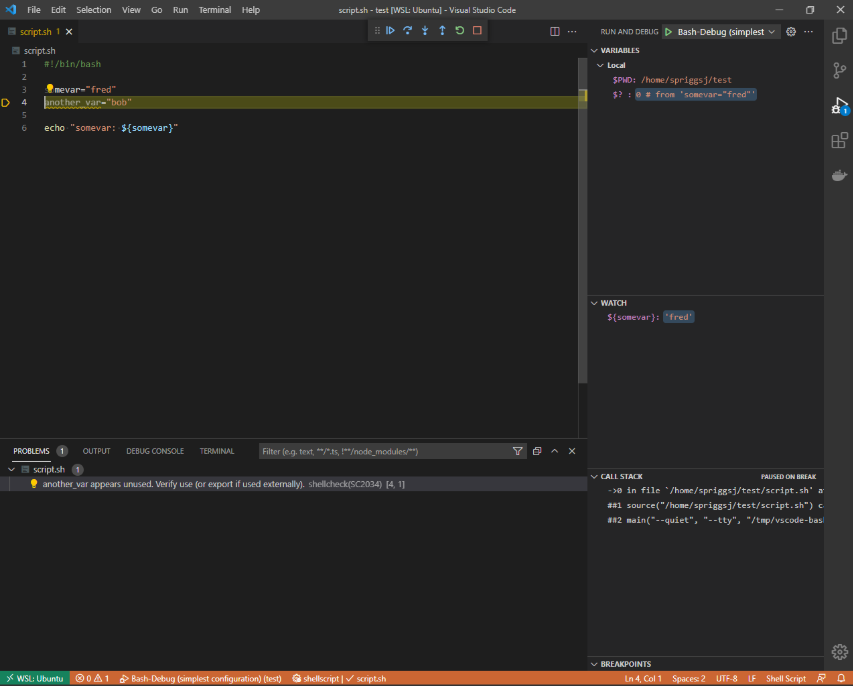
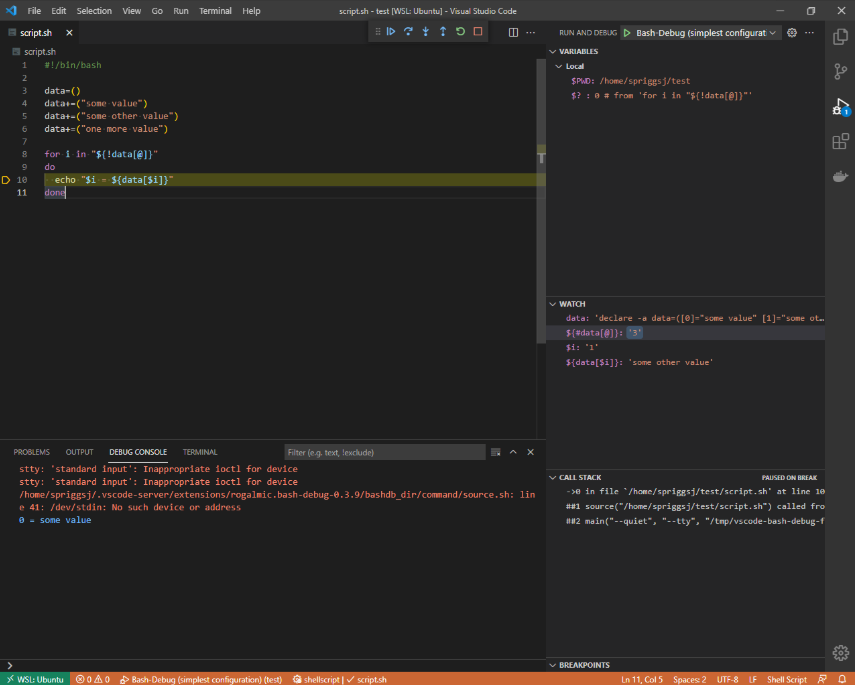
Instead, I wanted something like xdebug (from PHP)… and I found Bash Debug for VSCode. This doesn’t even need you to install any scripts or services on the target machine – it’s interactive, and has a “watch” section, where you either highlight and right-click a variable expression (like $somevar or ${somevar}) to see when it changes. You can see where in the “callstack” you are and see what values are registered by that script.
Shellcheck shows me problems in my code…But Bash Debug helps me to find out what values are at specific points in the code.
A few months ago, I was working on a personal project that needed a separate, offline linux environment. I tried various different schemes to run what I was doing in the confines of my laptop and I couldn’t make what I was working on actually achieve my goals. So… I bought a Raspberry Pi Zero W and a “Solderless Zero Dongle“, with the intention of running Docker containers on it… unfortunately, while Docker runs on a Pi Zero, it’s really hard to find base images for the ARMv6/armhf platform that the Pi Zero W… so I put it back in the drawer, and left it there.
Roll forwards a month or so, and I was doing some experiments with Nebula, and only had an old Chromebook to test it on… except, I couldn’t install the Nebula client for Linux on there, and the Android client wouldn’t give me some features I wanted… so I broke out that old Pi Zero W again…
Now, while the tests with Nebula I was working towards will be documented later, I found that a lot of the documentation about using a Raspberry Pi Zero as a USB gadget were rough and unexplained. So, this post breaks down much of the content of what I found, what I tried, and what did and didn’t work.
Late Edit 2021-06-04: I spotted some typos around providing specific DHCP options for interfaces, based on work I’m doing elsewhere with this script. I’ve updated these values accordingly. I’ve also created a specific branch for this revision.
Late Edit 2021-06-06: I’ve noticed this document doesn’t cover IPv6 at all right now. I started to perform some tweaks to cover IPv6, but as my ISP has decided not to bother with IPv6, and won’t support Hurricane Electric‘s Tunnelbroker system, I can’t test any of it, without building out an IPv6 test environment… maybe soon, eh?
I tend to write long and overly complicated set_fact statements in Ansible, ALL THE DAMN TIME. I write stuff like this:
rulebase: |
  {
    {% for var in vars | dict2items %}
      {% if var.key | regex_search(regex_rulebase_match) | type_debug != "NoneType"
        and (
          var.value | type_debug == "dict"
          or var.value | type_debug == "AnsibleMapping"
        ) %}
        {% for item in var.value | dict2items %}
          {% if item.key | regex_search(regex_rulebase_match) | type_debug != "NoneType"
            and (
              item.value | type_debug == "dict"
              or item.value | type_debug == "AnsibleMapping"
            ) %}
            "{{ var.key | regex_replace(regex_rulebase_match, '\2') }}{{ item.key | regex_replace(regex_rulebase_match, '\2') }}": {
              {# This block is used for rulegroup level options #}
              {% for key in ['log_from_start', 'log', 'status', 'nat', 'natpool', 'schedule', 'ips_enable', 'ssl_ssh_profile', 'ips_sensor'] %}
                {% if var.value[key] is defined and rule.value[key] is not defined %}
                  {% if var.value[key] | type_debug in ['string', 'AnsibleUnicode'] %}
                    "{{ key }}": "{{ var.value[key] }}",
                  {% else %}
                    "{{ key }}": {{ var.value[key] }},
                  {% endif %}
                {% endif %}
              {% endfor %}
              {% for rule in item.value | dict2items %}
                {% if rule.key in ['sources', 'destinations', 'services', 'src_internet_service', 'dst_internet_service'] and rule.value | type_debug not in ['list', 'AnsibleSequence'] %}
                  "{{ rule.key }}": ["{{ rule.value }}"],
                {% elif rule.value | type_debug in ['string', 'AnsibleUnicode'] %}
                  "{{ rule.key }}": "{{ rule.value }}",
                {% else %}
                  "{{ rule.key }}": {{ rule.value }},
                {% endif %}
              {% endfor %}
            },
          {% endif %}
        {% endfor %}
      {% endif %}
    {% endfor %}
  }
Now, if you’re writing set_fact or vars like this a lot, what you tend to end up with is the dreaded dict2items requires a dictionary, got instead. which basically means “Hah! You wrote a giant blob of what you thought was JSON, but didn’t render right, so we cast it to a string for you!”
The way I usually write my playbooks, I’ll do something with this set_fact at line, let’s say, 10, and then use it at line, let’s say, 500… So, I don’t know what the bloomin’ thing looks like then!
- name: Type Check - is_a_string
  assert:
    quiet: yes
    that:
    - vars[this_key] is not boolean
    - vars[this_key] is not number
    - vars[this_key] | int | string != vars[this_key] | string
    - vars[this_key] | float | string != vars[this_key] | string
    - vars[this_key] is string
    - vars[this_key] is not mapping
    - vars[this_key] is iterable
    success_msg: "{{ this_key }} is a string"
    fail_msg: |-
      {{ this_key }} should be a string, and is instead
      {%- if vars[this_key] is not defined %} undefined
      {%- else %} {{ vars[this_key] is boolean | ternary(
        'a boolean',
        (vars[this_key] | int | string == vars[this_key] | string) | ternary(
          'an integer',
          (vars[this_key] | float | string == vars[this_key] | string) | ternary(
            'a float',
            vars[this_key] is string | ternary(
              'a string',
              vars[this_key] is mapping | ternary(
                'a dict',
                vars[this_key] is iterable | ternary(
                  'a list',
                  'unknown (' ~ vars[this_key] | type_debug ~ ')'
                )
              )
            )
          )
        )
      )}}{% endif %} - {{ vars[this_key] | default('unset') }}
I hope this helps you, bold traveller with complex jinja2 templating requirements!
(Oh, and if you get “template error while templating string: no test named 'boolean'“, you’re probably running Ansible which you installed using apt from Ubuntu Universe, version 2.9.6+dfsg-1 [or, at least I was!] – to fix this, use pip to install a more recent version – preferably using virtualenv first!)
I recently got a new laptop, and for various reasons, I’m going to be primarily running Windows on that laptop. However, I still like having a working SSH server, running in the context of my Windows Subsystem for Linux (WSL) environment.
Initially, trying to run service ssh start failed with an error, because you need to re-execute the ssh configuration steps which are missed in a WSL environment. To fix that, run sudo apt install --reinstall openssh-server.
Once you know your service runs OK, you start digging around to find out how to start it on boot, and you’ll see lots of people saying things like “Just run a shell script that starts your first service, and then another shell script for the next service.”
Well, the frustration for me is that Linux already has this capability – the current popular version is called SystemD, but a slightly older variant is still knocking around in modern linux distributions, and it’s called SystemV Init, often referred to as just “sysv” or “init.d”.
The way that those services work is that you have an “init” file in /etc/init.d and then those files have a symbolic link into a “runlevel” directory, for example /etc/rc3.d. Each symbolic link is named S##service or K##service, where the ## represents the order in which it’s to be launched. The SSH Daemon, for example, that I want to run is created in there as /etc/rc3.d/S01ssh.
So, how do I make this work in the grander scheme of WSL? I can’t use SystemD, where I could say systemctl enable --now ssh, instead I need to add a (yes, I know) shell script, which looks in my desired runlevel directory. Runlevel 3 is the level at which network services have started, hence using that one. If I was trying to set up a graphical desktop, I’d instead be looking to use Runlevel 5, but the X Windows system isn’t ported to Windows like that yet… Anyway.
Because the rc#.d directory already has this structure for ordering and naming services to load, I can just step over this directory looking for files which match or do not match the naming convention, and I do that with this script:
#! /bin/bash
function run_rc() {
  base="$(basename "$1")"
  if [[ ${base:0:1} == "S" ]]
  then
    "$1" start
  else
    "$1" stop
  fi
}

if [ "$1" != "" ] && [ -e "$1" ]
then
  run_rc "$1"
else
  rc=3
  if [ "$1" != "" ] && [ -e "/etc/rc${$1}.d/" ]
  then
    rc="$1"
  fi
  for digit1 in {0..9}
  do
    for digit2 in {0..9}
    do
      find "/etc/rc${rc}.d/" -name "[SK]${digit1}${digit2}*" -exec "$0" '{}' \; 2>/dev/null
    done
  done
fi
I’ve put this script in /opt/wsl_init.sh
This does a bit of trickery, but basically runs the bottom block first. It loops over the digits 0 to 9 twice (giving you 00, 01, 02 and so on up to 99) and looks in /etc/rc3.d for any file containing the filename starting S or K and then with the two digits you’ve looped to by that point. Finally, it runs itself again, passing the name of the file it just found, and this is where the top block comes in.
In the top block we look at the “basename” – the part of the path supplied, without any prefixed directories attached, and then extract just the first character (that’s the ${base:0:1} part) to see whether it’s an “S” or anything else. If it’s an S (which everything there is likely to be), it executes the task like this: /etc/rc3.d/S01ssh start and this works because it’s how that script is designed! You can run one of the following instances of this command: service ssh start, /etc/init.d/ssh start or /etc/rc3.d/S01ssh start. There are other options, notably “stop” or “status”, but these aren’t really useful here.
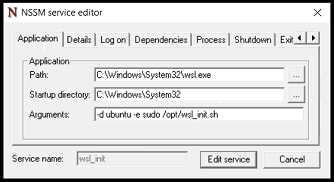
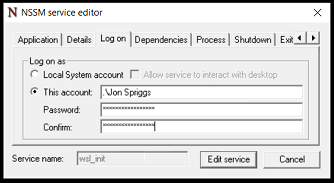
Now, how do we make Windows execute this on boot? I’m using NSSM, the “Non-sucking service manager” to add a line to the Windows System services. I placed the NSSM executable in C:\Program Files\nssm\nssm.exe, and then from a command line, ran C:\Program Files\nssm\nssm.exe install WSL_Init.
I configured it with the Application Path: C:\Windows\System32\wsl.exe and the Arguments: -d ubuntu -e sudo /opt/wsl_init.sh. Note that this only works because I’ve also got Sudo setup to execute this command without prompting for a password.
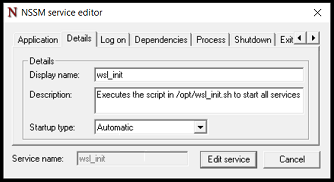
Here I invoke C:\Windows\System32\wsl.exe -d ubuntu -e sudo /opt/wsl_init.shI define the name of the service, as Services will see it, and also the description of the service.I put in MY username and My Windows Password here, otherwise I’m not running WSL in my user context, but another one.
And then I rebooted. SSH was running as I needed it.