"Raven" by "Jim Bahn" on Flickr

Sending SSH login notifications to Matrix via Huginn using Webhooks

On the Self Hosted Podcast’s Discord Server, someone posted a link to the following blog post, which I read and found really interesting…: https://blog.hay-kot.dev/ssh-notifications-in-home-assistant/

You see, the key part of that post wasn’t that they were posting to Home Assistant when they were logging in, but instead that they were triggering a webhook on login. And I can do stuff with Webhooks.

What’s a webhook?

A webhook is a callable URL, either with a “secret” embedded in the URL or some authentication header that lets you trigger an action of some sort. I first came across these with Github, but they’re pretty common now. Services will offer these as a way to get an action in one service to do something in another. A fairly common webhook for those getting started with these sorts of things is where creating a pull request (PR) on a Github repository will trigger a message on something like Slack to say the PR is there.

Well, that’s all well and good, but what does Matrix or Huginn have to do with things?

Matrix is a decentralized, end to end encrypted, eventually consistent database system, that just happens to be used extensively as a chat network. In particular, it’s used by Open Source projects, like KDE and Mozilla, and by Government bodies, like the whole French goverment (lead by DINSIC) the German Bundeswehr (Unified Armed Forces) department.

Matrix has a reference client, Element, that was previously called “Riot”, and in 2018 I produced a YouTube video showing how to bridge various alternative messaging systems into Matrix.

Huginn describes itself as:

Huginn is a system for building agents that perform automated tasks for you online. They can read the web, watch for events, and take actions on your behalf. Huginn’s Agents create and consume events, propagating them along a directed graph. Think of it as a hackable version of IFTTT or Zapier on your own server. You always know who has your data. You do.

Huginn Readme

With Huginn, I can create “agents”, including a “receive webhook agent” that will take the content I send, and tweak it to do something else. In the past I used IFTTT to do some fun things, like making this blog work, but now I use Huginn to post Tweets when I post to this blog.

So that I knew that Huginn was posting my twitter posts, I created a Matrix room called “Huginn Alerts” and used the Matrix account I created for the video I mentioned before to send me messages that it had made the posts I wanted. I followed the guidance from this page to do it: https://drwho.virtadpt.net/archive/2020-02-12/integrating-huginn-with-a-matrix-server/

Enough already. Just show me what you did.

In Element.io

  1. Get an access token for the Matrix account you want to post with.

Log into the web interface at https://app.element.io and go to your settings

Click where it says your handle, then click on where it says “All Settings”.

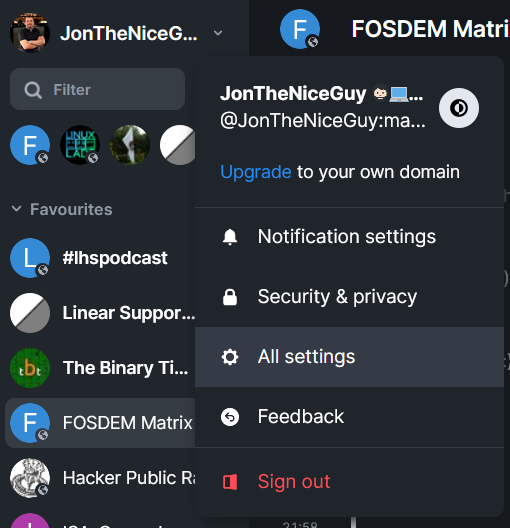
Then click on “Help & About” and scroll to the bottom of that page, where it says “Advanced”

Get to the “Advanced” part of the settings, under “Help & About” to get your access token.

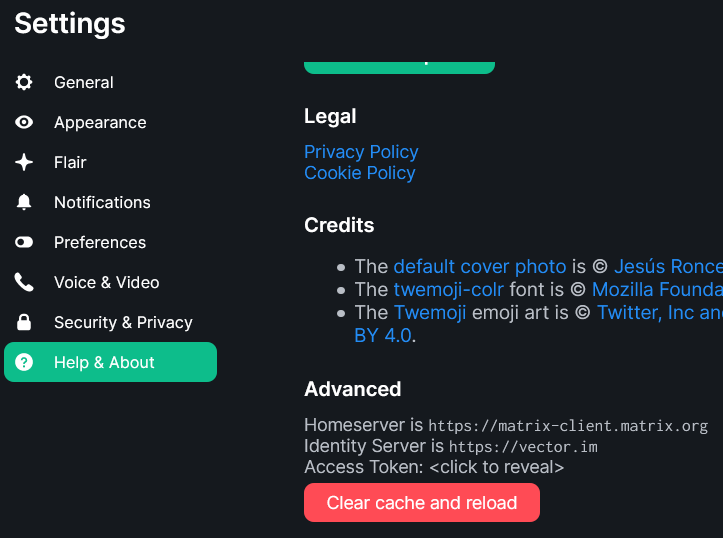
Click where it says “Access Token: <click to reveal>” (strangely, I’m not posting that πŸ˜‰)

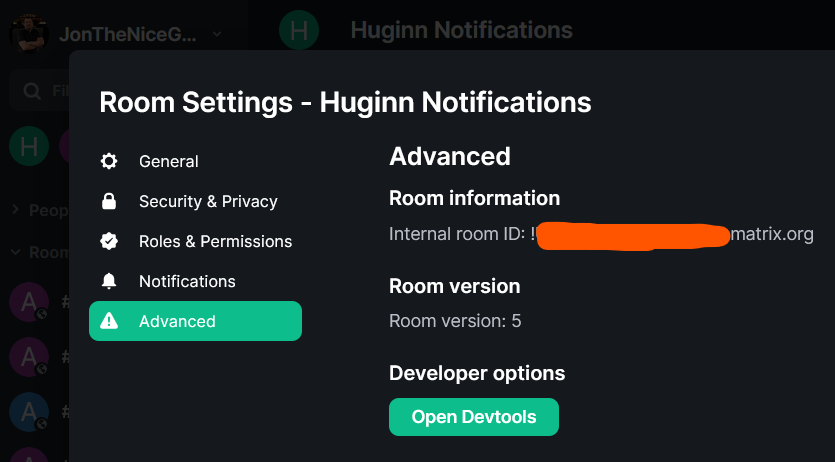
  1. Click on the room, then click on it’s name at the top to open the settings, then click on “Advanced” to get the “Internal room ID”
Gettng the Room ID. Note, it starts with an exclamation mark (!) and ends :<servername>.

In Huginn

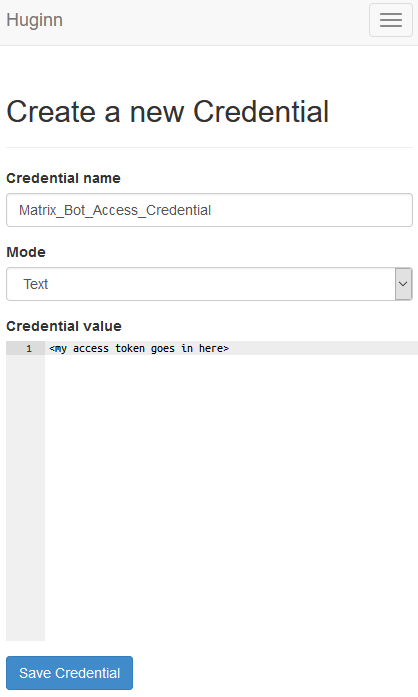
  1. Go to the “Credentials” tab, and click on “New Credential”. Give the credential a name (perhaps “Matrix Bot Access Token”), leave it as text and put your access token in here.
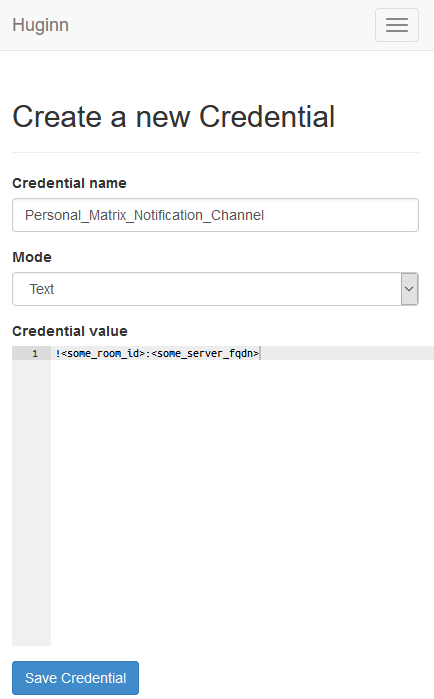
  1. Create a Credential for the Room ID. Like before, name it something sensible and put the ID you found earlier.
  1. Create a “Post Agent” by going to Agents and selecting “New agent”. This will show just the “Type” box. You can type in this box to put “Post Agent” and then find it. That will then provide you with the rest of these boxes. Provide a name, and tick the box marked “Propagate immediately”. I’ll cover the content of the “Options” box after this screenshot.

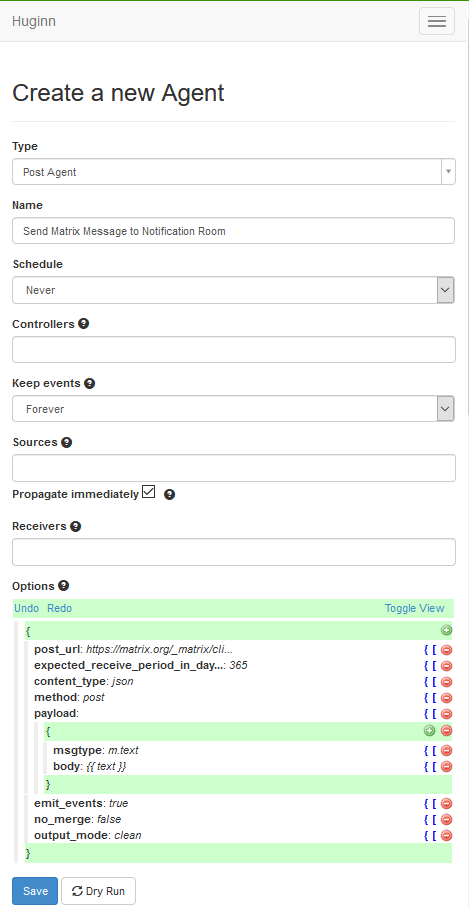
In the “Options” block is a button marked “Toggle View”. Select this which turns it from the above JSON pretty editor, into this text field (note your text is likely to be different):

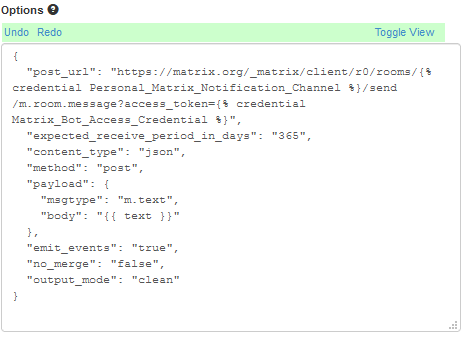
My content of that box is as follows:

{
  "post_url": "https://matrix.org/_matrix/client/r0/rooms/{% credential Personal_Matrix_Notification_Channel %}/send/m.room.message?access_token={% credential Matrix_Bot_Access_Credential %}",
  "expected_receive_period_in_days": "365",
  "content_type": "json",
  "method": "post",
  "payload": {
    "msgtype": "m.text",
    "body": "{{ text }}"
  },
  "emit_events": "true",
  "no_merge": "false",
  "output_mode": "clean"
}

Note that the “post_url” value contains two “credential” values, like this:

{% credential Personal_Matrix_Notification_Channel %} (this is the Room ID we found earlier) and {% credential Matrix_Bot_Access_Credential %} (this is the Access Token we found earlier).

If you’ve used different names for these values (which are perfectly valid!) then just change these two. The part where it says “{{ text }}” leave there, because we’ll be using that in a later section. Click “Save” (the blue button at the bottom).

  1. Create a Webhook Agent. Go to Agents and then “New Agent”. Select “Webhook Agent” from the “Type” field. Give it a name, like “SSH Logged In Notification Agent”. Set “Keep Events” to a reasonable number of days, like 5. In “Receivers” find the Notification agent you created (“Send Matrix Message to Notification Room” was the name I used). Then, in the screenshot, I’ve pressed the “Toggle View” button on the “Options” section, as this is, to me a little clearer.

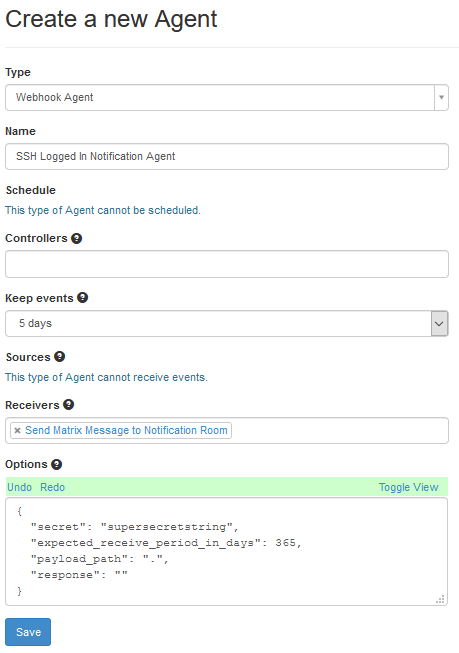
The content of the “options” box is:

{
  "secret": "supersecretstring",
  "expected_receive_period_in_days": 365,
  "payload_path": ".",
  "response": ""
}

Change the “secret” from “supersecretstring” to something a bit more useful and secure.

The “Expected Receive Period in Days” basically means, if you’ve not had an event cross this item in X number of days, does Huginn think this agent is broken? And the payload path of “.” basically means “pass everything to the next agent”.

Once you’ve completed this step, press “Save” which will take you back to your agents, and then go into the agent again. This will show you a page like this:

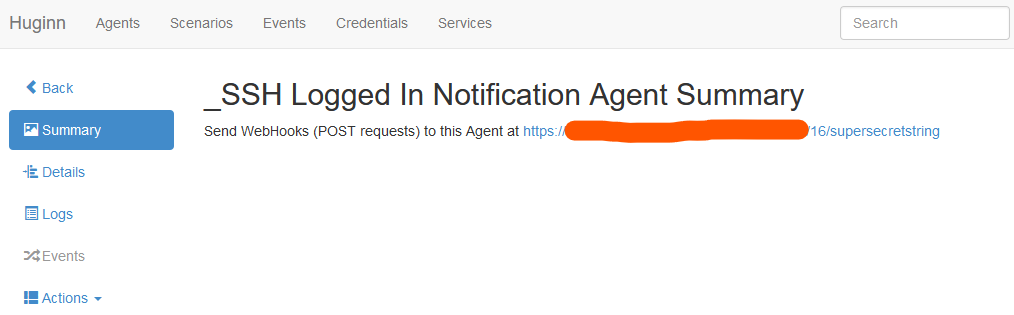
Copy that URL, because you’ll need it later…

On the server you are logging the SSH to

As root, create a file called /etc/ssh/sshrc. This file will be your script that will run every time someone logs in. It must have the file permissions 0644 (u+rw,g+r,o+r), which means that there is a slight risk that the Webhook secret is exposed.

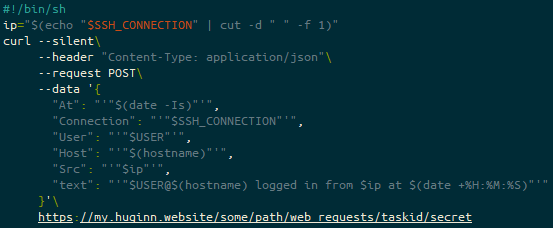
The content of that file is as follows:

#!/bin/sh
ip="$(echo "$SSH_CONNECTION" | cut -d " " -f 1)"
curl --silent\
     --header "Content-Type: application/json"\
     --request POST\
     --data '{
       "At": "'"$(date -Is)"'",
       "Connection": "'"$SSH_CONNECTION"'",
       "User": "'"$USER"'",
       "Host": "'"$(hostname)"'",
       "Src": "'"$ip"'",
       "text": "'"$USER@$(hostname) logged in from $ip at $(date +%H:%M:%S)"'"
     }'\
     https://my.huginn.website/some/path/web_requests/taskid/secret

The heading line (#!/bin/sh) is more there for shellcheck, as, according to the SSH man page this is executed by /bin/sh either way.

The bulk of these values (At, Connection, User, Host or Src) are not actually used by Huginn, but might be useful for later… the key one is text, which if you recall from the “Send Matrix Message to Notification Room” Huginn agent, we put {{ text }} into the “options” block – that’s this block here!

So what happens when we log in over SSH?

SSH asks the shell in the user’s context to execute /etc/ssh/sshrc before it hands over to the user’s login session. This script calls curl and hands some POST data to the url.

Huginn receives this POST via the “SSH Logged In Notification Agent”, and files it.

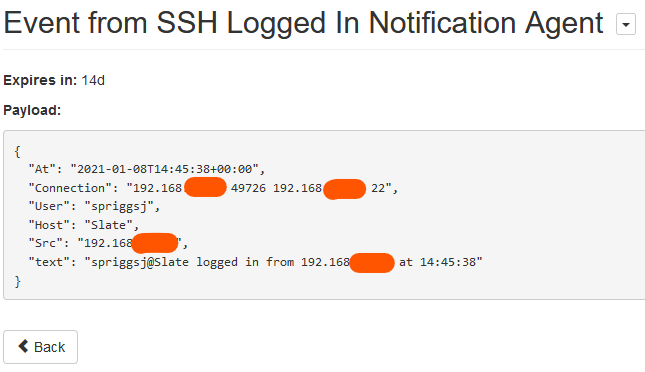
Huginn then hands that off to the “Send Matrix Message to Notification Room”:

Huginn makes a POST to the Matrix.org server, and Matrix sends the finished message to all the attached clients.

Featured image is β€œRaven” by β€œJim Bahn” on Flickr and is released under a CC-BY license.

"Main console" by "Steve Parker" on Flickr

Running services (like SSH, nginx, etc) on Windows Subsystem for Linux (WSL1) on boot

I recently got a new laptop, and for various reasons, I’m going to be primarily running Windows on that laptop. However, I still like having a working SSH server, running in the context of my Windows Subsystem for Linux (WSL) environment.

Initially, trying to run service ssh start failed with an error, because you need to re-execute the ssh configuration steps which are missed in a WSL environment. To fix that, run sudo apt install --reinstall openssh-server.

Once you know your service runs OK, you start digging around to find out how to start it on boot, and you’ll see lots of people saying things like “Just run a shell script that starts your first service, and then another shell script for the next service.”

Well, the frustration for me is that Linux already has this capability – the current popular version is called SystemD, but a slightly older variant is still knocking around in modern linux distributions, and it’s called SystemV Init, often referred to as just “sysv” or “init.d”.

The way that those services work is that you have an “init” file in /etc/init.d and then those files have a symbolic link into a “runlevel” directory, for example /etc/rc3.d. Each symbolic link is named S##service or K##service, where the ## represents the order in which it’s to be launched. The SSH Daemon, for example, that I want to run is created in there as /etc/rc3.d/S01ssh.

So, how do I make this work in the grander scheme of WSL? I can’t use SystemD, where I could say systemctl enable --now ssh, instead I need to add a (yes, I know) shell script, which looks in my desired runlevel directory. Runlevel 3 is the level at which network services have started, hence using that one. If I was trying to set up a graphical desktop, I’d instead be looking to use Runlevel 5, but the X Windows system isn’t ported to Windows like that yet… Anyway.

Because the rc#.d directory already has this structure for ordering and naming services to load, I can just step over this directory looking for files which match or do not match the naming convention, and I do that with this script:

#! /bin/bash
function run_rc() {
  base="$(basename "$1")"
  if [[ ${base:0:1} == "S" ]]
  then
    "$1" start
  else
    "$1" stop
  fi
}

if [ "$1" != "" ] && [ -e "$1" ]
then
  run_rc "$1"
else
  rc=3
  if [ "$1" != "" ] && [ -e "/etc/rc${$1}.d/" ]
  then
    rc="$1"
  fi
  for digit1 in {0..9}
  do
    for digit2 in {0..9}
    do
      find "/etc/rc${rc}.d/" -name "[SK]${digit1}${digit2}*" -exec "$0" '{}' \; 2>/dev/null
    done
  done
fi

I’ve put this script in /opt/wsl_init.sh

This does a bit of trickery, but basically runs the bottom block first. It loops over the digits 0 to 9 twice (giving you 00, 01, 02 and so on up to 99) and looks in /etc/rc3.d for any file containing the filename starting S or K and then with the two digits you’ve looped to by that point. Finally, it runs itself again, passing the name of the file it just found, and this is where the top block comes in.

In the top block we look at the “basename” – the part of the path supplied, without any prefixed directories attached, and then extract just the first character (that’s the ${base:0:1} part) to see whether it’s an “S” or anything else. If it’s an S (which everything there is likely to be), it executes the task like this: /etc/rc3.d/S01ssh start and this works because it’s how that script is designed! You can run one of the following instances of this command: service ssh start, /etc/init.d/ssh start or /etc/rc3.d/S01ssh start. There are other options, notably “stop” or “status”, but these aren’t really useful here.

Now, how do we make Windows execute this on boot? I’m using NSSM, the “Non-sucking service manager” to add a line to the Windows System services. I placed the NSSM executable in C:\Program Files\nssm\nssm.exe, and then from a command line, ran C:\Program Files\nssm\nssm.exe install WSL_Init.

I configured it with the Application Path: C:\Windows\System32\wsl.exe and the Arguments: -d ubuntu -e sudo /opt/wsl_init.sh. Note that this only works because I’ve also got Sudo setup to execute this command without prompting for a password.

Here I invoke C:\Windows\System32\wsl.exe -d ubuntu -e sudo /opt/wsl_init.sh
I define the name of the service, as Services will see it, and also the description of the service.
I put in MY username and My Windows Password here, otherwise I’m not running WSL in my user context, but another one.

And then I rebooted. SSH was running as I needed it.

Featured image is β€œMain console” by β€œSteve Parker” on Flickr and is released under a CC-BY license.

"#security #lockpick" by "John Jones" on Flickr

Auto-starting an SSH Agent in Windows Subsystem for Linux

I tend to use Windows Subsystem for Linux (WSL) as a comprehensive SSH client, mostly for running things like Ansible scripts and Terraform. One of the issues I’ve had with it though is that, on a Linux GUI based system, I would start my SSH Agent on login, and then the first time I used an SSH key, I would unlock the key using the agent, and it would be cached for the duration of my logged in session.

While I was looking for something last night, I came across this solution on Stack Overflow (which in turn links to this blog post, which in turn links to this mailing list post) that suggests adding the following stanza to ~/.profile in WSL. I’m running the WSL version of Ubuntu 20.04, but the same principles apply on Cygwin, or, probably, any headless-server installation of a Linux distribution, if that’s your thing.

SSH_ENV="$HOME/.ssh/agent-environment"
function start_agent {
    echo "Initialising new SSH agent..."
    /usr/bin/ssh-agent | sed 's/^echo/#echo/' > "${SSH_ENV}"
    echo succeeded
    chmod 600 "${SSH_ENV}"
    . "${SSH_ENV}" > /dev/null
}
# Source SSH settings, if applicable
if [ -f "${SSH_ENV}" ]; then
    . "${SSH_ENV}" > /dev/null
    ps -ef | grep ${SSH_AGENT_PID} | grep ssh-agent$ > /dev/null || {
        start_agent;
    }
else
    start_agent;
fi

Now, this part is all well-and-good, but what about that part where you want to SSH using a key, and then that being unlocked for the duration of your SSH Agent being available?

To get around that, in the same solution page, there is a suggestion of adding this line to your .ssh/config: AddKeysToAgent yes. I’ve previously suggested using dynamically included SSH configuration files, so in this case, I’d look for your file which contains your “wildcard” stanza (if you have one), and add the line there. This is what mine looks like:

Host *
  AddKeysToAgent yes
  IdentityFile ~/.ssh/MyCurrentKey

How does this help you? Well, if you’re using jump hosts (using ProxyJump MyBastionHost, for example) you’ll only be prompted for your SSH Key once, or if you typically do a lot of SSH sessions, you’ll only need to unlock your session once.

BUT, and I can’t really stress this enough, don’t use this on a shared or suspected compromised system! If you’ve got a root account which can access the content of your Agent’s Socket and PID, then any protections that private key may have held for your system is compromised.

Featured image is β€œ#security #lockpick” by β€œJohn Jones” on Flickr and is released under a CC-BY-ND license.

"Accept a New SSH Host Key" by "Linux Screenshots" on Flickr

Purposefully Reducing SSH Security when performing Builds of short-lived devices

I’ve recently been developing a few builds of things at home using throw-away sessions of virtual machines, and I found myself repeatedly having to accept and even having to remove SSH host keys for things I knew wouldn’t be around for long. It’s not a huge disaster, but it’s an annoyance.

This annoyance comes from the fact that SSH uses a thing called “Trust-On-First-Use” (Or TOFU) to protect yourself against a “Man-in-the-Middle” attack (or even where the host has been replaced with something malicious), which, for infrastructure that has a long lifetime (anything more than a couple of days) makes sense! You’re building something you want to trust hasn’t been compromised! That said, if you’re building new virtual machines, testing something and then rebuilding it to prove your script worked… well, that’s not so useful!

So, in this case, if you’ve got a designated build network, or if you trust, implicitly, your normal working network, this is a dead simple work-around.

In $HOME/.ssh/config or in $HOME/.ssh/config.d/local (if you’ve followed my previous advice to use separate ssh config files), add the following stanza:

# RFC1918
Host 10.* 172.16.* 172.17.* 172.18.* 172.19.* 172.20.* 172.21.* 172.22.* 172.23.* 172.24.* 172.25.* 172.26.* 172.27.* 172.28.* 172.29.* 172.30.* 172.31.* 192.168.*
        StrictHostKeyChecking no
        UserKnownHostsFile /dev/null

# RFC5373 and RFC2544
Host 192.0.2.* 198.51.100.* 203.0.113.* 198.18.* 198.19.*
        StrictHostKeyChecking no
        UserKnownHostsFile /dev/null

These stanzas let you disable host key checking for any IP address in the RFC1918 ranges (10.0.0.0/8, 172.16.0.0/12 and 192.168.0.0/16), and for the RFC5373 ranges (192.0.2.0/24, 198.51.100.0/24 and 203.0.113.0/24) – which should be used for documentation, and for the RFC2544 range (198.18.0.0/15) which should be used for inter-network testing.

Alternatively, if you always use a DDNS provider for short-lived assignments (for example, I use davd/docker-ddns) then instead, you can use this stanza:

Host *.ddns.example.com
        StrictHostKeyChecking no
        UserKnownHostsFile /dev/null

(Assuming, of course, you use ddns.example.com as your DDNS address!)

Featured image is β€œAccept a New SSH Host Key” by β€œLinux Screenshots” on Flickr and is released under a CC-BY license.

"Debian" by "medithIT" on Flickr

One to read: Installing #Debian on #QNAP TS-219P

A couple of years ago, a very lovely co-worked gave me his QNAP TS-219P which he no longer required. I’ve had it sitting around storing data, but not making the most use of it since he gave it to me.

After a bit of tinkering in my home network, I decided that I needed a more up-to-date OS on this device, so I found this page that tells you how to install Debian Buster. This will wipe the device, so make sure you’ve got a full backup of your content!

https://www.cyrius.com/debian/kirkwood/qnap/ts-219/install/

Essentially, you backup the existing firmware with these commands:

cat /dev/mtdblock0 > mtd0
cat /dev/mtdblock1 > mtd1
cat /dev/mtdblock2 > mtd2
cat /dev/mtdblock3 > mtd3
cat /dev/mtdblock4 > mtd4
cat /dev/mtdblock5 > mtd5

These files need to be transferred off, in “case of emergency”, then download the installation files:

mkdir /tmp/debian
cd /tmp/debian
busybox wget http://ftp.debian.org/debian/dists/buster/main/installer-armel/current/images/kirkwood/network-console/qnap/ts-21x/{initrd,kernel-6281,kernel-6282,flash-debian,model}
sh flash-debian
reboot

The flash-debian command takes around 3-5 minutes, apparently, although I did start the job and walk away, so it might have taken anywhere up to 30 minutes!

Then, SSH to the IP of the device, and use the credentials installer and install as username and password.

Complete the installation steps in the SSH session, then let it reboot.

Be aware that the device is likely to have at least one swap volume it will try to load, so it might be worth opening a shell and running the command “swapoff -a” before removing the swap partitions. It’s also worth removing all the partitions and then rebooting and starting again if you have any problems with the partitioning.

When it comes back, you have a base installation of Debian, which doesn’t have sudo installed, so use su - and put in the root password.

Good luck!

“You can’t run multiple commands in sudo” – and how to work around this

At work, we share tips and tricks, and one of my colleagues recently called me out on the following stanza I posted:

I like this [ansible] one for Debian based systems:
  - name: "Apt update, Full-upgrade, autoremove, autoclean"
    become: yes
    apt:
      upgrade: full
      update_cache: yes
      autoremove: yes
      autoclean: yes

And if you’re trying to figure out how to do that in Shell:
apt-get update && apt-get full-update -y && apt-get autoremove -y && apt-get autoclean -y

His response was “Surely you’re not logging into bash as root”. I said “I normally sudo -i as soon as I’ve logged in. I can’t recall offhand how one does a sudo for a string of command && command statements”

Well, as a result of this, I looked into it. Here’s one comment from the first Stack Overflow page I found:

You can’t run multiple commands from sudo – you always need to trick it into executing a shell which may accept multiple commands to run as parameters

So here are a few options on how to do that:

  1. sudo -s whoami \; whoami (link to answer)
  2. sudo sh -c "whoami ; whoami" (link to answer)
  3. But, my favourite is from this answer:

    An alternative using eval so avoiding use of a subshell: sudo -s eval 'whoami; whoami'

Why do I prefer the last one? Well, I already use eval for other purposes – mostly for starting my ssh-agent over SSH, like this: eval `ssh-agent` ; ssh-add

Running Google MusicManager for two profiles

I’ve previously made mention of my addiction to Google Play Music… but I was called out recently, and asked about the script I used at the time. I’m sorry to say that I have had some issues with it, and instead, have resorted to using X forwarding. Here’s how I do it.

I create a user account for that other person (note, GMM will only let you upload to 3 accounts using this method. For any more, you’ll need a virtual machine!).

I then create an SSH public/private key with no passphrase.

ssh-keygen -b 2048 -N “” -C “$(whoami)@localhost” -f ~/.ssh/gmm.id_rsa

I write the public key into that new user’s .ssh/authorized_keys, by running:

ssh-copy-id -i ~/.ssh/gmm.id_rsa bloggsf@localhost

I will be prompted for the password of that account.

Finally, I create this script:

#!/bin/bash
while ! ping -c 1 8.8.8.8 2>/dev/null >/dev/null ; do
  echo Waiting for network...
done

ssh -X bloggsf@localhost -i ~/.ssh/gmm.id_rsa /opt/google/musicmanager/google-musicmanager

This is then added to the startup tasks of my headless-but-running-a-desktop machine.