"Accept a New SSH Host Key" by "Linux Screenshots" on Flickr

Purposefully Reducing SSH Security when performing Builds of short-lived devices

I’ve recently been developing a few builds of things at home using throw-away sessions of virtual machines, and I found myself repeatedly having to accept and even having to remove SSH host keys for things I knew wouldn’t be around for long. It’s not a huge disaster, but it’s an annoyance.

This annoyance comes from the fact that SSH uses a thing called “Trust-On-First-Use” (Or TOFU) to protect yourself against a “Man-in-the-Middle” attack (or even where the host has been replaced with something malicious), which, for infrastructure that has a long lifetime (anything more than a couple of days) makes sense! You’re building something you want to trust hasn’t been compromised! That said, if you’re building new virtual machines, testing something and then rebuilding it to prove your script worked… well, that’s not so useful!

So, in this case, if you’ve got a designated build network, or if you trust, implicitly, your normal working network, this is a dead simple work-around.

In $HOME/.ssh/config or in $HOME/.ssh/config.d/local (if you’ve followed my previous advice to use separate ssh config files), add the following stanza:

# RFC1918
Host 10.* 172.16.* 172.17.* 172.18.* 172.19.* 172.20.* 172.21.* 172.22.* 172.23.* 172.24.* 172.25.* 172.26.* 172.27.* 172.28.* 172.29.* 172.30.* 172.31.* 192.168.*
        StrictHostKeyChecking no
        UserKnownHostsFile /dev/null

# RFC5373 and RFC2544
Host 192.0.2.* 198.51.100.* 203.0.113.* 198.18.* 198.19.*
        StrictHostKeyChecking no
        UserKnownHostsFile /dev/null

These stanzas let you disable host key checking for any IP address in the RFC1918 ranges (10.0.0.0/8, 172.16.0.0/12 and 192.168.0.0/16), and for the RFC5373 ranges (192.0.2.0/24, 198.51.100.0/24 and 203.0.113.0/24) – which should be used for documentation, and for the RFC2544 range (198.18.0.0/15) which should be used for inter-network testing.

Alternatively, if you always use a DDNS provider for short-lived assignments (for example, I use davd/docker-ddns) then instead, you can use this stanza:

Host *.ddns.example.com
        StrictHostKeyChecking no
        UserKnownHostsFile /dev/null

(Assuming, of course, you use ddns.example.com as your DDNS address!)

Featured image is “Accept a New SSH Host Key” by “Linux Screenshots” on Flickr and is released under a CC-BY license.

"Monitors" by "Jaysin Trevino" on Flickr

Using monit to monitor Docker Containers

As I only run a few machines with services that matter on them (notably, my home server and my web server), I don’t need a full-on monitoring service, so instead rely on a system called monit.

Monit is an open source piece of software, used to monitor (see, it’s easily named 😄) and, if possible remediate issues with things it sees wrong.

I use this for watching whether particular services are running (and if not, restart them), for whether the ink in my printer is empty, and to monitor the free space and SMART status on my disks.

Today I noticed that a Docker container had stopped, and I’d not noticed. It wasn’t a big thing, but it gnawed at me, so I had a bit of a look around to see what I can find about this.

I found this blog post, titled “Monitoring Docker Containers with Monit”, from 2014, which suggested monitoring the result from docker top… and would you believe it, that’s a valid trick 🙂

So, here’s what I’m doing! Each container has it’s own file called/etc/monit/scripts/check_container_<container-name>.sh which has just this command in it:

#! /bin/bash
docker top "<container-name>"
exit $?

Note that you replace <container-name> in both the filename and the script itself with the name of the container – for example, the container hello-world would be monitored with the file check_container_hello-world.sh, and the line in that file would say docker top "hello-world".

I then have a file in /etc/monit/conf.d/ called check_container_<container-name> which has this content

CHECK PROGRAM <container-name> WITH PATH /etc/monit/scripts/check_container_<container-name>.sh
  START PROGRAM = "/usr/bin/docker start <container-name>"
  STOP PROGRAM = "/usr/bin/docker stop <container-name>"
  IF status != 0 FOR 3 CYCLES THEN RESTART
  IF 2 RESTARTS WITHIN 5 CYCLES THEN UNMONITOR

I then ensure that in /etc/monit/monitrc the line “include /etc/monit/conf.d/*” is included and not commented out, and then restart monit with systemctl restart monit.

Featured image is “Monitors” by “Jaysin Trevino” on Flickr and is released under a CC-BY license.

"Fishing line and bobbin stuck on tree at Douthat State Park" by "Virginia State Parks" on Flickr

Note to self: Linux shell scripts don’t cope well with combined CRLF + LF files… Especially in User-Data / Custom Data / Cloud-Init scripts

This one is more a nudge to myself. On several occasions when building Infrastructure As Code (IAC), I split out a code sections into one or more files, for readability and reusability purposes. What I tended to do, and this was more apparent with the Linux builds than the Windows builds, was to forget to set the line terminator from CRLF to LF.

While this doesn’t really impact Windows builds too much (they’re kinda designed to support people being idiots with line endings now), Linux still really struggles with CRLF endings, and you’ll only see when you’ve broken this because you’ll completely fail to run any of the user-data script.

How do you determine this is your problem? Well, actually it’s a bit tricky, as neither cat, less, more or nano spot this issue. The only two things I found that identified it were file and vi.

The first part of the combined file with mixed line endings. This part has LF termination.
The second part of the combined file with mixed line endings. This part has CRLF termination.
What happens when we cat these two parts into one file? A file with CRLF, LF line terminators obviously!
What the combined file looks like in Vi. Note the blue ^M at the ends of the lines.

So, how to fix this? Assuming you’re using Visual Studio Code;

A failed line-ending clue in Visual Studio Code

You’ll notice this line showing “CRLF” in the status bar at the bottom of Code. Click on that, which brings up a discrete box near the top, as follows:

Oh no, it’s set to “CRLF”. That’s not what we want!

Selecting LF in that box changes the line feeds into LF for this file, but it’s not saved. Make sure you save this file before you re-run your terraform script!

Notice, we’re now using LF endings, but the file isn’t saved.

Fantastic! It’s all worked!

In Nano, I’ve opened the part with the invalid line endings.

Oh no! We have a “DOS Format” file. Quick, let’s fix it!

To fix this, we need to write the file out. Hit Ctrl+O. This tells us that we’re in DOS Format, and also gives us the keyboard combination to toggle “DOS Format” off – it’s Alt+D (In Unix/Linux world, the Alt key is referred to as the Meta key – hence M not A).

This is how we fix things

So, after hitting Alt+D, the “File Name to write” line changes, see below:

Yey, no pesky “DOS Format” warning here!

Using either editor (or any others, if you know how to solve line ending issues in other editors), you still need to combine your script back together before you can run it, so… do that, and your file will be fine to run! Good luck!

Featured image is “Fishing line and bobbin stuck on tree at Douthat State Park” by “Virginia State Parks” on Flickr and is released under a CC-BY license.

"Debian" by "medithIT" on Flickr

One to read: Installing #Debian on #QNAP TS-219P

A couple of years ago, a very lovely co-worked gave me his QNAP TS-219P which he no longer required. I’ve had it sitting around storing data, but not making the most use of it since he gave it to me.

After a bit of tinkering in my home network, I decided that I needed a more up-to-date OS on this device, so I found this page that tells you how to install Debian Buster. This will wipe the device, so make sure you’ve got a full backup of your content!

https://www.cyrius.com/debian/kirkwood/qnap/ts-219/install/

Essentially, you backup the existing firmware with these commands:

cat /dev/mtdblock0 > mtd0
cat /dev/mtdblock1 > mtd1
cat /dev/mtdblock2 > mtd2
cat /dev/mtdblock3 > mtd3
cat /dev/mtdblock4 > mtd4
cat /dev/mtdblock5 > mtd5

These files need to be transferred off, in “case of emergency”, then download the installation files:

mkdir /tmp/debian
cd /tmp/debian
busybox wget http://ftp.debian.org/debian/dists/buster/main/installer-armel/current/images/kirkwood/network-console/qnap/ts-21x/{initrd,kernel-6281,kernel-6282,flash-debian,model}
sh flash-debian
reboot

The flash-debian command takes around 3-5 minutes, apparently, although I did start the job and walk away, so it might have taken anywhere up to 30 minutes!

Then, SSH to the IP of the device, and use the credentials installer and install as username and password.

Complete the installation steps in the SSH session, then let it reboot.

Be aware that the device is likely to have at least one swap volume it will try to load, so it might be worth opening a shell and running the command “swapoff -a” before removing the swap partitions. It’s also worth removing all the partitions and then rebooting and starting again if you have any problems with the partitioning.

When it comes back, you have a base installation of Debian, which doesn’t have sudo installed, so use su - and put in the root password.

Good luck!

Opening to my video: Screencast 002 - A quick walk through Git

Screencast 002: A quick walk through Git (a mentoring style video)

I have done a follow-up Mentoring style video to support my last one. This video shows how to fix some of the issues in Git I came across in my last mentoring video!

Screencast 002: A quick walk through Git

I took some advice from a colleague who noticed that I skipped past a couple of issues with my Git setup, so I re-did them :) I hope this makes sense, and at 35 minutes, is a bit more understandable than the last 1h15 video!

Also on LBRY and Archive.org

Opening to my video: Screencast 001 - Ansible and Inspec using Vagrant

Screencast 001: Ansible and Inspec with Vagrant and Git (a mentoring style video)

If you’ve ever wondered how I use Ansible and Inspec, or wondered why some of my Vagrant files look like they do, well, I want to start recording some “mentor” style videos… You know how, if you were sitting next to someone who’s a mentor to you, and you watch how they build a solution.

The first one was released last night!

I recently saw a video by Chris Hartjes on how he creates his TDD (Test driven development) based PHP projects, and I really wanted to emulate that style, but talking about the things I use.

This was my second attempt at recording a mentoring style video yesterday, the first was shown to the Admin Admin Podcast listeners group on Telegram, and then sacrificed to the demo gods (there were lots of issues in that first video) never to be seen again.

From a tooling perspective, I’m using a remote virtual machine running Ubuntu Mate 18.04 over RDP (to improve performance) with xrdp and Remmina, OBS is running locally to record the content, and I’m using Visual Studio Code, git, Vagrant and Virtualbox, as well as Ansible and Inspec.

Late edit 2020-02-29: Like videos like this, hate YouTube? It’s also on archive.org: https://archive.org/details/JonTheNiceGuyScreencast001

Late edit 2020-03-01: Popey told me about LBRY.tv when I announced this on the Admin Admin Podcast telegram channel, and so I’ve also copied the video to there: https://lbry.tv/@JonTheNiceGuy:b/Screencast001-Ansible-and-Inspec-with-Vagrant:8

Publishing a “Bio” in Secure Scuttlebutt, using ssb-server

This is one of those “oh, there it is” posts, more for myself than anyone else. Anyway, if you use SSB from a shell (perhaps you run your own SSB Pub, for example), you might want to run this style of command:

ssb-server publish --type about --about "$(ssb-server whoami | jq .id -r)" --name "Some Server" --description "I'm just some server, you know"

As long as you have --name or --description in there, you should be good to go!

"Unnatural Love" by "Keith Garner" on Flickr

Configuring a Remote Desktop (Gnome Shell) for Ubuntu

I started thinking a couple of weeks ago, when my coding laptop broke, that it would be really useful to have a development machine somewhere else that I could use.

It wouldn’t need a lot of power (after all, I’m mostly developing web apps and not compiling stuff), but it does need to be a desktop OS, as I rather like being able to open code editors and suchlike, while I’ve got a web browser open.

I have an Android tablet, which while it’s great for being a tablet, it’s not much use as a desktop, and … yes, I’ve got a work laptop, but I don’t really want to install software on that (and I don’t think my admin team would be happy if I did).

Also, I quite like Linux.

Some time ago, I spotted that AWS has a “Virtual Desktop” environment, and I think that’s kinda what I’m after. Something I can spin up, run for a bit and then shut it down, so I thought I’d build something like that… but not pesky Windows, after all… who likes Windows, eh? ;)

So, I built a Virtual Desktop Environment (VDE) in AWS, using Terraform and a bit of shell script!

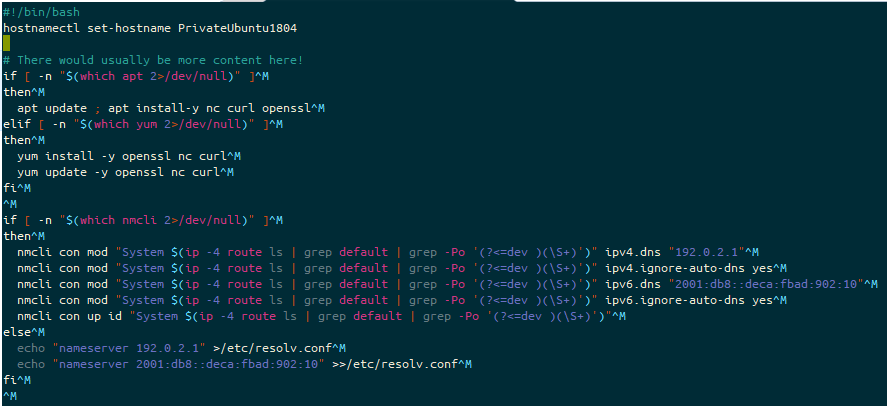
I start from an Ubuntu 18.04 server image, and, after the install is complete, I run this user-data script inside it. Yes, I know I could be doing this with Ansible, but… eh, I wanted it to be a quick deployment ;)

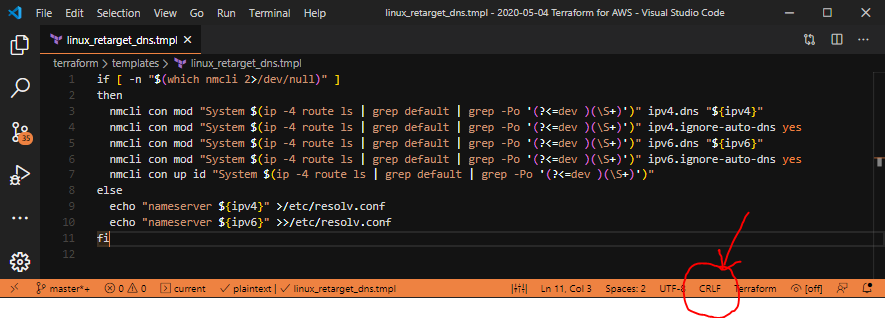
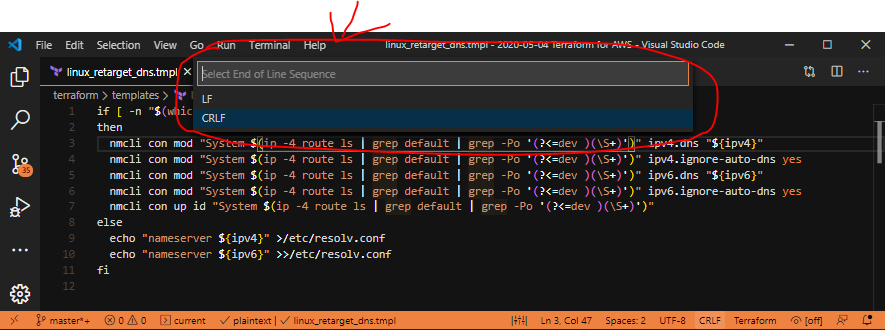
Oh, and there’s a couple of Terraform managed variables in here – ${aws_eip.vde.public_ip} is the AWS public IP address assigned to this host., ${var.firstuser} is the username we want to rename “ubuntu” (the stock server username) to. ${var.firstgecos} is the user’s “real name” which the machine identifies the user as (like “Log out Jon Spriggs” and so on). ${var.userpw} is either the password you want it to use, OR (by default) pwgen 12 which generates a 12 character long password. ${var.desktopenv} is the name of the desktop environment I want to install (Ubuntu by default) and … well, ${var.var_start} is a bit of a fudge, because I couldn’t, in a hurry, work out how to tell Terraform not to mangle the bash variable allocation of ${somevar} which is the format that Terraform also uses. D’oh.

#! /bin/bash
#################
# Set Hostname
#################
hostnamectl set-hostname vde.${aws_eip.vde.public_ip}.nip.io
#################
# Change User
#################
user=${var.firstuser}
if [ ! "$user" == 'ubuntu' ]
then
  until usermod -c "${var.firstgecos}" -l $user ubuntu ; do sleep 5 ; done
  until groupmod -n $user ubuntu ; do sleep 5 ; done
  until usermod  -d /home/$user -m $user ; do sleep 5 ; done
  if [ -f /etc/sudoers.d/90-cloudimg-ubuntu ]; then
    mv /etc/sudoers.d/90-cloudimg-ubuntu /etc/sudoers.d/90-cloud-init-users
  fi
  perl -pi -e "s/ubuntu/$user/g;" /etc/sudoers.d/90-cloud-init-users
fi
if [ '${var.userpw}' == '$(pwgen 12)' ]
then 
  apt update && apt install pwgen
fi
newpw="${var.userpw}"
echo "$newpw" > /var/log/userpw
fullpw="$newpw"
fullpw+="\n"
fullpw+="$newpw"
echo -e "$fullpw" | passwd $user
##########################
# Install Desktop and RDP
##########################
apt-get update
export DEBIAN_FRONTEND=noninteractive
apt-get full-upgrade -yq
apt-get autoremove -y
apt-get autoclean -y
apt-get install -y ${var.desktopenv}-desktop xrdp certbot
##########################
# Configure Certbot
##########################
echo "#!/bin/sh" > /etc/letsencrypt/merge_cert.sh
echo 'cat ${var.var_start}{RENEWED_LINEAGE}/privkey.pem ${var.var_start}{RENEWED_LINEAGE}/fullchain.pem > ${var.var_start}{RENEWED_LINEAGE}/merged.pem' >> /etc/letsencrypt/merge_cert.sh
echo 'chmod 640 ${var.var_start}{RENEWED_LINEAGE}/merged.pem' >> /etc/letsencrypt/merge_cert.sh
chmod 750 /etc/letsencrypt/merge_cert.sh
certbot certonly --standalone --deploy-hook /etc/letsencrypt/merge_cert.sh -n -d vde.${aws_eip.vde.public_ip}.nip.io -d ${aws_eip.vde.public_ip}.nip.io --register-unsafely-without-email --agree-tos
# Based on https://www.snel.com/support/xrdp-with-lets-encrypt-on-ubuntu-18-04/
sed -i 's~^certificate=$~certificate=/etc/letsencrypt/live/vde.${aws_eip.vde.public_ip}.nip.io/fullchain.pem~; s~^key_file=$~key_file=/etc/letsencrypt/live/vde.${aws_eip.vde.public_ip}.nip.io/privkey.pem' /etc/xrdp/xrdp.ini
##############################
# Fix colord remote user issue
##############################
# Derived from http://c-nergy.be/blog/?p=12043
echo "[Allow Colord all Users]
Identity=unix-user:*
Action=org.freedesktop.color-manager.create-device;org.freedesktop.color-manager.create-profile;org.freedesktop.color-manager.delete-device;org.freedesktop.color-manager.delete-profile;org.freedesktop.color-manager.modify-device;org.freedesktop.color-manager.modify-profile
ResultAny=no
ResultInactive=no
ResultActive=yes" > /etc/polkit-1/localauthority/50-local.d/45-allow.colord.pkla
##############################
# Configure Desktop
##############################
if [ '${var.desktopenv}' == 'ubuntu' ]
then 
  echo "#!/bin/bash" > /tmp/desktop_settings
  echo "gsettings set org.gnome.desktop.input-sources sources \"[('xkb', 'gb')]\"" >> /tmp/desktop_settings
  echo "gsettings set org.gnome.desktop.app-folders folder-children \"['Utilities', 'Sundry', 'YaST']\"" >> /tmp/desktop_settings
  echo "gsettings set org.gnome.desktop.privacy report-technical-problems false" >> /tmp/desktop_settings
  echo "gsettings set org.gnome.desktop.screensaver lock-enabled false" >> /tmp/desktop_settings
  echo "gsettings set org.gnome.desktop.session idle-delay 0" >> /tmp/desktop_settings
  echo "echo yes > /home/${var.firstuser}/.config/gnome-initial-setup-done" >> /tmp/desktop_settings
  sudo -H -u ${var.firstuser} dbus-launch --exit-with-session bash /tmp/desktop_settings
  rm -f /tmp/desktop_settings
fi
##########################
# Install VSCode
##########################
wget https://vscode-update.azurewebsites.net/latest/linux-deb-x64/stable -O /tmp/vscode.deb
apt install -y /tmp/vscode.deb
rm /var/crash/*
shutdown -r now

Ubuntu 18.04 has a “first login” wizard, that lets you pre-set up things like, what language will you be using. I bypassed this with the gsettings commands towards the end of the script, and writing the string “yes” to ~/.config/gnome-initial-setup-done.

Also, I wanted to be able to RDP to it. I’m a bit concerned by the use of VNC, especially where RDP is more than capable. It’s just an apt-install away, so… that’s what I do. But, because I’m RDP’ing into this box, I wanted to prevent the RDP session from locking, so I provide two commands to the session: gsettings set org.gnome.desktop.screensaver lock-enabled false which removes the screensaver’s ability to lock the screen, and gsettings set org.gnome.desktop.session idle-delay 0 which stops the screensaver from even starting in the first place.

Now all I need to do is to figure out where I’m going to store my code between boots ;)

So, in summary, I now have a Virtual Machine, which runs Ubuntu 18.04 Desktop, in AWS, with an RDP connection (powered by xRDP), and a disabled screensaver. Job done, I think!

Oh, and if I’m doing it “wrong”, let me know in the comments? :)

Featured image is “Unnatural Love” by “Keith Garner” on Flickr and is released under a CC-BY-SA license.

apt update && apt full-upgrade -y && apt autoremove -y && apt autoclean -y

Apt Updates with Ansible

I’ve got a small Ansible script that I bundle up on Ubuntu boxes to do apt updates. This was originally a one-statement job, but I’ve added a few lines to it, so I thought I’d explain what I’m doing (more for myself, for later!)

Initally, I just had a task to do apt: upgrade=full update_cache=yes autoremove=yes autoclean-yes but if you’re running the script over and over again, well, this gets slow… So I added a tweak!

Here it is folks, in all it’s glory!

- hosts: all
  tasks:
  - name: Get stat of last run apt
    stat:
      path: /var/cache/apt/pkgcache.bin
    register: apt_run

  - name: "Apt update, Full-upgrade, autoremove, autoclean check"
    debug:
      msg: "Skipping apt-update, etc. actions as apt update was run today"
    when: "'%Y-%m-%d' | strftime(apt_run.stat.mtime) in ansible_date_time.date"

  - name: "Apt update, Full-upgrade, autoremove, autoclean"
    apt:
      upgrade: full
      update_cache: yes
      autoremove: yes
      autoclean: yes
    when: "'%Y-%m-%d' | strftime(apt_run.stat.mtime) not in ansible_date_time.date"

What does this do? Well, according to this AskUbuntu post, the best file to check if an update has been performed is /var/cache/apt/pkgcache.bin, so we check the status of that file. Most file systems available to Linux distributions provide the mtime – or “last modified time”. This is returned in the number of seconds since UTC 00:00:00 on the Unix Epoch (1970-01-01), so we need to convert that to a date., which we return as YYYY-MM-DD (e.g. today is 2020-01-06) and then compare that to what the system thinks today is. If the dates don’t equate (so one string doesn’t match the other – in other words, apt update wasn’t run today), it runs the update. If the dates do match up, we get a statement saying that apt update was already run.

Fun times!