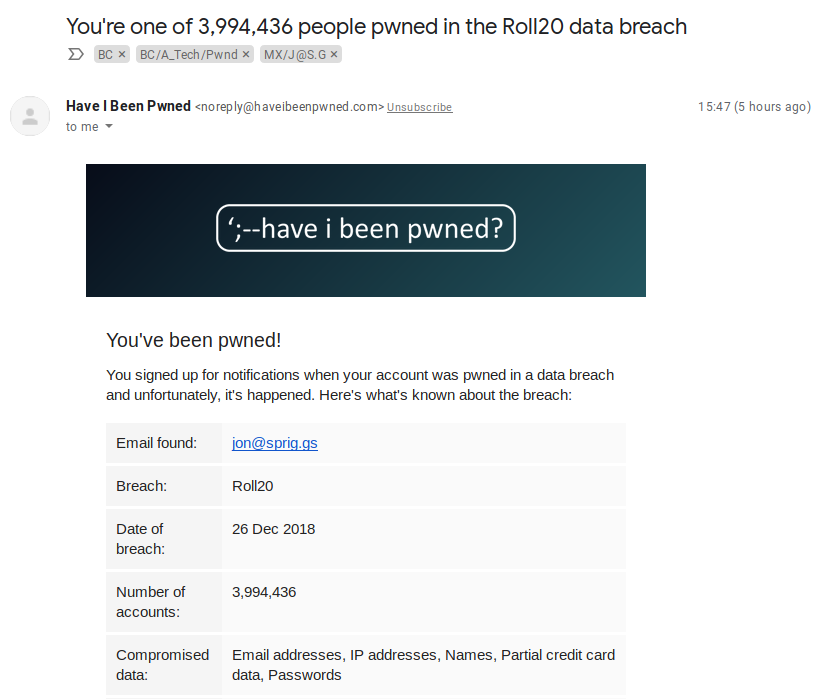
Hello! Maybe you just got a sneeking suspicion that a website you trusted isn’t behaving right, perhaps someone told you that “unusual content” is being posted in your name somewhere, or, if you’re really lucky, you might have just had an email from a website like “HaveIBeenPwned.com” or “Firefox Monitor“. It might look something like this:
An example of an email from the service “Have I Been Pwned”
Of course, it doesn’t feel like you’re lucky! It’s OK. These things happen quite a lot of the time, and you’re not the only one in this boat!
How bad is it, Doc?
First of all, don’t panic! Get some idea of the scale of problem this is by looking at a few key things.
How recent was the breach? Give this a score between 1 (right now) and 10 (more than 1 month ago).
How many websites and services do you use this account on? Give this a score between 1 (right now) and 10 (OMG, this is *my* password, and I use it everywhere).
How many other services would use this account to authenticate to, or get a password reset from? Give this a score between 1 (nope, it’s just this website. We’re good) and 10 (It’s my email account, and everything I’ve ever signed up to uses this account as the login address… or it’s Facebook/Google and I use their authentication to login to everything else).
How much does your reputation hang on this website or any other websites that someone reusing the credentials of this account would get access to? Give this a score between 1 (meh, I post cat pictures from an anonymous username) and 10 (I’m an INFLUENCER HERE dagnamit! I get money because I said stuff here and/or my job is on that website, or I am publicly connected to my employer by virtue of that profile).
(Optional) If this is from a breach notification, does it say that it’s just email addresses (score 1), or that it includes passwords (score 5), unencrypted or plaintext passwords (score 8) or full credit card details (score 10)?
Once you’ve got an idea of scale (4 to 40 or 5 to 50, depending on whether you used that last question), you’ve got an idea of how potentially bad it is.
Take action!
Make a list of the websites you think that you need to change this password on.
Start with email accounts (GMail, Hotmail, Outlook, Yahoo, AOL and so on) – each email account that uses the same password needs to be changed, and this is because almost every website uses your email address to make a “password” change on it! (e.g. “Forgot your password, just type in your email address here, and we’ll send you a reset link“).
Prominent social media profiles (e.g. Facebook, Twitter, Instagram) come next, even if they’re not linked to your persona. This is where your potential reputation damage comes from!
Next up is *this* website, the one you got the breach notification for. After all, you know this password is “wild” now!
Change some passwords
This is a bit of a bind, but I’d REALLY recommend making a fresh password for each of those sites. There are several options for doing this, but my preferred option is to use a password manager. If you’re not very tech savvy, consider using the service Lastpass. If you’re tech savvy, and understand how to keep files in sync across multiple devices, you might be interested in using KeePassXC (my personal preference) or BitWarden instead.
No really. A fresh password. Per site. Honest. And not just “MyComplexPassw0rd-Hotmail” because there are ways of spotting you’ve done something like that, and when they come to your facebook account, they’ll try “MyComplexPassw0rd-Facebook” just to see if it gets them in.
ℹ️ Using a password manager gives you a unique, per-account password. I just generated a fresh one (for a dummy website), and it was 2-K$F+j7#Zz8b$A^]qj. But, fortunately, I don’t have to remember it. I can just copy and paste it in to the form when I need to change it, or perhaps, if you have a browser add-on, that’ll fill it in for you.
Making a list, and checking it twice!
Fab, so you’ve now got a lovely list of unique passwords. A bit like Santa, it’s time to check your list again. Assume that your list of sites you just changed passwords for were all compromised, because someone knew that password… I know, it’s a scary thought! So, have a look at all those websites you just changed the password on and figure out what they have links to, then you’ll probably make your list of things you need to change a bit bigger.
Not sure what they have links to?
Well, perhaps you’re looking at an email account… have a look through the emails you’ve received in the last month, three months or year and see how many of those come from “something” unique. Perhaps you signed up to a shopping site with that email address? It’s probably worth getting a password reset for that site done.
Perhaps you’re looking at a social media site that lets you login to other services? Check through those other services and make sure that “someone” hasn’t allowed access to a website they control. After all, you did lose access to that website, and so you don’t know what it’s connected to.
Also, check all of these sites, and make sure there aren’t any unexpected “active sessions” (where someone else is logged into your account still). If you have got any, kick them out :)
OK, so the horse bolted, now close the gate!
Once you’ve sorted out all of these passwords, it’s probably worth looking at improving your security in general. To do this, we need to think about how people get access to your account. As I wrote in my “What to do when your Facebook account gets hacked?” post:
What if you accidentally gave your password to someone? Or if you went to a website that wasn’t actually the right page and put your password in there by mistake? Falling prey to this when it’s done on purpose is known as social engineering or phishing, and means that someone else has your password to get into your account.
The easiest way of locking this down is to use a “Second Factor” (sometimes abbreviated to 2FA). You need to give your password (“something you know”) to log into the website. Now you also need something separate, that isn’t in the same store. If this were a physical token (like a SoloKey, Yubikey, or a RSA SecurID token), it’d be “something you have” (after all, you need to carry around that “token” with you), but normally these days it’s something on your phone.
Some places will send you a text message, others will pop up an “approve login” screen (and, I should note, if you get one and YOU AREN’T LOGGING IN, don’t press “approve”!), or you might have a separate app (perhaps called “Google Authenticator”, “Authy” or something like “Duo Security”) that has a number that keeps changing.
You should then finish your login with a code from that app, SMS or token or reacting to that screen or perhaps even pressing a button on a thing you plug into your computer. If you want to know how to set this up, take a look at “TwoFactorAuth.org“, a website providing access to the documentation on setting up 2FA on many of the websites you currently use… but especially do this with your email accounts.
I had the privilege today to attend BSIDES Liverpool 2019. BSIDES is a infosec community conference. The majority of the talks were recorded, and I can strongly recommend making your way through the content when it becomes available.
Full disclosure: While my employer is a sponsor, I was not there to represent the company, I was just enjoying the show. A former colleague (good friend and, while he was still employed by Fujitsu, an FDE – so I think he still is one) is one of the organisers team.
The first talk I saw (aside from the welcome speech) was the keynote by Omri Segev Moyal (@gelossnake) about how to use serverless technologies (like AWS Lambda) to build a malware research platform. The key takeaway I have from that talk was how easy it is to build a simple python lambda script using Chalice. That was fantastic, and I’m looking forward to trying some things with that service!
For various reasons (mostly because I got talking to people), I missed the rest of the morning tracks except for the last talk before lunch. I heard great things about the Career Advice talk by Martin King, and the Social Engineering talk by Tom H, but will need to catch up on those on the videos released after.
Just before lunch we received a talk from “The Chief” (from the Channel 4 TV Series “Hunted”), Peter Bleksley, about an investigation he’s currently involved in. This was quite an intense session, and his history (the first 1/4 of his talk) was very interesting. Just before he went in for his talk, I got a selfie with him (which is the “Featured Image” for this post :) )
After lunch, I sat on the Rookies Track, and saw three fantastic talks, from Chrissi Robertson (@frootware) on Imposter Syndrome, Matt (@reversetor) on “Privacy in the age of Convenience” (reminding me of one of my very early talks at OggCamp/BarCamp Manchester) and Jan (@janfajfer) about detecting data leaks on mobile devices with EVPN. All three speakers were fab and nailed their content.
Next up was an unrecorded talk by Jamie (@2sec4u) about WannaCry, as he was part of the company who discovered the “Kill-Switch” domain. He gave a very detailed overview of the timeline about WannaCry, the current situation of the kill-switch, and a view on some of the data from infected-but-dormant machines which are still trying to reach the kill-switch. A very scary but well explained talk. Also, memes and rude words, but it’s clearly a subject that needed some levity, being part of a frankly rubbish set of circumstances.
After that was a talk from (two-out-of-six of) The Beer Farmers. This was a talk (mostly) about privacy and the lack of it from the social media systems of Facebook, Twitter and Google. As I listen to The Many Hats Club podcast, on which the Beer Farmers occasionally appear, it was a great experience matching faces to voices.
We finished the day on a talk by Finux (@f1nux) about Machiavelli as his writings (in the form of “The Prince”) would apply to Infosec. I was tempted to take a whole slew of photos of the slide deck, but figured I’d just wait for the video to be released, as it would, I’m sure, make more sense in context.
There was a closing talk, and then everyone retired to the bar. All in all, a great day, and I’m really glad I got the opportunity to go (thanks for your ticket Paul (@s7v7ns) – you missed out mate!)
SemVer, short for Semantic Versioning is an easy way of numbering your software versions. They follow the model Major.Minor.Patch, like this 0.9.1 and has a very opinionated view on what is considered a Major “version bump” and what isn’t.
Sometimes, when writing a library, it’s easy to forget what version you’re on. Perhaps you have a feature change you’re working on, but also bug fixes to two or three previous versions you need to keep an eye on? How about an easy way of figuring out what that next bump should be?
In a recent conversation on the McrTech slack, Steven [0] mentioned he had a simple bash script for incrementing his SemVer numbers, and posted it over. Naturally, I tweaked it to work more easily for my usecases so, this is *mostly* Steven’s code, but with a bit of a wrapper before and after by me :)
Late Edit: 2022-11-19 ictus4u spotted that I wasn’t handling the reset of PATCH to 0 when MINOR gets a bump. I fixed this in the above gist.
So how do you use this? Dead simple, use nextver in a tree that has an existing git tag SemVer to get the next patch number. If you want to bump it to the next minor or major version, try nextver minor or nextver major. If you don’t have a git tag, and don’t specify a SemVer number, then it’ll just assume you’re starting from fresh, and return 0.0.1 :)
One of the things I miss about Jekyll when I’m working with Ansible is the ability to fragment my data across multiple files, but still have it as a structured *whole* at the end.
For example, given the following directory structure in Jekyll:
+ _data
|
+---+ members
|   +--- member1.yml
|   +--- member2.yml
|
+---+ groups
    +--- group1.yml
    +--- group2.yml
The content of member1.yml and member2.yml will be rendered into site.data.members.member1 and site.data.members.member2 and likewise, group1 and group2 are loaded into their respective variables.
This kind of structure isn’t possible in Ansible, because all the data files are compressed into one vars value that we can read. To work around this on a few different projects I’ve worked on, I’ve ended up doing the following:
- set_fact:
    my_members: |-
      [
        {%- for var in vars | dict2items -%}
          {%- if var.key | regex_search(my_regex) is not none -%}
            "{{ var.key | regex_replace(my_regex, '') }}":
              {%- if var.value | string %}"{% endif -%}
              {{ var.value }}
              {%- if var.value | string %}"{% endif %},
          {%- endif -%}
        {%- endfor -%}
      ]
  vars:
    my_regex: '^member_'
So, what this does is to step over all the variables defined (for example, in host_vars\*, group_vars\*, from the gathered facts and from the role you’re in – following Ansible’s loading precedence), and then checks to see whether the key of that variable name (e.g. “member_i_am_a_member” or “member_1”) matches the regular expression (click here for more examples). If it does, the key (minus the regular expression matching piece [using regex_replace]) is added to a dictionary, and the value attached. If the value is actually a string, then it wraps it in quotes.
So, while this doesn’t give me my expressive data structure that Jekyll does (no site.data.members.member1.somevalue for me), I do at least get to have my_members.member1.somevalue if I put the right headers in! :)
I’ll leave extending this model for doing other sorts of building variables out (for example, something like if var.value['variable_place'] | default('') == 'my_members.member' + current_position) to the reader to work out how they could use something like this in their workflows!
I’m strongly in the “Ansible is my tool, what needs fixing” camp, when it comes to Infrastructure as Code (IaC) but, I know there are other tools out there which are equally as good. I’ve been strongly advised to take a look at Terraform from HashiCorp. I’m most familiar at the moment with Azure, so this is going to be based around resources available on Azure.
Late edit: I want to credit my colleague, Pete, for his help getting started with this. While many of the code samples have been changed from what he provided me with, if it hadn’t been for these code samples in the first place, I’d never have got started!
Late edit 2: This post was initially based on Terraform 0.11, and I was prompted by another colleague, Jon, that the available documentation still follows the 0.11 layout. 0.12 was released in May, and changes how variables are reused in the code. This post now *should* follow the 0.12 conventions, but if you spot something where it doesn’t, check out this post from the Terraform team.
As with most things, there’s a learning curve, and I struggled to find a “simple” getting started guide for Terraform. I’m sure this is a failing on my part, but I thought it wouldn’t hurt to put something out there for others to pick up and see if it helps someone else (and, if that “someone else” is you, please let me know in the comments!)
Pre-requisites
You need an Azure account for this. This part is very far outside my spectrum of influence, but I’m assuming you’ve got one. If not, look at something like Digital Ocean, AWS or VMWare :) For my “controller”, I’m using Windows Subsystem for Linux (WSL), and wrote the following notes about getting my pre-requisites.
Building the file structure
One quirk with Terraform, versus other tools like Ansible, is that when you run one of the terraform commands (like terraform init, terraform plan or terraform apply), it reads the entire content of any file suffixed “tf” in that directory, so if you don’t want a file to be loaded, you need to either move it out of the directory, comment it out, or rename it so it doesn’t end .tf. By convention, you normally have three “standard” files in a terraform directory – main.tf, variables.tf and output.tf, but logically speaking, you could have everything in a single file, or each instruction in it’s own file. Because this is a relatively simple script, I’ll use this standard layout.
The actions I’ll be performing are the “standard” steps you’d perform in Azure to build a single Infrastructure as a Service (IAAS) server service:
Create your Resource Group (RG)
Create a Virtual Network (VNET)
Create a Subnet
Create a Security Group (SG) and rules
Create a Public IP address (PubIP) with a DNS name associated to that IP.
Create a Network Interface (NIC)
Create a Virtual Machine (VM), supplying a username and password, the size of disks and VM instance, and any post-provisioning instructions (yep, I’m using Ansible for that :) ).
I’m using Visual Studio Code, but almost any IDE will have integrations for Terraform. The main thing I’m using it for is auto-completion of resource, data and output types, also the fact that control+clicking resource types opens your browser to the documentation page on terraform.io.
So, creating my main.tf, I start by telling it that I’m working with the Terraform AzureRM Provider (the bit of code that can talk Azure API).
This simple statement is enough to get Terraform to load the AzureRM, but it still doesn’t tell Terraform how to get access to the Azure account. Use az login from a WSL shell session to authenticate.
Next, we create our basic resource, vnet and subnet resources.
But wait, I hear you cry, what are those var.something bits in there? I mentioned before that in the “standard” set of files is a “variables.tf” file. In here, you specify values for later consumption. I have recorded variables for the resource group name and location, as well as the VNet name and subnet name. Let’s add those into variables.tf.
When you’ve specified a resource, you can capture any of the results from that resource to use later – either in the main.tf or in the output.tf files. By creating the resource group (called “rg” here, but you can call it anything from “demo” to “myfirstresourcegroup”), we can consume the name or location with azurerm_resource_group.rg.name and azurerm_resource_group.rg.location, and so on. In the above code, we use the VNet name in the subnet, and so on.
After the subnet is created, we can start adding the VM specific parts – a security group (with rules), a public IP (with DNS name) and a network interface. I’ll create the VM itself later. So, let’s do this.
BUT WAIT, what’s that ${trimspace(data.http.icanhazip.body)}/32 bit there?? Any resources we want to load from the terraform state, but that we’ve not directly defined ourselves needs to come from somewhere. These items are classed as “data” – that is, we want to know what their values are, but we aren’t *changing* the service to get it. You can also use this to import other resource items, perhaps a virtual network that is created by another team, or perhaps your account doesn’t have the rights to create a resource group. I’ll include a commented out data block in the overall main.tf file for review that specifies a VNet if you want to see how that works.
In this case, I want to put the public IP address I’m coming from into the NSG Rule, so I can get access to the VM, without opening it up to *everyone*. I’m not that sure that my IP address won’t change between one run and the next, so I’m using the icanhazip.com service to determine my IP address. But I’ve not defined how to get that resource yet. Let’s add it to the main.tf for now.
So, we’re now ready to create our virtual machine. It’s quite a long block, but I’ll pull certain elements apart once I’ve pasted this block in.
So, this is broken into four main pieces.
Virtual Machine Details. This part is relatively sensible. Name RG, location, NIC, Size and what happens to the disks when the machine powers on. OK.
OS basics: VM Hostname, username of the first user, and it’s password. Note, if you want to use an SSH key, this must be stored for Terraform to use without passphrase. If you mention an SSH key here, as well as a password, this can cause all sorts of connection issues, so pick one or the other.
And lastly, provisioning. I want to use Ansible for my provisioning. In this example, I have a basic playbook stored locally on my Terraform host, which I transfer to the VM, install Ansible via pip, and then execute ansible-playbook against the file I uploaded. This could just as easily be a git repo to clone or a shell script to copy in, but this is a “simple” example.
This part of code is done in three parts – create upload path, copy the files in, and then execute it. If you don’t create the upload path, it’ll upload just the first file it comes to into the path specified.
Each remote-exec and file provisioner statement must include the hostname, username and either the password, or SSH private key. In this example, I provide just the password.
So, having created all this lot, you need to execute the terraform workload. Initially you do terraform init. This downloads all the provisioners and puts them into the same tree as these .tf files are stored in. It also resets the state of the terraform discovered or created datastore.
Next, you do terraform plan -out tfout. Technically, the tfout part can be any filename, but having something like tfout marks it as clearly part of Terraform. This creates the tfout file with the current state, and whatever needs to change in the Terraform state file on it’s next run. Typically, if you don’t use a tfout file within about 20 minutes, it’s probably worth removing it.
Finally, once you’ve run your plan stage, now you need to apply it. In this case you execute terraform apply tfout. This tfout is the same filename you specified in terraform plan. If you don’t include -out tfout on your plan (or even run a plan!) and tfout in your apply, then you can skip the terraform plan stage entirely.
When I ran this, with a handful of changes to the variable files, I got this result:
Once you’re done with your environment, use terraform destroy to shut it all down… and enjoy :)
The full source is available in the associated Gist. Pull requests and constructive criticism are very welcome!
Featured image is “Seca” by “Olearys” on Flickr and is released under a CC-BY license.
I want to preach for a few minutes about Containers in Firefox. This is not like Docker containers, a Snap Package (using cgroups), or Shipping Containers, but instead a way of describing how each tab protects you from tracking.
Here’s a quick lesson in how the web works. Each website you visit, when you get the HTML page, it might *also* ask you store a small text file, a “Cookie” that then gets handed *back* to that site the next time you visit. It’s an easy way of saying “I’ve been here before, you know me already”.
This doesn’t just happen when you visit a web page (unless the web page is really *really* simple), it also happens for each resource on that page. If the page also asks for an image (say, the logo of a social media network), a script (say, a banner bar from an advertising network) or a font (yep, web fonts are also a thing!), each one of those also gets to say “here’s a Cookie, keep it for the next time you come back”.
For a few years, there have been ad-blockers (my favourite two are “uBlock Origin” and “Privacy Badger“), which can stop the content from ever being loaded… but it’s an arms race. The ad-blockers stop content from being loaded (mostly it’s just to stop the adverts, but the other stuff is a benefit that they’ve kept on doing), then the tracking firms do something else to make it so their content is loaded, and so-on. Firefox also has “Private Browsing Mode”, which can stop “third party cookies” (the ones from each of the additional sources on the page) from being shared… but I always think that Private Browsing mode looks shady.
In the last couple of years, Firefox started an experiment called “Firefox Multi-Account Containers” (or just “Containers” for short). This is designed to create a whole new “state” for each browser tab, that’s shared between those containers.
You can mark particular websites as being part of a particular container, so Twitter, Facebook and GMail all end up in my “Personal” container, whereas the sites I need for work are in the “Work” container.
For a while I was using them to support family members (“I just need you to log into your GMail account for me to have a poke around… let me create a new container for your account”, or “Let’s have a look at why you’re getting those Facebook posts. Can you log in in this container here?”).
Then I needed it to separate out a couple of Twitter accounts I’m responsible for (when I use the “Switch Containers” extension to jump between them)… Then I found a new extension which upgraded how I use them “Temporary Containers“. With a couple of tweaks (see below), this makes every new tab into it’s own container… so it’s a bit like Private Browsing Mode, but one which dynamically turns itself into a “non-private mode” if you hit the right URL.
So, this is my work-flow – it might not work for you, but equally, it might! When I open a new tab, or visit a website that isn’t already categorised as a “Personal”, “Work” (or so-on) container, I get taken to a new “Temporary” container.
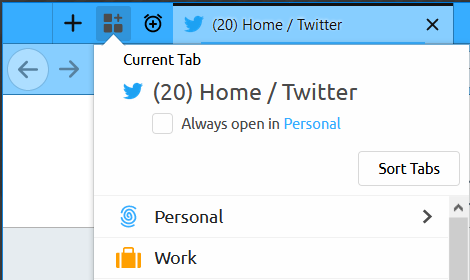
A Temporary Container window (note the “tmp2” in the address bar)
I then ask myself if this is something I need to log into with one of my existing containers (e.g. Google, Facebook, Twitter, Github, Azure, AWS etc), and if so, I’ll “Switch Containers” to that container (e.g. Personal).
Switching containers with the “Switch Containers” button
If I think that I always want to open it here then I’ll click on the “Containers” button in the bar, and select “Always open in ‘Personal'”.
Selecting “Always open in Personal”
If I’ve categorised something that I need to swap to something else (e.g. Twitter for another account, or a family member’s GMail account), then I explicitly “Switch Containers” or open a tab in that container first, and then go to the website.
If I need a new container for this window, I use the + symbol next to the “Edit Containers” button in the containers button in the window bar.
Adding a new container with the + button in the Open Container Tab dialogue
I also use the “Open Bookmark in Container” extension, for when I’m using bookmarks, as, by default, these can’t be opened in a container. I also use the “Containers Theme” extension, as can be seen by the colour changes in the above screenshots.
While this is fully available for Firefox on Desktop, it’s not yet available on Firefox for Android or Firefox for iOS, and there’s no word on whether it will come at all…
If you’re often doing “git” things, and you’ve mastered the git add README.md ; git commit -m 'Added readme' ; git push origin cycle, then these steps might help you.
Late Edit – 2019-11-05: Ansible 2.9 has some Check Point modules for interacting with the Check Point Manager API which are actually Idempotent, and if you’re running Ansible <=2.8, there are some non-idempotent modules available directly from Check Point. This post is about interacting with the OS. The OS might now be much more addressable using ansible_connection=ssh!
In Check Point Gaia R77, if you wanted to run Ansible against this node, you were completely out of luck. The version of Python on the host was broken, modules were missing and … well, it just wouldn’t work.
Today, I’m looking at running some Ansible playbooks against Check Point R80 nodes. Here’s some steps you need to get through to make it work.
Make sure the user that Ansible is going to be using has the shell /bin/bash. If you don’t have this set up, the command is: set user ansible shell /bin/bash.
If you want a separate user account to do ansible actions, run these commands: add user ansible uid 9999 homedir /home/ansible set user ansible password-hash $1$D3caF9$B4db4Ddecafbadnogoood (note this hash is not valid!) add rba user ansible roles adminRole set user ansible shell /bin/bash
Make sure your inventory specifies the right path for your Python binary. In the next code block you’ll see my inventory for three separate Check Point R80+ nodes. Note that I’ll only be targetting the “checkpoint” group, but that I’m using the r80_10, r80_20 and r80_30 groups to load the variables into there. I could, alternatively, add these in as values in group_vars/r80_10.yml and so on, but I find keeping everything to do with my connection in one place much cleaner. The python interpreter is in a separate path for each version time, and if you don’t specify ansible_ssh_transfer_method=piped you’ll get a message like this: [WARNING]: sftp transfer mechanism failed on [cpr80-30]. Use ANSIBLE_DEBUG=1 to see detailed information(fix from Add pipeline-ish method using dd for file transfer over SSH (#18642) on the Ansible git repo)
One quick word of warning though, don’t use gather_facts: true or the setup: module. Both of these still rely on missing libraries on the Check Point nodes, and won’t work… But then again, you can get whatever you need from shell commands….. right? ;)
A couple of years ago, a colleague created (and I enhanced) a Vagrant and Ansible playbook called “Project X” which would run an AWX instance in a Virtual Machine. It’s a bit heavy, and did a lot of things to do with persistence that I really didn’t need, so I parked my changes and kept an eye on his playbook…
Fast-forward to a week-or-so ago. I needed to explain what a Git/Ansible Workflow would look like, and so I went back to look at ProjectX. Oh my, it looks very complex and consumed a lot of roles that, historically, I’ve not been that impressed with… I just needed the basics to run AWX. Oh, and I also needed a Gitlab environment.
I knew that Gitlab had a docker-based install, and so does AWX, so I trundled off to find some install guides. These are listed in the playbook I eventually created (hence not listing them here). Not all the choices I made were inspired by those guides – I wanted to make quite a bit of this stuff “build itself”… this meant I wanted users, groups and projects to be created in Gitlab, and users, projects, organisations, inventories and credentials to be created in AWX.
I knew that you can create Docker Containers in Ansible, so after I’d got my pre-requisites built (full upgrade, docker installed, pip libraries installed), I add the gitlab-ce:latest docker image, and expose some ports. Even now, I’m not getting the SSH port mapped that I was expecting, but … it’s no disaster.
I did notice that the Gitlab service takes ages to start once the container is marked as running, so I did some more digging, and found that the uri module can be used to poll a URL. It wasn’t documented well how you can make it keep polling until you get the response you want, so … I added a PR on the Ansible project’s github repo for that one (and I also wrote a blog post about that earlier too).
Once I had a working Gitlab service, I needed to customize it. There are a bunch of Gitlab modules in Ansible but since a few releases back of Gitlab, these don’t work any more, so I had to find a different way. That different way was to run an internal command called “gitlab-rails”. It’s not perfect (so it doesn’t create repos in your projects) but it’s pretty good at giving you just enough to build your demo environment. So that’s getting Gitlab up…
Now I need to build AWX. There’s lots of build guides for this, but actually I had most luck using the README in their repository (I know, who’d have thought it!??!) There are some “Secrets” that should be changed in production that I’m changing in my script, but on the whole, it’s pretty much a vanilla install.
Unlike the Gitlab modules, the Ansible Tower modules all work, so I use these to create the users, credentials and so-on. Like the gitlab-rails commands, however, the documentation for using the tower modules is pretty ropey, and I still don’t have things like “getting your users to have access to your organisation” working from the get-go, but for the bulk of the administration, it does “just work”.
Like all my playbooks, I use group_vars to define the stuff I don’t want to keep repeating. In this demo, I’ve set all the passwords to “Passw0rd”, and I’ve created 3 users in both AWX and Gitlab – csa, ops and release – indicative of the sorts of people this demo I ran was aimed at – Architects, Operations and Release Managers.
Maybe, one day, I’ll even be able to release the presentation that went with the demo ;)
What we do here is to start an action with an “async” time (to give the Schedule an opportunity to register itself) and a “poll” time of 0 (to prevent the Schedule from waiting to be finished). We then tell it that it’s “never changed” (changed_when: False) because otherwise it always shows as changed, and to register the scheduled item itself as a “sleeper”.
After all the async jobs get queued, we then check the status of all the scheduled items with the async_status module, passing it the registered job ID. This lets me spin up a lot more items in parallel, and then “just” confirm afterwards that they’ve been run properly.
It’s not perfect, and it can make for rather messy code. But, it does work, and it’s well worth giving it the once over, particularly if you’ve got some slow-to-run tasks in your playbook!