At work last week, I finally solved an issue by writing some code, and I wanted to explain why I wrote it.
At it’s core, Kubernetes is an orchestrator which runs “Container Images”, which are structured filesystem snapshots, taken after running individual commands against a base system. These container images are stored in a container registry, and the most well known of these is the Docker registry, known as Docker Hub.
A registry can be public, meaning you don’t need credentials to get any images from it, or private. Some also offer a mixed-mode where you can make a certain number of requests without requiring authentication, but if you need more than that amount of requests, you need to provide credentials.
During the build-out of a new cluster, I discovered that the ECR (Elastic Container Registry) from AWS requires a new type of authentication – the Kubelet Credential Provider, which required the following changes:
In /etc/sysconfig/kubelet you provide these two switches; --image-credential-provider-bin-dir /usr/local/bin/image-credential-provider and --image-credential-provider-config /etc/kubernetes/image-credential-provider-config.json.
In /etc/kubernetes/image-credential-provider-config.json you provide a list of registries and the credential provider to use, which looks like this:
I will confess I made heavy use of ChatGPT to get a steer on certain aspects of how to write the code, but all the code is generic and there’s nothing proprietary in this code.
Using the Generic Credential Provider
Follow the steps above – change your Kubernetes environment to ensure you have the kubelet configuration changes and the JSON credential provider configuration put in the relevant parts of your tree. Set the “matchImages” values to include the registry in question – for dockerhub, I’d probably use ["docker.io", "*.docker.io"]
Download the generic-credential-provider script from Github, put it in the right path in your worker node’s filesystem (if you followed my notes above it’ll be in /usr/local/bin/image-credential-provider/generic-credential-provider but this is *your* system we’re talking about, not mine! You know your build better than I do!)
Create the /etc/kubernetes/registries directory – this can be changed by editing the script to use a new path, and for testing purposes there is a flag --credroot /some/new/path but that doesn’t work for the kubelet configuration file.
Create a credential file, for example, /etc/kubernetes/registries/example.org.json which contains this string: {"username":"token_username","password":"token_password"}. [Yes, it’s a plaintext credential. Make sure it’s scoped for only image downloads. No, this still isn’t very good. But how else would you do this?! (Pull requests are welcomed!)] You can add a duration value into that JSON dictionary, to change the default timeout from 5 minutes. Technically, the default is actually set in /etc/kubernetes/image-credential-provider-config.json but I wanted to have my own per-credential, and as these values are coming from the filesystem, and therefore has very little performance liability, I didn’t want to have a large delay in the cache.
You should also see an entry in your syslog service showing a line that says “Credential request fulfilled for your.registry.example.com” and if you pass it a check that it fails, it should say “Failed to fulfill credential request for failure.example.org“.
Late edit 2025-12-04: I had cause today to revisit this. While this may help you to build your own Credential Provider, it doesn’t provide enough detail to test why an image isn’t pulling. For that I wrote and later asked Claude to enhance a script to pull images. That’s here: pullImage Functions
If this helped you, please consider buying me a drink to say thanks!
I love the tee command – it captures stdout [1] and puts it in a file, while then returning that output to stdout for the next process in a pipe to consume, for example:
$ ls -l | tee /tmp/output
total 1
xrwxrwxrw 1 jonspriggs jonspriggs 0 Jul 27 11:16 build.sh
$ cat /tmp/output
total 1
xrwxrwxrw 1 jonspriggs jonspriggs 0 Jul 27 11:16 build.sh
But wait, why is that useful? Well, in a script, you don’t always want to see the content scrolling past, but in the case of a problem, you might need to catch up with the logs afterwards. Alternatively, you might do something like this:
if some_process | tee /tmp/output | grep -q "some text"
then
  echo "Found 'some text' - full output:"
  cat /tmp/output
fi
This works great for stdout but what about stderr [2]? In this case you could just do:
some_process 2>&1 | tee /tmp/output
But that mashes all of stdout and stderr into the same blob.
In my case, I want to capture all the output (stdout and stderr) of a given process into a file. Only stdout is forwarded to the next process, but I still wanted to have the option to see stderr as well during processing. Enter process substitution.
With this, I run capture_out step-1 do_a_thing and then in /tmp/tmp.sometext/step-1/stdout and /tmp/tmp.sometext/step-1/stderr are the full outputs I need… but wait, I can also do:
if capture_out has_an_error something-wrong | capture_out handler check_output
then
  echo "It all went great"
else
  echo "Process failure"
  echo "--Initial process"
  # Use wc -c to check the number of characters in the file
  if [ -e "${TEMP_DATA_PATH}/has_an_error/stdout"] && [ 0 -ne "$(wc -c "${TEMP_DATA_PATH}/has_an_error/stdout")" ]
  then
    echo "----stdout:"
    cat "${TEMP_DATA_PATH}/has_an_error/stdout"
  fi
  if [ -e "${TEMP_DATA_PATH}/has_an_error/stderr"] && [ 0 -ne "$(wc -c "${TEMP_DATA_PATH}/has_an_error/stderr")" ]
  then
    echo "----stderr:"
    cat "${TEMP_DATA_PATH}/has_an_error/stderr"
  fi
  echo "--Second stage"
  if [ -e "${TEMP_DATA_PATH}/handler/stdout"] && [ 0 -ne "$(wc -c "${TEMP_DATA_PATH}/handler/stdout")" ]
  then
    echo "----stdout:"
    cat "${TEMP_DATA_PATH}/handler/stdout"
  fi
  if [ -e "${TEMP_DATA_PATH}/handler/stderr"] && [ 0 -ne "$(wc -c "${TEMP_DATA_PATH}/handler/stderr")" ]
  then
    echo "----stderr:"
    cat "${TEMP_DATA_PATH}/handler/stderr"
  fi
fi
This has become part of my normal toolkit now for logging processes. Thanks bash!
Also, thanks to ChatGPT for helping me find this structure that I’d seen before, but couldn’t remember how to do it! (it almost got it right too! Remember kids, don’t *trust* what ChatGPT gives you, use it as a research starting point, test *that* against your own knowledge, test *that* against your environment and test *that* against expected error cases too! Copy & Paste is not the best idea with AI generated code!)
Footnotes
[1] stdout is the name of the normal output text we see in a shell, it’s also sometimes referred to as “file descriptor 1” or “fd1”. You can also output to &1 with >&1 which means “send to fd1”
[2] stderr is the name of the output in a shell when an error occurs. It isn’t caught by things like some_process > /dev/null which makes it useful when you don’t want to see output, just errors. Like stdout, it’s also referred to as “file descriptor 2” or “fd2” and you can output to &2 with >&2 if you want to send stdout to stderr.
In my current role we are using Packer to build images on a Xen Orchestrator environment, use a CI/CD system to install that image into both a Xen Template and an AWS AMI, and then we use Terraform to use that image across our estate. The images we build with Packer have this stanza in it:
But, because Xen doesn’t track when a template is created, instead I needed to do something different. Enter get_xoa_template.sh.
This file contains hidden or bidirectional Unicode text that may be interpreted or compiled differently than what appears below. To review, open the file in an editor that reveals hidden Unicode characters.
Learn more about bidirectional Unicode characters
[ -z "$TEMPLATE_IS" ] && fail "Could not match this template" 4
if [ -n "$DEBUG" ]
then
echo "{\"is\": ${TEMPLATE_IS}}" | tee -a "$DEBUG"
else
echo "{\"is\": ${TEMPLATE_IS}}"
fi
}
[ -n "$(command -v xo-cli)" ] || fail "xo-cli is missing, and is a required dependency for this script. Please install it; \`sudo npm -g install xo-cli\`" 5
This script is invoked from your terraform like this:
variable "template_name" {
  default     = "SomeLinux-version.iso-"
  description = "A regex, partial or full string to match in the template name"
}

variable "poolname" {
  default = "MyPool"
}

data "external" "get_xoa_template" {
  program = [
    "/bin/bash", "${path.module}/get_xoa_template.sh",
    "--template", var.template_name,
    "--pool", var.poolname
  ]
}

data "xenorchestra_pool" "pool" {
  name_label = var.poolname
}

data "xenorchestra_template" "template" {
  name_label = data.external.get_xoa_template.result.is
  pool_id    = data.xenorchestra_pool.pool.id
}
And that’s how you do it. Oh, and if you need to pin to a specific version? Change the template_name value from the partial or regex version to the full version, like this:
variable "template_name" {
  # This assumes your image was minted at midnight on 1970-01-01
  default     = "SomeLinux-version.iso-19700101000000"
}
Last week I created a post talking about the new project I’ve started on Github called “Terminate-Notice” (which in hindsight isn’t very accurate – at best it’s ‘spot-instance-responses’ and at worst it’s ‘instance-rebalance-and-actions-responder’ but neither work well)… Anyway, I mentioned how I was creating RPM and DEB packages for my bash scripts and that I hadn’t put it into a repo yet.
Well, now I have, so let’s wander through how I made this work.
I have a the following files in my shell script, which are:
/usr/sbin/terminate-notice (the actual script which will run)
/usr/lib/systemd/system/terminate-notice.service (the SystemD Unit file to start and stop the script)
/usr/share/doc/terminate-notice/LICENSE (the license under which the code is released)
/etc/terminate-notice.conf.d/service.conf (the file which tells the script how to run)
These live in the root directory of my repository.
I also have the .github directory (where the things that make this script work will live), a LICENSE file (so Github knows what license it’s released under) and a README.md file (so people visiting the repo can find out about it).
A bit about Github Actions
Github Actions is a CI/CD pipeline built into Github. It responds to triggers – in our case, pushes (or uploads, in old fashioned terms) to the repository, and then runs commands or actions. The actions which will run are stored in a simple YAML formatted file, referred to as a workflow which contains some setup fields and then the “jobs” (collections of actions) themselves. The structure is as follows:
# The pretty name rendered by Actions to refer to this workflow
name: Workflow Name

# Only run this workflow when the push is an annotated tag starting v
on:
  push:
    tags:
      - 'v*'

# The workflow contains a collection of jobs, each of which has
# some actions (or "steps") to run
jobs:
  # This is used to identify the output in other jobs
  Unique_Name_For_This_Job:
    # This is the pretty name rendered in the Github UI for this job
    name: Job Name
    # This is the OS that the job will run on - typically
    # one of: ubuntu-latest, windows-latest, macos-latest
    runs-on: runner-os
    # The actual actions to perform
    steps:
      # This is a YAML list, so note where the hyphens (-) are
        # The pretty name of this step
      - name: Checkout Code
        # The name of the public collection of actions to perform
        uses: actions/checkout@v3
        # Any variables to pass into this action module
        with:
          path: "REPO"

      # This action will run a shell command
      - name: Run a command
        run: echo "Hello World"
Build a DEB package
At the simplest point, creating a DEB package is;
Create the directory structure (as above) that will unpack from your package file and put the files in the right places.
Create a DEBIAN/control file which provides enough details for your package manager to handle it.
Run dpkg-deb --build ${PATH_TO_SOURCE} ${OUTPUT_FILENAME}
Assuming the DEBIAN/control file was static and also lived in the repo, and I were just releasing the DEB file, then I could make the above work with the following steps:
name: Create the DEB

permissions:
  contents: write

on:
  push:
    tags:
      - 'v*'

jobs:
  Create_Packages:
    name: Create Package
    runs-on: ubuntu-latest
    steps:
      - name: Checkout code
        uses: actions/checkout@v3
        with:
          path: "REPO"

      - name: Copy script files around to stop .github from being added to the package then build the package
        run: |
          mkdir PKG_SOURCE
          cp -Rf REPO/usr REPO/etc REPO/DEBIAN PKG_SOURCE
          dpkg-deb --build PKG_SOURCE package.deb

      - name: Release the Package
        uses: softprops/action-gh-release@v1
        with:
          files: package.deb
But no, I had to get complicated and ALSO build an RPM file… and put some dynamic stuff in there.
Build an RPM file
RPMs are a little more complex, but not by much. RPM takes a spec file, which starts off looking like the DEBIAN/control file, and adds some “install” instructions. Let’s take a look at that spec file:
The “Name”, “Version”, “Release” and “BuildArch” values in the top of that file define what the resulting filename is (NAME_VERSION-RELEASE.BUILDARCH.rpm).
Notice that there are some “macros” which replace /etc with %{_sysconfdir}, /usr/sbin with %{_sbindir} and so on, which means that, theoretically, this RPM could be installed in an esoteric tree… but most people won’t bother.
The one quirk with this is that %{name} bit there – RPM files need to have all these sources in a directory named after the package name, which in turn is stored in a directory called SOURCES (so SOURCES/my-package for example), and then it copies the files to wherever they need to go. I’ve listed etc/config/file and usr/sbin/script but these could just have easily been file and script for all that the spec file cares.
Once you have the spec file, you run sudo rpmbuild --define "_topdir $(pwd)" -bb file.spec to build the RPM.
So, again, how would that work from a workflow YAML file perspective, assuming a static spec and source tree as described above?
name: Create the DEB

permissions:
  contents: write

on:
  push:
    tags:
      - 'v*'

jobs:
  Create_Packages:
    name: Create Package
    runs-on: ubuntu-latest
    steps:
      - name: Checkout code
        uses: actions/checkout@v3
        with:
          path: "REPO"

      - name: Copy script files around to stop .github from being added to the package then build the package
        run: |
          mkdir -p SOURCES/my-package-name
          cp -Rf REPO/usr REPO/etc SOURCES/my-package-name
          sudo rpmbuild --define "_topdir $(pwd)" -bb my-package-name.spec

      - name: Release the Package
        uses: softprops/action-gh-release@v1
        with:
          files: RPMS/my-package-name_0.0.1-1.noarch.rpm
But again, I want to be fancy (and I want to make resulting packages as simple to repeat as possible)!
So, this is my release.yml as of today:
name: Run the Release

permissions:
  contents: write

on:
  push:
    tags:
      - 'v*'

jobs:
  Create_Packages:
    name: Create Packages
    runs-on: ubuntu-latest
    steps:
      - name: Checkout code
        uses: actions/checkout@v3
        with:
          path: "REPO"

      - name: Calculate some variables
        run: |
          (
            echo "GITHUB_REPO_NAME=$(echo "${GITHUB_REPOSITORY}" | cut -d/ -f2)"
            echo "VERSION=$(echo "${GITHUB_REF_NAME}" | sed -e 's/^v//')"
            echo "DESCRIPTION=A script which polls the AWS Metadata Service looking for an 'instance action', and triggers scripts in response to the termination notice."
            echo "DEB_ARCHITECTURE=${ARCHITECTURE:-all}"
            echo "RPM_ARCHITECTURE=${ARCHITECTURE:-noarch}"
            echo "RELEASE=1"
            cd REPO
            echo "FIRST_YEAR=$(git log $(git rev-list --max-parents=0 HEAD) --date="format:%Y" --format="format:%ad")"
            echo "THIS_COMMIT_YEAR=$(git log HEAD -n1 --date="format:%Y" --format="format:%ad")"
            echo "THIS_COMMIT_DATE=$(git log HEAD -n1 --format="format:%as")"
            if [ "$FIRST_YEAR" = "$THIS_COMMIT_YEAR" ]
            then
              echo "YEAR_RANGE=$FIRST_YEAR"
            else
              echo "YEAR_RANGE=${FIRST_YEAR}-${THIS_COMMIT_YEAR}"
            fi
            cd ..
          ) >> $GITHUB_ENV

      - name: Make Directory Structure
        run: mkdir -p "SOURCES/${GITHUB_REPO_NAME}" SPECS release

      - name: Copy script files into SOURCES
        run: |
          cp -Rf REPO/[a-z]* "SOURCES/${GITHUB_REPO_NAME}"
          cp REPO/LICENSE REPO/README.md "SOURCES/${GITHUB_REPO_NAME}/usr/share/doc/${GITHUB_REPO_NAME}/"
          if grep -lr '#TAG#' SOURCES
          then
            sed -i -e "s/#TAG#/${VERSION}/" $(grep -lr '#TAG#' SOURCES)
          fi
          if grep -lr '#TAG_DATE#' SOURCES
          then
            sed -i -e "s/#TAG_DATE#/${THIS_COMMIT_YEAR}/" $(grep -lr '#TAG_DATE#' SOURCES)
          fi
          if grep -lr '#DATE_RANGE#' SOURCES
          then
            sed -i -e "s/#DATE_RANGE#/${YEAR_RANGE}/" $(grep -lr '#DATE_RANGE#' SOURCES)
          fi
          if grep -lr '#MAINTAINER#' SOURCES
          then
            sed -i -e "s/#MAINTAINER#/${MAINTAINER:-Jon Spriggs <jon@sprig.gs>}/" $(grep -lr '#MAINTAINER#' SOURCES)
          fi

      - name: Create Control File
        # Fields from https://www.debian.org/doc/debian-policy/ch-controlfields.html#binary-package-control-files-debian-control
        run: |
          mkdir -p SOURCES/${GITHUB_REPO_NAME}/DEBIAN
          (
            echo "Package:      ${GITHUB_REPO_NAME}"
            echo "Version:      ${VERSION}"
            echo "Section:      ${SECTION:-misc}"
            echo "Priority:     ${PRIORITY:-optional}"
            echo "Architecture: ${DEB_ARCHITECTURE}"
            if [ -n "${DEPENDS}" ]
            then
              echo "Depends: ${DEPENDS}"
            fi
            echo "Maintainer: ${MAINTAINER:-Jon Spriggs <jon@sprig.gs>}"
            echo "Description: ${DESCRIPTION}"
            if [ -n "${HOMEPAGE}" ]
            then
              echo "Homepage: ${HOMEPAGE}"
            fi
          ) | tee SOURCES/${GITHUB_REPO_NAME}/DEBIAN/control
          (
            echo "Files:"
            echo " *"
            echo "Copyright: ${YEAR_RANGE} ${MAINTAINER:-Jon Spriggs <jon@sprig.gs>}"
            echo "License: MIT"
            echo ""
            echo "License: MIT"
            sed 's/^/ /' "SOURCES/${GITHUB_REPO_NAME}/usr/share/doc/${GITHUB_REPO_NAME}/LICENSE"
          ) | tee SOURCES/${GITHUB_REPO_NAME}/DEBIAN/copyright

      - name: Create Spec File
        run: PATH="REPO/.github/scripts:${PATH}" create_spec_file.sh

      - name: Build DEB Package
        run: dpkg-deb --build SOURCES/${GITHUB_REPO_NAME} "${{ env.GITHUB_REPO_NAME }}_${{ env.VERSION }}_${{ env.DEB_ARCHITECTURE }}.deb"

      - name: Build RPM Package
        run: sudo rpmbuild --define "_topdir $(pwd)" -bb SPECS/${GITHUB_REPO_NAME}.spec

      - name: Confirm builds complete
        run: sudo install -m 644 -o runner -g runner $(find . -type f -name *.deb && find . -type f -name *.rpm) release/

      - name: Release
        uses: softprops/action-gh-release@v1
        with:
          files: release/*
So this means I can, within reason, drop this workflow (plus a couple of other scripts to generate the slightly more complex RPM file – see the other files in that directory structure) into another package to release it.
OH WAIT, I DID! (for the terminate-notice-slack repo, for example!) All I actually needed to do there was to change the description line, and off it went!
So, this is all well and good, but how can I distribute these? Enter Repositories.
Making a Repository
Honestly, I took most of the work here from two fantastic blog posts for creating an RPM repo and a DEB repo.
First you need to create a GPG key.
To do this, I created the following pgp-key.batch file outside my repositories tree
%echo Generating an example PGP key
Key-Type: RSA
Key-Length: 4096
Name-Real: YOUR_ORG_NAME
Name-Email: your_org_name@users.noreply.github.com
Expire-Date: 0
%no-ask-passphrase
%no-protection
%commit
Store the public.asc file to one side (you’ll need it later) and keep the private.asc safe because we need to put that into Github.
Creating Github Pages
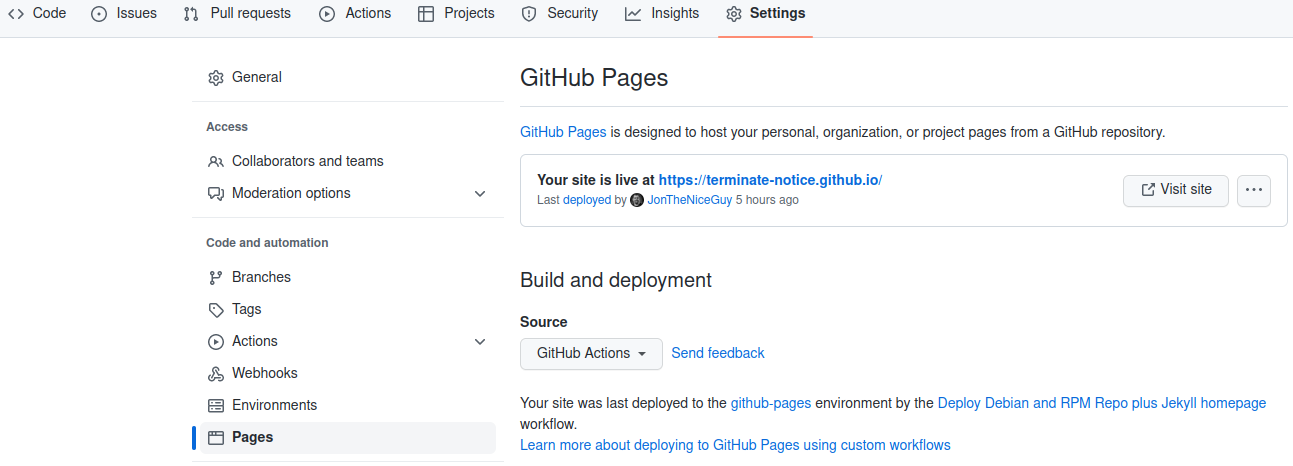
Create a new Git repository in your organisation called your-org.github.io. This marks the repository as being a Github Pages repository. Just to make that more explicit, in the settings for the repository, go to the pages section. (Note that yes, the text around this may differ, but are accurate as of 2023-03-28 in EN-GB localisation.)
Under “Source” select “GitHub Actions”.
Clone this repository to your local machine, and copy public.asc into the root of the tree with a sensible name, ending .asc.
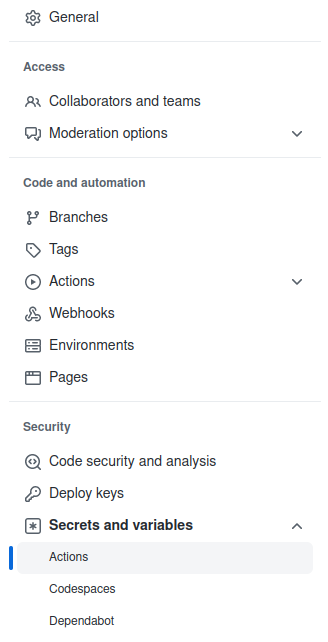
In the Github settings, find “Secrets and variables” under “Security” and pick “Actions”.
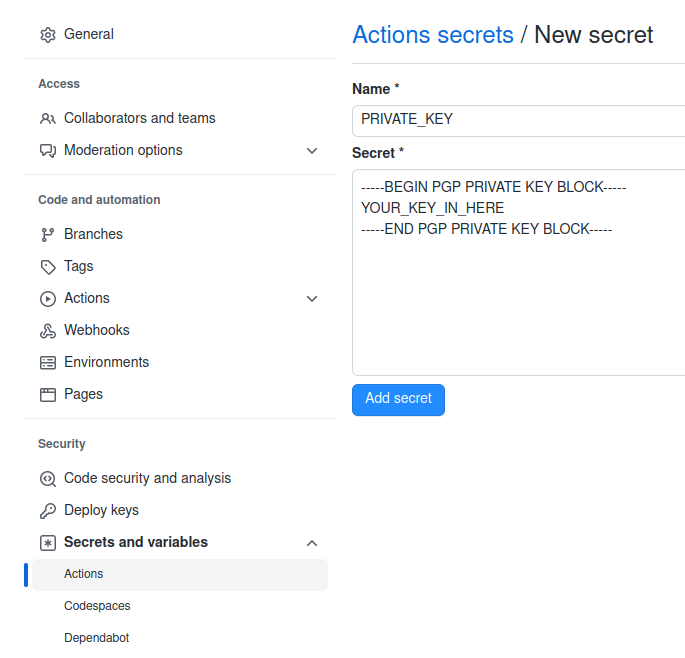
Select “New repository secret” and call it “PRIVATE_KEY”.
Now you can use this to sign things (and you will sign *SO MUCH* stuff)
Building the HTML front to your repo (I’m using Jekyll)
I’ve elected to use Jekyll because I know it, and it’s quite easy, but you should pick what works for you. My workflow for deploying these repos into the website rely on Jekyll because Github built that integration, but you’ll likely find other tools for things like Eleventy or Hugo.
Put a file called _config.yml into the root directory, and fill it with relevant content:
title: your-org
email: email_address@example.org
description: >-
  This project does stuff.
baseurl: ""
url: "https://your-org.github.io"
github_username: your-org

# Build settings
theme: minima
plugins:
  - jekyll-feed
exclude:
  - tools/
  - doc/
Naturally, make “your-org” “email_address@example.org” and the descriptions more relevant to your environment.
Next, create an index.md file with whatever is relevant for your org, but it must start with something like:
---
layout: home
title: YOUR-ORG Website
---
Here is the content for the front page.
Building the repo behind your static content
We’re back to working with Github Actions workflow files, so let’s pop that open.
I’ve basically changed the “stock” Jekyll static site Github Actions file and added every step that starts [REPO] to make the repository stuff fit in around the steps that start [JEKYLL] which build and deploy the Jekyll based site.
The key part to all this though is the step Build DEB and RPM repos which calls a script that downloads all the RPM and DEB files from the various other repository build stages and does some actions to them. Now yes, I could have put all of this into the workflow.yml file, but I think it would have made it all a bit more confusing! So, let’s work through those steps!
Making an RPM Repo
To build a RPM repo you get and sign each of the RPM packages you want to offer. You do this with this command:
Then, once you have all your RPM files signed, you then run a command called createrepo_c (available in Debian archives – Github Actions doesn’t have a RedHat based distro available at this time, so I didn’t look for the RPM equivalent). This creates the repository metadata, and finally you sign that file, like this:
gpg --detach-sign --armor repodata/repomd.xml
Making a DEB Repo
To build a DEB repo you get each of the DEB packages you want to offer in a directory called pool/main (you can also call “main” something else – for example “contrib”, “extras” and so on).
Once you have all your files, you create another directory called dists/stable/main/binary-all into which we’ll run a command dpkg-scanpackages to create the list of the available packages. Yes, “main” could also be called “contrib”, “extras” and “stable” could be called “testing” or “preprod” or the name of your software release (like “jaunty”, “focal” or “warty”). The “all” after the word “binary” is the architecture in question.
dpkg-scanpackages creates an index of the packages in that directory including the version number, maintainer and the cryptographic hashes of the DEB files.
We zip (using gzip and bzip2) the Packages file it creates to improve the download speeds of these files, and then make a Release file. This in turn has the cryptographic hashes of each of the Packages and zipped Packages files, which in turn is then signed with GPG.
Ugh, that was MESSY
Making the repository available to your distributions
RPM repos have it quite easy here – there’s a simple file, that looks like this:
The distribution user simply downloads this file, puts it into /etc/yum.sources.d/org-name.repo and now all the packages are available for download. Woohoo!
DEB repos are a little harder.
First, download the public key – https://org-name.github.io/public.asc and put it in /etc/apt/keyrings/org-name.asc. Next, create file in /etc/apt/sources.list.d/org-name.list with this line in:
deb [arch=all signed-by=/etc/apt/keyrings/org-name.asc] https://org-name.github.io/deb stable main
And now they can install whatever packages they want too!
Doing this the simple way
Of course, this is all well-and-good, but if you’ve got a simple script you want to package, please don’t hesitate to use the .github directory I’m using for terminate-notice, which is available in the -skeleton repo and then to make it into a repo, you can reuse the .github directory in the terminate-notice.github.io repo to start your adventure.
During some debugging of an issue with our AWS Spot Instances at work, a colleague noticed that we weren’t responding to the Instance Actions that AWS sends when it’s due to shut down a spot instance.
I’ve been working on my Decision Records open source project for a few months now, and I’ve finally settled on the cross-platform language Rust to create my script. As a result, I’ve got a build process which lets me build for Windows, Mac OS and Linux. I’m currently building a single, unsigned binary for each platform, and I wanted to make it so that Github Actions would build and release these three files for me. Most of the guidance which is currently out there points to some unmaintained actions, originally released by GitHub… but now they point to a 3rd party “release” action as their recommended alternative, so I thought I’d explain how I’m using it to release on several platforms at once.
Although I can go into detail about the release file I’m using for Rust-Decision-Records, I’m instead going to provide a much more simplistic view, based on my (finally working) initial test run.
GitHub Actions
GitHub have a built-in Continuous Integration, Continuous Deployment/Delivery (CI/CD) system, called GitHub Actions. You can have several activities it performs, and these are executed by way of instructions in .github/workflows/<somefile>.yml. I’ll be using .github/workflows/build.yml in this example. If you have multiple GitHub Action files you wanted to invoke (perhaps around issue management, unit testing and so on), these can be stored in separate .yml files.
The build.yml actions file will perform several tasks, separated out into two separate activities, a “Create Release” stage, and a “Build Release” stage. The Build stage will use a “Matrix” to execute builds on the three platforms at the same time – Linux AMD64, Windows and Mac OS.
The actual build steps? In this case, it’ll just be writing a single-line text file, stating the release it’s using.
So, let’s get started.
Create Release
A GitHub Release is typically linked to a specific “tagged” commit. To trigger the release feature, every time a commit is tagged with a string starting “v” (like v1.0.0), this will trigger the release process. So, let’s add those lines to the top of the file:
name: Create Release

on:
  push:
    tags:
      - 'v*'
You could just as easily use the filter pattern ‘v[0-9]+.[0-9]+.[0-9]+’ if you wanted to use proper Semantic Versioning, but this is a simple demo, right? 😉
Next we need the actual action we want to start with. This is at the same level as the “on” and “name” tags in that YML file, like this:
So, this is the actual “create release” job. I don’t think it matters what OS it runs on, but ubuntu-latest is the one I’ve seen used most often.
In this, you instruct it to create a simple release, using the text in the annotated tag you pushed as the release notes.
This is using a third-party release action, softprops/action-gh-release, which has not been vetted by me, but is explicitly linked from GitHub’s own action.
If you check the release at this point, (that is, without any other code working) you’d get just the source code as a zip and a .tgz file. BUT WE WANT MORE! So let’s build this mutha!
Build Release
Like with the create_release job, we have a few fields of instructions before we get to the actual actions it’ll take. Let’s have a look at them first. These instructions are at the same level as the jobs:\n create_release: line in the previous block, and I’ll have the entire file listed below.
So this section gives this job an ID (build_release) and a name (Build Release), so far, so exactly the same as the previous block. Next we say “You need to have finished the previous action (create_release) before proceeding” with the needs: create_release line.
But the real sting here is the strategy:\n matrix: block. This says “run these activities with several runners” (in this case, an unspecified Ubuntu, Mac OS and Windows release (each just “latest”). The include block asks the runners to add some template variables to the tasks we’re about to run – specifically release_suffix.
The last line in this snippet asks the runner to interpret the templated value matrix.os as the OS to use for this run.
Let’s move on to the build steps.
    steps:
      - name: Checkout code
        uses: actions/checkout@v2

      - name: Run Linux Build
        if: matrix.os == 'ubuntu-latest'
        run: echo "Ubuntu Latest" > release_ubuntu

      - name: Run Mac Build
        if: matrix.os == 'macos-latest'
        run: echo "MacOS Latest" > release_mac

      - name: Run Windows Build
        if: matrix.os == 'windows-latest'
        run: echo "Windows Latest" > release_windows
This checks out the source code on each runner, and then has a conditional build statement, based on the OS you’re using for each runner.
It should be fairly simple to see how you could build this out to be much more complex.
The final step in the matrix activity is to add the “built” file to the release. For this we use the softprops release action again.
As previously mentioned, I use Ansible a lot inside Virtual machines orchestrated with Vagrant. Today’s brief tip is how to make Vagrant install the absolutely latest version of Ansible on Ubuntu boxes with Pip.
Here’s your Vagrantfile
Vagrant.configure("2") do |config|
  config.vm.box = "ubuntu/focal64"
  config.vm.provision "ansible_local", run: "always" do |ansible|
    ansible.playbook         = "setup.yml"
    ansible.playbook_command = "sudo ansible-playbook"
    ansible.install_mode     = "pip"
    ansible.pip_install_cmd  = "(until sudo apt update ; do sleep 1 ; done && sudo apt install -y python3-pip && sudo rm -f /usr/bin/pip && sudo ln -s /usr/bin/pip3 /usr/bin/pip && sudo -H pip install --upgrade pip) 2>&1 | tee -a /var/log/vagrant-init"
  end
end
“But, that pip_install_cmd block is huge”, I hear you cry!
Well, yes, but let’s split that out into a slightly more readable code block! (Yes, I’ve removed the “&&” for clarity sake – it just means “only execute the next command if this one worked”)
(
  # Wait until we get the apt "package lock" released
  until sudo apt update
  do
    # By sleeping for 1 second increments until it works
    sleep 1
  done

  # Then install python3-pip
  sudo apt install -y python3-pip

  # Just in case python2-pip is installed, delete it
  sudo rm -f /usr/bin/pip

  # And symbolically link pip3 to pip
  sudo ln -s /usr/bin/pip3 /usr/bin/pip

  # And then do a pip self-upgrade
  sudo -H pip install --upgrade pip

# And output this to the end of the file /var/log/vagrant-init, including any error messages
) 2>&1 | tee -a /var/log/vagrant-init
What does this actually do? Well, pip is the python package manager, so we’re asking for the latest packaged version to be installed (it often isn’t particularly with older releases of, well, frankly any Linux distribution) – this is the “pip_install_cmd” block. Then, once pip is installed, it’ll run “pip install ansible” – which will give it the latest version available to Pip, and then when that’s all done, it’ll run “sudo ansible-playbook /vagrant/setup.yml”
In the past few months I’ve been working on a project, and I’ve been doing the bulk of that work using Vagrant.
By default and convention, all Vagrant machines, set up using Virtualbox have a “NAT” interface defined as the first network interface, but I like to configure a second interface as a “Bridged” interface which gives the host a “Real” IP address on the network as this means that any security appliances I have on my network can see what device is causing what traffic, and I can quickly identify which hosts are misbehaving.
By default, Virtualbox uses the network 10.0.2.0/24 for the NAT interface, and runs a DHCP server for that interface. In the past, I’ve removed the default route which uses 10.0.2.2 (the IP address of the NAT interface on the host device), but with Ubuntu 20.04, this route keeps being re-injected, so I had to come up with a solution.
Fixing Netplan
Ubuntu, in at least 20.04, but (according to Wikipedia) probably since 17.10, has used Netplan to define network interfaces, superseding the earlier ifupdown package (which uses /etc/network/interfaces and /etc/network/interface.d/* files to define the network). Netplan is a kind of meta-script which, instructs systemd or NetworkManager to reconfigure the network interfaces, and so making the configuration changes here seemed most sensible.
Vagrant configures the file /etc/netplan/50-cloud-init.yml with a network configuration to support this DHCP interface, and then applies it. To fix it, we need to rewrite this file completely.
When I then came to a box running Fedora, I had a similar issue, except now I don’t have NetPlan to work with? How do I resolve this one?!
Actually, this is a four line script!
#!/bin/bash

# Get the name of the interface which has the IP address 10.0.2.2
netname="$(ip route | grep 10.0.2.2 | head -n 1 | sed -Ee 's/^(.*dev )(.*)$/\2/;s/proto [A-Za-z0-9]+//;s/metric [0-9]+//;s/[ \t]+$//')"

# Ask NetworkManager for a list of all the active connections, look for the string "eth0" and then just get the connection name.
nm="$(nmcli connection show --active | grep "${netname}" | sed -Ee 's/^(.*)([ \t][-0-9a-f]{36})(.*)$/\1/;s/[\t ]+$//g')"
# Set the network to have a metric of 250
nmcli connection modify "$nm" ipv4.route-metric 250
# And then re-apply the network config
nmcli connection up "$nm"
The last major interface management tool I’ve experienced on standard server Linux is “ifupdown” – /etc/network/interfaces. This is mostly used on Debian. How do we fix that one? Well, that’s a bit more tricky!
#!/bin/bash

# Get the name of the interface with the IP address 10.0.2.2
netname="$(ip route | grep 10.0.2.2 | head -n 1 | sed -Ee 's/^(.*dev )(.*)$/\2/;s/proto [A-Za-z0-9]+//;s/metric [0-9]+//;s/[ \t]+$//')"

# Create a new /etc/network/interfaces file which just looks in "interfaces.d"
echo "source /etc/network/interfaces.d/*" > /etc/network/interfaces

# Create the loopback interface file
{
  echo "auto lo"
  echo "iface lo inet loopback"
} > "/etc/network/interfaces.d/lo"
# Bounce the interface
ifdown lo ; ifup lo

# Create the first "real" interface file
{
  echo "allow-hotplug ${netname}"
  echo "iface ${netname} inet dhcp"
  echo "  metric 1000"
} > "/etc/network/interfaces.d/${netname}"
# Bounce the interface
ifdown "${netname}" ; ifup "${netname}"

# Loop through the rest of the interfaces
ip link | grep UP | grep -v lo | grep -v "${netname}" | cut -d: -f2 | sed -Ee 's/[ \t]+([A-Za-z0-9.]+)[ \t]*/\1/' | while IFS= read -r int
do
  # Create the interface file for this interface, assuming DHCP
  {
    echo "allow-hotplug ${int}"
    echo "iface ${int} inet dhcp"
  } > "/etc/network/interfaces.d/${int}"
  # Bounce the interface
  ifdown "${int}" ; ifup "${int}"
done
Looking for one consistent script which does this all?
#!/bin/bash
# This script ensures that the metric of the first "NAT" interface is set to 1000,
# while resetting the rest of the interfaces to "whatever" the DHCP server offers.

function netname() {
  ip route | grep 10.0.2.2 | head -n 1 | sed -Ee 's/^(.*dev )(.*)$/\2/;s/proto [A-Za-z0-9]+//;s/metric [0-9]+//;s/[ \t]+$//'
}

if command -v netplan
then
  ################################################
  # NETPLAN
  ################################################

  # Find details about the interface
  ifname="$(grep -A1 ethernets "/etc/netplan/50-cloud-init.yaml" | tail -n1 | sed -Ee 's/[ ]*//' | cut -d: -f1)"
  match="$(grep macaddress "/etc/netplan/50-cloud-init.yaml" | sed -Ee 's/[ ]*//' | cut -d\  -f2)"

  # Configure the netplan file
  {
    echo "network:"
    echo "  ethernets:"
    echo "    ${ifname}:"
    echo "      dhcp4: true"
    echo "      dhcp4-overrides:"
    echo "        route-metric: 1000"
    echo "      match:"
    echo "        macaddress: ${match}"
    echo "      set-name: ${ifname}"
    echo "  version: 2"
  } >/etc/netplan/50-cloud-init.yaml

  # Apply the config
  netplan apply
elif command -v nmcli
then
  ################################################
  # NETWORKMANAGER
  ################################################

  # Ask NetworkManager for a list of all the active connections, look for the string "eth0" and then just get the connection name.
  nm="$(nmcli connection show --active | grep "$(netname)" | sed -Ee 's/^(.*)([ \t][-0-9a-f]{36})(.*)$/\1/;s/[\t ]+$//g')"
  # Set the network to have a metric of 250
  nmcli connection modify "$nm" ipv4.route-metric 1000
  nmcli connection modify "$nm" ipv6.route-metric 1000
  # And then re-apply the network config
  nmcli connection up "$nm"
elif command -v ifup
then
  ################################################
  # IFUPDOWN
  ################################################

  # Get the name of the interface with the IP address 10.0.2.2
  netname="$(netname)"
  # Create a new /etc/network/interfaces file which just looks in "interfaces.d"
  echo "source /etc/network/interfaces.d/*" > /etc/network/interfaces
  # Create the loopback interface file
  {
    echo "auto lo"
    echo "iface lo inet loopback"
  } > "/etc/network/interfaces.d/lo"
  # Bounce the interface
  ifdown lo ; ifup lo
  # Create the first "real" interface file
  {
    echo "allow-hotplug ${netname}"
    echo "iface ${netname} inet dhcp"
    echo "  metric 1000"
  } > "/etc/network/interfaces.d/${netname}"
  # Bounce the interface
  ifdown "${netname}" ; ifup "${netname}"
  # Loop through the rest of the interfaces
  ip link | grep UP | grep -v lo | grep -v "${netname}" | cut -d: -f2 | sed -Ee 's/[ \t]+([A-Za-z0-9.]+)[ \t]*/\1/' | while IFS= read -r int
  do
    # Create the interface file for this interface, assuming DHCP
    {
      echo "allow-hotplug ${int}"
      echo "iface ${int} inet dhcp"
    } > "/etc/network/interfaces.d/${int}"
    # Bounce the interface
    ifdown "${int}" ; ifup "${int}"
  done
fi
Several months ago, I wrote a post talking about Architectural Decision Records with adr-tools, but since then I’ve moved on a bit with things, so I wanted to write about alternatives.
Late edit 2021-12-14: I released (v0.0.1) my own rust-based application for creating Decision Records. Please feel free to make pull requests, raise issues, etc :)
I also wanted to comment a bit on why I use the term “Decision Records” (always “decision record”, never “DR” due to the overloading of that particular abbreviation) rather than “Architectural Decision Records” (ADR), but I’ll get to that towards the end of the post 😊
Using Decision Records the Manual Way
A decision record is usually basically a text file, using the “Markdown” format, which has several “standard” blocks of text in it. The “npryce” version, which most people use, has the following sections in it:
Title (as a “level 1” heading) which also holds the date of the record.
A (level 2 heading) status section, holding the status of this decision (and any links to documents which supersede or relate to this decision).
The context of the decision.
The decision.
The consequences of that decision.
So, somewhat understandably, your organisational tooling should support you making your own documents, without using those tools.
There are conventions about how the index-critical details will be stored:
Your title block should follow the format # 1. Decision Title. The # symbol means it is the primary heading for the document, then the number, which should probably be lower than 9999, is used as an index for linking to other records and then the text of the title should also be the name of the file you’ve created. In this case, it will likely be 0001-decision-title.md.
The status will usually be one of: Approved or Proposed. If a document is superseded, it should remove this status. Any other link type will live under the line showing the current status.
So, there’s no reason why you couldn’t just use this template for any files you create:
# NUMBER. TITLE

Date: yyyy-mm-dd

## Status

Accepted
Superseded by [2. Another Decision](0002-another-decision.md)

## Context

The context of the decision.

## Decision

The decision.

## Consequences

The consequences of that decision.
BUT, that’s not very automated, is it?
ADRs using Bash
Of course, most people making decision records use the Bash command line….. right? Oh, perhaps not. I’ll get back to you in a tic. If you’re using Bash, the “npryce” tooling I mentioned above is the same one I wrote about those months ago. So, read that, and then crack on with your ADRs.
ADRs using Powershell
So, if you’re using Windows, you might be tempted to find a decision record tool for Powershell. If so, I found “ajoberstar” on Github had produced just such a thing, and you “just”, as an administrator, run:
Then edit the script you installed (in C:\Program Files\WindowsPowerShell\Modules\ArchitectureDecisionRecords\0.1.1\ArchitectureDecisionRecords.psm1) and search-and-replace UTF8NoBOM for UTF8 and then save it…
And then you can run commands like Initialize-Adr or New-Adr -Title 'Use a database'. However, this script was last touched on 2nd July 2018, and although I’ve raised a few issues, they don’t seem to have been resolved (see also replacing UTF8NoBOM above).
ADRs using VSCode
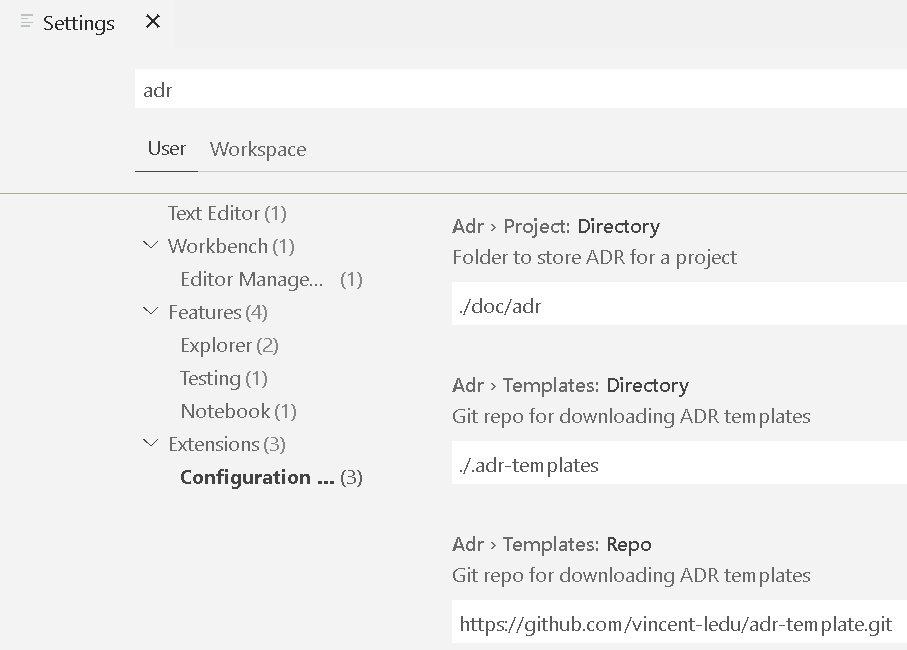
By far, so far, the best tooling I’ve seen in this space is the adr-tools extension for VSCode. It too, however, has it’s own caveats, but these are not disastrous. Essentially, you need to create a path in which you store the template to use. You can get this from his own repo, here: https://github.com/vincent-ledu/adr-template.git and put it in .adr-templates in the root directory of your project. This, however, is customizable, by going to the settings for your user or workspace, searching for ADR and adjusting the paths accordingly.
A settings pane showing the Adr paths in your project’s tree
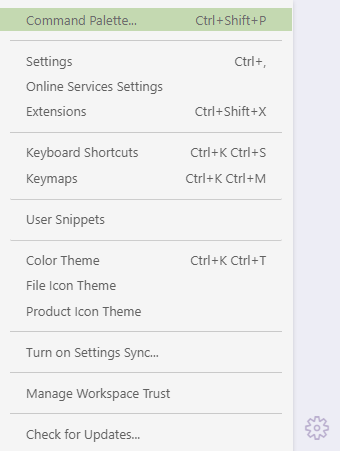
To add a new decision record, press Ctrl+Shift+P or click the cog icon in the sidebar, and select “Command Palette…”
Opening the Command Palette in VS Code
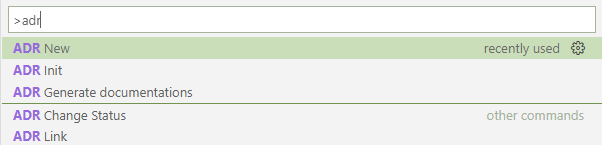
Then start typing “adr” to select from “ADR New”, “ADR Init”, “ADR Change Status” or “ADR Link”.
The Command Palette showing your options for commands to run
All of these will walk you through some options at the top of the screen, either asking for some text input, or asking you to select between options.
You may be tempted to just run this up now, and select “ADR New”, and it’ll look like it’s working, but, you first need to have obtained the template and create the directory structure. Selecting “ADR Init” will create the directory structure for your project and will try to perform a git clone of the repo mentioned above, but if you are already in a git repository, or you have some form of MITM proxy in the way, this will also break silently. The easiest thing to do is to either manually create the paths in your tree, according to what you have set or selected, or just run the ADR init, and then obtain the template from the git repo.
Talking of templates, in the previous scripts, the script would come with a template file built-in, and it would do a simple string replacement of the values “NUMBER”, “TITLE” and “STATUS”. With this script it instead uses it’s own template, which is stored in your project’s file tree, and uses parameter substitution, finding strings wrapped in pairs of curled braces (like {{ this }}). The downside to this is that you can’t just reuse the template I listed above… but no worries, get the file from the repo and stick it in your tree where it’s expecting it, or let the adr init function clone the template into your path – job done.
What other options are there?
Well, actually, this comes down to why I’m using the term “decision records” rather than “architectural decision record”, because I’m writing my own tool, and all the “adr” namespaces on Github were taken, and I’d seen a fair amount of posts suggesting that the “A” in “ADR” should stand for “Any”.. and I figured why should it exist at all?
Why Javascript? Frankly, I needed to learn a modern programming language, and wanted to apply it to a domain I was interested in. It’s currently not complete, it creates the record path and a configuration file, and I’m currently writing the functions to create new records. Also, because it’s Javascript, in theory I can also use the internals to create a VSCode extension with this later… MUCH later!
Why re-implement this at all? Firstly, it looks like most of the development work on those projects halted around 3-4 years ago, with no further interest in updating them to resolve bugs and issues. I didn’t want to fork the projects as-is, as I think they were largely written to scratch a particular itch (which is fine!) but they all miss key things I want to provide, like proper unit testing (only the npryce project comes close to this), internationalisation (none of them have this) and the ability to use a company- or project-wide template (only the VSCode extension does this). I also saw requests to support alternative file formats (like Restructured Text, which was completely rejected) and realised that if you built the script in such a way that these alternate formats could be used, then there was no reason not to support that.
In summary
There are tools you can use, whatever platform you’re using. My preference is the VSCode extension, and eventually will (hopefully!!) be the script I’m writing… but it’s not ready, yet.
I’m taking a renewed look into Unit Testing the scripts I’m writing, because (amongst other reasons) it’s important to know what expected behaviours you break when you make a change to a script!
A quick detour – what is Unit Testing?
A unit test is where you take one component of your script, and prove that, given specific valid or invalid tests, it works in an expected way.
For example, if you normally run sum_two_digits 1 1 and expect to see 2 as the result, with a unit test, you might write the following tests:
sum_two_digits should fail (no arguments)
sum_two_digits 1 should fail (no arguments)
sum_two_digits 1 1 should pass!
sum_two_digits 1 1 1 may fail (too many arguments), may pass (only sum the first two digits)
sum_two_digits a b should fail (not numbers)
and so on… you might have seen this tweet, for example
OK, so far, so awesome. Now let’s start adding BATS. (Yes, this is not necessarily the “best” way to create your “test_all.sh” script, but it works for my case!)
Now, let’s write two simple tests, one which fails and one which passes, so I can show you what this looks like. Create a file called test/prove_bats.bats
#!/usr/bin/env ./libs/bats/bin/bats

@test "This will fail" {
  run false
  [ "$status" -eq 0 ]
}

@test "This will pass" {
  run true
  [ "$status" -eq 0 ]
}
And now, when we run this with test/test_all.sh we get the following:
 ✗ This will fail
   (in test file prove_bats.bats, line 5)
     `[ "$status" -eq 0 ]' failed
 ✓ This will pass

2 tests, 1 failure
Excellent, now we know that our test library works, and we have a rough idea of what a test looks like. Let’s build something a bit more awesome. But first, let’s remove prove_bats.bats file, with rm test/prove_bats.bats.
Starting to develop “real” tests
Let’s create a new file, test/path_checking.bats. Our amazing script needs to have a configuration file, but we’re not really sure where in the path it is! Let’s get building!
#!/usr/bin/env ./libs/bats/bin/bats

# This runs before each of the following tests are executed.
setup() {
  source "../my_script.sh"
  cd "$BATS_TEST_TMPDIR"
}

@test "No configuration file is found" {
  run find_config_file
  echo "Status received: $status"
  echo "Actual output:"
  echo "$output"
  [ "$output" == "No configuration file found." ]
  [ "$status" -eq 1 ]
}
When we run this test (using test/test_all.sh), we get this response:
 ✗ No configuration file is found
   (in test file path_checking.bats, line 14)
     `[ "$output" == "No configuration file found." ]' failed with status 127
   Status received: 127
   Actual output:
   /tmp/my_script/test/libs/bats/lib/bats-core/test_functions.bash: line 39: find_config_file: command not found

1 test, 1 failure
Uh oh! Well, I guess that’s because we don’t have a function called find_config_file yet in that script. Ah, yes, let’s quickly divert into making your script more testable, by making use of functions!
Bash script testing with functions
When many people write a bash script, you’ll see something like this:
#!/bin/bash
echo "Validate 'uname -a' returns a string: "
read_some_value="$(uname -a)"
if [ -n "$read_some_value" ]
then
  echo "Yep"
fi
While this works, what it’s not good for is testing each of those bits (and also, as a sideline, if your script is edited while you’re running it, it’ll break, because Bash parses each line as it gets to it!)
A good way of making this “better” is to break this down into functions. At the very least, create a “main” function, and put everything into there, like this:
#!/bin/bash
function main() {
  echo "Validate 'uname -a' returns a string: "
  read_some_value="$(uname -a)"
  if [ -n "$read_some_value" ]
  then
    echo "Yep"
  fi
}

main
By splitting this into a “main” function, which is called when it runs, at the very least, a change to the script during operation won’t break it… but it’s still not very testable. Let’s break down some more of this functionality.
#!/bin/bash
function read_uname() {
  echo "$(uname -a)"
}
function test_response() {
  if [ -n "$1" ]
  then
    echo "Yep"
  fi
}
function main() {
  echo "Validate 'uname -a' returns a string: "
  read_some_value="$(read_uname)"
  test_response "$read_some_value"
}

main
So, what does this give us? Well, in theory we can test each part of this in isolation, but at the moment, bash will execute all those functions straight away, because they’re being called under “main”… so we need to abstract main out a bit further. Let’s replace that last line, main into a quick check.
if [[ "${BASH_SOURCE[0]}" == "${0}" ]]
then
  main
fi
Stopping your code from running by default with some helper variables
The special value $BASH_SOURCE[0] will return the name of the file that’s being read at this point, while $0 is the name of the script that was executed. As a little example, I’ve created two files, source_file.sh and test_sourcing.sh. Here’s source_file.sh:
So, this means if we source our script (which we’ll do with our testing framework), $BASH_SOURCE[0] will return a different value from $0, so it knows not to invoke the “main” function, and we can abstract that all into more test code.
Now we’ve addressed all that lot, we need to start writing code… where did we get to? Oh yes, find_config_file: command not found
Walking up a filesystem tree
The function we want needs to look in this path, and all the parent paths for a file called “.myscript-config“. To do this, we need two functions – one to get the directory name of the “real” directory, and the other to do the walking up the path.
function _absolute_directory() {
  # Change to the directory provided, or if we can't, return with error 1
  cd "$1" || return 1
  # Return the full pathname, resolving symbolic links to "real" paths
  pwd -P
}

function find_config_file() {
  # Get the "real" directory name for this path
  absolute_directory="$(_absolute_directory ".")"
  # As long as the directory name isn't "/" (the root directory), and the
  #  return value (config_path) isn't empty, check for the config file.
  while [ "$absolute_directory" != "/" ] &&
        [ -n "$absolute_directory" ] &&
        [ -z "$config_path" ]
  do
    # Is the file we're looking for here?
    if [ -f "$absolute_directory/.myscript-config" ]
    then
      # Store the value
      config_path="$absolute_directory/.myscript-config"
    else
      # Get the directory name for the parent directory, ready to loop.
      absolute_directory="$(_absolute_directory "$absolute_directory/..")"
    fi
  done
  # If we've exited the loop, but have no return value, exit with an error
  if [ -z "$config_path" ]
  then
    echo "No config found. Please create .myscript-config in your project's root directory."
    # Failure states return an exit code of anything greater than 0. Success is 0.
    exit 1
  else
    # Output the result
    echo "$config_path"
  fi
}
Let’s re-run our test!
 ✗ No configuration file is found
   (in test file path_checking.bats, line 14)
     `[ "$output" == "No configuration file found." ]' failed
   Status received: 1
   Actual output:
   No config found. Please create .myscript-config in your project's root directory.

1 test, 1 failure
Uh oh! Our output isn’t what we told it to use. Fortunately, we’ve recorded the output it sent (“No config found. Please...“) so we can fix our test (or, find that output line and fix that).
Let’s fix the test! (The BATS test file just shows the test we’re amending)
@test "No configuration file is found" {
  run find_config_file
  echo "Status received: $status"
  echo "Actual output:"
  echo "$output"
  [ "$output" == "No config found. Please create .myscript-config in your project's root directory." ]
  [ "$status" -eq 1 ]
}
Fab, and now when we run it, it’s all good!
user@host:/tmp/my_script$ test/test_all.sh
 ✓ No configuration file is found

1 test, 0 failures
So, how do we test what happens when the file is there? We make a new test! Add this to your test file, or create a new one, ending .bats in the test directory.
@test "Configuration file is found and is OK" {
  touch .myscript-config
  run find_config_file
  echo "Status received: $status"
  echo "Actual output:"
  echo "$output"
  [ "$output" == "$BATS_TEST_TMPDIR/.myscript-config" ]
  [ "$status" -eq 0 ]
}
And now, when you run your test, you’ll see this:
user@host:/tmp/my_script$ test/test_all.sh
 ✓ No configuration file is found
 ✓ Configuration file is found and is OK

2 tests, 0 failures
Extending BATS
There are some extra BATS tests you can run – at the moment you’re doing manual checks of output and success or failure checks which aren’t very pretty. Let’s include the “assert” library for BATS.
Firstly, we need this library added as a submodule again.
# This module provides the formatting for the other non-core libraries
git submodule add https://github.com/bats-core/bats-support.git test/libs/bats-support
# This is the actual assertion tests library
git submodule add https://github.com/bats-core/bats-assert.git test/libs/bats-assert
And now we need to update our test. At the top of the file, under the #!/usr/bin/env line, add these:
@test "No configuration file is found" {
  run find_config_file
  assert_output "No config found. Please create .myscript-config in your project's root directory."
  assert_failure
}

@test "Configuration file is found and is OK" {
  touch .myscript-config
  run find_config_file
  assert_output "$BATS_TEST_TMPDIR/.myscript-config"
  assert_success
}
Note that we removed the “echo” statements in this file. I’ve purposefully broken both types of tests (exit 1 became exit 0 and the file I’m looking for is $absolute_directory/.config instead of $absolute_directory/.myscript-config) in the source file, and now you can see what this looks like:
 ✗ No configuration file is found
   (from function `assert_failure' in file libs/bats-assert/src/assert_failure.bash, line 66,
    in test file path_checking.bats, line 15)
     `assert_failure' failed

   -- command succeeded, but it was expected to fail --
   output : No config found. Please create .myscript-config in your project's root directory.
   --

 ✗ Configuration file is found and is OK
   (from function `assert_output' in file libs/bats-assert/src/assert_output.bash, line 194,
    in test file path_checking.bats, line 21)
     `assert_output "$BATS_TEST_TMPDIR/.myscript-config"' failed

   -- output differs --
   expected : /tmp/bats-run-21332-1130Ph/suite-tmpdir-QMDmz6/file-tmpdir-path_checking.bats-nQf7jh/test-tmpdir--I3pJYk/.myscript-config
   actual   : No config found. Please create .myscript-config in your project's root directory.
   --
And so now you can see some of how to do unit testing with Bash and BATS. BATS also says you can unit test any command that can be run in a Bash environment, so have fun!