I’ve been using HashiCorp’s Vagrant with Oracle’s VirtualBox for several years (probably since 2013, if my blog posts are anything to go by), and I’ve always been pretty comfortable with how it works.
This said, when using a Windows machine running Microsoft’s Hyper-V (built into Windows since Windows 7/2018) VirtualBox is unable (by default) to run 64 bit virtual machines (thanks to Hyper-V “stealing” the VT-x/AMD-V bit from the BIOS/EFI).
Around last year or maybe even the year before, Microsoft introduced a “Hypervisior Platform” add-on, which lets VirtualBox run 64 bit machines on a Hyper-V host (more on this later). HOWEVER, it is much slower than in native mode, and can often freeze on booting…
Meanwhile, Vagrant, (a configuration file that acts as a wrapper around various hypervisors, using VirtualBox by default) boots machines in a “headless” mode by default, so you can’t see the freezing.
I’m trying to use an Ubuntu 18.04 virtual machine for various builds I’m creating, and found that I’d get a few issues on boot, so let’s get these sorted out.
VirtualBox can’t start 64bit virtual machines when Hyper-V is installed.
You need to confirm that certain Windows features are enabled, including “Hyper-V” and “Windows Hypervisor Platform”. Confirm you’re running at least Windows 10 version 1803 which is the first release with the “Windows Hypervisor Platform”.
GUI mode
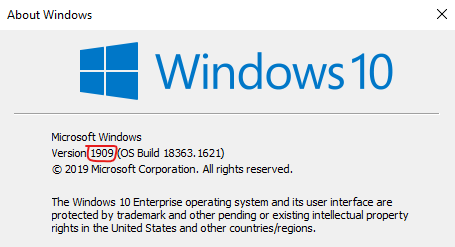
Run winver to bring up this box. Confirm the version number is greater than 1803. Mine is 1909.
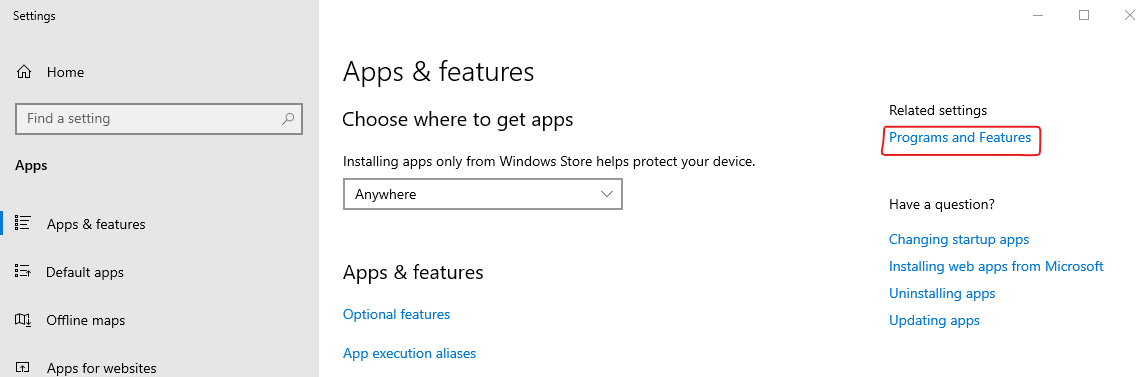
Right click on the start menu, and select “Apps and Features”. Click on “Programs and Features”.
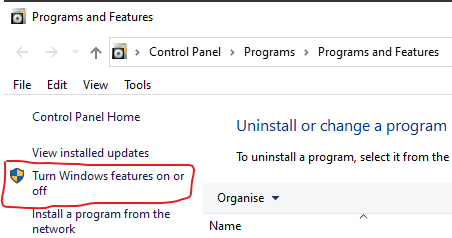
In the “Programs and Features” window, click on “Turn Windows Features on or off”. Note the shield icon here indicates that administrative access is required, and you may be required to authenticate to the machine to progress past this stage.
Next, ensure that the following “Windows Features” are enabled; “Hyper-V”, “Virtual Machine Platform” and “Windows Hypervisor Platform”. Click on “OK” to install these features, if they’re not already installed.
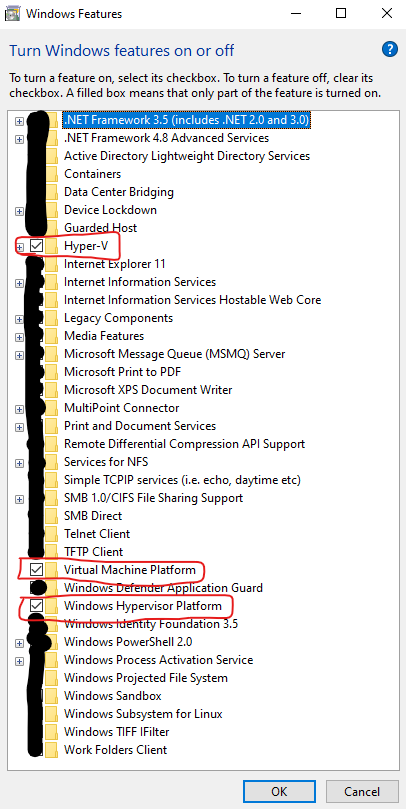
Note that once you’ve pressed “OK”, you’ll likely need to reboot your machine, if any of these features were not already installed.
CLI mode
Right click on the start menu, and start an Administrative Powershell session.
Run the command Get-ComputerInfo | select WindowsVersion. You should get a response which looks like this:
WindowsVersion
--------------
1909
Note that the version number needs to be greater than 1803.
Next, find the names of the features you need to install. These features have region specific names, so outside EN-GB, these names may not match your requirements!
Run the command Get-WindowsOptionalFeature -online | select FeatureName,State and you’re looking for the following lines (this has been cropped to just what you need):
FeatureName                                     State
-----------                                     -----
HypervisorPlatform                            Enabled
VirtualMachinePlatform                        Enabled
Microsoft-Hyper-V-All                         Enabled
If any of these three features are not enabled, run Enable-WindowsOptionalFeature -online -FeatureName x where “x” is the name of the feature, listed in the above text block, you want to install. For example: Enable-WindowsOptionalFeature -online -FeatureName HypervisorPlatform,VirtualMachinePlatform,Microsoft-Hyper-V-All. If you run this when they’re already enabled, it should return RestartNeeded : False, but otherwise you’re likely to need to reboot.
After the reboot
After you’ve rebooted, and you start a 64 bit virtual machine in VirtualBox, you’ll see this icon in the bottom corner.

Booting the Virtual Machine with Vagrant fails because it takes too long to boot
This was historically a big issue with Vagrant and VirtualBox, particularly with Windows Vagrant boxes, but prior to the Hyper-V/VirtualBox solution, it’d been largely fixed (or at least, I wasn’t seeing it!) There is a “standard” timeout for booting a Virtual Machine, I think at approximately 5 minutes, but I might be wrong. To make this “issue” stop occurring, add this config.vm.boot_timeout = 0 line to your Vagrantfile, like this:
Vagrant.configure("2") do |config|
  config.vm.boot_timeout = 0
end
This says to Vagrant, don’t worry how long it takes to boot, just keep waiting until it does. Yes, it will be slower, but it should get there in the end!
Booting the Virtual Maching with Vagrant does not fail, but it never authenticates with your Private Key.
Your VM may sit at this block for quite a while:
==> default: Waiting for machine to boot. This may take a few minutes...
    default: SSH address: 127.0.0.1:2222
    default: SSH username: vagrant
    default: SSH auth method: private key
If this occurs, you may find that your virtual machine has hung during the boot process… but weirdly, a simple work-around to this is to ensure that the VirtualBox GUI is open, and that you’ve got a block like this (config.vm.provider / vb.gui=true / end) in your Vagrantfile:
Vagrant.configure("2") do |config|
  config.vm.provider "virtualbox" do |vb|
    vb.gui = true
  end
end
This forces VirtualBox to open a window with your Virtual Machine’s console on it (much like having a monitor attached to real hardware). You don’t need to interact with it, but any random hangs or halts on your virtual machine may be solved just by bringing this window, or the VirtualBox Machines GUI, to the foreground.
Sometimes you may see, when this happens, a coredump or section of kernel debugging code on the console. Don’t worry about this!
Vagrant refuses to SSH to your virtual machine when using the vagrant ssh command.
Provisioning works like a treat, and you can SSH into the virtual machine from any other environment, but, when you run vagrant ssh, you get an error about keys not being permitted or usable. This is fixable by adding a single line, either to your system or user -wide environment variables, or by adding a line to your Vagrantfile.
The environment variable is VAGRANT_PREFER_SYSTEM_BIN, and by setting this to 0, it will use bundled versions of ssh or rsync instead of using any versions provided by Windows.
You can add a line like this ENV['VAGRANT_PREFER_SYSTEM_BIN']="0" to your Vagrantfile, outside of the block Vagrant.configure…end, like this:
ENV['VAGRANT_PREFER_SYSTEM_BIN']="0"
Vagrant.configure("2") do |config|
end
Sources
- “Use VirtualBox 6.0 and Hyper-V at the same time thanks to the Hyper-V API” https://us.informatiweb.net/tutorials/it/virtualization/virtualbox-use-virtualbox-and-hyper-v-at-the-same-time.html
- Get Windows Version using Powershell: https://stackoverflow.com/a/64314697/5738
- “How to enable a Windows Feature via Powershell” https://stackoverflow.com/a/34537239/5738
- Vagrant environment variables: https://www.vagrantup.com/docs/other/environmental-variables#vagrant_prefer_system_bin
- Using Ruby Environmental Variables: https://www.thoughtco.com/using-environment-variables-2908194
Featured image is “Picture in Picture” by “Mats” on Flickr and is released under a CC-BY-SA license.