Earlier this year LEGO released the Optimus Prime set, 10302, and I said to my friends at the time “£150… It’s good, but is it that good? (Who am I kidding… Add to basket)” but, of course, I didn’t.
Later in the year, I was fortunate enough to visit Billund in Denmark, the home of LEGO, and I got to see the glory of the Optimus Prime set in the … plastic? Anyway, because I was there with hand luggage only, I couldn’t fit the box and set into the luggage, so I couldn’t get it abroad, and assumed that was it – no more Optimus for me.
Until Christmas Day arrives, and my (amazing, beautiful, best person ever) wife hands me a box… As I pick it up from her, I say “That… sounds like Lego” but I still haven’t put two-and-two together yet. I peel open the paper and my mouth drops. It’s this set.
See, I’m of the era that watched all the cartoons, had all the comics, and (thanks to, in hindsight, my verygenerous parents) had a few of the toys… so this is a true throwback for me.
The build itself
Jules and I agreed that today would be the “build our Lego sets” day, so as I started my breakfast I cracked open the box.
The Optimus Prime LEGO set (10302) box, showing the robot-form.The rear of the box shows the transforming model, plus the accessories which come with the build.11 bags of the LEGO Optimus Prime set 10302, plus a cardboard envelope containing instructions and 5 stickers.
I set to work. Right from the outset, the classic windscreen was visible, and it’s a perfect opening section for the set, and builds the anticipation for the final build.
The result of the first bag of lego – the classic windscreen for Optimus which hides the Matrix of Leadership (built later)
Several hours later (including a few rounds of Singstar and Buzz, lunch and dinner), Optimus Prime is complete.
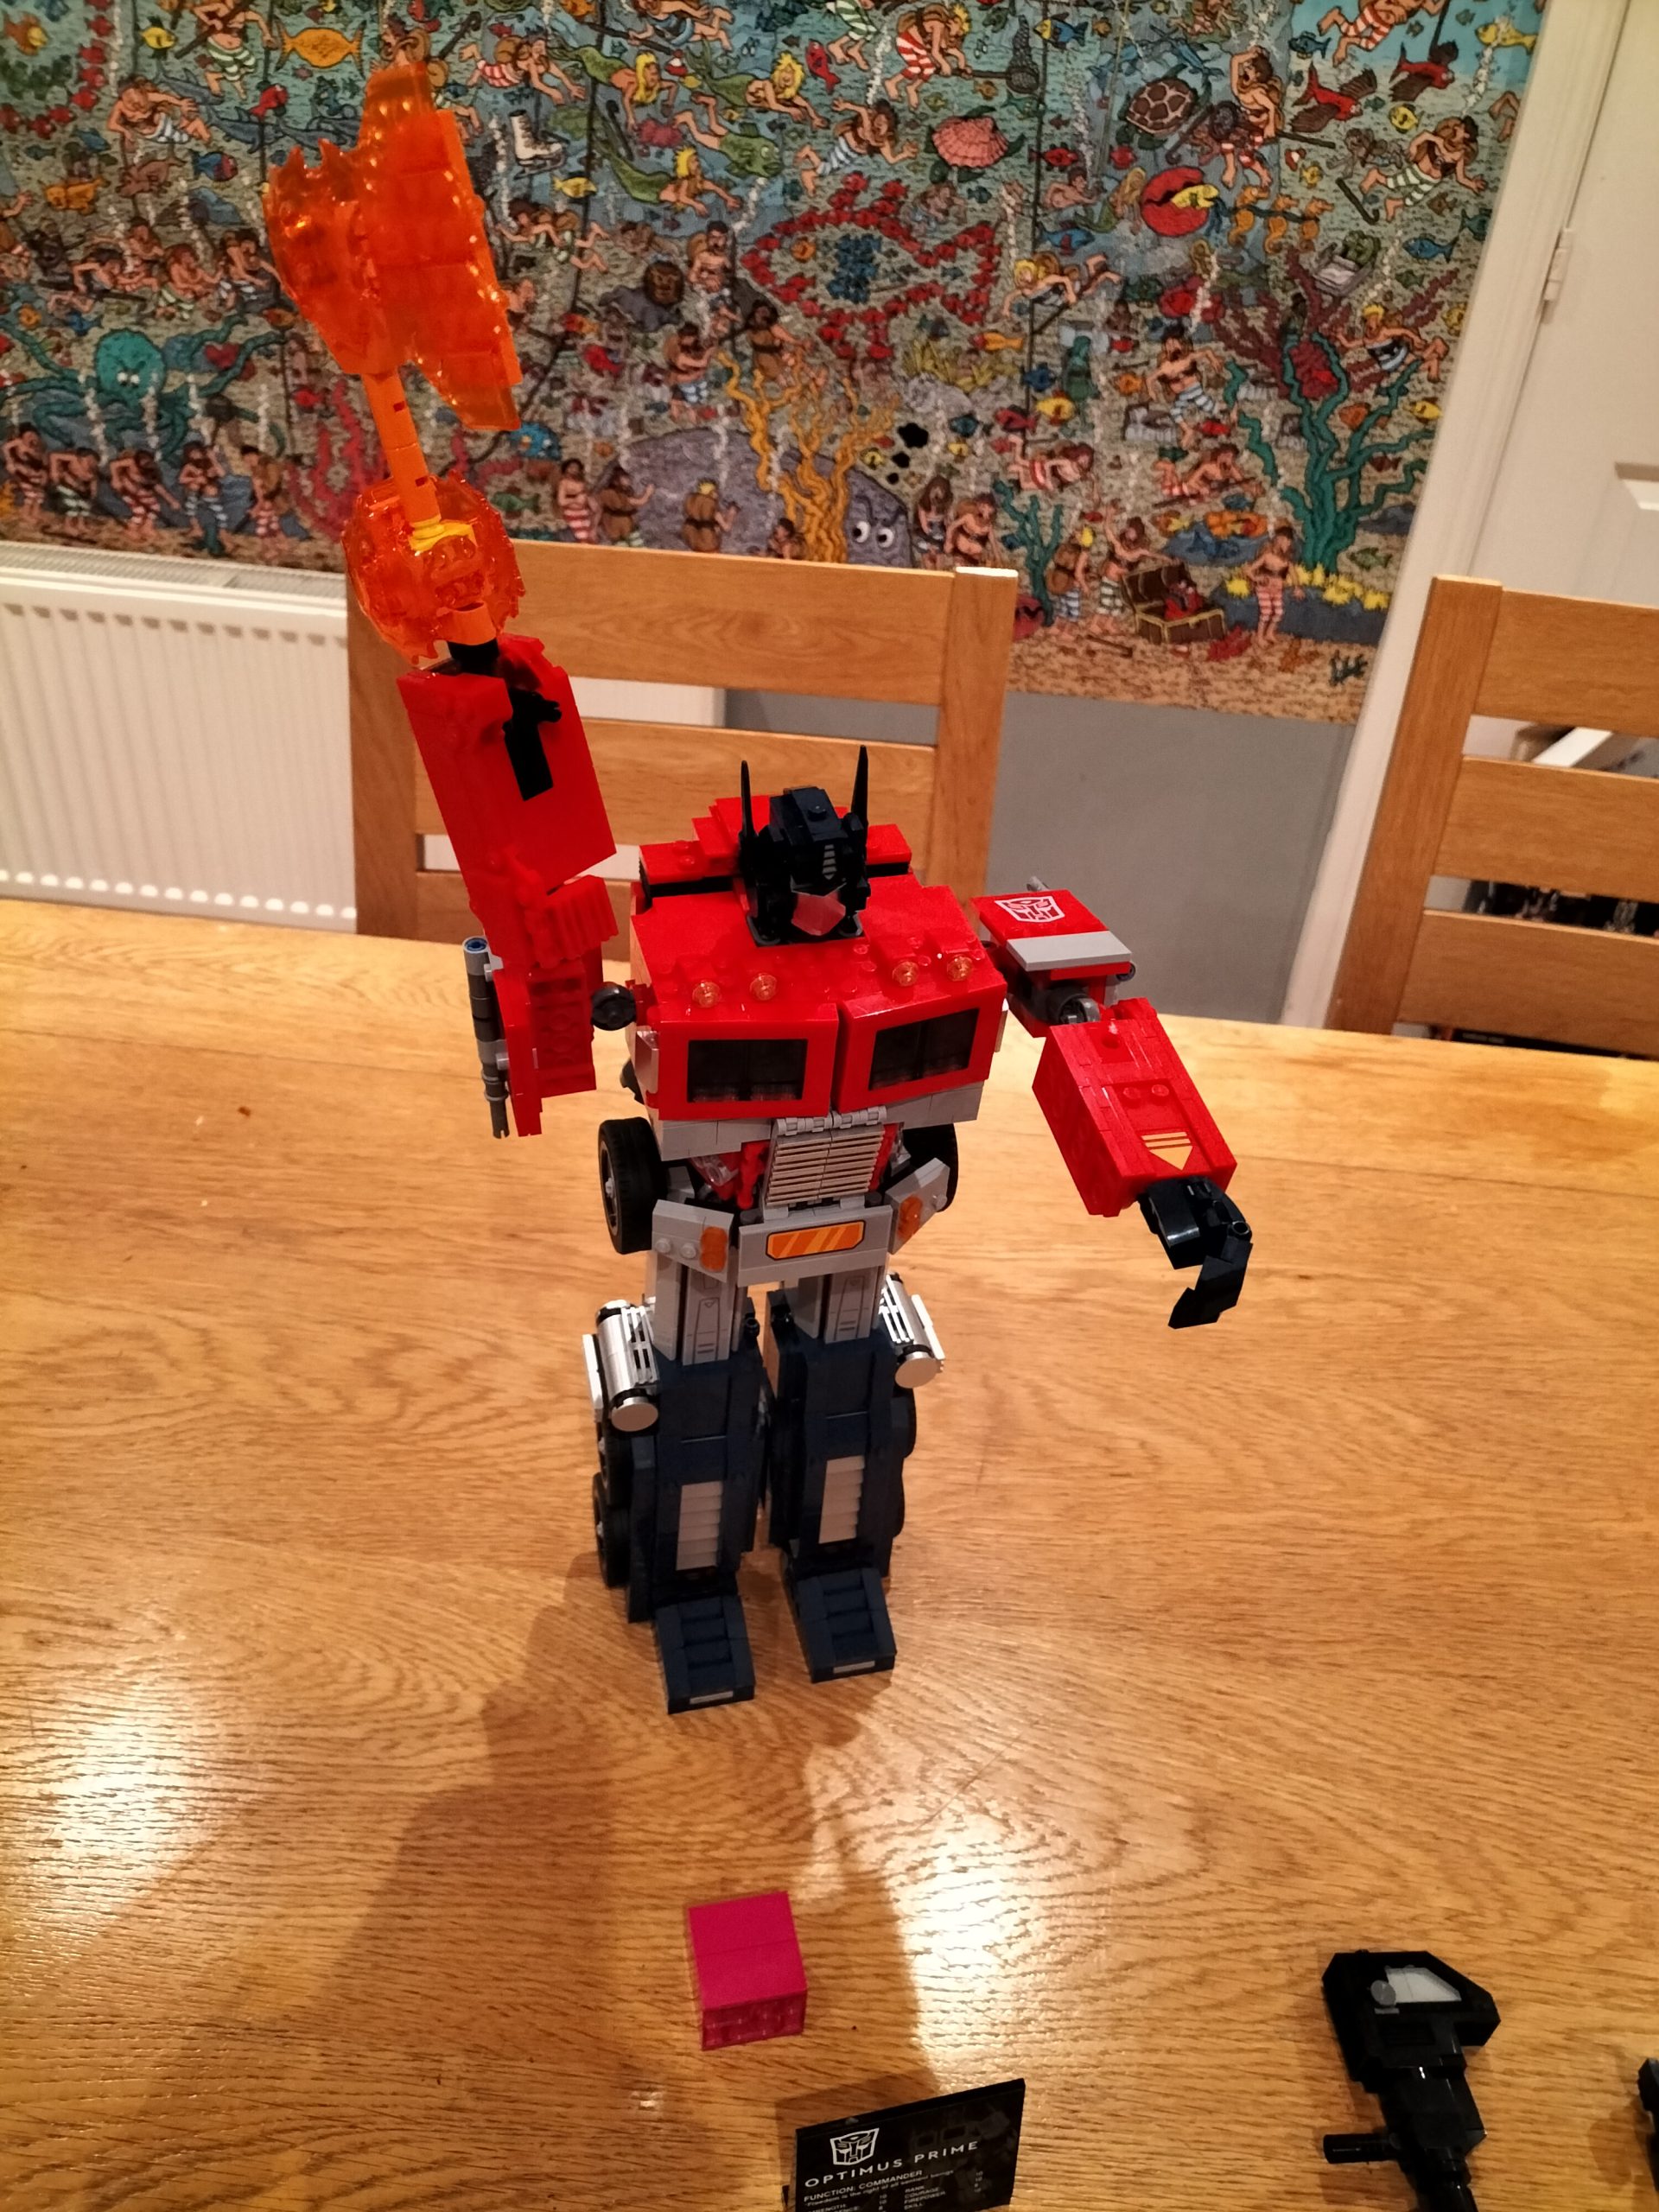
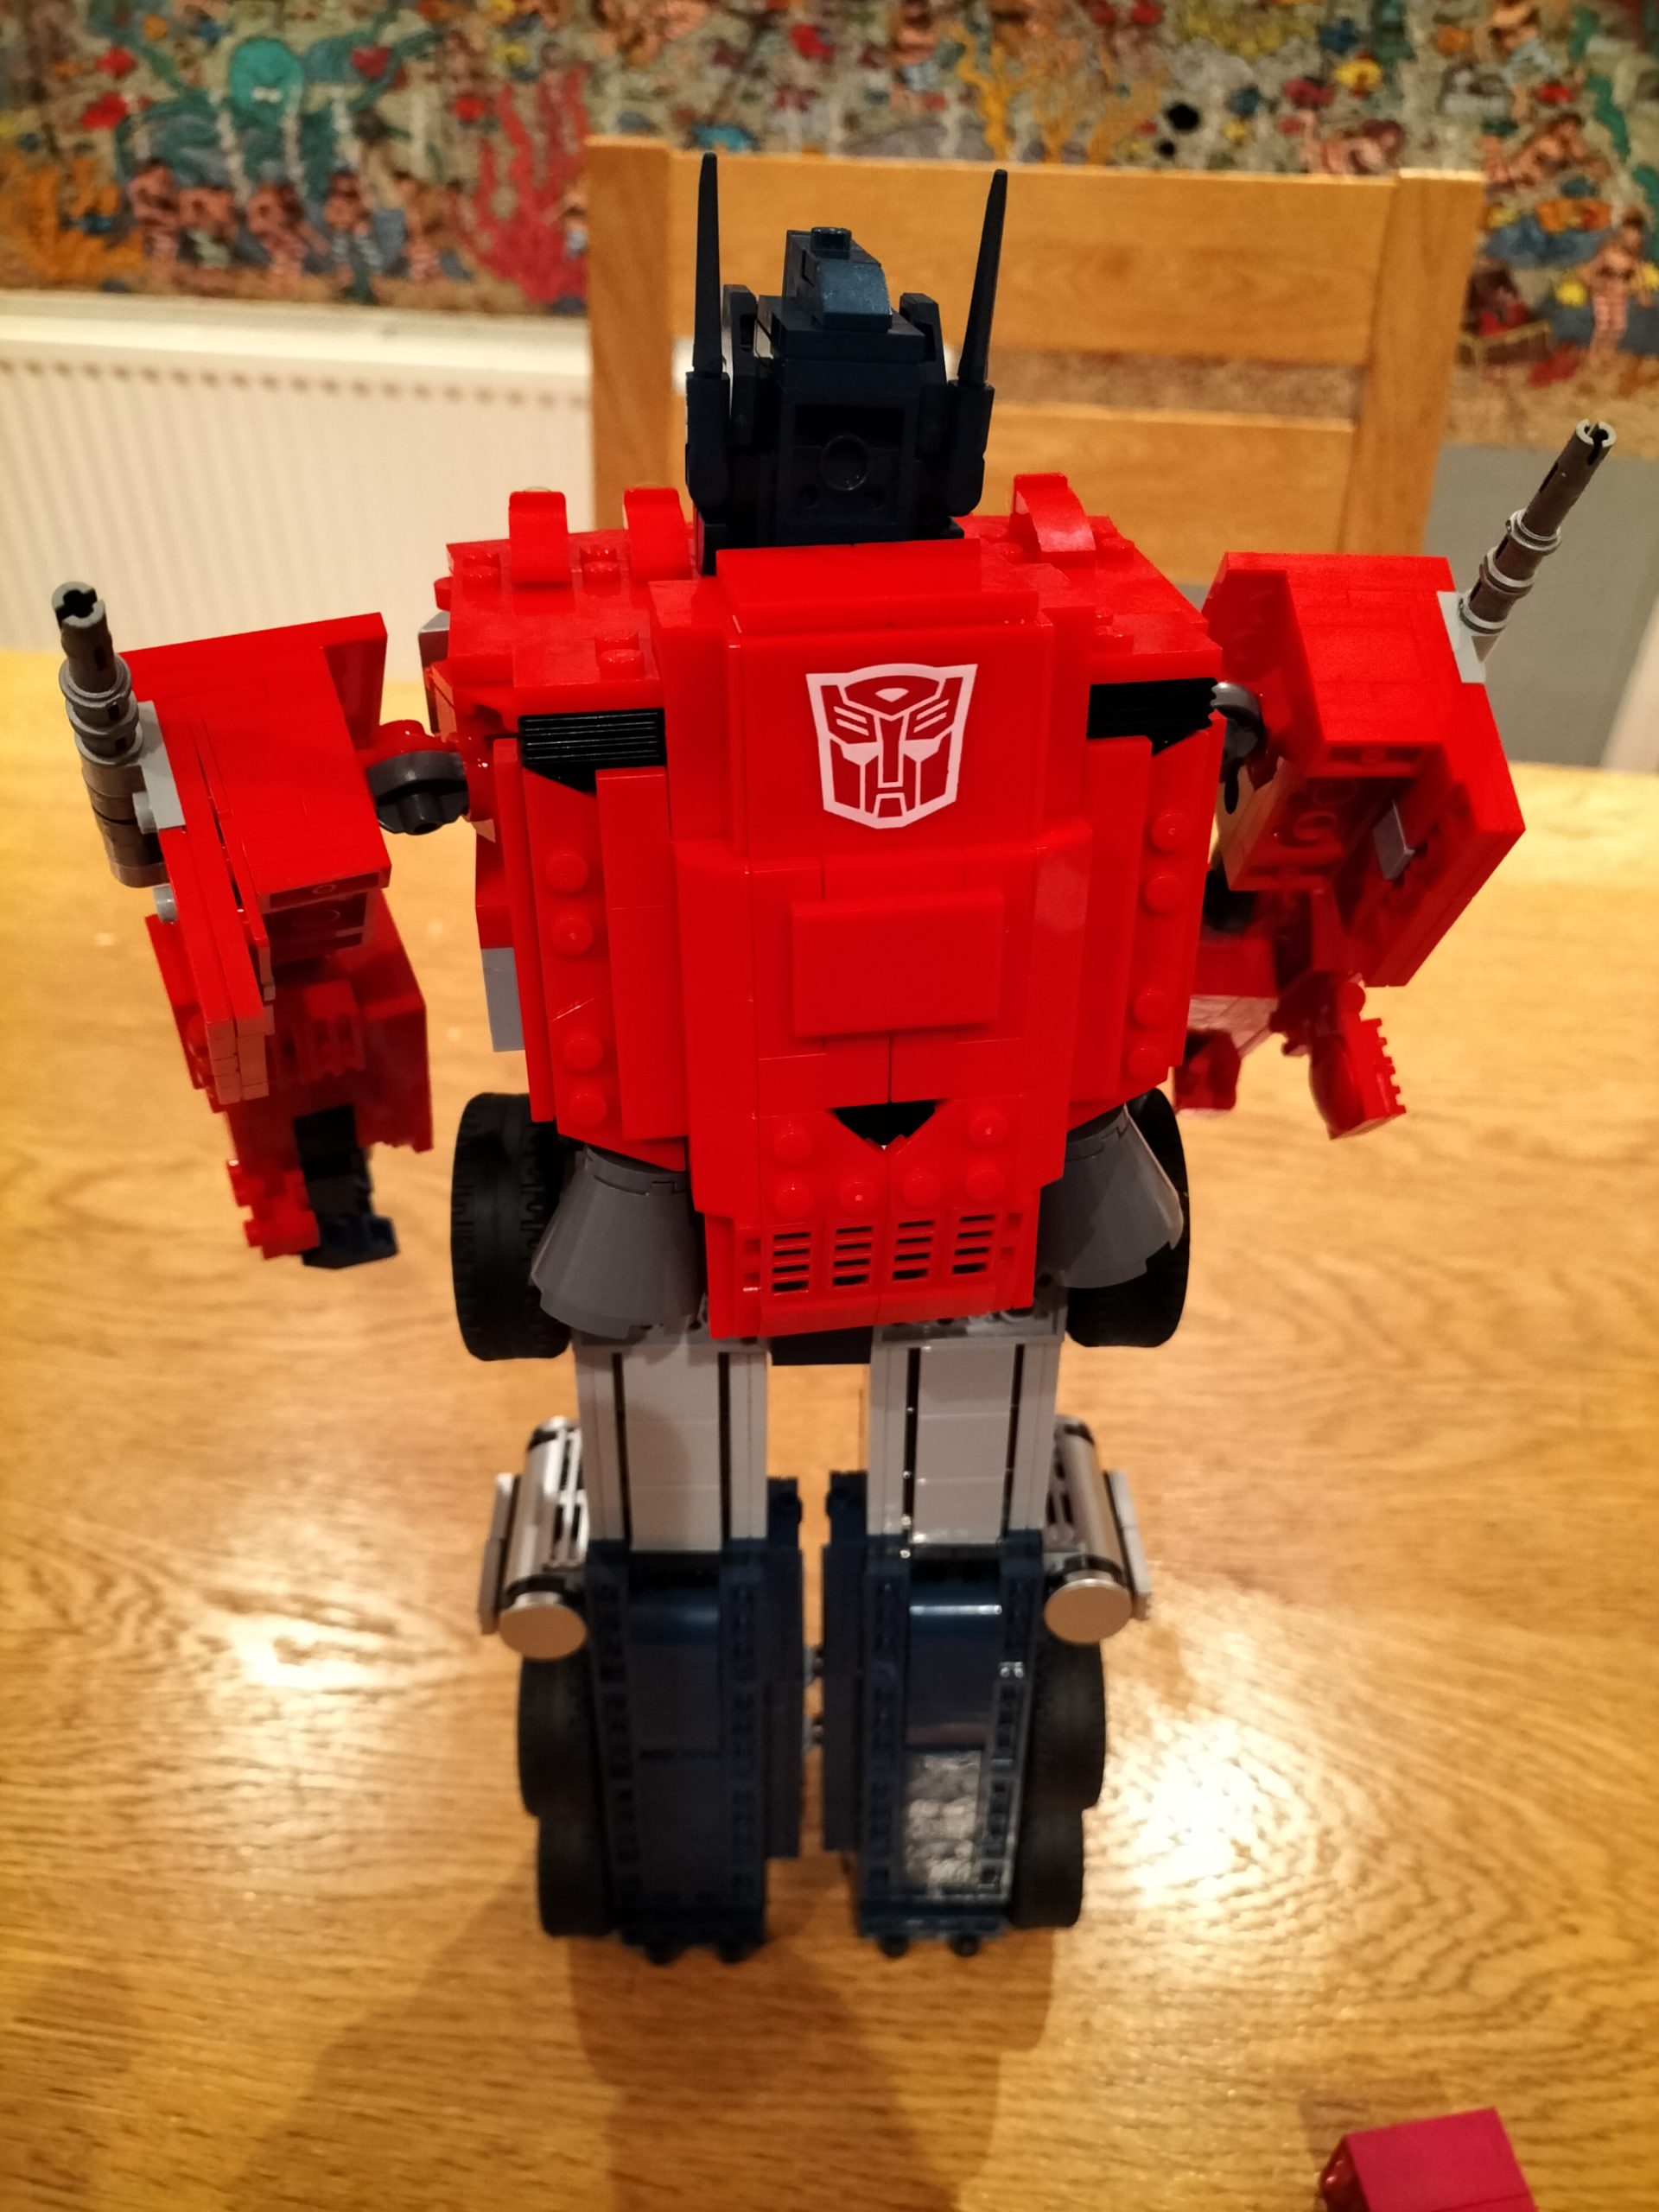
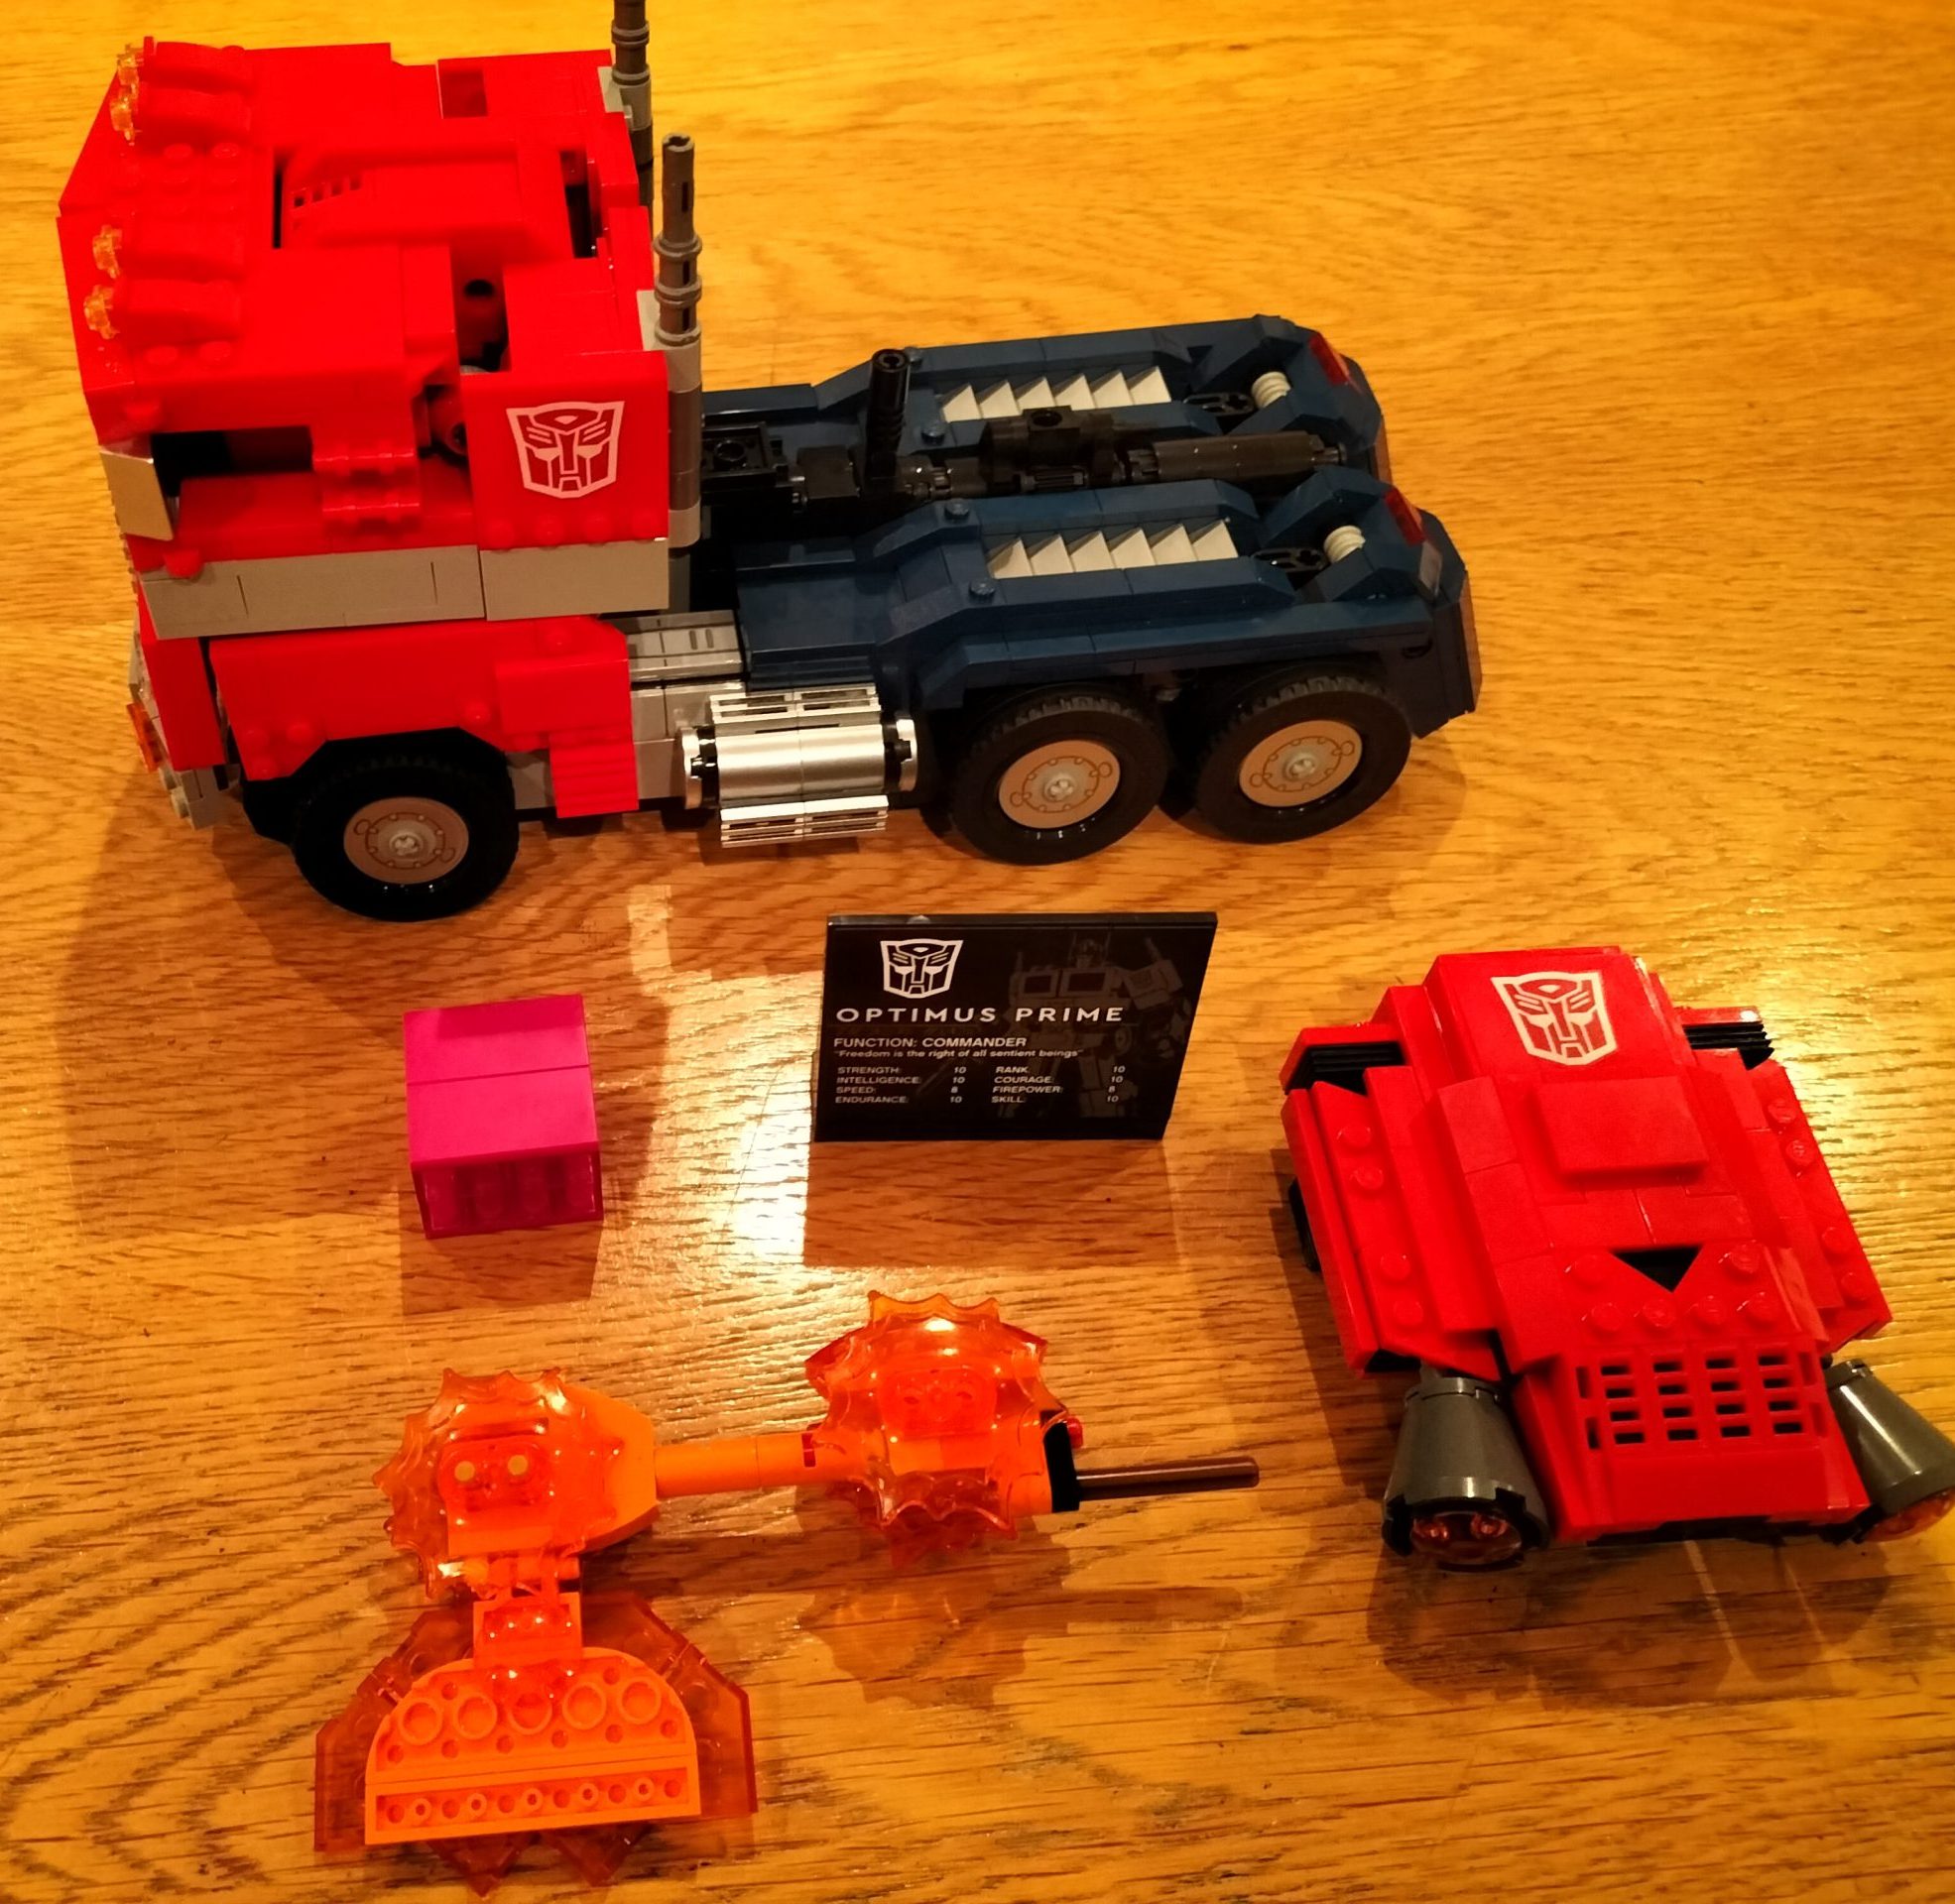
The completed model, standing in robot form, with gun in hand. Axe and Energon cube on the table in front of the robot, and a plaque about Optimus Prime.This time Optimus in Robot-Form, with the axe in hand.And finally, in robot form, showing off the detachable jetpack.In vehicle mode, the gun is part of the wheel-train, but the axe, Energon cube and jetpack need to travel separately!
Conclusion
This was a great build, and I’m glad I got the set – I’ll have plenty of enjoyment from showing it off and transforming it. I’m also really impressed at the level of detail they’ve gone into (although, to be fair, the grand piano which I got for Jules last year also set this bar pretty high).
Total build time was probably about 6 hours all-in, mostly building by myself, although Emily weighed in and helped for a bit. There were just enough pieces in each bag to justify having a new bag, but probably could have reduced things down to about 6 bags without too many worries.
It’s mildly frustrating that the jetpack and axe aren’t somehow incorporated into the vehicle-form, and the axe does occasionally fall off or pull the arm off, but, eh… it’s just there for the battles, and he’d be more likely to just shoot the gun. These are definitely things I can live with, I just need to be sure I don’t lose them!
So, final review – glad I got it, and the build revealed a few Easter eggs about the build that I really appreciated. 9/10
Thinking of getting the set? Consider buying it through my referral link: Amazon UK
As an Amazon Associate I earn from qualifying purchases. This means, if you follow a link from this page to an Amazon item, I may earn referral fees.
On Wednesday, 21st April, I saw a link to a blog post in a chat group for the Linux Lads podcast. This blog post included a discount code to make the GitLab Certified Associate course and exam free. I signed up, and then shared the post to colleagues.
Free GitLab certification course and exam – until 30th April 2021.
GitLab has created a “Certified Associate” certification course which normally costs $650, but is available for free until 30th April using the discount code listed on this blog post and is available for one year after purchase (or free purchase).
I’ve signed up for the course today, and will be taking the 6 hour course, which covers:
Section 1: Self-Study – Introduction to GitLab
* GitLab Overview * GitLab Comparison * GitLab Components and Navigation * Demos and Hands On Exercises
You don’t need your own GitLab environment – you get one provided to you as part of the course.
Another benefit to this course is that you’ll learn about Git as part of the course, so if you’re looking to do any code development, infrastructure as code, documentation as code, or just learning how to store any content in a version control system – this will teach you how 😀
Good luck to everyone participating in the course!
After sharing this post, the GitLab team amended the post to remove the discount code as they were significantly oversubscribed! I’ve heard rumours that it’s possible to find the code, either on Gitlab’s own source code repository, or perhaps using Archive.org’s wayback machine, but I’ve not tried!
On Friday I started the course and completed it yesterday. The rest of this post will be my thoughts on the course itself, and the exam.
Signing up for the course and getting started
Signing up was pretty straightforward. It wasn’t clear that you had a year between when you enrolled for the course and until you first opened the content, but that once you’d opened the link to use the Gitlab demo environment, you had 21 days to use it. You’re encouraged to sign up for the demo environment on the first stage, thereby limiting you to the 21 days from that point. I suspect that if you re-visit that link on a second or third time, you’d get fresh credentials, so no real disaster there, but it does make you feel a bit under pressure to use the environment.
First impressions
The training environment is pretty standard, as far as corporate training goes. You have a side-bar showing the modules you need to complete before the end of the course, and as you scroll down through each module, you get various different media-types arriving, including youtube videos, fade-in text, flashcards which require clicking on and side-scrolling presentation cards. (Honestly, I do wonder whether this is particularly accessible to those with visual or motor impairments… I hope so, but I don’t know how I’d check!)
As you progress through each module, in the sidebar to the left, a circle outline is slowly turned from grey to purple, and when you finish a module the outline is replaced by a filled circle with a white tick in it. At the bottom of each module is a link to the next module.
The content
You have a series of 3 sections:
“Introduction to Gitlab” (aka, “Corporate Propaganda” 😉) which includes the history of the GitLab project and product, how many contributors it has, what it’s primary objective is, and so on. There’s even an “Infotainment” QVC-like advert about how amazing GitLab is in this section, which is quite cute. At the end of this first section, you get a “Hands On” section, where you’re encouraged to use GitLab to create a new Project. I’ll come back to the Hands on sections after this.
“Using Git and Gitlab”, which you’d expect to be more hands-on but is largely more flashcards and presentation cards, each with a hands on section at the end.
“Certification Assessments” has two modules to explain what needs to happen (one before, one after) and then two parts to the “assessment” – a multiple-choice section which has to be answered 100% correctly to proceed, and a “hands on” exam, which is basically a collection of “perform this task” questions, which you are expected to perform in the demo environment.
Hands-on sections focus on a specific task – “create a project”, “commit code”, “create an issue”, “create a merge request” and so-on. There are no tasks which will stretch even the freshest Git user, and seeing the sorts of things that the “Auto DevOps” function can enable might interest someone who wants to use GitLab. I was somewhat disappointed that there was barely any focus on the fact that GitLab can be self-hosted, and what it takes to set something like that up.
We also get to witness the entire power (apparently) of upgrading to the “Premium” and “Ultimate” packages of GitLab’s proprietary add-ons… Epics. I jest of course, I’ve looked and there’s loads more to that upgrade!
The final exams (No Spoilers)
This is in two parts, a multiple-choice selection on a fixed set of 14 questions, with 100% accuracy required to move on to the next stage that can be retaken indefinitely, and a hands-on set of… from memory… 14ish tasks which must be completed on a project you create.
The exam is generally things about GitLab which you’ve covered in the course, but included two questions about using Git that were not covered in any of the modules. For this reason, I’d suggest when you get to those questions, open a git environment, and try each of the commands offered given the specific scenario.
Once you’ve finished the hands-on section, using the credentials you were given, you’re asked to complete a Google Forms page which includes the URL of the GitLab Project you’ve performed your work in, and the username for your GitLab Demo Environment. You submit this form, and in 7 days (apparently, although, given the take-up of the course, I’m not convinced this is an accurate number) you’ll get your result. If you fail, apparently, you’ll be invited to re-try your hands-on exam again.
At least some of the hands-on section tasks are a bit ambiguous, suggesting you should make this change on the first question, and then “merge that change into this branch” (again, from memory) in the next task.
My final thoughts
So, was it worth $650 to take this course? No, absolutely not. I realise that people have put time and effort into the content and there will be people within GitLab Inc checking the results at the end… but at most it’s worth maybe $200, and even that is probably a stretch.
If this course was listed at any price (other than free) would I have taken it? …. Probably not. It’s useful to show you can drive a GitLab environment, but if I were going for a job that needed to use Git, I’d probably point them at a project I’ve created on GitHub or GitLab, as the basics of Git are more likely to be what I’d need to show capabilities in.
Does this course teach you anything new about Git or GitLab that just using the products wouldn’t have done? Tentatively, yes. I didn’t know anything about the “Auto DevOps” feature of GitLab, I’d never used the “Quick Actions” in either issues or merge requests, and there were a couple of git command lines that were new to me… but on the whole, the course is about using a web based version control system, which I’ve been doing for >10 years.
Would this course have taught you anything about Git and GitLab if you were new to both? Yes! But I wouldn’t have considered paying $650… or even $65 for this, when YouTube has this sort of content for free!
What changes would you make to this course? For me, I’d probably introduce more content about the CI/CD elements of GitLab, I might introduce a couple of questions or a module about self-hosting and differences about the tiers (to explain why it would be worth paying $99/user/month for the additional features in the software). I’d probably also split the course up into several pieces, where each of those pieces goes towards a larger target… so perhaps there might be a “basic user” track, which is just “GitLab inc history”, “using git” and “using Gitlab for issues and changes”, then an advanced user, covering “GitLab tiers”, “GitLab CI/CD”, “Auto DevOps”, running “Git Runners”, and perhaps a Self Hosting course which adds running the service yourself, integrating GitLab with other services, and so on. You might also (as GitLab are a very open company) have a “marketing GitLab” course (for TAMs, Pre-Sales and Sales) which could also be consumed externally.
TL;DR: Linux is usually awesome, but it doesn’t work for my niche case.
Why was I in the market for a new computer?
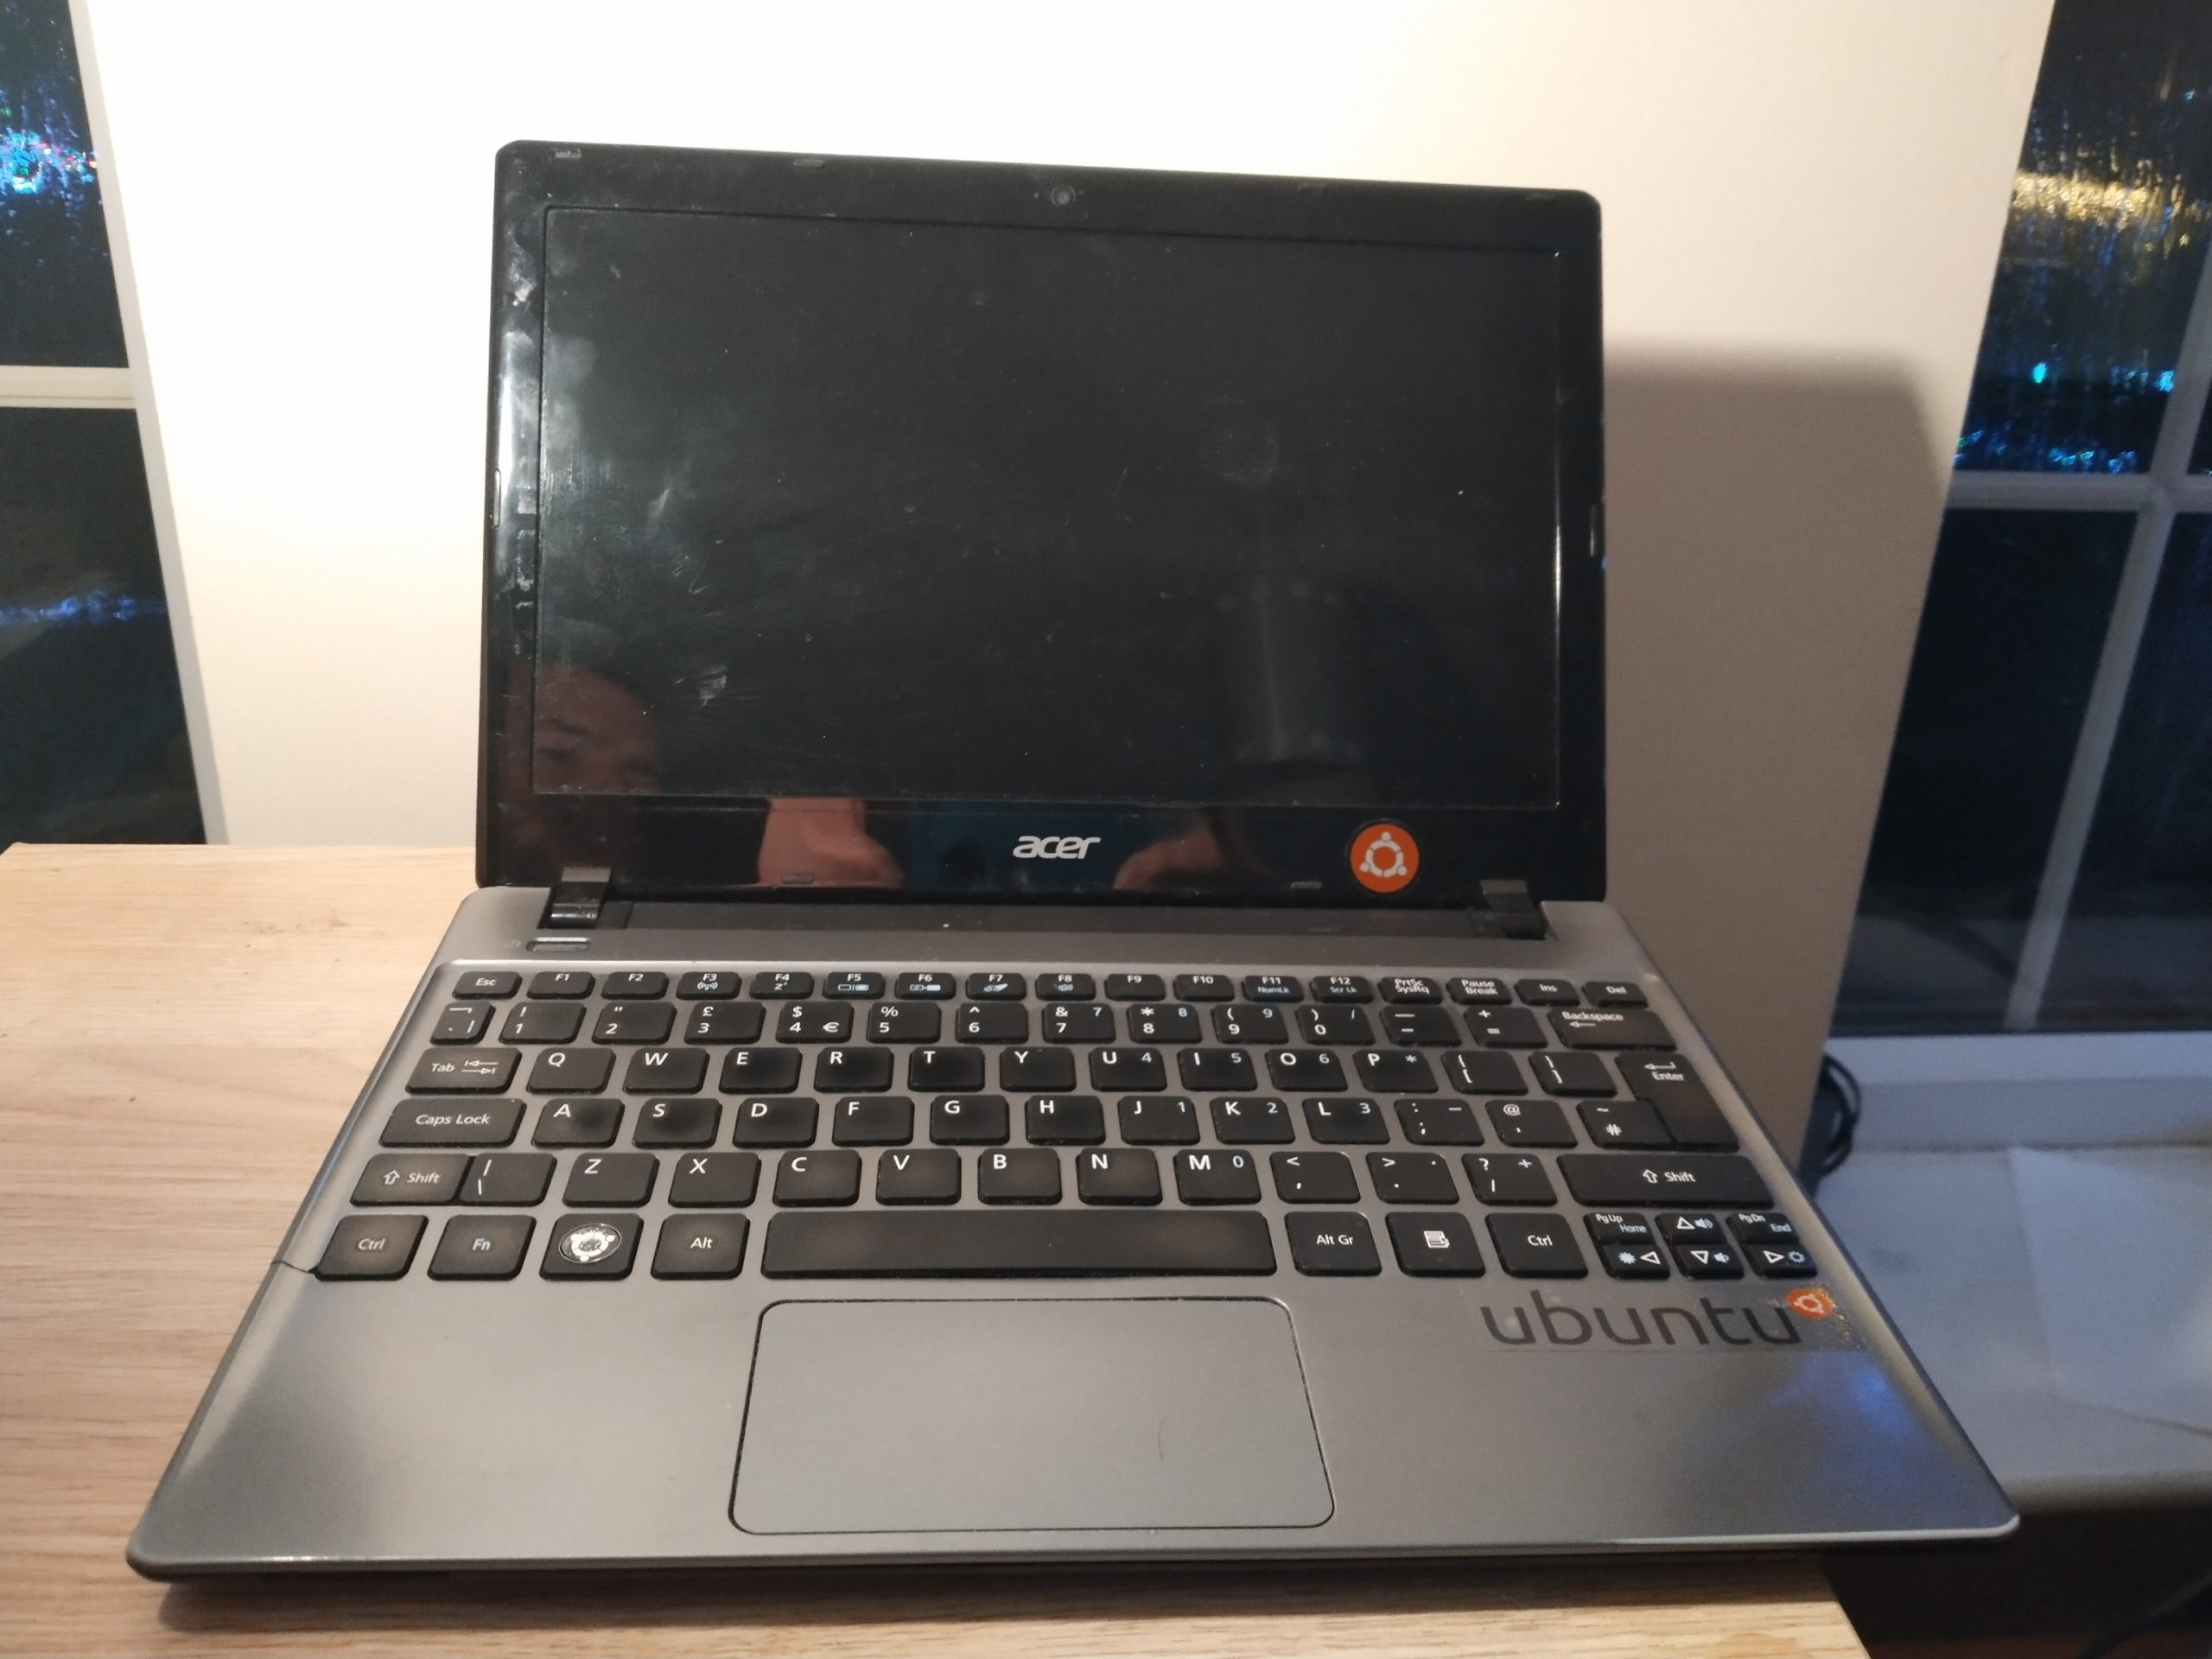
October 2019 my beloved (but 7 year old) Acer V5-171, “Minilith” (so named because it was smaller than it’s predecessor, a 17″ monster of a black slab that was named “Monolith”) started exhibiting signs of having a dead battery. I replaced the battery with an 3rd party replacement, and while it charged OK for a few runs, it stopped charging all together (I could get a maximum of 5% charge), so I put the old battery in, and it started working better. Huzzah. All was going well until around 6 months ago when the hard drive failed, so I replaced it with an SSD, and that gave it a new lease of life… and this month, well, it just wouldn’t boot reliably. I finally decided that it was time to let it go and play with Timmy the dog at the farm, and replace it with something newer.
The back of “Minilith”, my 7 year old Laptop.
Minilith’s Keyboard and Screen
Fortunately, this co-incided with a small win on the company social Prize Draw of a reasonable sized pay out, enough to consider looking at the Ex-Demo staff sales list made available to me by dint of my employer.
Making my choice.
There weren’t a lot of options, to be fair, but one item stood out to me. A Stylistic Tablet Computer. I’d previously had an Asus Transformer TF300T – a tablet-come-computer which had a detachable keyboard. I’d loved that, even though it didn’t really do what I wanted it for (and, I think I’d paid quite a bit over what it was worth, really)… but what I really wanted to do was have a tablet I could use for computing… Hence, the Stylistic.
Image of the tablet view of the Stylistic V727 computer from a German blog.
Fujitsu are in a bit of an odd place, at least in the UK (I’ve not looked elsewhere) for personal computers – we sell quite well (apparently) to business, but we moved out of the “selling to the public” market probably around 2010, and so it was pretty hard to gauge how well this laptop performed. Oh, and of course, being a “Linux Enthusiast”, I wanted to be able to run Ubuntu, Fedora or others on it.
Because it was an internal sale, and I wanted to test Ubuntu on it before I bought it, I was able to get the sales team to let me evaluate it before I bought it.
It arrives!
It arrived as the tablet and keyboard, with a dock for setting it on your desk. I tested it with Windows, where the dock worked well, but the keyboard by itself didn’t so much. You see, the keyboard is an optional accessory, and had been sold with the laptop, all good thus far. Except what you also need to get, when you get the keyboard, is the case. The case gives you the sturdy back to give the “laptop” a frame. It’s basically the hinge that the top-heavy screen needs to keep itself upright.
A screen capture of the Fujitsu Stylistic V727 from the datasheet. Note this image shows the optional keyboard and the optional case.
The sales team were very understanding, and found a case to ship to me as well, but it wouldn’t come for a few days, so I was left to try out the rest of the hardware.
What do you get for your money?
The processor is an Intel i5-7Y57 dual core CPU with four threads, running at 1.2GHz.
It has 8GB of RAM and a 256GB m2 SATA drive.
The 12.3″ touch-or-pen (included) enabled screen has a maximum resolution of 1920×1280 pixels. The surface of the tablet is considered a WACOM tablet, and the pen can be sensed from a reasonable distance away. There are two buttons on the side of the pen, which turns a tap on the screen from a “normal” left click to a right click, or a center click.
On the rear is a fingerprint sensor.
From a network perspective, the WIFI supports 802.11ac, Bluetooth 4.2, and under the battery there is a LTE module onboard (although, I’ve not tested that).
On the side is a USB3.1 A connector, and a USB C connector (the specs sheet I linked to above suggests there is a single USB 3 and a USB 2 interface, but I doubt the USB C is USB 2).
There is also a MicroSD slot, which is detected by the booted OS as an MMC device, but it is not detected as a bootable device.
There’s a combined 3.5mm audio in and out jack, which I’ve not tried and a power socket.
There are two cameras, a 5 megapixel front-facing camera and an 8 megapixel rear facing camera with a flash.
The detachable keyboard has an integrated touchpad. It’s all good, and compared to my poor Acer V5, it’s a massive step up ❤
When you add in the desk dock (where, to be fair, it’s spent most of it’s time since I got it), the connections also then include Gigabit Ethernet, a Display Port interface, a VGA port and three USB 3 A interfaces, and a power socket.
The OS Comparison starts
Windows first
I booted it in Windows, and found it really rather responsive, especially once I’d reinstalled Windows without all the customizations the demo team had put on…
My previous install of Windows on Minilith had been the Home edition, and I’d found the semi-constant nagging to install games and the like rather annoying. I’ve had a couple of Windows 10 Professional installs at work, and, while those builds came with their own fair share of corporately mandated bloat (after all, their threat models are somewhat different to mine) they usually felt more slim than the Windows 10 home install I’d had, so when I saw this had Windows 10 Professional, I was looking forward to seeing something a bit leaner… and I wasn’t let down. All the hardware worked fine, I had the fingerprint reader working, no worries and the dock was great.
Docking and undocking is relatively seamless, although the first try was a bit tricky, I’ve got used to it. I had two screens attached via my work-supplied Fujitsu PR08 DisplayLink adaptor, plugged through the dock, and again, that all worked fine.
I could use the pen in the tablet mode really well. It makes selecting items on the screen easy, and if you don’t want to use the virtual keyboard, in some cases, it pops up a handwriting recognition box, although the time I showed this to my wife (where I’d been using it successfully for some time), it didn’t recognise half the words I wrote… but I’m sure that’s just my dreadful scrawl, and not the tablet’s fault!
Even using the tablet without the pen worked really well. Tapping the screen is a left click, and a long press on an area is a right click, similar to how Android handles left-and-right clicks in RDP and VNC sessions. The keyboard has several “modes” – a reduced character set, a thumb typing set or a full keyboard. The reduced set has a control key and an escape key, but no alt, windows or arrow keys. I didn’t try the thumb typing set (this thing is 12″ across!) but the full keyboard is an “ISO layout” 75% keyboard (I discovered by matching the image to this website!) which means I still get my Control, Alt, and Windows keys.
Next, Ubuntu
I booted from a USB stick that had the Ubuntu 20.04 installer on it. Ubuntu booted fine, allowed me to repartition the Windows partition into approximately half the drive, and install away. During the install, I was asked to provide a password to setup the SecureBoot keys, and instructed that it’d prompt me for it on the next reboot. Most of the hardware worked fine. Dock, keyboard, Wifi, Bluetooth… all good. The fingerprint sensor wasn’t detected, and still isn’t, but I’m OK with that, it was always just a nice-to-have. The install worked fine, and yes, on reboot, I got a blue screen asking me to set up my “MOK” (which, I guessed eventually, was the SecureBoot setup). I realised that the SecureBoot install stage of the Linux install copies a private key to the UEFI space, and on the next boot, it spots there’s a key there and asks you to unlock that private key, so it can install it into the boot keys. All good!
I was working away on it with the tablet in the dock. I tried using it with the detachable keyboard, but it was a bit tricky to use without the rigid back, so I kept it in the dock. The pen works a treat too.
The problem came when I tried to use it as a tablet.
You see, where Windows has a selection of keyboard layouts for their “On Screen Keyboard” (OSK), the Gnome one only lets you use this layout:
While this is passable for tapping stuff into a URL bar in your browser, entering a password for logging in, or typing simple statements into dialogue boxes, there are some key things it’s missing. The first (for me) is a Control, Alt or Super (Windows) key. This means I can’t do any programming, of any sort, in Tablet mode. Note, this just works on Windows, and is possible on Android with an extended keyboard called “Hacker Keyboard”. There are also no cursor keys, which seems like it’s less important, but it makes editing things you’ve typed (or mistyped) MUCH harder.
“Well, OK then, let’s have a look around and see what our options are?”
I’d heard good things about “OnBoard”, a predecessor to Gnome OSK, but because OSK is registered as “The” on screen keyboard, and runs as a system process, and OnBoard is a user process, Gnome OSK pops up any time you want to do on screen keyboard things, even if you’ve got OnBoard loaded. Ahah! I found an extension which blocks Gnome OSK… except that stops it from being able to be used for logging in.
You see, that whole “system” versus “user” process thing I mentioned before. The Gnome lock screen is considered a system process, not a user one, which means that if you’ve disabled Gnome OSK, then you can’t put your password in, but equally, if you’re typing in a box with OnBoard, change focus and change back again, up pops Gnome OSK.
Breaking down and turning it around.
I should confess, I didn’t spend a lot of time wondering about this. I booted a Kubuntu environment instead, and found that this really didn’t work for me either (although I now don’t remember what stopped me from liking it – I might have to revisit this!) By this point, I’d spent several hours “messing” around with this, and I just wanted to give something a try. So I booted back into Windows.
I gave the on screen keyboard another try. It worked great. I tried doing some sketches in Paint 3D (the replacement for Windows Paint) with the pen, and it was very easy (so much so, I need to work out how to use it for my next design call with work!)
All the familiar tools I use in my work or personal environment are there.
VSCode. Check.
A usable shell (via Windows Subsystem for Linux). Check.
File synchronization (via Syncthing). Check.
Web browser (Firefox). Check.
Audio recording software (Audacity). Check.
Image editor (GIMP). Check.
Voice chat for the podcast software (Mumble). Check.
And the fingerprint reader works… so I stuck with Windows 10.
The only last catch, whether it was Windows or Linux? There’s no HDMI or VGA out without the dock… so I need to start looking into “cheap” display adaptors that I can use for presenting things, whenever we get back to “normal” and I can start attending and speaking at conferences again.
What about the case?
Oh yehr, so a few days after I get the computer, the case turns up. It attaches to the back of the computer with tape, and feels like leather (although, I’m sure it’s not leather). It definitely makes it feel like a “quality” product 😀. It’s a little bit more tricky to drop into the dock, but it makes it feel like a Laptop when you’re using it like one. The detachable keyboard is interesting. I’ve used it in the car, waiting for children to finish activities, and it’s fine, because it goes flat. I’ve detached the keyboard from the screen to just do tablet-y things with it, and that’s fine too.
So in summary
I think if I didn’t want it to be a tablet as much as a computer, I’d have been fine.
If you want a Windows Tablet that turns into a Laptop, it’s fine. If you want a low-profile desktop computer (in a dock) that can become a laptop, it’s fine.
But until Gnome or one of the other flavours gets a handle on how to do a reasonable on-screen keyboard… I don’t think I’ll be using Linux on here (because it’s also a tablet) for the next few months… and I think that’s going to be OK.
All of that said, if you use any Linux distributions with a tablet style mode, and you’ve got a working OSK, please contact me (via one of the links at the top of the site) to let me know what and how you did it, and I’ll give it a try too!
Edit 2025-07: Five years later
I used this tablet as a keyboard-attached-with-Ubuntu affair for several years. It was only (around 4 years later) when Ubuntu 24.04 rolled around that the On Screen Keyboard became good enough to use it for more than just entering passwords… by which time I’d effectively stopped using it as the fixed RAM and Storage meant it wasn’t really useful for anything other than a remote terminal to other things. In addition, the battery life was getting slowly worse. Taking it to a conference, I found myself back in the state where I was always finding a seat next to the mains sockets. Talking of which, it did come with me to some fab events but there was nowhere to put stickers (unlike my beloved Minilith) and without taking the docking station to give me an HDMI output method, it made it really hard to present anything. Later on I managed to get USB HDMI out adaptors, but by this point it was just too late.
This year I got involved in some activities where I kinda needed a computer, so dragged this out of a drawer, and found the battery was giving me 5-10 minutes off mains, so went looking for a replacement battery… and discovered that this model, as it’s a niche product anyway, you can’t get a replacement battery. So, it’s now resigned back to the drawer-o-doom.
If I had a do-over, would I have bought this? Probably not. The heavy screen and light keyboard meant if you didn’t have the stand on it you couldn’t really use it. The case made putting it into the docking station really hard, and the fact I couldn’t upgrade the RAM or storage was a big negative. I never got the fingerprint sensor to work under Linux. Lack of HDMI out should have been a red-flag too, but… I guess you learn that by having that experience. I don’t regret having got this laptop, but I wouldn’t have done it again.
In it, Ricardo introduces me to two things which are interesting.
Using the wait command literally waits for all the backgrounded tasks to finish.
Running bash commands like this: function1 & function2 & function3 should run all three processes in parallel. To be honest, I’d always usually do it like this: function1 & function2 & function3 &
The other thing which Ricardo links to is a page suggesting that if you’re downloading a bash script and executing it (which, you know, probably isn’t a good idea at the best of times), then wrapping it in a function, like this:
#!/bin/bash

function main() {
  echo "Some function"
}

main
This means that the bash scripting engine needs to download and parse all the functions before it can run the script. As a result, you’re less likely to get a broken run of your script, because imagine it only got as far as:
#!/bin/bash
echo "Some fun
Then it wouldn’t have terminated the echo command (as an example)…
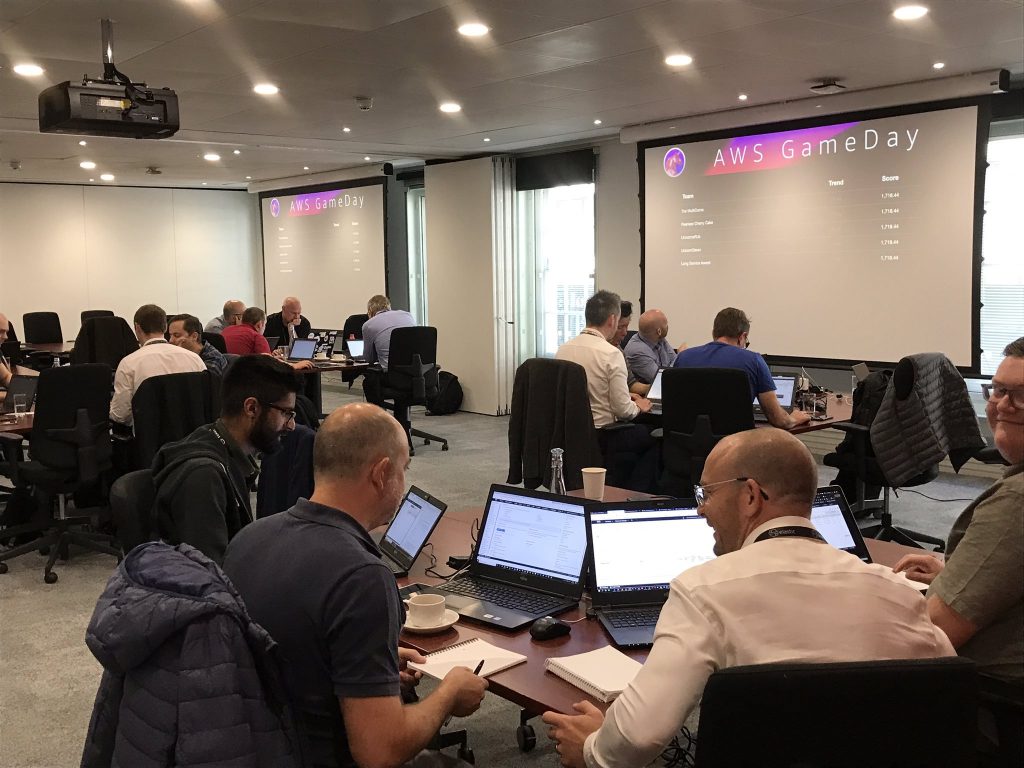
It’s only been a few months since I last attended an AWS Game Day, but the Microservices Game Day came up in the internal calendar, and I jumped at the chance.
To quote from my last post:
A Game Day (sometimes disambiguated as an “Adversarial Game Day”, because of sporting events) is a day where you either have a dummy environment, or, if you have the scale, a portion of your live network is removed from live service and used as a training ground. In this case, AWS provided a specific dummy environment “Unicorn.Rentals”, and all the attendees are the new recruits to the DevOps Team… Oh, and all the previous DevOps team members had just left the company… all at once.
Guess what? We were recruited BACK by Unicorn.Rentals! Again, the Ops Team have all “quit” (someone needs to talk to their HR team, for crying out loud), and we’re left with their migration from a legacy system to a new microservices based system. Teams are groups of 4 people.
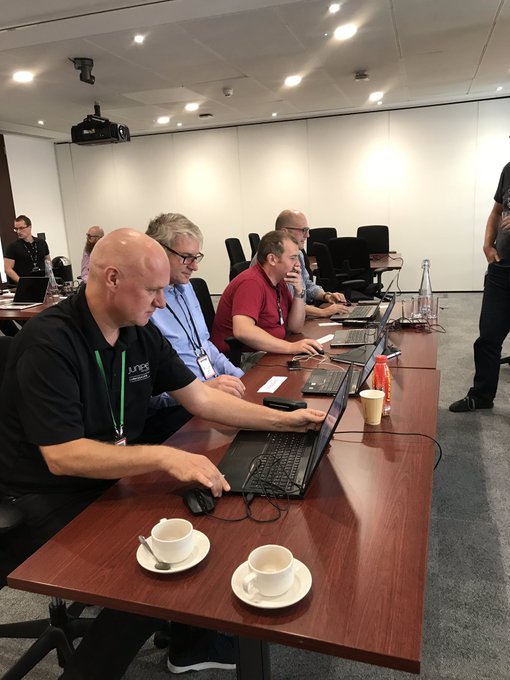
Team Red Hats – left to right: Paul Clarke, Ho Kingsley, Jason Daniels and Me (the owner of the mentioned Red Hat)
The task was to maintain a “service router”, and three micro services. Like the last session, there were moments where the stability of the network was challenged, with issues in code, environment and even external actors (no spoilers, remember).
The main take-away I had was that even though I’ve been cramming Docker and Kubernetes knowledge like crazy (more blog posts to come, folks), it doesn’t mean anything if you can’t actually put it into practice.
The pressure is on you right from the start – when you’re trying to get your head around the service you’re running, and working out how to make your microservices work right. There’s also an element of negotiation (admirably performed in our team by Jason) to get people to work together, and keep your eye on the “troubles” in your environment.
My role was mostly around getting on top of improving the condition of the Service Router, and about half way through the session, I decided to try and apply my newfound Docker knowledge to the problem. Naturally, as I’ve not done this under live fire before, I completely mangled the attempt, even managing to knock one of the working microservices off in the process. I was working with a great team as there were no recriminations or criticism for doing that, just an understanding that we needed to roll-back and fix things.
Trying to work out what needed to be done with that broken Docker container took a lot of effort and even right to the last minute, I still hadn’t managed to get my head around it enough to trust it at the end. I think it’s fair to say, though, that it gave me a lot of impetus to try to understand how a docker container should work and has made me want to try and build something less purposefully complex to see how it would work “in the real world”…
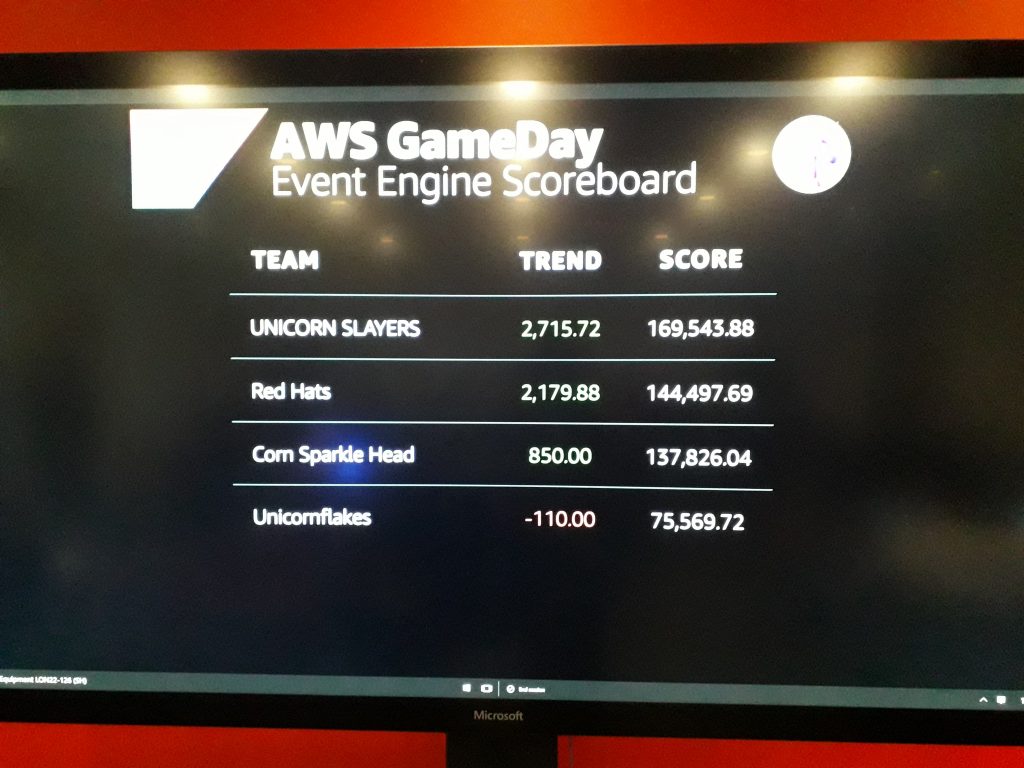
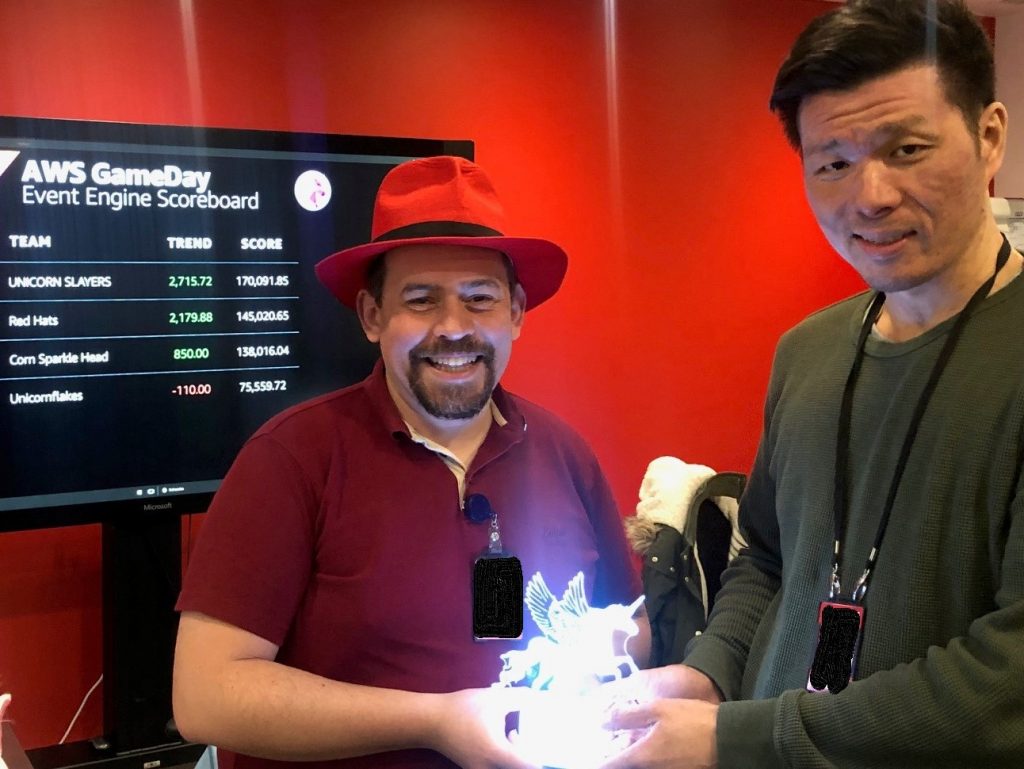
The AWS Microservices Game Day Scoreboard at the end
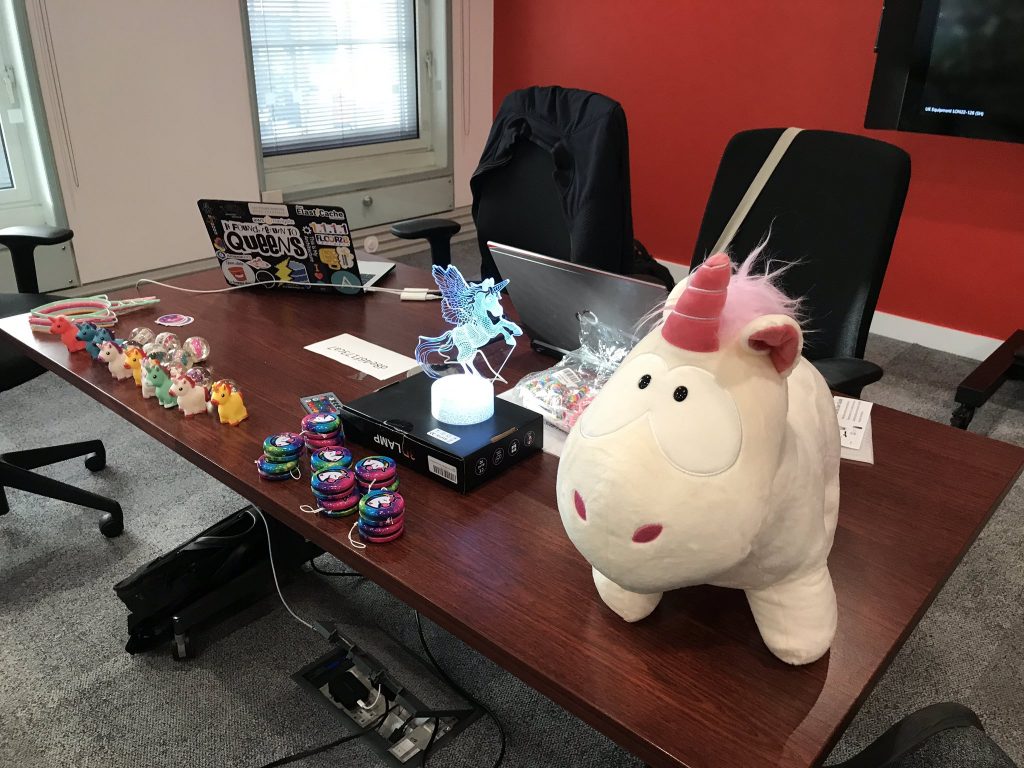
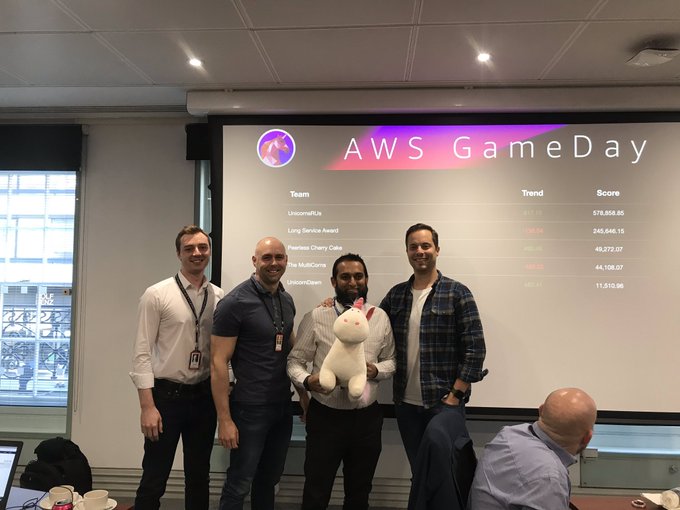
Even without doing something crazy with all the components, Team Red Hats came in second, so I came home with my second LED unicorn, currently sitting on my desk, waiting for a child to be good enough to award them A Unicorn from Unicorn Rentals!
Me and Ho accepting our prize for second place
If you’re offered the opportunity to do one of these, take it!!
This is a little different from my usual posts, but I heard about this from the User Error podcast this morning. In 2018 Melinda Seckington gave a talk at DevRelCon Tokyo which she then reposted in full detail on her blog. This set of posts is well worth a read, particularly if you’re someone who enjoys writing and delivering presentations, or if it’s part of your job.
While I don’t adhere to her advice exactly, I can see a lot of benefits to the way that she’s advising to create your decks.
It’s worth mentioning that if you follow the links on the blog posts, post 4 of 5 links to the wrong page for the last page (post 5/5), but there is a “next post” button at the bottom of the page… or just follow the links from this page :)
Firstly, an apology! It’s more than a week after OggCamp. I’m quite aware that this is very very late for me!
About OggCamp for those who weren’t there!
OggCamp is an annual semi-scheduled Unconference. An Unconference (sometimes known as a “BarCamp”) is where when you arrive on the first day, the schedule (also known as the “Grid”) is blank, with a stack of post-it notes next to the grid. You’re encouraged to put talks on the grid, and keep checking the grid to see what’s up next.
OggCamp is a conference which encourages people to talk about Free Culture (Free and Open Source Software, Open Hardware, Creative Commons Content) and other permissively licensed works. It’s also a “Geeky” conference, so games will often appear, they encourage hardware makers to attend, and this year the event also contained “FlawCon”, a security conference, so the event also had a higher-than-usual proportion of Infosec people there!
OggCamp was started by podcasters in 2009, and so there’s usually at least one or two podcasts being recorded. This year, there was a panel session, Linux Outlaws “rode for one last time”, Hacker Public Radio (HPR) were out and about to talk to people at the event, and the podcast I co-host, The Admin Admin Podcast, found a quiet spot to record a show too. Sadly, with the exception of my own podcast recording, I didn’t make it to any of the other recordings I mentioned, as I was attending talks by other people at those times.
Differences, for me, from previous years
Since OggCamp ’10, I was either not at the event (on the years each of my children were born), was running the Talk Scheduling Software; CampFireManager, crewing, or organising the event. This was the first year I managed to get to see talks all day since the very first OggCamp, so that was a big change for me.
This year, Lorna organised the grid, from right in front of it. Except for the welcome and closing talks, I don’t think she left the grid for the entire day both days. In previous years, when we weren’t using CampFireManager, the grid was left unattended, with an occasional drive-by crew member transferring the grid to Joind.In. Talking of which, here’s the Joind.In view of Saturday…
Saturday
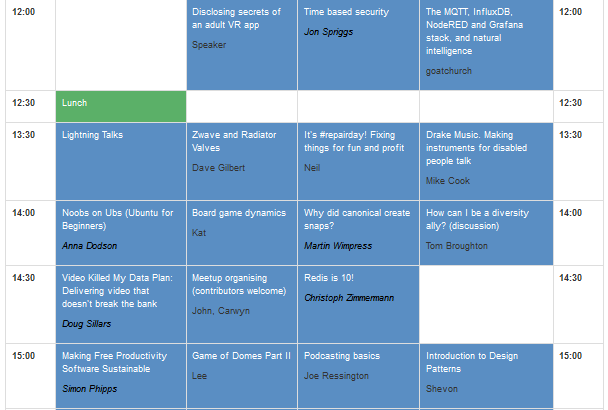
A screen shot of the grid from Saturday. Talks marked with a * are talks I attended.
I went to the “Opening Talk” first. This is your usual “Here’s how to get on the Wi-fi, here’s how to participate, here’s the sort of things we want from you” talk, and was run by Dan and Lorna.
OpenBenches is a project that records what is on the plaques on benches that people arrange for their relatives, sometimes when they die. I’ve been aware of this project for some time, but never contributed. Until now I thought you had to manually type in what was on each plaque (and I think, at the beginning you had to), but NO, they’re now doing Optical Character Recognition (OCR) to copy the text out of the photos.
The talk discussed the statistics of the project, the technology stack and why the project was started. It was just lovely and really well delivered.
— Jon Spriggs – toot.io/@JonTheNiceGuy (@jontheniceguy) October 19, 2019
Next I went to see Jeroen talking about Self Publishing.
Jeroen first attended OggCamp last year, giving a talk about Mainframes. This year he was back, talking about running a project with a very small community. Before he got to that though, he wanted to talk about self publishing. He endorsed Lulu for paper printing, AsciiDoc and AsciiDoctor to produce the content (PanDoc to convert between formats, if you started with something that isn’t AsciiDoc(tor)) and then Inkscape to create the cover. I asked him if he would suggest anything for eBooks, but he doesn’t create eBooks so couldn’t make any suggestions.
We got a demo of publishing a finished book on Lulu, with a running translation from Jeroen’s native language :) It was a great talk, and very well delivered in 25 minutes!
After that, I gave a late-pitched talk on Time Based Security (TBS). I made a few mistakes here – not least of which was failing to charge my laptop having used it while I was travelling in – so my laptop wouldn’t actually boot… I couldn’t even put up a single slide with my details! Trying to explain the maths around TBS without something to show it is hard, and involves walking around and waving your hands about. I had about 20 people in the room and I felt woefully underprepared.
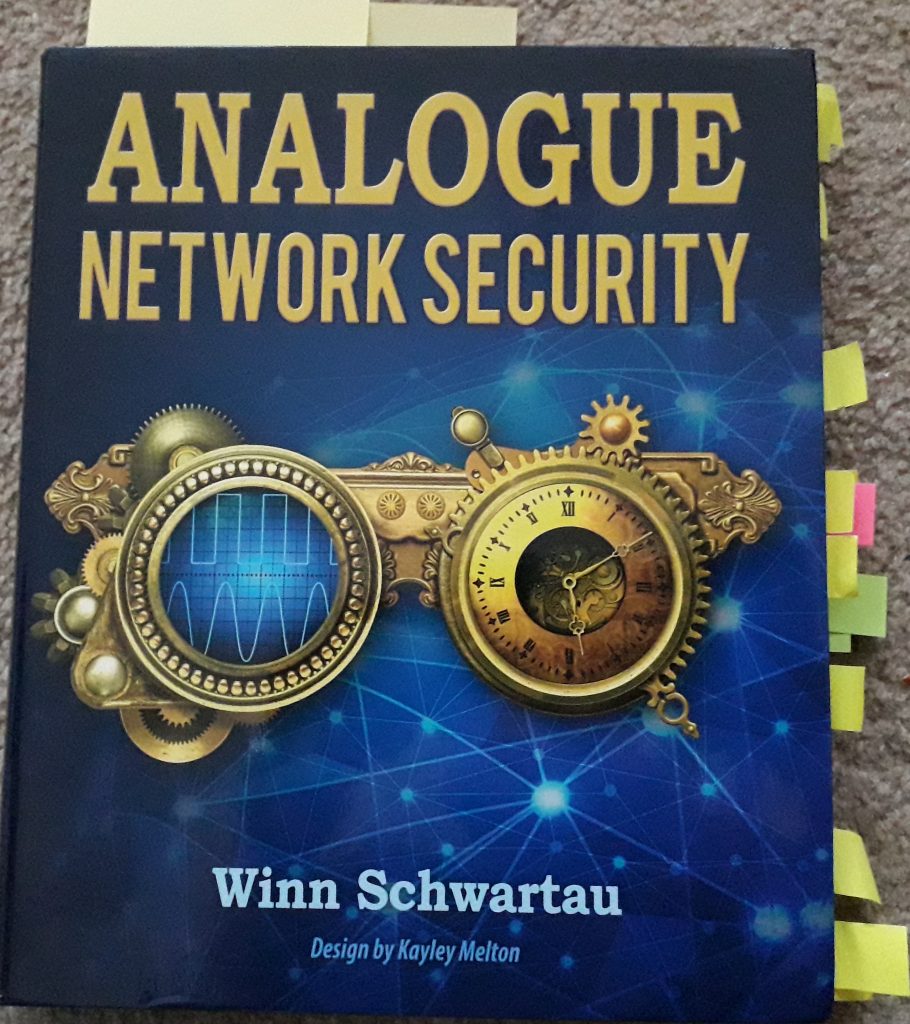
Because I ended up running much shorter than I expected, I also started to bring in other material from the Analogue Network Security book (pictured above, with post-it-note reference markers for my review) that I’m currently writing a review on. This was my next mistake. So, I mentioned about feedback loops (which about 1/3 of the book is about) and that in the later sections of the book it’s mentioned that this can improve workflow where you need sign-off to complete changes. I mixed up a few terms and it sounded like I was endorsing having changes made without approvals. I tried to pull it back, but not having brought the book with me or having enough experience in vocalising the material… yehr, it was never going to go well. Oh well, I’m hoping to get the review nailed down and then start writing proper presentations on the matter, so I can try and deliver it better next year!
Then… Lunch. Phil, my father-in-law, plus Kian and Cat went to a Chinese Bakery for lunch.
— Jon Spriggs – toot.io/@JonTheNiceGuy (@jontheniceguy) October 19, 2019
Neil’s talk was my next talk to see; an ad-hoc review of web pages about Repair Day
After I gave my talk, I headed to see Neil give an ad-hoc talk about Repair Day. Neil had a collection of pages he wanted to show off. Neil works with The Restart Project to help people fix their own broken things, not just computers (which is Neil’s area of interest) but also white goods, radios, home electronics, clothes and furniture.
In the audience was Stuart Ward (featured later) who also mentioned about running Repair Cafes. After the talk was complete, Stuart posted a collection of links to the Joind.In page for people to find out more for themselves later.
— Jon Spriggs – toot.io/@JonTheNiceGuy (@jontheniceguy) October 19, 2019
This was my stand-out talk for Day 1. Anna had come to OggCamp last year, and thought there wasn’t sufficient content for people new to Linux, so she proposed, wrote and delivered a blinder!
I went to Anna’s talk next. I went in, amongst other reasons, because thought I would be going in to support someone “new to Ubuntu”, and came out stunned at how well the talk was delivered!
Someone wise* wrote on twitter a few months ago something like “The point when someone new joins your team is when you get to challenge implied knowledge. If they ask ‘Why’ and you have to say ‘I don’t know’ it means you need to justify why you do something, and perhaps stop doing it.”
* Someone in this case means I can’t find the tweet!
In this case, I wanted to know what being “New” to Ubuntu (my preferred desktop Linux distribution right now) meant to people. Anna’s talk was fantastic, and got right to the heart of what someone new to Linux would feel like. She mentions downloading “things” from the Internet, setting them to be executable by everyone, and then running them. She also mentions running everything under “sudo” or as root, and then went into where she found she should put things. This was sprinkled with a lot of appropriate emojis. It was a really great talk.
— Jon Spriggs – toot.io/@JonTheNiceGuy (@jontheniceguy) October 19, 2019
As an event organiser, I’m always interested in what other groups are doing!
After Anna’s talk, I went to a round-table session about meetup and event organisers. This was inspired by something new that Lorna had organised this year for the unconference schedule. Next to the board, showing what talks were going to be given, was another board asking for talks to be given. Someone had asked for a talk about organising meet-ups, and so several of the attendees who are organisers of local groups came together to give their views on how to start a group, how to motivate attendees to come to your groups, and how to keep the momentum going.
I’m sorry to say that this was one of the weaker sessions I went to over the weekend. Because no-one had really planned anything in this slot, and none of the people running the session were really comfortable in what they were delivering, it was hard to get any points out of the speakers, and there was very little interaction with the audience. This could have been run as a Q&A session from experienced group organisers, or even a round-table… but never mind!
Towards the end of the session, I stood up and asked about whether any groups like TechNW.UK existed in their regions, and asked people who organised groups like this to put pull requests to get their groups added to that website. I hope to see something come out of that!
After I left this session, I went to look at the exhibition hall and the Kids Track room.
In the exhibition hall was the Merch Stand, the grid, two stands that were apparently about musical things – one of which basically had a guitar and amp constantly being used by a very good musician. After that was Matrix.org, The FSFE, Hacker Public Radio. Along the other wall was a lock picking stand from FlawCon, Manchester Grey Hats and InfoSec Hoppers, a telepresence bot and more!
In the kids room were computers, micro:bits and willing instructors! It looked like a lot of fun for kids, but there wasn’t much room! I had a bit of a chat with a few friends I met along the way, before I went to see my co-host, Al, talking about Wireguard.
— Jon Spriggs – toot.io/@JonTheNiceGuy (@jontheniceguy) October 19, 2019
Al hadn’t expected to be giving this talk today!
Al has been talking about Wireguard a few times over the past year-or-so, and wanted to give a talk about it. He’d planned to propose it for Sunday, but was encouraged by Lorna to talk about it on Saturday. As a result, he hadn’t had a chance to run though the demo he’d planned to give, and it tripped him up at the end of his demo, when the notes he was following mixed up private and public keys at each end… Aside from that, it was a great talk, and made me want to look at Wireguard again!
— Jon Spriggs – toot.io/@JonTheNiceGuy (@jontheniceguy) October 19, 2019
My final talk for the day was one I didn’t expect to be in!
Kian is a friend of mine from days of old, and when he walked into the room I’d just been in for Al’s talk… I decided to sit in whatever he was talking about. Kian spoke to a small audience about hardware builds he’d done over the years, and the mishaps that had occurred on them. A very entertaining talk, albeit one that I couldn’t really empathise with, as I’ve not done any hardware builds since I did my Radio Amateur Exam. Hearing the story of the halloween pumpkin with eyes that were supposed to look at you was very funny though, and the videos really completed the story!
After the talks were done, I went to get dinner with my co-hosts from the Admin Admin podcast, and a few of the other attendees. After we were done, I went back to the venue, but couldn’t settle as I’d had a headache coming on.
While I was gearing up to leave, I ended up having a good chat with Ben Grubert, who changed my view somewhat on how to deliver a talk. He said that people, particularly those who are very process focused, struggle to explain something that links back to the goal, for example, explaining how to win at a board game. It made me completely re-think how my talk I wanted to give on Sunday would go, and I left soon after that conversation so I could re-write my talk. I’ve since gone on to share that advice with several other people!
Sunday
A screen shot of the Sunday Schedule. Again, starred talks are the ones I attended.
— Jon Spriggs – toot.io/@JonTheNiceGuy (@jontheniceguy) October 20, 2019
My hands-down favourite talk from the entire weekend!
At Barcamp Manchester 9, which I attended a few weeks before OggCamp, I missed a talk by Rachel. I saw a picture of one of her slides, and I think I might even have caught the last slide of it… Either way, I was desperately sad that I’d missed the talk, and so encouraged her to attend OggCamp to deliver it. Once I saw she was on the grid, I knew exactly where I was going!
Rachel’s talk did not fail to deliver. I’ve heard from lots and lots of people that they were moved by this talk. Rachel was talking about her life, mostly undiagnosed with Autism, ADHD and depression. She enriched the talk with fun comments, including asking someone to play the part of Romeo from Romeo and Juliet, and then asking him, without having seen the book, why he didn’t know his lines. It sounds quite brutal, but actually, it sets the scene quite well on her life. There’s a fantastic photo of the spectrum of issues related to autism that just keeps having more and more artefacts being added to it.
I’ve heard that she wants to take this talk to more people, businesses and conferences, so I won’t spoil any more of the surprises, but it’s a really powerful talk and I’d strongly encourage anyone to bring Rachel into their environment to hear her talk.
While sitting in Kian’s talk the day before, I missed a session on Ansible Security. I’d made the point, in the morning, of finding Michael from the Matrix Project who gave the talk, and they said that they’d planned to host a “Birds of A Feather” (BOF) session on the Sunday following the feedback from the talk.
I managed to make it to this session, but unfortunately, I didn’t get any photos.
Having been to the meet-up session the day before, I was partially dreading this session, as Ansible is something I’m still very keen on. I needn’t have worried, as Michael managed to control several very chatty people (myself very much included). He managed to engage people but then stop them from going on too much. I wish there was somewhere the people who attended this talk to join to catch up and share knowledge, but… oh well.
Next I went to a talk on the Java Open Street Map editor, JOSM. It was very much a show-and-tell “This is how I use the tool”, but I struggled to follow it, and, sadly left early.
LATE EDIT 2019-11-04: Stuart contacted my on Twitter to apologise for making his talk hard to follow. I wanted to add some extra notes. The problem I had was not with Stuart’s talk per-sey, but more that I couldn’t focus on the subject, and wasn’t sure if I wasn’t in the right head-space for the talk or perhaps I was just hungry. I wanted to become more involved in Open Street Map, and thought I could get a better idea on how to contribute from this talk, but as I said, I wasn’t tracking the content. I walked out more to clear my head than because I didn’t enjoy the talk.
I realised I was getting hungry, so went to Subway for my lunch, and came back refreshed in time to give my second talk.
A screen shot from the talk “Here’s how you win: Secure Scuttlebutt”
This talk was on Secure Scuttlebutt (SSB), a decentralised social media platform. There were about 20 people in the audience, and I had some very sensible questions about the project. At the end of the talk, I’d encouraged three people to give it a try, two of whom fell at the first hurdle, and the third persisted in the bar at the end of the day, and has since connected with me on there. Woohoo!
The talk was a stark contrast to the talk I felt I’d not done justice to the day before, and I felt like I’d really nailed this talk. I’m still exceptionally grateful to Ben who’d pointed me in the right direction for the talk layout the night before.
At the end of my talk, I wandered around a bit – I wasn’t really sure what I wanted to see next, so instead I caught up with friends who also weren’t in talks. I bumped into Rachel, and recorded a quick promo for her speaking career and then saw some friends start a Dungeons and Dragons (D&D) game up in the exhibition area!
This looks like a great talk at #OggCamp for people who are interested in IoT. @ralight talking about "Introduction to Streamsheets, the real time IoT spreadsheet". The first talk this weekend that made me go "Oh, that's clever"!https://t.co/wzXsHhhDVZpic.twitter.com/KKVJYBdQZu
— Jon Spriggs – toot.io/@JonTheNiceGuy (@jontheniceguy) October 20, 2019
The first talk at OggCamp about a technology I’d not seen the likes of before.
I made my way to Roger’s talk about Stream Sheets, an Internet Of Things (IoT) connected tool like Google Sheets. It can read content from MQTT, REST APIs and other similar data sources, tweak and convert them, and then publish them back again. All very interesting, although I’m unlikely to use it somewhere any time soon! I was glad though to popularise it with colleagues when I got back to work on Monday!
— Jon Spriggs – toot.io/@JonTheNiceGuy (@jontheniceguy) October 20, 2019
My last talk attended of the day – Jamie Tanner
Jamie had talked at OggCamp ’18, and I was very glad to see him back at OggCamp this year – particularly on the main stage!
His talk was about self hosting and the Indie Web movement. He talked about why he self hosts, and what sort of content he “owns” when he can (spoiler: all of it!) He not only stores bookmarks in a public blog, but his Google Fit step counter results, his RSVPs to events and … yes, even blog posts. He talked about why he felt that you too should be part of the Indie Web.
After Jamie’s talk, was the annual rafflecast. A laptop was given away, but not to me (boo!) And then I went to record the Admin Admin Podcast.
From left to right, Jerry, Gary, Al, and then Me (with my red hat from Red Hat). Out of shot is Mr Joe Ressington, who let us use his recording gear. Because he’s lovely.
On the way to Joe’s hotel (where we did this recording), I got us a bit lost, and ended up walking us clear across to the Northern Quarter of Manchester. We then had to walk back to just near Piccadilly station, where his hotel was! Oops. The show has since been released, if you want to hear us talking about OggCamp, and guest host Gary.
We went to the Lass O’Gowry pub for a drink before I had to catch my rail replacement bus home, and catch up on some sleep!
On the last replacement bus home from #oggcamp/#flawcon. I had an amazing time and hope all the other attendees did too! ❤️ Together we made a conference! 👊
— Jon Spriggs – toot.io/@JonTheNiceGuy (@jontheniceguy) October 20, 2019
And that was OggCamp ’19. The featured image is of the OggCamp Grid on Saturday.
OggCamp are looking for someone to take over the organising in 2020 (supported by past organisers, like me!) so if you’re interested, please getintouch!
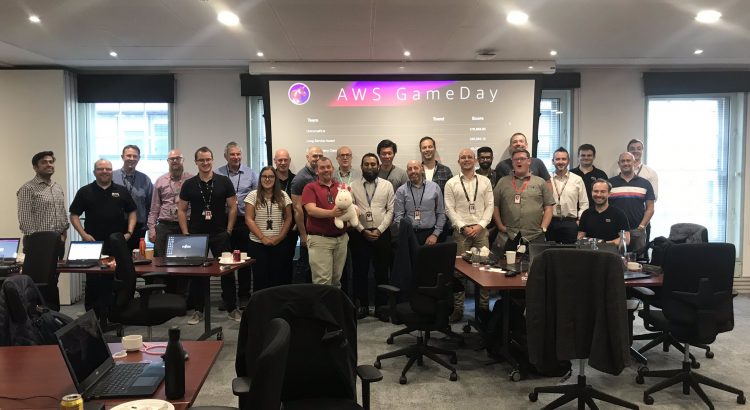
I was invited, through work, to participate in an AWS tradition – the AWS Game Day. This event was organised by my employer for our internal staff to experience a day in the life of a fully deployed AWS environment… and have some fun with it too. The AWS Game Day is a common scenario, and if you’re lucky enough to join one, you’ll probably be doing this one… As such, there will be… #NoSpoilers.
A Game Day (sometimes disambiguated as an “Adversarial Game Day”, because of sporting events) is a day where you either have a dummy environment, or, if you have the scale, a portion of your live network is removed from live service and used as a training ground. In this case, AWS provided a specific dummy environment “Unicorn.Rentals”, and all the attendees are the new recruits to the DevOps Team… Oh, and all the previous DevOps team members had just left the company… all at once.
Attendees were split into teams of four, and each team had a disparate background.
We’re given access to;
Our login panel. This gives us our score, our trending increase or decrease in score over the last “period” (I think it was 5 minutes), our access to the AWS console, and a panel to update the CNAME for the DNS records.
AWS Console. This is a mostly unrestricted account in AWS. There are some things we don’t get access to – for example, we didn’t get the CloudFormation Template for setting up the game day, and we couldn’t make changes to the IAM environment at all. Oh, and what was particularly frustrating was not being able to … Oh yes, I forgot, #NoSpoilers ;)
A central scoreboard of all the teams
A running tally of how we were scored
Each web request served under X seconds received one score
Each request served between X and Y seconds received another score,
Each request served over Y seconds received a third score.
Failing to respond to a request received a negative score.
Infrastructure costs deducted points from the score (to stop you just putting stuff at ALL THE SERVERS, ALL THE TIME).
The outgoing DevOps team’s “runbook”. Not too dissimilar to the sort of documentation you write before you go on leave. “If this thing break, run this or just reboot the box”, “You might see this fail with something like this message if the server can’t keep up with the load”. Enough to give you a pointer on where to look, not quite enough to give you the answer :)
The environment we were working on was, well, relatively simple. An auto-scaling web service, running a simple binary on an EC2 instance behind a load balancer. We extended the reach of services we could use (#NoSpoilers!) to give us greater up-time, improved responsiveness and broader scope of access. We were also able to monitor … um, things :) and change the way we viewed the application.
I don’t want to give too many details, because it will spoil the surprises, but I will say that we learned a lot about the services in AWS we had access to, which wasn’t the full product set (just “basic” AWS IaaS tooling).
When the event finished, everyone I spoke to agreed that having a game day is a really good idea! One person said “You only really learn something when you fix it! This is like being called out, without the actual impact to a customer” and another said “I’ve done more with AWS in this day than I have the past couple of months since I’ve been looking at it.”
And, as you can probably tell, I agree! I’d love to see more games days like this! I can see how running something like this, on technology you use in your customer estate, can be unbelievably powerful – especially if you’ve got a mildly nefarious GM running some background processes to break things (#NoSpoilers). If you can make it time-sensitive too (“you’ve got one day to restore service”, or like in this case, “every minute we’re not selling product, we’re losing points”), then that makes it feel like you’ve been called out, but without the stress of feeling like you’re actually going to lose your job at the end of the day (not that I’ve ever actually felt like that when I’ve been called out!!)
Anyway, massive kudos to our AWS SE team for delivering the training, and a huge cheer of support to Sara for getting the event organised. I look forward to getting invited to a new scenario sometime soon! ;)
Here are some pictures from the event!
The teams get to know each other, and we find out about the day ahead! Picture by @Fujitsu_FDE.Our team, becoming a team by changing the table layout! It made a difference, we went to the top of the leader board for at least 5 minutes! Picture by @Fujitsu_FDE.The final scores. Picture by @Fujitsu_FDEOur lucky attendees got to win some of these items! Picture by @Fujitsu_FDE“Well Done” (ha, yehr, right!) to the winning team (“FIX!”) “UnicornsRUs”. Picture by @Fujitsu_FDE.
The featured image is “AWS Game Day Attendees” by @Fujitsu_FDE.
I’m still digging into the details of it, but in essence, the “Armadillo” (Crunchy on the outside, soft on the inside) protection model is broken (sometimes known as the “Fortress Model”). You assume that your impenetrable network boundary will prevent attackers from getting to your sensitive data. While this may stop them for a while, what you’re actually seeing here is one part of a complex protection system, however many organisations miss the fact that this is just one part.
The examples used in the onlyonline content I’ve found about this refer to a burglary.
In this context, your “Protection” (P) is measured in time. Perhaps you have hardened glass that takes 20 seconds to break.
Next, we evaluate “Detection” (D) which is also, surprisingly enough, measured in time. As the glass is hit, it triggers an alarm to a security facility. That takes 20 seconds to respond and goes to a dispatch centre, another 20 seconds for that to be answered and a police officer dispatched.
The police officer being dispatched is the “Response” (R). The police take (optimistically) 2 minutes to arrive (it was written in the 90’s so the police forces weren’t decimated then).
So, in the TBS system, we say that Detection (D) of 40 seconds plus Response (R) of 120 seconds = 160 seconds. This is greater than Protection (P) of 20 seconds, so we have an Exposure (E) time of 140 seconds E = P – (D + R). The question that is posed is, how much damage can be done in E?
So, compare this to your average pre-automation SOC. Your firewall, SIEM (Security Incident Event Management system), IDS (Intrusion Detection System) or WAF (Web Application Firewall) triggers an alarm. Someone is trying to do something (e.g. Denial Of Service attack, password spraying or port scanning for vulnerable services) a system you’re responsible for. While D might be in the tiny fractions of a minute (perhaps let’s say 1 minute, for maths sake), R is likely to be minutes or even hours, depending on the refresh rate of the ticket management system or alarm system (again, for maths sake, let’s say 60 minutes). So, D+R is now 61 minutes. How long is P really going to hold? Could it be less than 30 minutes against a determined attacker? (Let’s assume P is 30 minutes for maths sake).
Let’s do the calculation for a pre-automation SOC (Security Operations Centre). P-(D+R)=E. E here is 31 minutes. How much damage can an attacker do in 31 minutes? Could they put a backdoor into your system? Can they download sensitive data to a remote system? Could they pivot to your monitoring system, and remove the logs that said they were in there?
If you consider how much smaller the D and R numbers become with an event driven SOAR (Security Orchestration and Automation Response) system – does that improve your P and E numbers? Consider that if you can get E to 0, this could be considered to be “A Secure Environment”.
Also, consider the fact that many of the tools we implement for security reduce D and R, but if you’re not monitoring the outputs of the Detection components, then your response time grows significantly. If your Detection component is misconfigured in that it’s producing too many False Positives (for example, “The Boy Who Cried Wolf“), so you don’t see the real incident, then your Response might only be when a security service notifies you that your data, your service or your money has been exposed and lost. And that wouldn’t be good now… Time to look into automation 😁
I had the privilege today to attend BSIDES Liverpool 2019. BSIDES is a infosec community conference. The majority of the talks were recorded, and I can strongly recommend making your way through the content when it becomes available.
Full disclosure: While my employer is a sponsor, I was not there to represent the company, I was just enjoying the show. A former colleague (good friend and, while he was still employed by Fujitsu, an FDE – so I think he still is one) is one of the organisers team.
The first talk I saw (aside from the welcome speech) was the keynote by Omri Segev Moyal (@gelossnake) about how to use serverless technologies (like AWS Lambda) to build a malware research platform. The key takeaway I have from that talk was how easy it is to build a simple python lambda script using Chalice. That was fantastic, and I’m looking forward to trying some things with that service!
For various reasons (mostly because I got talking to people), I missed the rest of the morning tracks except for the last talk before lunch. I heard great things about the Career Advice talk by Martin King, and the Social Engineering talk by Tom H, but will need to catch up on those on the videos released after.
Just before lunch we received a talk from “The Chief” (from the Channel 4 TV Series “Hunted”), Peter Bleksley, about an investigation he’s currently involved in. This was quite an intense session, and his history (the first 1/4 of his talk) was very interesting. Just before he went in for his talk, I got a selfie with him (which is the “Featured Image” for this post :) )
After lunch, I sat on the Rookies Track, and saw three fantastic talks, from Chrissi Robertson (@frootware) on Imposter Syndrome, Matt (@reversetor) on “Privacy in the age of Convenience” (reminding me of one of my very early talks at OggCamp/BarCamp Manchester) and Jan (@janfajfer) about detecting data leaks on mobile devices with EVPN. All three speakers were fab and nailed their content.
Next up was an unrecorded talk by Jamie (@2sec4u) about WannaCry, as he was part of the company who discovered the “Kill-Switch” domain. He gave a very detailed overview of the timeline about WannaCry, the current situation of the kill-switch, and a view on some of the data from infected-but-dormant machines which are still trying to reach the kill-switch. A very scary but well explained talk. Also, memes and rude words, but it’s clearly a subject that needed some levity, being part of a frankly rubbish set of circumstances.
After that was a talk from (two-out-of-six of) The Beer Farmers. This was a talk (mostly) about privacy and the lack of it from the social media systems of Facebook, Twitter and Google. As I listen to The Many Hats Club podcast, on which the Beer Farmers occasionally appear, it was a great experience matching faces to voices.
We finished the day on a talk by Finux (@f1nux) about Machiavelli as his writings (in the form of “The Prince”) would apply to Infosec. I was tempted to take a whole slew of photos of the slide deck, but figured I’d just wait for the video to be released, as it would, I’m sure, make more sense in context.
There was a closing talk, and then everyone retired to the bar. All in all, a great day, and I’m really glad I got the opportunity to go (thanks for your ticket Paul (@s7v7ns) – you missed out mate!)